
The staircase is often the first thing you see when you walk into a home, acting as a grand centerpiece. During the holidays, this central feature offers a wonderful opportunity to create a memorable and festive welcome for family and friends.
Dressing up your banister and steps can completely transform the atmosphere of your home, turning a simple passageway into a stunning holiday display. Whether your style is classic and traditional or modern and whimsical, there’s a creative way to bring seasonal cheer to your stairs.
Here, we’ve gathered 41 stunning ideas for how to decorate your stairs for the holidays. From simple, natural garlands to elaborate, themed creations, each one comes with a simple DIY guide to help you bring the look to life.
1. Scandinavian Winter Wonderland

Embrace a quiet and gentle holiday spirit with this clean, simple stair design. A delicate cedar garland, dotted with the warm twinkle of fairy lights, gracefully follows the line of the handrail. This minimalist approach draws attention to the thoughtful arrangement on the steps themselves.
Each stair holds a small story. You’ll find glowing ceramic houses nestled next to carved wooden reindeer, creating a peaceful village scene. The soft flicker of candles within glass holders adds a warm, inviting light. A string of wooden beads ties all the elements together, leading the eye down to a rustic star at the base. This style brings a sense of calm nature indoors.
DIY Guide: Crafting Your Serene Stairscape
What You’ll Need:
- One long, thin garland made of cedar or pine branches (real or fake)
- A string of warm white fairy lights (the kind with a small battery pack is great)
- Thin white ribbon or clear zip ties
- A long string of plain wooden beads
- A few small, white ceramic houses (you can find these at craft stores)
- Small wooden animal figures, like reindeer or bears
- Glass jars or hurricane holders with white candles (use battery-powered candles to be extra safe!)
- A wooden star for the bottom step
Step-by-Step Instructions:
- Light Up the Garland: First, lay your green garland flat on the floor. Carefully wrap the string of fairy lights around it, weaving the lights in and out of the branches. Hide the battery pack at one end.
- Attach to the Handrail: Gently lift the garland and place it on top of your stair handrail. Let it swoop down naturally. Use your white ribbon or zip ties to loosely fasten it to the rail in a few spots so it stays put.
- Place Your Candles: Set one or two glass candle holders on different steps. Place them close to the wall so no one trips. Put a candle inside each one.
- Build Your Village: Now for the fun part! Arrange your little ceramic houses and wooden animals on the other steps. You can put a house and a reindeer together on one step, and maybe two houses on another.
- Add the Beaded Garland: Take your string of wooden beads and drape it along the steps. Let it curve gently around your houses and animals.
- The Final Star: Place your wooden star on the very bottom step as a finishing touch.
- Turn Everything On: Switch on your fairy lights and your battery-powered candles. Step back and see how cozy and beautiful your stairs look!
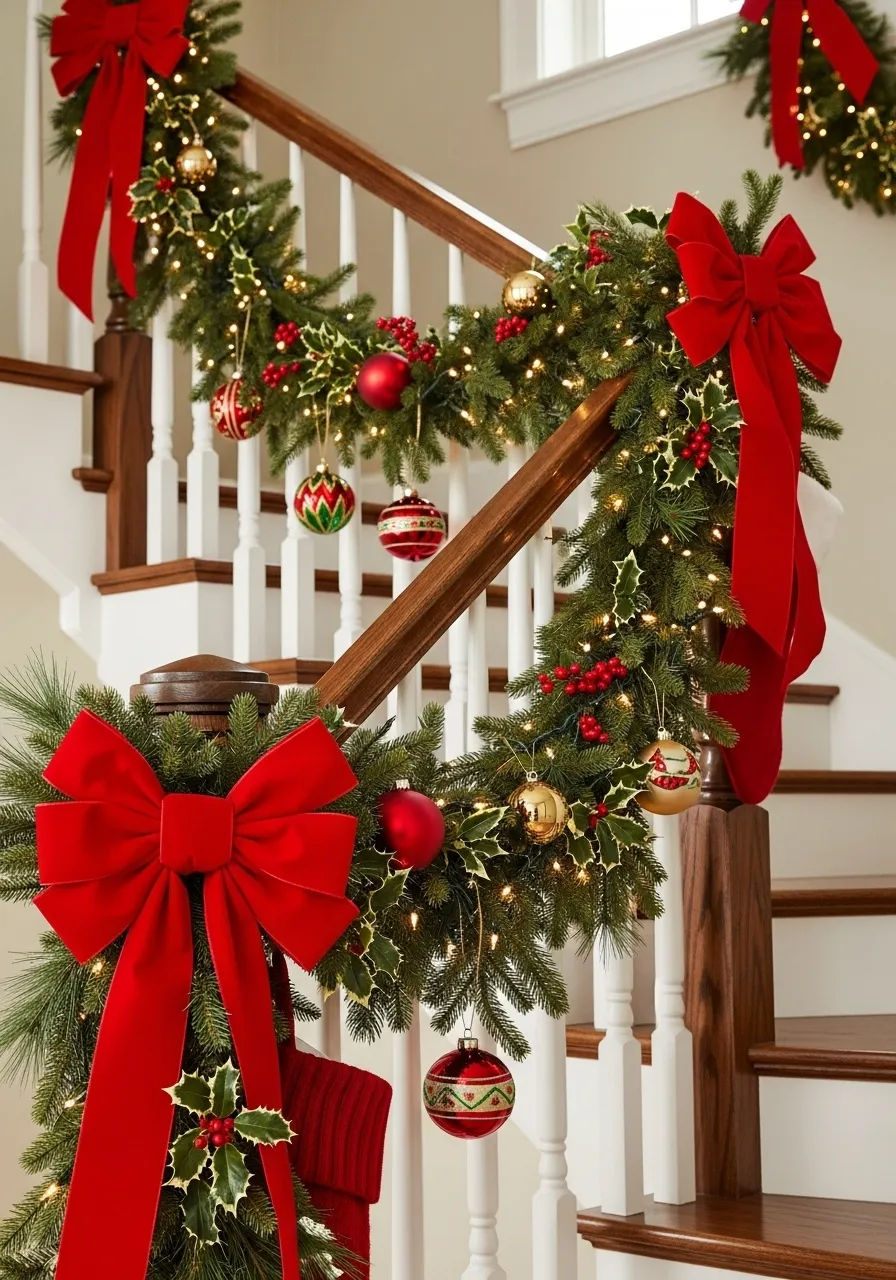
2. Classic Holiday Elegance

This look is pure Christmas cheer, a timeless scene right from a holiday card. A thick, lush pine garland full of life and texture wraps around the handrail. It’s brightly lit with warm, classic lights that give off a welcoming glow. The design feels both grand and incredibly joyful.
Big, beautiful red velvet bows are the stars of the show, placed thoughtfully to create a sense of rhythm. Nestled among the green branches are shiny red and gold ornaments, catching the light perfectly. Sprigs of holly with bright red berries add another layer of traditional charm, making the whole staircase feel festive and full of warmth.
DIY Guide: Creating a Timeless Christmas Staircase
What You’ll Need:
- A thick, full pine garland
- String of warm white Christmas lights
- Floral wire or green zip ties
- Several large, pre-made red velvet bows
- A box of assorted red and gold ball ornaments (with different finishes like shiny and matte)
- A few small picks of fake holly berries
- Ornament hooks
Step-by-Step Instructions:
- Wrap the Lights: Just like before, start by wrapping your lights around the garland while it’s on the floor. This is much easier than doing it on the stairs.
- Secure the Garland: Drape the lit garland along your handrail. Use floral wire or zip ties to attach it securely at the top, bottom, and a few points in the middle so it has a nice shape.
- Add the Bows: Take your big red bows and attach one to the very bottom post. Add the others at the points where the garland curves or at the top of each post. Use the wire that comes on the bow to twist it tightly.
- Place the Holly: Poke the small stems of the holly berry picks into the garland, spreading them out. Place some near the bows to make the color pop.
- Hang the Ornaments: Use ornament hooks to hang your red and gold balls. Cluster two or three together in some spots for a fuller look. Step back to make sure they are spread out nicely.
3. Midnight Glamour Garland

For a touch of drama and sophistication, this design is a showstopper. A base of flocked greenery, appearing kissed by frost, is heavily decorated with a mix of shiny and sparkling ornaments. The color palette of silver, gold, and a deep navy blue creates a rich and luxurious feel, like a festive evening party.
Clusters of ornaments in various sizes, including some that look like miniature disco balls, hang gracefully from the garland. Golden floral picks and shimmering navy blue ribbon are woven throughout, adding layers of texture. This is a bold, modern take on holiday decor that glitters and shines from every angle, especially at night.
DIY Guide: Assembling Your Glamorous Garland
What You’ll Need:
- A flocked (snowy) garland
- Wide, glittery navy blue ribbon
- Silver and gold ball ornaments in many sizes
- A few disco ball-style ornaments
- Gold or silver glittery floral picks or leaf stems
- Floral wire
Step-by-Step Instructions:
- Position the Garland: First, attach your snowy garland to the staircase handrail.
- Weave the Ribbon: Take your navy blue ribbon and weave it in and out of the garland from top to bottom. Let it billow out in places.
- Create Ornament Clusters: Take three ornaments of different sizes (for example, one large gold, one medium silver, and one small disco ball). Use floral wire to tie their tops together, creating a little bunch.
- Attach the Clusters: Make several of these ornament clusters. Attach them to the garland at different points, tucking them into the branches. Fill in any gaps with single ornaments.
- Add the Final Sparkle: Poke the stems of the glittery gold or silver picks into the garland. Place them near the ornament clusters and at the top and bottom to complete the glamorous look.
4. Rustic Woodland Charm

This staircase brings the cozy feeling of a winter cabin right into your home. A simple green garland serves as the base for a collection of natural and rustic treasures. The entire design feels warm, earthy, and wonderfully inviting, as if you’ve just stepped in from a snowy forest.
Large burlap bows add a soft, textural element that contrasts with the fresh pine. Real pinecones, bundles of cinnamon sticks tied with twine, and even small pieces of birch logs are tucked into the greenery. At the base, wooden lanterns with flickering battery-powered candles cast a warm and safe glow, completing the comfortable, woodland scene.
DIY Guide: Building a Cozy Cabin Staircase
What You’ll Need:
- A standard pine garland
- Wide burlap ribbon
- Natural pinecones of various sizes
- A few small, clean birch logs (about 6-8 inches long)
- Cinnamon sticks and twine
- Floral wire
- Wooden lanterns and battery-operated pillar candles
Step-by-Step Instructions:
- Hang the Garland: Secure your pine garland to the handrail.
- Make Burlap Bows: Cut long pieces of burlap ribbon and tie them into simple, large bows. Leave the tails long. Use floral wire to attach them to the garland every few feet.
- Add the Logs and Pinecones: Use floral wire to attach the birch logs and larger pinecones. Wrap the wire tightly around the object, leave two long ends, and then twist those ends onto a sturdy branch of the garland.
- Create Cinnamon Bundles: Take three or four cinnamon sticks and tie them together in the middle with a piece of twine. Make a few of these bundles. Use the twine to tie them onto the garland.
- Arrange the Lanterns: Place two or three lanterns of different heights on the steps at the bottom of the staircase. Put a safe, battery-powered candle inside each one and turn them on for a warm glow.
5. Frosted Winter Fantasy

Step into a magical, icy world with this stunning winter-themed staircase. A thick, heavily flocked garland looks as if it’s been covered in a fresh blanket of snow. The color scheme is a cool and calming mix of silver, white, and icy blue, creating a truly enchanting winter wonderland.
Shimmering silver ribbons are tied into beautiful bows, matching the silvery ball ornaments. The real magic comes from the hanging icicle and snowflake ornaments that seem to float in the air. Cool-toned blue lights woven through the garland cast a magical glow, making the entire display sparkle as if it were carved from ice.
DIY Guide: Creating Your Icy Wonderland
What You’ll Need:
- A thick, heavily flocked garland
- A string of cool blue or bright white LED lights
- Wide, sparkly silver ribbon
- Silver ball ornaments
- Plastic or glass icicle ornaments
- Snowflake ornaments
- Ornament hooks and floral wire
Step-by-Step Instructions:
- Light the Garland: Carefully wrap your blue or white lights around the snowy garland.
- Attach to Stairs: Fasten the garland securely to your handrail. The snowy ones can be heavy, so make sure it’s attached well.
- Add the Bows: Tie simple, elegant bows with your silver ribbon. Attach them with floral wire at key points, like the top, bottom, and middle.
- Hang the Ornaments: Begin hanging your ornaments. Place the silver balls deeper inside the branches.
- Create the Icy Drips: Use ornament hooks to hang the icicle and snowflake ornaments so they dangle down below the main garland. This will make it look like the staircase is truly frozen. Let them hang at different lengths for a natural look.
6. Festive Farmhouse Gathering

This staircase is bursting with cozy, rustic charm. It perfectly captures the modern farmhouse style with its cheerful and welcoming decorations. A simple, wispy green garland is the backdrop for a playful mix of patterns and textures that feel both stylish and down-to-earth.
The standout feature is the bold black-and-white buffalo check ribbon, used for large, fluffy bows. Matching stockings hang ready for treats, personalized with little tags. Galvanized metal buckets holding small bits of greenery sit on the steps, adding an authentic farm touch. It’s a fun, family-friendly look that is full of personality.
DIY Guide: A Farmhouse Holiday How-To
What You’ll Need:
- A simple, thin pine or cedar garland
- A wide roll of black-and-white buffalo check ribbon (with wire edges is best)
- A second roll of thinner red-and-white patterned ribbon
- Stockings (some with the buffalo check pattern)
- Small chalkboard tags and a chalk marker
- Small galvanized metal buckets
- Extra greenery sprigs and pinecones
Step-by-Step Instructions:
- Hang the Garland: Attach your garland to the handrail.
- Make Layered Bows: Make a large bow with the buffalo check ribbon. Then, make a slightly smaller bow with the red-and-white ribbon and layer it on top. Use floral wire to hold them together and attach them to the garland.
- Hang the Stockings: Use ribbon to hang the stockings from the handrail, placing them between the bows. Write names or initials on the chalkboard tags and tie one to each stocking.
- Decorate the Steps: Fill the small metal buckets with a few sprigs of greenery and a pinecone or two. Place these carefully on the sides of a few steps.
- Add Extra Touches: You can hang small wooden ornaments or signs from the garland to add even more personality.
7. Jewel-Toned Holiday Splendor

This staircase is a brilliant explosion of rich, vibrant color. It moves beyond the traditional red and green into a lavish display of jewel tones. A full and festive pine garland is absolutely packed with decorations, creating an abundant, maximalist look that is full of energy and opulence.
A magnificent bow, crafted from multiple ribbons in shades of emerald, sapphire, and ruby, sits proudly at the top. The garland is heavily adorned with ornaments in stunning shades of magenta, teal, deep purple, and green. Glittery gold leaf picks are tucked in throughout, adding a final touch of shimmer to this dazzling and joyous holiday display.
DIY Guide: Your Vibrant Jewel-Toned Display
What You’ll Need:
- A very full, thick artificial pine garland with lights already on it
- Several rolls of wired ribbon in jewel-tone colors (e.g., emerald green velvet, sapphire blue satin, ruby red glitter)
- A large assortment of ball ornaments in jewel tones (teal, magenta, blue, purple, green)
- Gold glittery leaf stems or floral picks
- Floral wire
Step-by-Step Instructions:
- Secure the Garland: Attach your thick, pre-lit garland to the handrail. Fluff out all the branches to make it look as full as possible.
- Create a Statement Bow: Take your different colored ribbons and create one huge, multi-layered bow for the newel post (the main post at the bottom or top). This is your centerpiece.
- Tuck in More Ribbon: Weave long pieces of one or two of the ribbon colors through the rest of the garland.
- Load Up the Ornaments: This look is all about abundance! Start wiring ornaments deep into the garland, right next to the handrail. Then add another layer of ornaments closer to the surface. Use all the different colors.
- Add Gold Accents: Finally, stick the stems of the gold glittery leaves into the garland, pointing them outwards. This adds another layer of sparkle and fills in any last gaps.
8. Coastal Holiday Tidings

Bring the fresh, breezy feel of the seaside to your holiday decor with this unique coastal theme. Instead of pinecones and holly, this design uses treasures from the ocean. A garland of mixed greenery, including soft eucalyptus, creates a beautiful base for a beach-inspired Christmas celebration.
A bow made from fishing net material sets the tone at the top. Starfish of various sizes are dotted along the garland, while beautiful glass float ornaments hang down, mimicking buoys in the water. Lanterns on the steps are filled with blue sand, and seashells are scattered about. It’s a calm, refreshing, and creative way to celebrate the season.
DIY Guide: Crafting Your Seaside Staircase
What You’ll Need:
- A garland with mixed, airy greenery (like eucalyptus and cedar)
- A piece of decorative fishnet
- A few large and small starfish
- Blue or seafoam green glass float ornaments
- Thin rope or twine for hanging
- Wooden lanterns and battery-powered candles
- Blue craft sand and assorted seashells
- Hot glue gun
Step-by-Step Instructions:
- Drape the Greenery: Attach your garland to the handrail.
- Add the Netting: Loosely drape the decorative fishnet over the garland. You can tie a simple bow with it at the top or just let it hang naturally.
- Attach the Starfish: Use a hot glue gun to attach a small loop of twine to the back of your starfish. Let it dry completely. Then, use the twine to tie the starfish onto the garland branches.
- Hang the Floats: Use twine or clear fishing line to hang the glass float ornaments from the garland so they dangle down.
- Prepare the Lanterns: Fill the bottom of your lanterns with the blue craft sand. Place a battery-powered candle in the middle. Arrange a few seashells on the sand around the candle. Place the finished lanterns on the steps.
9. Sweet Candyland Celebration

This decoration is a delightful treat for the eyes, perfect for homes with children or anyone with a sweet tooth. It transforms a staircase into a whimsical Candyland fantasy. A snow-dusted or “flocked” tree provides a white, sugary-looking base for an explosion of bright, candy-colored decorations.
The centerpiece is an adorable gingerbread house, perched happily among the branches. The rest of the tree is filled with fun ornaments shaped like peppermint swirls, lollipops, and gingerbread men. Striped ribbon in festive pinks, greens, and reds winds its way through the display like a piece of candy itself, making the whole scene look good enough to eat.
DIY Guide: Building Your Own Candy Tree
What You’ll Need:
- A small, flocked (snowy) artificial Christmas tree
- A pre-made gingerbread house (or a kit to make your own!)
- A small, flat cake stand or sturdy piece of cardboard covered in foil
- Brightly colored, patterned ribbon (pinks, greens, reds)
- Candy-themed ornaments: lollipops, gingerbread men, peppermints, etc.
- Floral wire or pipe cleaners
Step-by-Step Instructions:
- Position the Tree: Place your small, snowy tree on a landing or at the wide base of a staircase. Make sure it’s stable.
- Place the Gingerbread House: Put your gingerbread house on the small cake stand. Find a sturdy, flat area within the tree’s branches and nestle the stand securely inside. You want the house to be the main attraction.
- Add the Ribbon: Starting from the top, weave your colorful ribbon down and around the tree. Let it curve in and out of the branches.
- Decorate with “Candy”: Now, hang all of your fun candy-themed ornaments all over the tree. Spread out the different shapes and colors.
- Fill in Gaps: If you have any empty spots, you can tuck in some extra pinecones or some simple, brightly colored ball ornaments to make the tree look extra full and festive.
10. Vintage Victorian Christmas

Step back in time with this rich and nostalgic staircase decoration. This style is all about deep colors, luxurious textures, and ornate details that evoke the feeling of a classic, old-world Christmas. A full, dense garland is layered with elements that feel both elegant and deeply personal.
Wide, deep red velvet ribbon is woven alongside delicate lace, creating a beautiful contrast of textures. The ornaments are intricate and have a vintage feel, some shaped like historical figures or classic baubles. The warm, soft glow from faux candlelight adds to the historic ambiance, while small, antique-style frames holding family photos make the display incredibly special and meaningful.
DIY Guide: An Old-World Holiday Project
What You’ll Need:
- A very full and traditional pine garland
- A roll of wide, dark red or burgundy velvet ribbon
- A roll of wide lace ribbon
- A collection of vintage-style or ornate ornaments
- Battery-operated clip-on candle lights for Christmas trees
- A few small, ornate photo frames (like gold or silver ones) and small black-and-white photos
- Floral wire
Step-by-Step Instructions:
- Hang the Garland: Secure the full garland onto your handrail.
- Layer the Ribbons: Take the end of your velvet ribbon and the end of your lace ribbon and hold them together. Weave them as one big, layered ribbon through your garland.
- Add the Candlelight: Clip your battery-powered candle lights onto some of the upper branches of the garland, pointing them upwards, just like they would have been on an old-fashioned tree.
- Hang Ornaments: Carefully hang your special, ornate ornaments throughout the garland.
- Place the Photos: At the base of the staircase, lean your small, framed family photos against the posts or on the steps. This personal touch is what truly makes the Victorian style feel so warm and historic.
11. Natural Greenery Cascade

This approach celebrates the simple beauty of fresh greenery. An exceptionally thick and lush garland, made from a mix of different leaves like eucalyptus, olive branches, and cedar, creates a stunning visual. The focus here is entirely on the texture and shades of green, giving a fresh-from-the-garden feel to the staircase.
There are no lights or ornaments, allowing the natural elegance of the foliage to stand out. This minimalist style is both modern and timeless, bringing a sense of organic calm to the holiday home. A single, simple ribbon might be tied at the end, but the greenery is the true star, proving that sometimes less is truly more.
DIY Guide: Assembling a Lush, All-Natural Garland
What You’ll Need:
- A basic, inexpensive pine garland to use as a base
- Several bunches of fresh or high-quality faux greenery (eucalyptus, olive branches, cedar, rosemary)
- Green floral wire
- Garland ties or zip ties
Step-by-Step Instructions:
- Attach the Base: First, secure your plain pine garland to the handrail. This will give you a strong base to work with and make the final product look fuller.
- Create Small Bundles: Take a few sprigs of your different types of greenery and arrange them into a small handheld bunch. Wrap the stems together tightly with floral wire.
- Attach the Bundles: Start at the top of the stairs. Place your first greenery bundle onto the base garland and use floral wire to attach it securely.
- Layer and Overlap: Take your next bundle and place it so the leafy part covers the wired stems of the first one. Attach it with wire. Continue this process all the way down the stairs, always hiding the stems of the previous bunch.
- Fluff and Finish: Once you reach the bottom, go back and fluff out all the leaves. Tuck in any loose pieces to create a beautiful, seamless cascade of green.
12. Cozy Lodge Plaid

This staircase has all the warmth of a mountain lodge on a snowy day. The classic red, green, and navy plaid ribbon sets a cozy and traditional tone. It is fashioned into large, welcoming bows that stand out against the rich green of the pine garland.
This design feels comfortable and familiar. Simple, rustic ornaments like miniature wooden skis and delicate snowflakes hang from the garland, adding to the winter cabin theme. Small clusters of pinecones and sprigs of twigs tucked into the garland enhance the natural, woodsy feel, making you want to curl up with a cup of hot cocoa.
DIY Guide: Creating a Mountain Lodge Look
What You’ll Need:
- A classic pine garland with built-in warm lights
- Wide, wired plaid ribbon
- Small, rustic ornaments (like wooden skis, snowflakes, or animals)
- A few pinecones and small twigs
- Floral wire
Step-by-Step Instructions:
- Attach the Garland: Secure your pre-lit pine garland to the handrail.
- Weave the Ribbon: Instead of just bows, weave a long piece of the plaid ribbon loosely in and out of the garland from top to bottom.
- Make and Add Bows: Use more of the plaid ribbon to create two or three large, fluffy bows. Use floral wire to attach one to the top post and one to the bottom post.
- Tuck in Natural Elements: Poke the pinecones and small twigs into the garland. The wire branches of the garland should hold them in place.
- Hang the Ornaments: Finally, hang your charming wooden skis and snowflake ornaments along the length of the garland.
13. Spiced Citrus Garland

This decoration is a feast for the senses, bringing the wonderful smells of Christmas into your home. A simple garland of bay leaves and fir provides a dark green backdrop for the vibrant, glowing colors of dried orange slices. It’s a natural, beautiful, and wonderfully fragrant approach to holiday decorating.
The translucent orange slices almost look like stained glass when the light hits them. Bundles of cinnamon sticks tied with twine and whole oranges studded with cloves (pomanders) hang alongside them. The addition of star anise provides another layer of scent and a lovely star shape, making this a truly delightful and aromatic display.
DIY Guide: Making a Fragrant Holiday Garland
What You’ll Need:
- A simple garland of bay leaves or fir
- 3-4 large oranges
- Whole cloves
- Cinnamon sticks
- Twine or jute string
- Star anise pods
- A hot glue gun
- An oven and a baking sheet
Step-by-Step Instructions:
- Dry the Orange Slices: Ask an adult to help you. Preheat your oven to its lowest temperature (around 200°F or 90°C). Slice one or two oranges very thinly. Place the slices on a baking sheet and bake for 3-4 hours, flipping them halfway through, until they are dry. Let them cool.
- Make Pomanders: Take the remaining whole oranges and poke holes in them with a toothpick. Push whole cloves into the holes to make pretty patterns.
- Create Decorations: Tie bundles of 3-4 cinnamon sticks together with twine. Use a hot glue gun to stick star anise pods onto some of the dried orange slices.
- Assemble the Garland: Attach your simple green garland to the handrail.
- Hang Your Fragrant Pieces: Use twine to hang your dried orange slices, clove-studded pomanders, and cinnamon bundles from the garland. Let them hang at different lengths.
14. Winter Glow Elegance

This look is soft, sophisticated, and serene. It uses a limited color palette of white, silver, and champagne gold to create a look of understated elegance. A beautiful, heavily flocked Christmas tree serves as the base, its snowy white branches creating a perfect canvas for the shimmering ornaments.
The ornaments are simple glass balls in varying sizes and finishes—matte white, sparkling silver, and shiny gold. They are arranged thoughtfully to catch the light from every angle. A simple, wide white satin ribbon cascades down the tree, adding a final touch of grace. This style is calming and chic, like a quiet, snowy morning.
DIY Guide: A Sophisticated Holiday Tree
What You’ll Need:
- A flocked (snowy) artificial tree
- A collection of ornaments in white, silver, and champagne gold
- A roll of wide, plain white satin ribbon
- Ornament hooks
Step-by-Step Instructions:
- Set Up Your Tree: Assemble your snowy tree and fluff all the branches so it looks full and even.
- Drape the Ribbon: Before adding any ornaments, take your white ribbon and gently drape it down the tree. Start at the top and let it curve and tuck into the branches as it goes down. Don’t pull it tight.
- Hang the Largest Ornaments: Start with your biggest ornaments. Hang them deeper inside the tree, closer to the trunk. This adds depth.
- Add Medium and Small Ornaments: Next, hang your medium-sized ornaments, filling in the gaps. Finally, place the smallest, most delicate ornaments on the tips of the branches.
- Check Your Balance: Step back and look at the tree. Make sure the different colors (white, silver, gold) are spread out nicely and don’t clump together in one spot.
15. Alpine Ski Retreat

Get ready to hit the slopes with this fun, ski-lodge-themed staircase. This design is full of nostalgic charm and celebrates the joy of winter sports. A classic pine garland is decorated with elements that you might find at a cozy ski resort, creating a playful and rustic holiday atmosphere.
The garland features red and white snowflake ornaments, miniature wooden snowshoes, and even little signs that look like ski lift passes. A cheerful plaid and snowflake-patterned ribbon is woven throughout, tying everything together. It’s a creative and spirited theme that’s great for a family that loves winter adventures.
DIY Guide: Your Own Ski Lodge Stairs
What You’ll Need:
- A green pine garland
- Holiday-themed ribbon (plaid or snowflake patterns work well)
- Themed ornaments: find or make mini skis, snowshoes, and snowflakes.
- Small, rectangular pieces of white cardstock and a red marker for the “lift passes”
- Floral wire and a hole punch
Step-by-Step Instructions:
- Hang and Weave: Attach your garland to the handrail and weave your themed ribbon through it.
- Make Lift Passes: Write fun, snowy messages on your small pieces of cardstock, like “Snow Day!” or “First Tracks.” Punch a hole in the corner of each one.
- Hang the Ornaments: Use ribbon or ornament hooks to hang your snowflakes, mini snowshoes, and homemade lift passes from the garland. Spread them out evenly.
- Add a Bow: Make a big, festive bow with your ribbon and attach it to the bottom newel post to welcome everyone to your “lodge.”
16. Nutcracker Suite Staircase

This staircase brings the magic of the famous holiday ballet to life. The entire design is a whimsical tribute to The Nutcracker, filled with beloved characters and enchanting details. It’s a storybook scene that will delight both children and adults with its theatrical and festive charm.
A green garland is swathed in luxurious red and blue velvet ribbons. Dotted along the railing are beautiful ornaments of nutcrackers, graceful ballerinas, and golden musical instruments. At the base, a large, commanding Nutcracker soldier stands guard, ready to lead the holiday festivities. This theme is full of wonder and classic Christmas magic.
DIY Guide: A Nutcracker Ballet Scene
What You’ll Need:
- A full green garland
- Wide velvet ribbon in red and blue
- Nutcracker-themed ornaments (ballerinas, soldiers, instruments, mice)
- A large nutcracker figure for the base
- Floral wire
Step-by-Step Instructions:
- Drape the Garland: Secure the garland to the handrail.
- Wrap the Ribbons: Take both the red and blue ribbons and wrap them loosely around the garland, letting them twist and swirl.
- Make the Bows: Create two or three large bows using the red ribbon and attach them to the top, middle, and bottom of the garland.
- Tell the Story: Hang your Nutcracker ornaments along the garland. Try to create little scenes—maybe place a ballerina near a musical instrument or have a few soldiers standing together.
- The Grand Finale: Place your large nutcracker figure on a sturdy box at the bottom of the stairs so he can watch over the celebration.
17. Celestial Night Sky

This decoration transforms a staircase into a magical, starry night sky. It’s a dreamy and elegant theme that feels both festive and peaceful. A simple green garland is adorned with heavenly bodies, set against a deep blue wall that looks like the evening sky itself.
A large, glittering star sits at the top, like the North Star guiding the way. Hanging from the garland on nearly invisible threads are dozens of smaller, shimmering stars and crescent moons in silver and gold. The delicate twinkle of fairy lights woven through the greenery adds to the illusion of a sparkling galaxy right in your home.
DIY Guide: Creating a Starry Night Staircase
What You’ll Need:
- A simple pine garland
- A string of warm white fairy lights
- A collection of star and moon ornaments in silver and gold
- One large star ornament for the top
- Clear fishing line
- Blue ribbon
- Floral wire
Step-by-Step Instructions:
- Light and Hang: Wrap the fairy lights around your garland and attach it to the handrail.
- Add the Ribbon: Weave some simple blue ribbon through the garland.
- The North Star: Attach your largest star ornament to the very top or bottom post of the handrail.
- Make Stars Float: Cut pieces of clear fishing line to different lengths (from 6 inches to 12 inches). Tie one end to a star or moon ornament and the other end to a branch of the garland.
- Create a Galaxy: Continue hanging the stars and moons, spreading them out and using different lengths of fishing line. The clear line will make them look like they are floating in mid-air against the wall.
18. Peppermint Twist Extravaganza

This staircase is a bold and cheerful explosion of candy cane fun. The look is bright, playful, and packed with energy. A thick, snowy white garland creates the feel of a winter wonderland, providing a crisp backdrop for the vibrant red and white decorations.
Massive bows made from red and white striped ribbon are the main feature, making a huge statement. The garland is filled with ornaments shaped like peppermint candies and lollipops. Leaning against the post at the bottom are oversized candy canes, completing this sweet and festive theme. The whole design is pure holiday happiness.
DIY Guide: A Candy Cane Lane Creation
What You’ll Need:
- A thick, flocked (snowy) garland with white lights
- A wide roll of red-and-white striped wired ribbon
- Peppermint-shaped ornaments
- A few large, lightweight plastic candy canes
- Floral wire
Step-by-Step Instructions:
- Hang the Snowy Garland: Attach your pre-lit white garland to the handrail.
- Make Giant Bows: The wired ribbon is key here. Make several very large, fluffy bows. Don’t be afraid to make them really big! Attach one to the top and bottom posts, and a few more in between.
- Weave More Ribbon: Use a long piece of the same ribbon to weave in and out of the garland, connecting the bows.
- Add the “Candy”: Hang your peppermint ornaments all over the garland, tucking them in between the ribbon loops.
- Place the Big Canes: Lean two or three of the oversized candy canes against the post at the very bottom of the stairs for a fun final touch.
19. Enchanted Forest Floor

This staircase brings the quiet magic of a winter forest floor into the home. It is an incredibly detailed and naturalistic design that feels like a living piece of the woods. The arrangement is organic and asymmetrical, closely mimicking how things grow in nature.
A base of cedar and pine is layered with real moss, creating a soft, green carpet. Realistic-looking mushrooms appear to sprout from birch logs, while small, empty birds’ nests are tucked in as if waiting for spring. Piles of pinecones of all sizes are scattered throughout, completing this enchanting and earthy woodland scene.
DIY Guide: Building Your Woodland Wonderland
What You’ll Need:
- A simple green garland for the base
- Sheets of craft moss (available at craft stores)
- A few small birch logs
- Realistic faux mushrooms
- Small craft birds’ nests
- A large bag of assorted pinecones
- A hot glue gun
Step-by-Step Instructions:
- Start with Greenery: Lay your garland along the side of the stairs, right against the wall. Let it follow the line of the steps.
- Add the Moss: Tuck and drape the sheets of moss over and around the garland to create a soft, earthy base.
- Place the Logs: Position the birch logs on the steps, nestled into the mossy garland.
- Grow Your Mushrooms: Use a hot glue gun to attach the faux mushrooms to the logs and moss so they look like they are growing naturally.
- Settle the Nests: Find little nooks in your display and gently place the birds’ nests inside.
- Scatter the Pinecones: Finally, arrange your pinecones all around. Create little piles of them at the base and scatter individual ones along the steps.
20. Bohemian Holiday Spirit

This staircase design is warm, artistic, and full of handmade charm. It swaps traditional holiday sparkle for rich textures and earthy tones, creating a cozy, bohemian vibe. An airy garland of olive branches serves as a simple, natural base for a collection of unique, handcrafted ornaments.
The decorations are all about fiber arts. Colorful yarn pom-poms hang alongside elegant tassels and small, beaded ornaments. The colors are warm and inviting—terracotta, mustard yellow, teal, and cream. This style feels personal and creative, showing that holiday decor can be wonderfully unconventional and stylish.
DIY Guide: Your Handmade Bohemian Garland
What You’ll Need:
- A garland of olive branches (real or fake)
- Yarn in earthy colors (terracotta, cream, mustard, teal)
- A fork or a pom-pom maker
- A small piece of cardboard
- Wooden beads
- Twine
Step-by-Step Instructions:
- Drape the Garland: Attach the olive branch garland to your handrail.
- Make Pom-Poms: To make a pom-pom, wrap yarn around the tines of a fork many, many times. Tie a tight knot in the middle of the wrapped yarn, then slide it off. Cut all the loops on both sides and fluff it into a ball.
- Make Tassels: To make a tassel, wrap yarn around a piece of cardboard (about 4 inches tall) about 20 times. Slide it off carefully. Tie a piece of yarn tightly around the top of the loops. Then, take another piece of yarn and wrap it around the bundle about an inch from the top to create the tassel “head.” Cut the bottom loops and trim them so they’re even.
- String Some Beads: Cut pieces of twine and thread a few wooden beads onto them, tying a knot at the bottom so they don’t fall off.
- Decorate Your Garland: Tie your homemade pom-poms, tassels, and beaded strings onto the olive branches, spreading out the different colors and textures.
21. Falling Snowflakes Fantasy

This design creates the magical illusion of a gentle snowfall indoors. It’s a clean, modern, and wonderfully serene look that transforms the staircase into a winter spectacle. A simple flocked garland winds up the handrail, looking as though it has been freshly dusted with snow.
The real show comes from the dozens of paper or plastic snowflakes that hang from the ceiling and banister. They are suspended at various heights on clear threads, making them appear to be floating in mid-air. The play of light and shadow created by the snowflakes adds a beautiful, dynamic quality to this enchanting display.
DIY Guide: Creating an Indoor Snowfall
What You’ll Need:
- A flocked (snowy) garland
- A pack of assorted white paper or thin plastic snowflakes in different sizes and designs
- A spool of clear fishing line or thin white thread
- A needle
- Small, clear tape or thumbtacks for the ceiling
Step-by-Step Instructions:
- Hang the Garland: First, attach your snowy garland to the handrail.
- Prepare the Snowflakes: Cut many pieces of your clear fishing line, all in different lengths (from one foot to four feet long).
- Thread Each Snowflake: Use a needle to carefully poke a hole in the top of a snowflake. Thread one piece of your fishing line through the hole and tie a small knot to secure it. Do this for all of your snowflakes.
- Hang from the Banister: Tie some of the shorter-threaded snowflakes directly to the spindles of your staircase banister. Let them hang down into the open space.
- Create the Ceiling Snow: For the longer ones, carefully use small pieces of clear tape or thumbtacks to attach the end of the fishing line to the ceiling above the staircase. Let them hang down over the stairs to complete the magical falling snow effect.
22. Santa’s North Pole Post

This staircase is bursting with the nostalgic fun of writing letters to Santa. It’s a whimsical and heartfelt theme that is full of charming details from Santa’s workshop. A full green garland becomes a cheerful mail route, loaded with holiday wishes and classic Christmas icons.
The garland is packed with vintage-style ornaments, small toys, and even tiny envelopes addressed to the North Pole. Red and white Santa-themed stockings hang from the railing, ready to be filled. A cute “North Pole” sign at the bottom of the stairs points the way, finishing off this playful and family-friendly scene.
DIY Guide: Your Own Santa Mail Station
What You’ll Need:
- A full green pine garland
- A roll of festive, patterned ribbon
- A few small, white envelopes and red paper for stamps
- A collection of small, classic-style toy ornaments
- Red Santa stockings
- A “North Pole” sign (store-bought or handmade)
Step-by-Step Instructions:
- Hang the Garland and Ribbon: Secure the garland to your handrail, and then weave your festive ribbon in and out of the branches.
- Make “Letters to Santa”: On the front of your small white envelopes, write “Santa Claus, North Pole” in your best handwriting. Cut a tiny red square from the paper and glue it in the corner like a stamp.
- Decorate the Garland: Use floral wire or ornament hooks to attach your toy ornaments and “letters” to the garland.
- Hang the Stockings: Use loops of ribbon to hang the stockings from the handrail in between the other decorations.
- Place Your Sign: Attach your “North Pole” sign to the post at the bottom of the stairs to officially open your holiday mail station.
23. Gilded Magnolia Garland

This design offers a touch of southern elegance and natural beauty. It’s a sophisticated and warm look that combines fresh greenery with the luxurious glow of gold. A lush garland made of magnolia leaves and eucalyptus provides a beautiful, deep green base for shimmering accents.
The magic is in the details. Natural elements like pinecones, walnuts, and dried lotus pods are spray-painted a brilliant gold, adding texture and shine. These gilded pieces are nestled among the leaves, catching the light beautifully. A simple gold satin ribbon weaves through the arrangement, tying the whole elegant look together.
DIY Guide: Creating a Golden Magnolia Display
What You’ll Need:
- A garland made of magnolia and eucalyptus (or add these fresh leaves to a basic garland)
- Pinecones, large walnuts, and dried lotus pods
- A can of gold metallic spray paint
- Gold satin ribbon
- A hot glue gun or floral wire
Step-by-Step Instructions:
- Go for Gold: In a well-ventilated area (like outside), lay your pinecones, nuts, and pods on some newspaper. Spray them with the gold paint, making sure to cover all sides. Let them dry completely.
- Assemble the Garland: Drape your magnolia and eucalyptus garland on the handrail.
- Weave the Ribbon: Gently weave your gold satin ribbon through the length of the garland.
- Attach the Gilded Pieces: Use a hot glue gun or thin floral wire to attach your gold-painted pinecones, walnuts, and lotus pods. Arrange them in small clusters along the garland for the most impact.
24. Pink Flamingo Holiday Party

Break from tradition with this fabulously fun and vibrant staircase. This look is all about bold color and playful personality. A snowy flocked garland creates a cool, icy base that makes the hot pink decorations pop even more. It’s a tropical Christmas celebration that is guaranteed to make you smile.
The garland is filled with ornaments in every shade of pink, from soft blush to shocking fuchsia. Shiny silver disco balls add a touch of party glamour. The stars of the show are the quirky pink flamingo ornaments, bringing a warm-weather vibe to the winter season. A big, hot pink bow completes this unforgettable and joyful display.
DIY Guide: Throwing a Pink Holiday Bash
What You’ll Need:
- A thick, flocked (snowy) garland
- A large assortment of ball ornaments in different shades of pink and silver
- A few mini disco ball ornaments
- Pink flamingo ornaments
- A roll of wide, hot pink ribbon
Step-by-Step Instructions:
- Hang the Garland: Attach your snowy garland to the handrail. The white base will really make the pink stand out.
- Add the Bow: Make a large, beautiful bow with your hot pink ribbon and attach it to a prominent spot, like the bottom post.
- Hang the Ball Ornaments: Start filling the garland with your pink and silver ball ornaments. Mix the different shades and finishes (shiny, matte, glitter) to create lots of visual interest.
- Bring in the Party: Hang your mini disco balls in a few spots to add some extra sparkle.
- The Flamingo Finish: Finally, add your fun flamingo ornaments! Place them so they are easy to see and can show off their quirky charm.
25. Modern Black and White Chic

This holiday decor makes a bold, graphic statement. It’s a highly stylish and modern look that uses a strict black-and-white color palette for a dramatic effect. A pure white artificial tree provides a clean, stark canvas for the striking patterns and shapes.
The ornaments are all decorated with strong graphic patterns—bold stripes, classic polka dots, and checkerboards. A large, beautiful bow made from black-and-white striped ribbon serves as the stunning centerpiece. A simple string of black beads is used instead of a traditional garland, adding another layer of sleek, modern texture.
DIY Guide: A Graphic Black and White Tree
What You’ll Need:
- A white artificial Christmas tree
- Plain white or silver ball ornaments
- Black craft paint and paint pens
- A roll of wide, black-and-white striped wired ribbon
- A string of black craft beads
- Painter’s tape
Step-by-Step Instructions:
- Set Up Your Tree: Assemble your white tree and make sure the branches are fluffed out.
- Paint Your Ornaments: This is the creative part! Use painter’s tape to create crisp stripes on some ornaments, then paint the open sections black. Use paint pens to draw polka dots or other patterns on the other ornaments. Let everything dry.
- Add the Beaded Garland: Drape your string of black beads around the tree like you would a normal garland.
- Create the Bow: Make a very large, fluffy bow with your striped ribbon and use its wire to attach it right at the top of the tree. Let the long tails of the ribbon hang down.
- Hang the Ornaments: Carefully place your custom-painted black-and-white ornaments all over the tree.
26. Felt Woodland Friends

This staircase is filled with the gentle charm of handmade woodland creatures. It is an adorable and heartwarming theme that feels soft, cozy, and great for a home with little ones. A simple garland of greenery and a rustic branch serve as a natural perch for a collection of cute, felt animals.
Felted foxes, owls, bears, and deer are the main characters in this sweet scene. They sit amongst small, felt Christmas trees, creating a tiny, magical forest. The handmade quality of the ornaments gives the whole display a sense of love and care, making it a truly special decoration for the holiday season.
DIY Guide: Assembling a Felt Animal Forest
What You’ll Need:
- A simple green garland
- A sturdy, interesting-looking tree branch
- A collection of felt woodland animal ornaments (store-bought or handmade)
- A few small, green felt tree ornaments
- Twine and a hot glue gun
Step-by-Step Instructions:
- Create the Base: First, lay your green garland along your handrail or mantel. Then, securely place the sturdy tree branch on top of it. You can use twine or wire to attach them together.
- Settle in the Animals: Some of your felt animals might be able to sit directly on the branch. For others, you can use a small dab of hot glue on their feet to help them stay in place (it will peel off the branch later).
- Plant the Trees: Place your small felt tree ornaments among the animals to create your forest scene.
- Hang the Rest: For any ornaments that are meant to hang, use simple twine loops to hang them from the lower parts of the garland and the branch.
27. Golden Grandeur

This decoration is the definition of holiday glamour. It is a lavish and dazzling display that is dripping in gold. The entire arrangement is designed to shimmer and sparkle, creating an incredibly rich and opulent atmosphere that is full of festive warmth.
A thick garland is almost completely covered in golden elements. There are glittery gold leaves, bunches of metallic gold berries, and ornate ball ornaments with intricate patterns. A huge, shining gold ribbon is tied into a magnificent bow. The sheer amount of gold creates a breathtaking effect, especially when it catches the glow of nearby Christmas lights.
DIY Guide: Achieving a Luxurious Gold Look
What You’ll Need:
- A thick, pre-lit pine garland
- Many different kinds of gold floral picks: glittery leaves, metallic berry clusters, etc.
- A collection of ornate gold ball ornaments
- A roll of wide, wired gold ribbon
Step-by-Step Instructions:
- Start with the Garland: Attach your lit garland to the handrail. Fluff out the branches.
- Make a Statement Bow: Create a very large, dramatic bow with your gold ribbon and attach it to the most visible spot.
- Start Layering: This look is all about layering. Start by pushing the stems of your largest gold leaf picks deep into the garland.
- Add More Sparkle: Next, add your gold berry clusters, placing them closer to the surface.
- The Final Touch: Hang your ornate gold ornaments last. Let them dangle and catch the light. The goal is to fill almost every bit of green space with a touch of gold for a truly magnificent look.
28. A Christmas Carol Staircase

This staircase captures the timeless spirit of a classic Dickensian Christmas. The decorations are inspired by old-fashioned traditions and the story of “A Christmas Carol,” creating a scene that is both elegant and full of nostalgia. The dark blue and rich wood tones give it a warm, historic feel.
A deep blue ribbon is woven through a pine garland that’s been decorated with fruits and pinecones. The most charming details are the ornaments made from sheet music, shaped into cones and tiny books. Miniature top hats hang from the railing, and the scene is lit by the soft, safe glow of candles in lanterns, just as it would have been long ago.
DIY Guide: A Dickens-Inspired Holiday
What You’ll Need:
- A pine garland
- Wide, dark blue ribbon
- Old sheet music (photocopies work great)
- Small, charming ornaments (like top hats, tiny books, or faux fruit)
- A few lanterns with battery-powered candles
- Twine and a hot glue gun
Step-by-Step Instructions:
- Drape and Weave: Attach the garland to your handrail and weave the dark blue ribbon through it.
- Make Sheet Music Cones: Cut a square from your sheet music. Roll it into a cone shape and secure the edge with a dab of glue. Fill the cone with a small sprig of greenery.
- Hang the Ornaments: Hang your top hat and other classic ornaments from the garland.
- Add the Music: Use twine to hang your sheet music cones. You can also carefully lean them on the steps.
- Light the Scene: Place your lanterns with the safe, battery-powered candles on the steps to cast a warm, old-fashioned glow on your beautiful display.
29. Southwestern Holiday Fiesta

Celebrate the holidays with the warm, vibrant spirit of the Southwest. This unique staircase theme blends traditional greenery with the iconic colors and textures of the desert. It is a creative and festive display that is full of regional character and charm.
A pine garland is decorated with faux succulents and bright, colorful flowers. The centerpiece is a stunning ristra, a large bunch of dried red chili peppers, that hangs dramatically. Ornaments painted with bold, geometric patterns hang from colorful ribbons. At the base, a small cactus stands in for a traditional Christmas tree, wrapped in a festive blanket.
DIY Guide: A Festive Southwestern Staircase
What You’ll Need:
- A pine garland
- A faux chili pepper ristra
- A few faux succulent picks
- Colorful ornaments (or paint plain ones with southwestern patterns)
- A small cactus plant and a colorful, woven blanket
- Luminaria bags: white paper bags, sand, and battery-powered tea lights
Step-by-Step Instructions:
- Hang the Garland: Secure the garland to your handrail.
- Add the Peppers: Securely hang your chili ristra from a high point on the garland so it can drape down.
- Tuck in Succulents: Poke the stems of the faux succulents into the branches of the garland.
- Hang Ornaments: Hang your brightly patterned ornaments along the railing.
- Set the Scene: Wrap the base of your cactus pot with the colorful blanket and place it at the bottom of the stairs. Create safe luminarias by pouring an inch of sand into a white paper bag and placing a battery-powered tea light inside. Place a few of these on the steps.
30. Arctic Winter Pals

This adorable theme creates a tiny, frozen world filled with charming arctic and antarctic animals. It’s a sweet and imaginative display that is perfect for capturing the magic of a polar winter. A glittering, icy-blue and white landscape sets the scene for these cute creature ornaments.
A frosty white garland provides a perch for friendly polar bears, penguins, and arctic foxes. Below, on a bed of fake snow, seals and other animals play amongst sparkling icebergs. This decoration tells a story, turning a simple space into a delightful diorama of the planet’s coldest, most magical places.
DIY Guide: Creating Your Own Arctic Scene
What You’ll Need:
- A white or silver tinsel garland
- A collection of cute arctic animal ornaments (polar bears, penguins, foxes, seals)
- A bag of fluffy cotton batting or fake snow
- A few pieces of styrofoam, cut into iceberg shapes
- Light blue and white craft paint and glitter
Step-by-Step Instructions:
- Paint Your Icebergs: Paint the top of your styrofoam shapes white and the sides a light icy blue. While the paint is still wet, sprinkle them with glitter. Let them dry.
- Create the Snowy Ground: On a mantelpiece or a wide step at the bottom of the stairs, spread out your cotton batting or fake snow to create a soft, snowy landscape.
- Place the Icebergs: Arrange your glittering icebergs on top of the snow.
- Hang the Garland: Drape your white tinsel garland above the scene.
- Arrange Your Animals: Hang some of the animal ornaments from the garland. Place the other animal figures on the snowy ground and on top of the icebergs to create your charming arctic world.
31. Pastel Winter Garden

This holiday design is a soft and romantic dream. It trades traditional deep reds and greens for a delicate palette of pastels, creating a look that is both frosty and floral. A snowy flocked garland provides the wintery base for what looks like a magical garden blooming in the snow.
Soft pink, lavender, and cream faux flowers are nestled among the icy branches, looking like sugar-spun blossoms. Iridescent and pastel blue ornaments add a touch of shimmer, while silky ribbons in matching soft hues cascade down gracefully. Sparkling crystal pendants hang like frozen dewdrops, completing this enchanting and unique holiday vision.
DIY Guide: Planting Your Pastel Holiday Garden
What You’ll Need:
- A thick, flocked (snowy) garland
- High-quality faux flowers in pastel colors (roses, peonies, etc.)
- A collection of pastel and iridescent ball ornaments
- Rolls of thin, silky ribbon in matching pastels (pink, mint, lavender)
- A few clear crystal or acrylic pendants
- Floral wire
Step-by-Step Instructions:
- Secure the Garland: Attach your snowy garland to the handrail.
- Plant the Flowers: Cut the stems of your faux flowers to about 3-4 inches long. Poke the stems directly into the garland, arranging them in small clusters of different colors.
- Add the Ornaments: Hang your pastel and iridescent ornaments in the spaces between the flower clusters.
- Drape the Ribbons: Cut long pieces of your different colored ribbons. Tie them loosely to the garland, letting the long tails hang down gracefully.
- Add Crystal Drops: Use ornament hooks or thin wire to hang the crystal pendants from the bottom of the garland so they catch the light and sparkle.
32. Retro Holiday Flashback

Take a trip down memory lane with this fun, retro-inspired display. This look is all about the shiny, whimsical charm of mid-century Christmas decorations. It’s bright, cheerful, and full of nostalgic character that feels both playful and stylish.
Two swoops of shimmering gold tinsel garland create a simple, sparkling backdrop. The stars of the show are the vintage-style glass ornaments, known as Shiny Brites. They feature bright colors, indented reflector shapes, and quirky painted patterns. A few fun, non-traditional ornaments, like shiny red cherries, add to the cheerful, kitchy vibe.
DIY Guide: A Mid-Century Modern Holiday
What You’ll Need:
- Gold or silver tinsel garland
- A collection of vintage-style glass ornaments (look for bright colors and interesting shapes)
- A few fun, novelty ornaments (like cherries or other fruits)
- Ornament hooks
- Small, clear wall hooks
Step-by-Step Instructions:
- Hang the Tinsel: Use small, clear wall hooks to attach your tinsel garland to the wall above your staircase, creating one or two gentle swoops.
- Choose Your Ornaments: Lay out all your vintage-style ornaments. This look is not about being perfectly matched, so have fun with the different colors and shapes.
- Space Them Out: Place your largest or most interesting ornament in the very center of the lowest swoop.
- Hang the Rest: Continue hanging the rest of your ornaments along the tinsel. Leave some space between them so each unique shape can be seen clearly. Add your fun cherry ornaments last for a pop of color.
33. Mystical Glowing Orbs

This staircase decoration is moody, magical, and utterly enchanting. It creates the feeling of a mystical forest at twilight, using dark, natural textures and a unique source of light. This is a dramatic and sophisticated look that is both rustic and deeply atmospheric.
A lush, dark garland full of pine, cedar, and moss is draped heavily along the stairs. Tucked into the greenery are flickering candles that cast an intimate glow. The most captivating feature is the series of large, glowing orbs that sit on the steps. These spheres of soft, warm light illuminate the scene from below, creating a truly magical pathway.
DIY Guide: Creating Your Enchanted Staircase
What You’ll Need:
- A very full, dark green garland with different textures
- Sheets of craft moss
- A few battery-powered pillar candles
- Several large, frosted glass or plastic globe lights (battery-powered or plug-in)
Step-by-Step Instructions:
- Drape the Garland: This look is heavy and organic. Drape your garland so it sits heavily on the outer edge of the steps, rather than just on the handrail.
- Add the Moss: Tuck pieces of craft moss into and around the garland to make it look more natural and woodsy.
- Place the Orbs: Carefully place your large globe lights on several of the steps, nestled into the garland. Make sure their cords are tucked safely out of the way or that they are battery-powered.
- Add Candlelight: Place your safe, battery-powered pillar candles on the handrail posts or on the steps, away from the main walking path.
- Turn On the Magic: Switch on your orbs and candles. The combination of the different light sources will create a beautiful, layered, and mystical glow.
34. Dried Botanical Elegance

This beautiful garland celebrates the subtle, muted beauty of dried botanicals. It’s a natural and textural look that feels calm, rustic, and wonderfully aromatic. This design uses a mix of dried flowers, seed pods, and herbs to create a decoration that is as lovely to smell as it is to see.
A base of cedar and holly is adorned with bundles of dried lavender, which adds a touch of soft color and a wonderful scent. Dried strawflowers, lotus pods, and wicker balls provide interesting shapes and textures. The whole arrangement is tied together with simple twine, enhancing its earthy and handmade feel.
DIY Guide: A Garland of Dried Treasures
What You’ll Need:
- A simple cedar or pine garland
- A bundle of dried lavender
- Other dried botanicals like strawflowers, lotus pods, or small wicker balls
- Twine
- Floral wire
Step-by-Step Instructions:
- Attach the Garland: Secure your green garland to the handrail.
- Make Lavender Bundles: Take a small handful of your dried lavender and tie the stems together tightly with a piece of twine. Make several of these bundles.
- Attach the Bundles: Use floral wire or the ends of the twine to tie your lavender bundles onto the garland. Spread them out evenly.
- Add Other Textures: Use floral wire to attach your other dried elements, like the lotus pods and wicker balls.
- The Finishing Touches: Tuck in a few individual strawflowers or other small dried flowers to fill in any gaps and add little pops of color.
35. Cozy Knit Garland

Wrap your staircase in the warm embrace of a cozy sweater with this wonderfully textural design. This look is all about softness and warmth, using chunky cable-knit fabric to create a unique and inviting garland. It’s like a warm hug for your home during the coldest months.
A standard green garland is completely wrapped and woven with wide, knitted scarves in soft grey and cream. Hanging below are large, fluffy yarn pom-poms and thick tassels that add to the plush, handmade feel. The entire display is a celebration of cozy comfort, turning your staircase into the snuggliest spot in the house.
DIY Guide: Your Own Cozy Cable-Knit Creation
What You’ll Need:
- A basic pine garland with lights
- Two or three old, chunky cable-knit scarves in coordinating colors (like grey and cream)
- Yarn in matching colors
- A piece of cardboard for making tassels and pom-poms
- Scissors
Step-by-Step Instructions:
- Hang the Garland: Attach your pre-lit pine garland to the handrail.
- Wrap the Scarves: Take one of your scarves and, starting at the top, wrap it around the garland. When you get to the end of the first scarf, start with the second, overlapping them slightly. Let the ends of the last scarf hang down.
- Make Pom-Poms and Tassels: Use your yarn and cardboard to make several large pom-poms and tassels. You can find simple instructions online by searching for “how to make a yarn pom-pom.”
- Hang the Yarn Decor: Tie your finished pom-poms and tassels onto the garland using long pieces of yarn. Let them hang down at different lengths for a playful, layered look.
36. Creative Artist’s Display

Unleash your inner artist with this colorful and creative holiday display. This idea turns your wall into a gallery of festive cheer, celebrating the joy of making things by hand. It’s a wonderfully personal and vibrant way to showcase creativity during the holidays.
A string of lights serves as the clothesline for a rainbow of painted paper swatches. Hanging among them are the tools of the trade—paint brushes and even a painter’s palette. Small, colorful handmade ornaments and miniature abstract paintings add to the artistic flair, making this a one-of-a-kind decoration.
DIY Guide: Curating Your Own Artful Display
What You’ll Need:
- A string of fairy lights
- Heavy white paper or small canvases
- Rainbow-colored craft paints and brushes
- A small painter’s palette ornament (or a real one)
- Small clips or clothespins
- Festive ribbon
Step-by-Step Instructions:
- Hang the Lights: String your fairy lights along the wall, letting them swoop in the middle.
- Create a Rainbow Banner: Cut your heavy paper into rectangles. Paint each one a different color of the rainbow and let them dry.
- Make Mini Masterpieces: On a few other small pieces of paper or mini canvases, paint fun, colorful abstract designs.
- Assemble Your Gallery: Use the small clips to hang your rainbow banner pieces along the top of the lights. Then, hang your mini paintings, paint brushes, and palette among them. Add a few simple ball ornaments tied with festive ribbon for extra holiday cheer.
37. Sun & Moon Celestial Celebration

This staircase is decorated with the brilliant, powerful magic of the cosmos. It’s a vibrant and energetic take on a celestial theme, full of bold shapes and shining metallic colors. This display feels grand and celebratory, like a festival for the sun, moon, and stars.
A full pine garland is loaded with dazzling ornaments. Large, golden suns with expressive faces hang alongside serene blue and silver crescent moons. The garland is filled in with shiny blue, gold, and silver balls, and accented with sparkling floral picks. At the base, star-shaped lanterns and gift boxes complete this stunning cosmic scene.
DIY Guide: A Holiday for the Cosmos
What You’ll Need:
- A thick, pre-lit pine garland
- A collection of sun and moon ornaments in gold, silver, and blue
- An assortment of ball ornaments in blue and gold
- Sparkly silver or gold floral picks (the kind that look like starbursts)
- Star-shaped lanterns or boxes for the base
Step-by-Step Instructions:
- Secure the Garland: Attach your garland to the handrail and fluff it out.
- Place the Stars: First, hang your main sun and moon ornaments. These are your focal points, so spread them out nicely along the garland.
- Fill with Color: Use your blue and gold ball ornaments to fill in all the empty spaces. Cluster them together for a rich, full look.
- Add Starbursts: Poke the stems of your sparkly floral picks deep into the garland. Position them so they look like they are bursting out from behind the ornaments.
- Decorate the Base: Arrange your star-shaped lanterns and boxes on the steps at the bottom of the staircase.
38. Scottish Highlands Theme

Bring a touch of Scottish charm to your holiday decor with this handsome and rustic theme. This design is a tribute to the Scottish Highlands, featuring classic tartan plaid, hardy thistles, and, of course, the beloved Scottie dog. It’s a look that is both traditional and full of character.
A simple pine garland is woven with a bold, red-and-green tartan ribbon. Tucked into the greenery are beautiful, spiky blue thistles—the national flower of Scotland. The most charming part is the collection of adorable ornaments, including little bagpipes and Scottie dogs dressed in their own tiny tartan coats.
DIY Guide: A Touch of the Highlands
What You’ll Need:
- A classic pine garland with lights
- Wide, wired tartan (plaid) ribbon
- Faux blue thistle floral picks
- Charming themed ornaments, like Scottie dogs and bagpipes
- A few pinecones
Step-by-Step Instructions:
- Hang the Garland: Attach your lit garland to the handrail.
- Weave the Tartan: Loosely weave your tartan ribbon in and out of the garland from top to bottom.
- Add the Thistles: Poke the stems of the faux thistle picks into the garland. The spiky texture looks wonderful against the soft pine needles.
- Tuck in Pinecones: Add a few pinecones for an extra touch of rustic texture.
- Hang the Ornaments: Finally, hang your adorable Scottie dog and bagpipe ornaments. Place them where they can be easily seen and admired.
39. Edible Abundance Garland

This stunning garland is a true feast for the eyes, celebrating the bounty of the harvest. It’s a unique and sophisticated design that uses real fruits, vegetables, and herbs to create a decoration that is both beautiful and fragrant. This is a wonderfully organic and luxurious way to decorate for the holidays.
A base of fresh greenery is absolutely laden with beautiful produce. Whole artichokes provide incredible texture, while deep red pomegranates and bright oranges add rich pops of color. Bundles of fresh herbs like sage and thyme hang down, releasing their wonderful aroma into the air.
DIY Guide: Building a Bountiful Harvest Garland
What You’ll Need:
- A very sturdy garland base (real or fake)
- Floral wire
- Small artichokes, pomegranates, and oranges (or realistic faux versions)
- Bundles of fresh, woody herbs like sage, rosemary, and thyme
- Twine
Step-by-Step Instructions:
- Secure Your Base: Attach your sturdy garland base to the handrail. This will need to hold some weight.
- Wire the Produce: Carefully poke a long, sturdy piece of floral wire through the base of an artichoke or pomegranate. Twist the wire ends together, leaving two long “tails.”
- Attach the Produce: Use the wire tails to securely attach the wired fruits and vegetables to the garland base. Spread them out to create a balanced look.
- Make Herb Bundles: Take a handful of your fresh herbs and tie the stems together tightly with twine, leaving a long tail.
- Hang the Herbs: Use the twine to tie your herb bundles to the underside of the garland, letting them hang down gracefully.
40. New Year’s Eve Countdown

Keep the party going after Christmas with this fun and festive New Year’s Eve theme. This decoration is all about the glitz and glamour of ringing in the new year. Using a classic black, gold, and silver color scheme, it turns your staircase into the centerpiece of your celebration.
Black and gold tinsel garlands are draped along the handrail. A “Happy New Year” banner hangs proudly on the wall. The decorations are all about the party—ornaments shaped like champagne bottles and glasses, clocks showing midnight, and sparkling stars. It’s a brilliant way to transition your home from one holiday to the next.
DIY Guide: Your Own New Year’s Party on the Stairs
What You’ll Need:
- Black and gold tinsel garlands
- A “Happy New Year” banner
- New Year’s themed ornaments (clocks, champagne bottles, stars)
- A few simple silver and gold ball ornaments
- Tape or wall-safe adhesive hooks
Step-by-Step Instructions:
- Hang the Banner: First, hang your “Happy New Year” banner on the wall along the staircase.
- Drape the Tinsel: Loosely drape your black and gold tinsel garlands along the handrail. You can even twist them together.
- Hang the Ornaments: Hang your fun, themed ornaments from the tinsel. Place the clock ornament in a central location.
- Fill in the Gaps: Use your simple silver and gold ball ornaments to fill in any empty spots and add extra sparkle to the display.
- Add Party Favors: For a final touch, you can place some party horns or noisemakers at the base of the stairs!
41. Peace & Goodwill Garland

This simple and heartfelt garland shares a beautiful message for the holiday season. It’s a minimalist and modern design that focuses on the classic wish for “Peace on Earth.” The clean and simple style makes the meaningful words and symbols the true focus of the decoration.
A string of twine lit with delicate fairy lights is the base for this display. Hanging from it are a variety of ornaments: sparkling peace signs, globes, and simple white tags with messages of peace and goodwill. Pieces of patterned folk-art ribbon add a touch of color and handmade charm to this lovely and thoughtful garland.
DIY Guide: A Message of Peace Garland
What You’ll Need:
- A long piece of twine or jute rope
- A string of warm white fairy lights (battery-powered)
- Small, wooden clothespins or clips
- White cardstock or thin wooden tags
- A black marker or letter stencils
- A few peace sign ornaments and simple ball ornaments
- A roll of patterned ribbon
Step-by-Step Instructions:
- String the Lights: Drape your twine where you want to hang it. Then, wrap the string of fairy lights around the twine.
- Write Your Messages: On your white tags, write out messages like “Peace,” “Joy,” and “Goodwill.” You can write them by hand or use stencils for a cleaner look.
- Prepare the Ribbons: Cut a few pieces of your patterned ribbon, each about one foot long.
- Assemble Your Garland: Use the small clothespins to clip everything onto your lighted twine. Clip on a message tag, then a peace sign ornament, then loop a piece of ribbon over the twine. Continue clipping on your different elements until the garland is full and balanced.
As you can see, the possibilities for decorating your staircase are as boundless as your imagination. From a simple strand of fresh cedar to a vibrant explosion of jewel-toned ornaments, your stairs can be a canvas for your unique holiday style.
Don’t be afraid to mix elements from different ideas or to add your own personal touches with handmade ornaments or treasured family decorations. The goal is to create a space that feels warm, welcoming, and full of the joy of the season.
Key Takeaways
- Start with a Base: A garland, whether it’s lush pine, simple cedar, or even cozy scarves, is the perfect foundation for any staircase design.
- Think Beyond the Banister: Decorating the steps with lanterns, small trees, or character figures adds depth and creates a more complete scene.
- Embrace a Theme: Choosing a theme—like coastal, woodland, or Candyland—can help guide your choices and create a cohesive, stunning look.
- DIY Adds Heart: Simple handmade touches, from dried orange slices to yarn pom-poms, make your decorations feel personal and unique.
- Lighting is Magic: Never underestimate the power of fairy lights or battery-powered candles to add a warm and magical glow to any display.