
Living in a small apartment often feels restrictive. You might look at your white walls and feel a lack of inspiration. Most people think they need a huge house to express their style. That is simply not true.

You can turn a tiny studio into a high-fashion retreat with just a few clever changes. Your home should reflect your personality regardless of its size. Every corner holds potential for beauty and function.
We have gathered forty-one unique ways to refresh your living space. These concepts focus on maximizing every inch of your floor plan. Get ready to transform your dull unit into a chic sanctuary.
1 Minimalist Monochromatic Bedroom Retreat
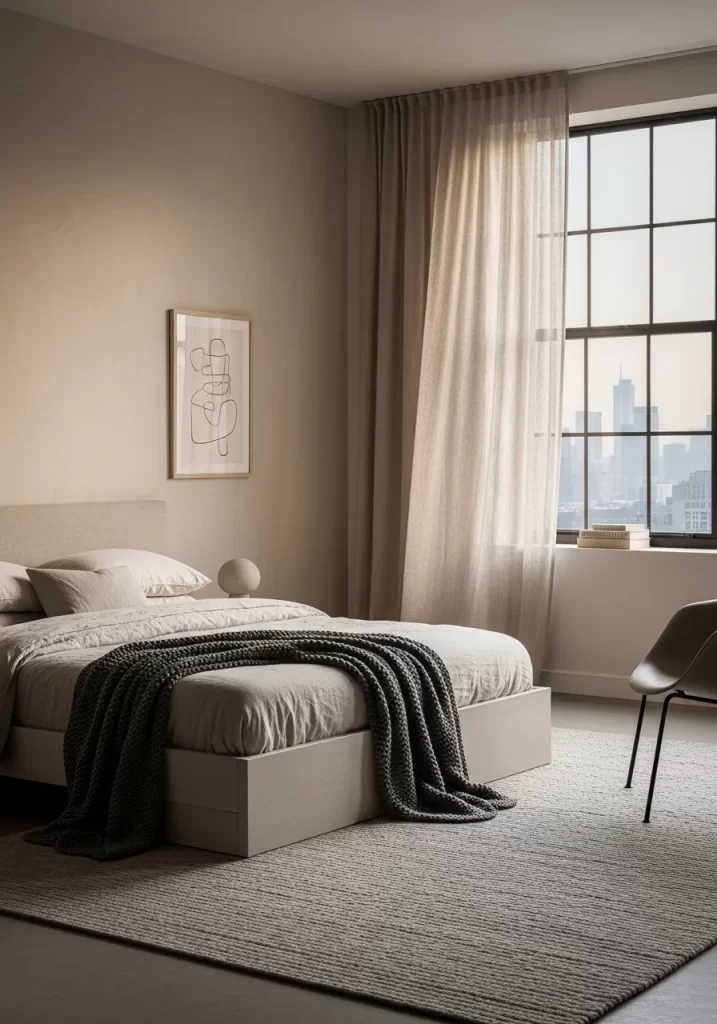
Small apartments often feel cluttered when too many colors compete for attention. This chic apartment aesthetic focuses on a soft, monochromatic palette to create an airy feel. By using various shades of beige and cream, the room appears larger and more cohesive.
Natural light plays a huge role in this design. Sheer linen curtains allow sunshine to filter through while maintaining your privacy. A textured knit throw adds depth to the bed without overwhelming the limited floor space. Simple line art on the wall serves as a sophisticated focal point that does not make the area feel cramped.
Choose low-profile furniture to keep sightlines open. This strategy prevents the room from looking boxed in. Soft rugs provide a cozy foundation, making your tiny bedroom feel like a high-end hotel suite.
Material Required List
- One large canvas or heavy art paper
- Black acrylic paint or a thick permanent marker
- Light oak or beige wooden picture frame
- Neutral-toned linen or cotton bedding
- Chunky knit weighted blanket in charcoal or deep grey
Equipment Required List
- Small paintbrush
- Measuring tape
- Level tool
- Pencil
- Hammer and small nails
DIY Instruction Step by Step
- Measure your wall space above the bed to decide on the best frame size.
- Lay your canvas or paper on a flat, clean surface.
- Draw a single, continuous loopy line using your black marker or paint to create abstract art.
- Let the paint dry completely for at least one hour before touching it.
- Place the artwork inside the wooden frame and secure the backing.
- Mark a spot on the wall centered with your headboard using a pencil.
- Use the level tool to ensure your mark is straight so the art hangs evenly.
- Tap a nail into the wall and hang your new custom decor piece.
- Finish the look by layering your neutral bedding and draping the chunky throw diagonally across the foot of the bed.
2 Vintage French Floor Mirror Accent
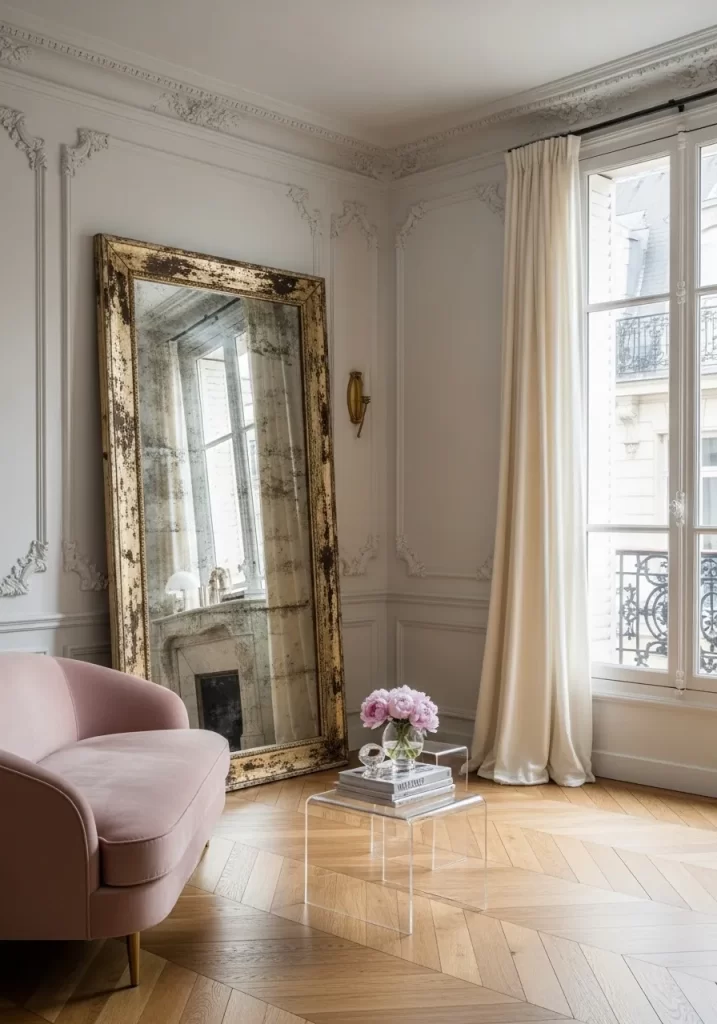
Small apartments often feel restricted, but a massive vintage floor mirror can instantly change that perception. This chic aesthetic trick bounces natural light across the room to create the illusion of a much larger living area. By leaning a tall, ornate mirror against a wall, you add height and a sense of grandeur to a modest floor plan.
The gold distressed frame provides a touch of history and elegance without requiring permanent wall changes. Pair this piece with soft textures like a velvet blush sofa to balance the hard glass surface. Transparent acrylic tables keep the space feeling open because they do not block the view of your beautiful herringbone floors. This setup turns a simple corner into a high-fashion focal point.
Material Required List
- One large rectangular wall mirror
- Gold metallic spray paint
- Dark brown acrylic paint
- Antique glaze or wood wax
- Rags for wiping
- Painters tape
Equipment Required List
- Plastic drop cloth
- Sandpaper (medium grit)
- Small sponge
- Safety goggles
- Mask for fumes
DIY Instruction Step by Step
- Protect your workspace by laying down a plastic drop cloth in a well-ventilated area.
- Use painters tape to cover the glass surface of the mirror completely so no paint touches it.
- Lightly sand the wooden or plastic frame to help the new paint stick better.
- Apply a base coat of gold metallic spray paint over the entire frame and let it dry for one hour.
- Dip a small sponge into dark brown acrylic paint and lightly dab it onto the corners and edges.
- Wipe away most of the brown paint with a rag while it is still wet to create a faded, aged look.
- Apply a thin layer of antique glaze over the gold sections to dull the shine for a vintage feel.
- Remove the painters tape carefully once all paint is dry to the touch.
- Lean the mirror against your chosen wall at a slight angle to capture the most light.
3 Modern Organic Stone Fireplace Wall
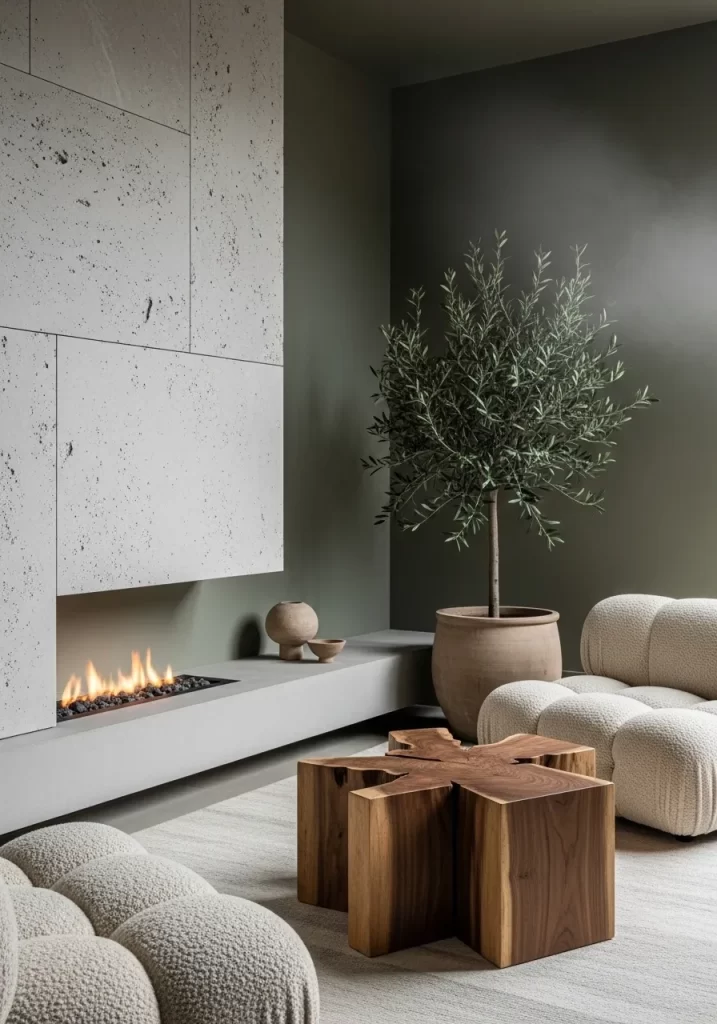
Bringing natural elements indoors helps a cramped apartment feel grounded and serene. This organic aesthetic uses textured stone panels to create a stunning feature wall that mimics a luxury retreat. The contrast between the cool grey stone and warm olive green walls adds sophisticated depth to a small living room.
A low-profile fireplace provides a cozy glow without taking up the vertical space a traditional hearth requires. You can complement this look with sculptural furniture, such as a cloud-like textured chair and a raw wood stump coffee table. Adding a tall indoor tree like an olive or ficus brings life to the corner and draws the eye upward. This design proves that even a small space can handle bold textures if you keep the color palette earthy and muted.
Material Required List
- Lightweight faux stone wall panels
- Industrial strength construction adhesive
- One potted indoor olive tree
- Large terracotta planter
- Raw wood stump or block
Equipment Required List
- Caulk gun
- Level tool
- Hand saw (for trimming panels)
- Measuring tape
- Pencil
DIY Instruction Step by Step
- Clean the wall surface thoroughly to remove any dust or grease that might stop the glue from sticking.
- Measure the height and width of your wall to plan how many stone panels you need.
- Use a pencil and level tool to draw a straight line where the first row of panels will sit.
- Apply lines of construction adhesive to the back of your first faux stone panel using the caulk gun.
- Press the panel firmly against the wall, following your level line.
- Trim any edge panels with a hand saw to fit the corners of your room perfectly.
- Let the wall dry for 24 hours before placing any furniture against it.
- Place your olive tree in the terracotta planter and position it near the new stone wall.
- Center your wood stump coffee table in the seating area to finish the organic look.
4 Industrial Loft Library Divider
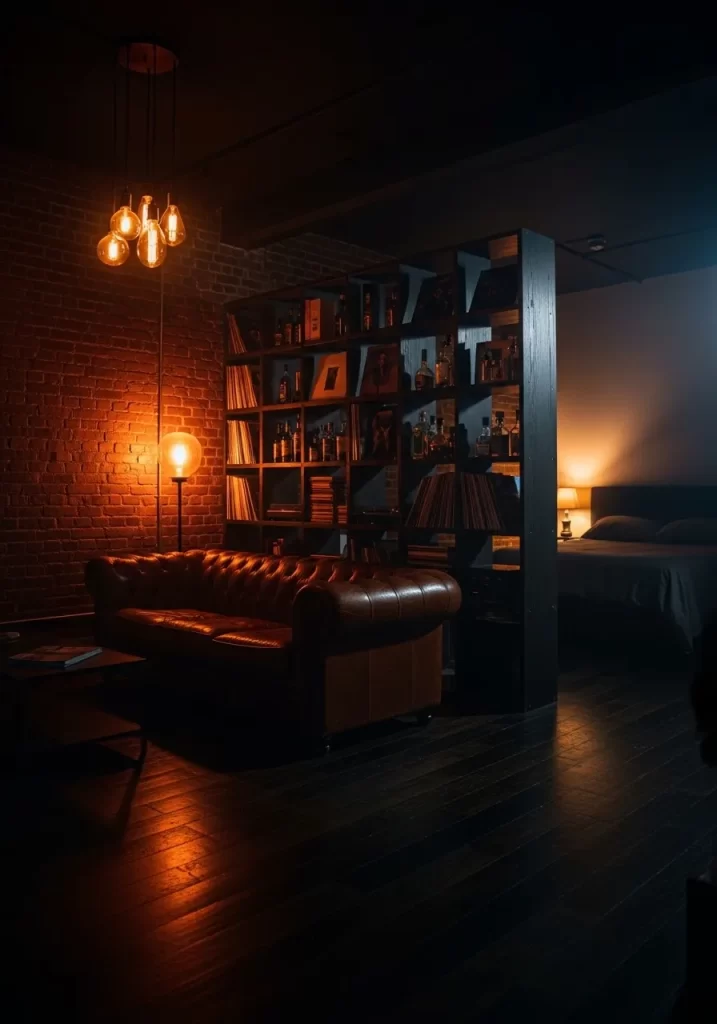
Creating separate zones in a studio apartment is often a major challenge. A tall, open-backed bookshelf serves as a functional wall that divides your sleeping and living areas without blocking light. This industrial aesthetic uses dark wood or metal shelving to add a masculine, sophisticated vibe to the room.
Warm lighting is key to making this dark palette feel inviting rather than gloomy. Exposed Edison bulbs hanging from the ceiling and amber-hued floor lamps create a soft, sunset glow. By filling the shelves with books, vinyl records, and glassware, you turn your storage into a piece of art. The brick wall backdrop adds texture and reinforces the urban loft feel, making the entire apartment look intentional and curated.
Material Required List
- Free-standing open-back bookshelf unit
- Warm-toned Edison bulb pendant lights
- Leather-bound books or colorful magazines
- Collection of glass bottles or decanters
- Adhesive felt pads (for furniture feet)
Equipment Required List
- Screwdriver or hex key (for shelf assembly)
- Step ladder
- Cable clips (to hide cords)
- Cleaning cloth
DIY Instruction Step by Step
- Assemble your open-back bookshelf according to the manufacturer instructions in the middle of your room.
- Stick adhesive felt pads to the bottom of the shelf feet to protect your floors from scratches.
- Position the shelf so it sits perpendicular to the wall, clearly separating the bed from the sofa.
- Arrange your heaviest books on the bottom shelves to keep the unit stable and safe.
- Place glassware and decorative items on the middle shelves where they are at eye level.
- Leave some shelf gaps empty to allow light to pass through the room easily.
- Hang the pendant lights over the seating area to define the space further.
- Use cable clips to run the light cords neatly along the ceiling or down the side of the shelf.
- Sit on your sofa to ensure the divider provides enough privacy for the sleeping area.
5 Cozy Hygge Winter Window Nook
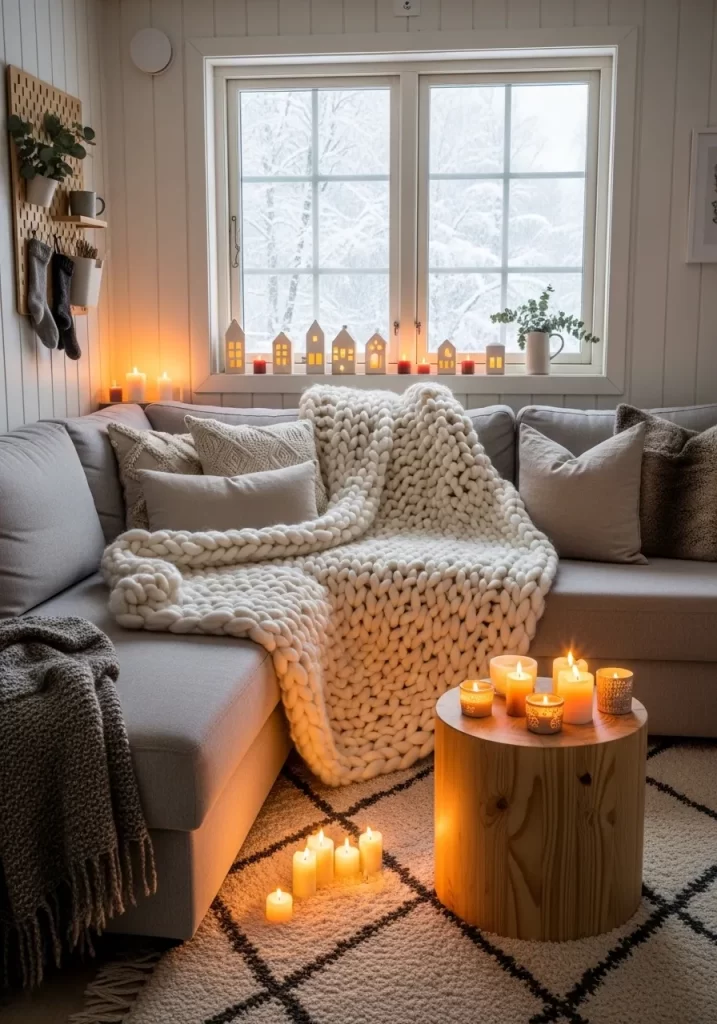
When the weather turns cold, your apartment should feel like a warm hug. This hygge-inspired aesthetic focuses on extreme comfort through heavy textures and soft lighting. A chunky knit wool blanket draped over the sofa is the star of this look, providing instant warmth and visual interest.
Small ceramic houses lined up on the windowsill create a whimsical mini-village that glows when you add tea lights. Using many small candles instead of one bright overhead light makes the room feel intimate and calm. This setup is excellent for small spaces because it utilizes the window ledge for decor rather than taking up valuable table space. Neutral tones keep the vibe peaceful while the flickering flames add a touch of magic to snowy evenings.
Material Required List
- Extra-large chunky knit wool throw blanket
- Set of white ceramic tea light houses
- Battery-operated or wax tea light candles
- Pegboard for wall storage
- Small indoor plants in white pots
Equipment Required List
- Scissors
- Level tool
- Drill and wall anchors
- Screwdriver
DIY Instruction Step by Step
- Clean your windowsill and remove any clutter to make room for your winter village.
- Place the ceramic houses in a row across the ledge, mixing different heights for a natural look.
- Insert tea lights into each house and turn them on to create a warm glow.
- Mount a pegboard on a nearby wall using a drill and wall anchors to keep small items organized.
- Hang small plants and mugs from the pegboard hooks to save counter space.
- Spread your chunky knit blanket over the corner of your sofa, letting it spill onto the floor slightly.
- Arrange textured pillows on the sofa to create a soft backrest for lounging.
- Place additional candles on a low side table to surround the seating area with light.
- Dim the main lights and enjoy your cozy, light-filled retreat.
6 Sleek Glass Office Partition

Modern apartments benefit greatly from transparent design choices that maintain a sense of flow. A black-framed glass partition creates a professional home office space without making the bedroom feel small. This industrial-chic look is clean, sharp, and highly functional for remote workers.
Using a clear acrylic chair makes the desk area almost disappear visually, which keeps the room looking uncluttered. The contrast between the dark frames and the bright city view adds a dramatic, high-end feel to the apartment. Minimalist track lighting on the ceiling ensures the workspace is well-lit without the need for bulky floor lamps. This aesthetic is all about precision and maximizing every square inch of a luxury studio.
Material Required List
- Modular glass and metal room divider panels
- Clear acrylic ghost chair
- Slim black metal desk
- Small black desk lamp
- Concrete-look floor rug
Equipment Required List
- Measuring tape
- Allen wrench (usually included with furniture)
- Level tool
- Glass cleaner and microfiber cloth
DIY Instruction Step by Step
- Measure the height of your ceiling to ensure the glass partition will fit securely.
- Assemble the metal frame of the partition according to the instructions provided.
- Use a level tool to make sure the vertical bars are perfectly straight before tightening the screws.
- Secure the partition to the floor and ceiling as directed to prevent it from tipping.
- Place your slim metal desk against the glass wall so you can look through it while working.
- Position the clear acrylic chair under the desk to maintain the invisible furniture look.
- Add a small desk lamp for focused lighting during evening tasks.
- Clean the glass panels thoroughly with a microfiber cloth to remove fingerprints and smudges.
- Lay the concrete-look rug under the office area to define the floor space.
7 Bold Emerald Velvet Bedroom
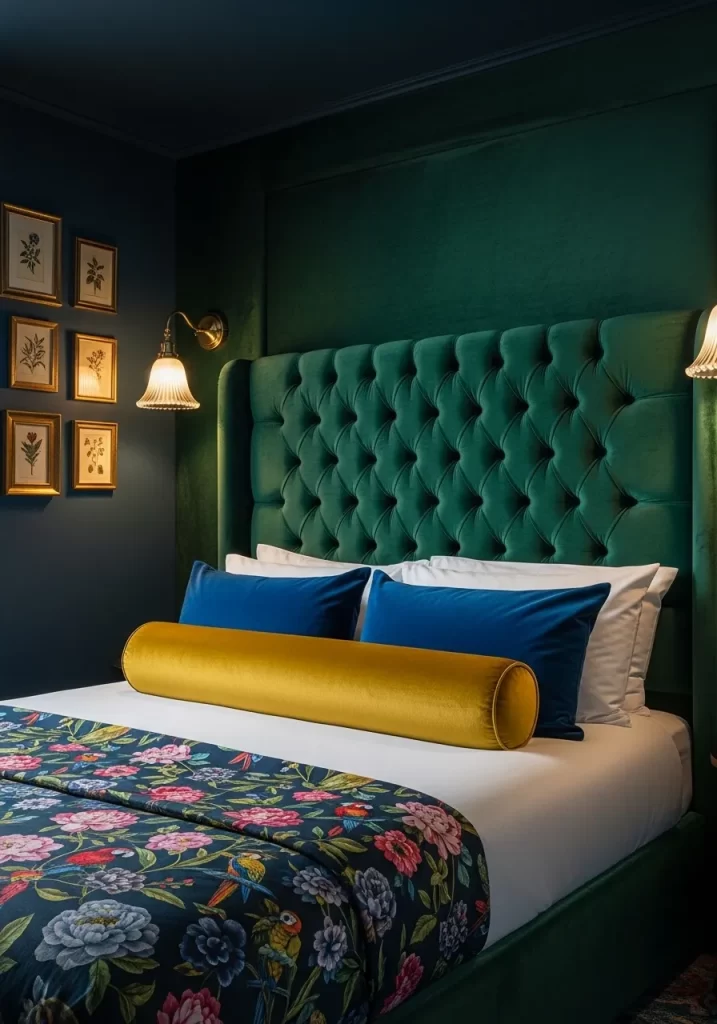
If you want to move away from neutrals, a deep jewel-tone aesthetic adds instant character to a small room. A tufted emerald green velvet headboard serves as a luxurious anchor for the space. Dark navy walls create a moody, sophisticated atmosphere that makes the gold accents pop.
Mixing patterns, like a floral duvet with solid velvet pillows, gives the room a designer feel. Small framed botanical prints arranged in a grid add vintage charm to the walls. Sconce lighting is a smart choice for small apartments because it frees up space on your nightstand. This look is about embracing maximalism in a controlled way, using rich colors to make the room feel expensive and curated.
Material Required List
- Emerald green velvet fabric (3 to 4 yards)
- Large piece of plywood for the headboard
- Foam padding and batting
- Staple gun and staples
- Gold picture frames with floral art
Equipment Required List
- Power drill
- Wall mounting brackets
- Measuring tape
- Scissors
- Level tool
DIY Instruction Step by Step
- Cut your plywood to the width of your bed frame using a saw or have it pre-cut at the store.
- Layer the foam and batting over the plywood and wrap it tightly around the edges.
- Staple the emerald velvet fabric over the padding, starting from the center of each side and moving outward.
- Use a drill to attach mounting brackets to the back of your new headboard and the wall.
- Hang the headboard securely and push your bed against it.
- Measure a grid on the wall for your botanical prints and mark each spot with a pencil.
- Use the level tool to ensure your frames are perfectly aligned.
- Install wall-mounted sconces on either side of the bed to save nightstand space.
- Layer your floral duvet and velvet pillows to complete the high-end look.
8 Zen Inspired Room Divider

Peace and quiet are essential in a busy city apartment. A wooden slat room divider offers a Zen-like aesthetic that provides privacy while letting air and light circulate. This natural wood element brings a sense of calm and balance to a bright, sun-drenched bedroom.
A large textured vase filled with tall pampas grass adds a soft, organic touch to the corner. Using a jute or woven rug under the bed grounds the space with natural fibers. The minimal furniture and white curtains keep the focus on the play of light and shadow created by the divider. This design is excellent for anyone looking to create a meditative space in a small, modern home.
Material Required List
- Folding wooden slat room divider
- Large ceramic floor vase
- Dried pampas grass stems
- Large jute or seagrass area rug
- Light grey linen bedding
Equipment Required List
- Vacuum cleaner
- Scissors (to trim pampas grass)
- Measuring tape
DIY Instruction Step by Step
- Clear the floor area where you want to place your rug and vacuum it thoroughly.
- Lay down the jute rug and center it under the bottom half of your bed.
- Unfold the wooden slat divider and position it near the bed to create a private nook.
- Adjust the angle of the divider so it stands stable on its own without wobbling.
- Place the large ceramic vase in the corner where the divider meets the wall.
- Trim the bottom of the pampas grass stems so they sit at varying heights in the vase.
- Fluff the pampas grass gently to give it a full, airy appearance.
- Dress the bed with light grey linen sheets for a soft, natural texture.
- Open your curtains to let the sunlight create beautiful patterns through the wooden slats.
9 Mid-Century Modern Creative Hub

A small apartment can still be a place of high energy and creativity. This mid-century modern aesthetic uses warm wood tones and pops of primary colors like yellow and orange to stimulate the mind. A wall-mounted shelving unit is a brilliant way to display books and decor without using any floor space.
The low sideboard provides plenty of hidden storage for clutter while serving as a platform for a vintage-style clock and art. A colorful geometric rug ties all the bright accents together and makes the room feel playful. Choosing furniture with tapered legs, like the desk and sofa, allows you to see more of the floor, which helps a small room feel much more open.
Material Required List
- Wall-mounted shelving system (string style)
- Mid-century modern wood sideboard
- Yellow molded plastic chair
- Colorful geometric patterned rug
- Retro-style desk lamp
Equipment Required List
- Power drill and bits
- Wall anchors and screws
- Level tool
- Pencil
- Screwdriver
DIY Instruction Step by Step
- Locate the studs in your wall using a stud finder to ensure your shelves can hold weight.
- Mark the height for your wall-mounted shelves and use a level to keep them straight.
- Drill holes and secure the metal wall brackets with sturdy screws.
- Hook the wooden shelves into the brackets at your desired heights.
- Place the wood sideboard underneath the shelves to create a solid furniture base.
- Lay the geometric rug in the center of the room to define the creative zone.
- Set up your desk with the yellow chair and retro lamp for a bright workspace.
- Organize your books on the shelves by color or size for a clean look.
- Add a vintage record player or clock to the sideboard to enhance the mid-century vibe.
10 Dark Academia Study Corner
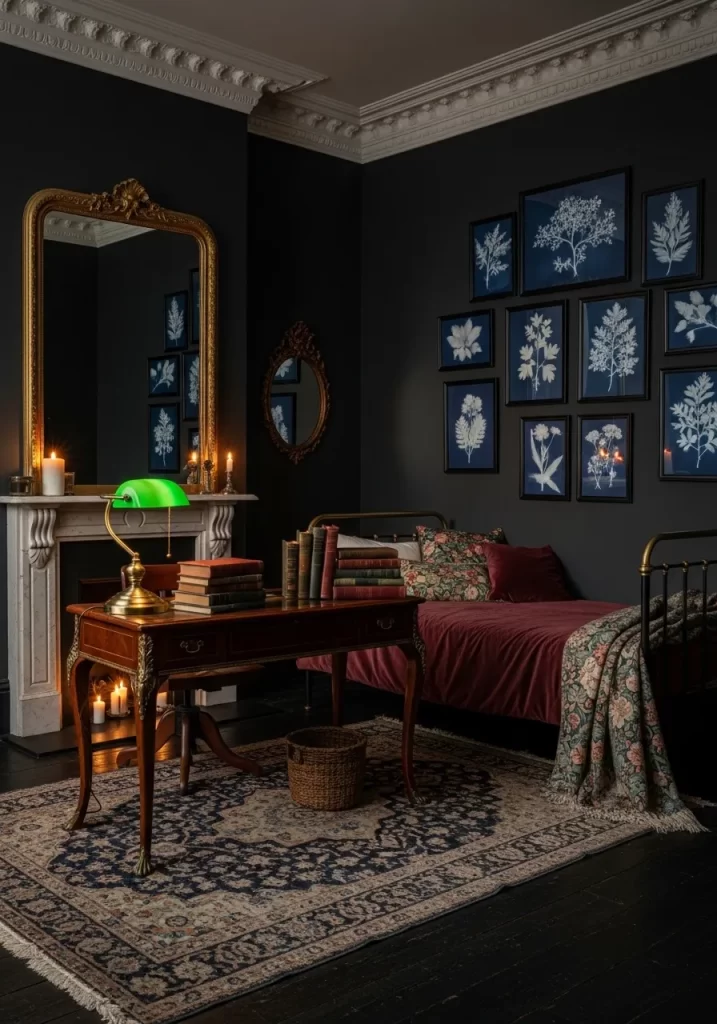
Embrace the mystery and charm of the dark academia aesthetic in your small apartment. Deep charcoal walls and a vintage wooden desk create a scholarly atmosphere that feels cozy rather than cramped. A large ornate gold mirror over the fireplace adds a touch of historical luxury and helps reflect candlelight.
A gallery wall of botanical or architectural sketches in uniform black frames creates a smart, organized look. Using a rich Persian-style rug adds warmth to the dark floors and provides a soft place for your feet while you read. This design is for the person who loves old books, warm tea, and a quiet space to think. The green banker’s lamp provides a classic pop of color that stands out beautifully against the dark backdrop.
Material Required List
- Deep charcoal or black interior paint
- Vintage-style wooden writing desk
- Ornate gold-framed wall mirror
- Green glass banker’s lamp
- Multiple black picture frames with white art
Equipment Required List
- Paint rollers and brushes
- Painter’s tape
- Hammer and nails
- Level tool
- Measuring tape
DIY Instruction Step by Step
- Apply painter’s tape to the edges of your ceiling and baseboards before painting the walls charcoal.
- Paint two thin coats for an even, rich color and let it dry for at least four hours.
- Center the gold mirror over your fireplace or a low shelf to act as a focal point.
- Arrange your writing desk in front of a wall to create a dedicated study area.
- Place the banker’s lamp on the desk and hide the cord behind the furniture.
- Plan your gallery wall on the floor first to find the best arrangement for your frames.
- Use a measuring tape and level to hang the frames in a clean, even grid.
- Lay the Persian rug under the desk to tie the dark colors and wood tones together.
- Stack several old books on the desk and light a few candles for the ultimate academic vibe.
11 Terracotta Desert Sanctuary
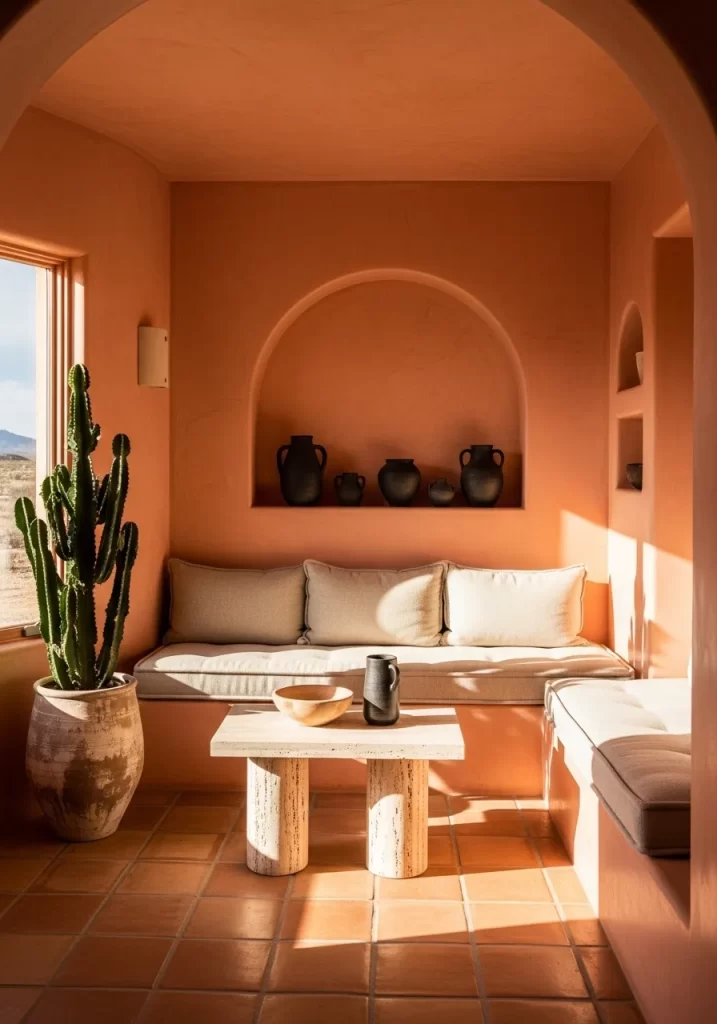
Warm earthy tones turn a small apartment into a sun-soaked desert sanctuary. This aesthetic utilizes monochromatic terracotta walls to create a continuous, soothing flow throughout the seating area. The built-in arched alcoves offer a creative way to display dark ceramic pottery without cluttering small tables.
A tall saguaro cactus in a rustic stone pot brings a bold vertical element that draws the eye upward. Low-profile cushioned benches maximize seating along the walls while keeping the center of the room open. Using a stone-top coffee table with cylindrical legs adds a raw, architectural feel. This desert-inspired look is perfect for anyone who wants a warm, tranquil home that feels connected to nature.
Material Required List
- Terracotta-colored matte interior paint
- Built-in or floating arched shelf kit
- Collection of matte black ceramic vases
- Low-profile floor cushions or bench pads
- Natural stone or travertine coffee table
Equipment Required List
- Paint rollers and edging tools
- Measuring tape
- Level tool
- Adhesive for floating shelves
- Drill (if using mechanical wall mounts)
DIY Instruction Step by Step
- Paint your walls with a matte terracotta shade to create a warm, earthy base for the room.
- Measure the center of your main wall to install an arched shelf kit for displaying pottery.
- Use a level to ensure the arch is perfectly straight before securing it with adhesive or screws.
- Paint the inside of the arch the same color as the wall for a seamless built-in look.
- Arrange your black ceramic vases inside the arch, grouping them in odd numbers for visual balance.
- Place low-profile benches or cushions along the perimeter of the room to save space.
- Position a large potted cactus near a window to act as a natural, living sculpture.
- Center your stone coffee table in front of the seating area to ground the space.
- Add light-colored throw pillows to the benches to provide a soft contrast against the orange walls.
12 Retro Bauhaus Primary Lounge
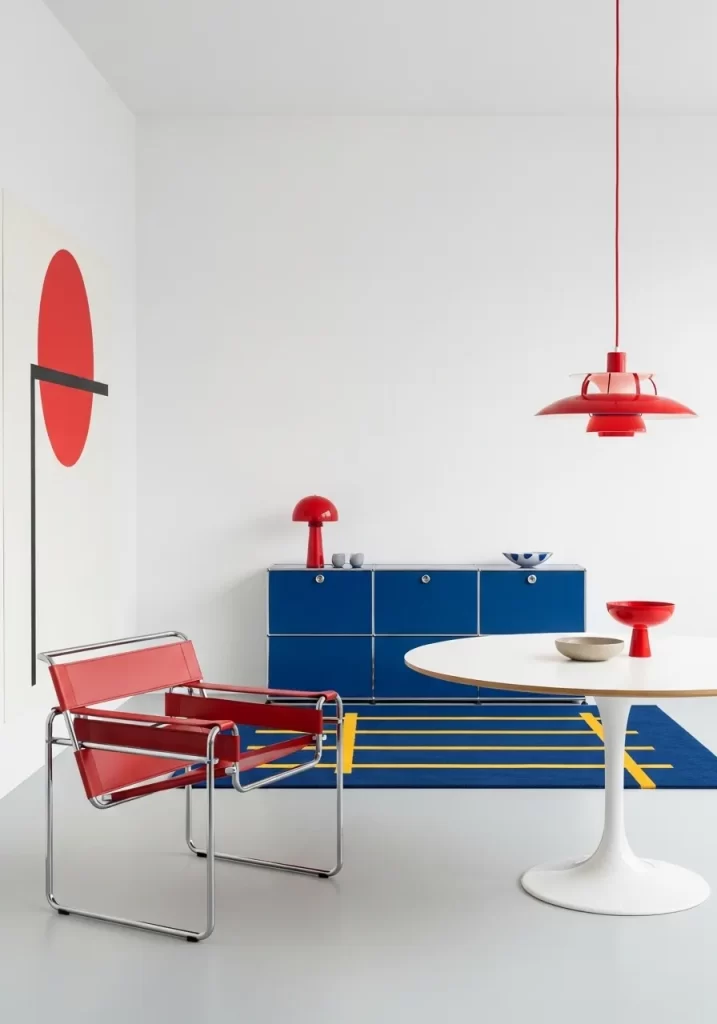
Small spaces come alive with the bold geometry and primary colors of the Bauhaus aesthetic. This look features a striking red cantilever chair that serves as both a functional seat and a piece of modern art. A deep blue modular storage unit provides a sharp color contrast while keeping your belongings organized and out of sight.
The white walls act as a clean gallery backdrop, making the red sun wall art a dramatic focal point. A blue and yellow striped rug adds movement to the floor and ties the primary color palette together. Choosing furniture with thin chrome frames keeps the visual weight low, which prevents the apartment from feeling crowded. This design is excellent for lovers of high-contrast, iconic modern design.
Material Required List
- Red leather and chrome cantilever chair
- Blue modular metal storage cabinet
- Red pendant light with a wide dish shade
- Yellow and blue geometric striped rug
- Large red circle wall art or decal
Equipment Required List
- Screwdriver (for cabinet assembly)
- Step ladder
- Level tool
- Measuring tape
- Cleaning cloth for chrome surfaces
DIY Instruction Step by Step
- Paint a large red circle or apply a vinyl decal on your main white wall to anchor the room.
- Assemble your blue modular cabinet and place it against the wall under your art.
- Hang the red pendant light over your dining or work table to define that specific zone.
- Use a step ladder to ensure the light is at a comfortable height, typically 30 inches above the table.
- Lay your striped rug on the floor, aligning the stripes with the edge of your furniture.
- Place the red cantilever chair at an angle to the rug to create an inviting seating spot.
- Arrange a few simple ceramic bowls on the cabinet for a touch of functional decor.
- Polish the chrome frames of your furniture with a soft cloth to keep them shining bright.
- Keep the rest of the walls white to let the primary colors truly stand out.
13 Urban Jungle Greenhouse Dining
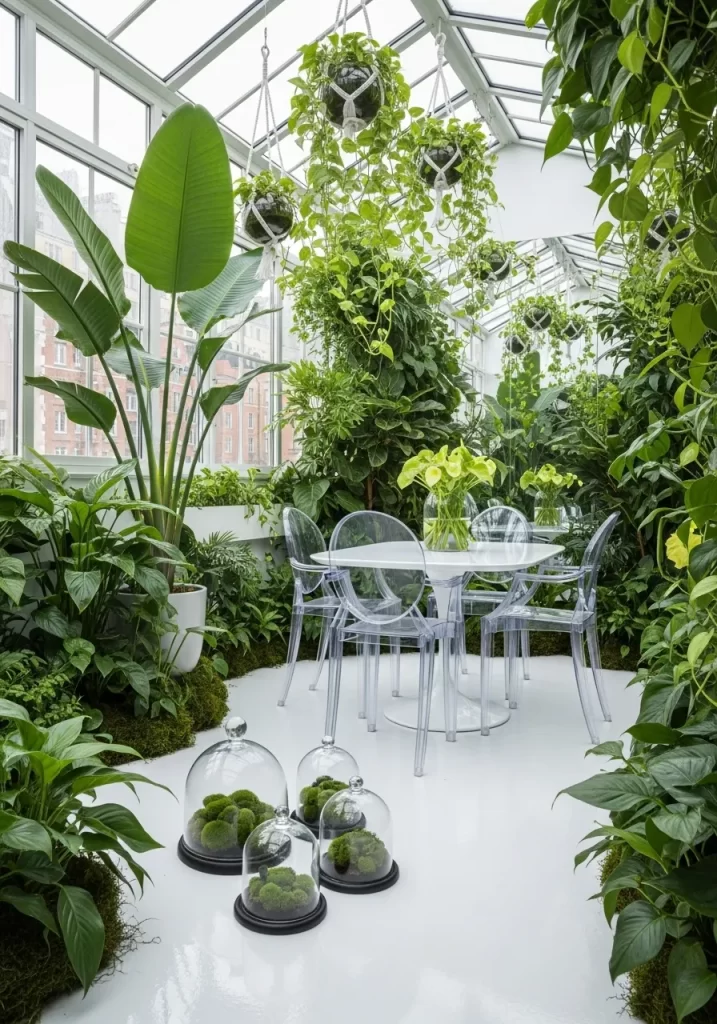
Transforming your dining area into a lush urban jungle makes a small apartment feel vibrant and fresh. This aesthetic uses a white-on-white base to let the deep greens of tropical plants take center stage. Tall Bird of Paradise plants create a natural canopy that softens the hard lines of a glass-walled sunroom or balcony.
Hanging pothos from the ceiling utilizes vertical space that often goes wasted in tiny homes. Transparent acrylic chairs and a white pedestal table seem to float, making the floor area look much larger than it is. Small glass cloches filled with moss add a whimsical, laboratory-style touch to the floor. This look is perfect for plant lovers who want to dine in a serene, botanical garden setting.
Material Required List
- White pedestal dining table
- Set of clear acrylic dining chairs
- Multiple hanging macrame plant holders
- Assortment of glass cloches and domes
- Large potted tropical plants
Equipment Required List
- Ceiling hooks and a drill
- Watering can
- Microfiber cloth for glass surfaces
- Level tool
DIY Instruction Step by Step
- Position your white pedestal table in the brightest part of your apartment.
- Surround the table with clear acrylic chairs to keep the view of your plants unobstructed.
- Drill holes in the ceiling and install sturdy hooks for your hanging plants.
- Place trailing plants like Pothos or Ivy in macrame holders and hang them at different heights.
- Arrange your largest potted plants in the corners of the room to create a wall of green.
- Place small glass cloches on the floor or a side table and fill them with fresh green moss.
- Keep the glass and acrylic surfaces spotless using a microfiber cloth to maintain the airy look.
- Add a simple glass vase with white flowers to the center of the table for a final touch.
- Ensure your plants are grouped together, which helps maintain humidity for their health.
14 Modern Farmhouse Breakfast Nook
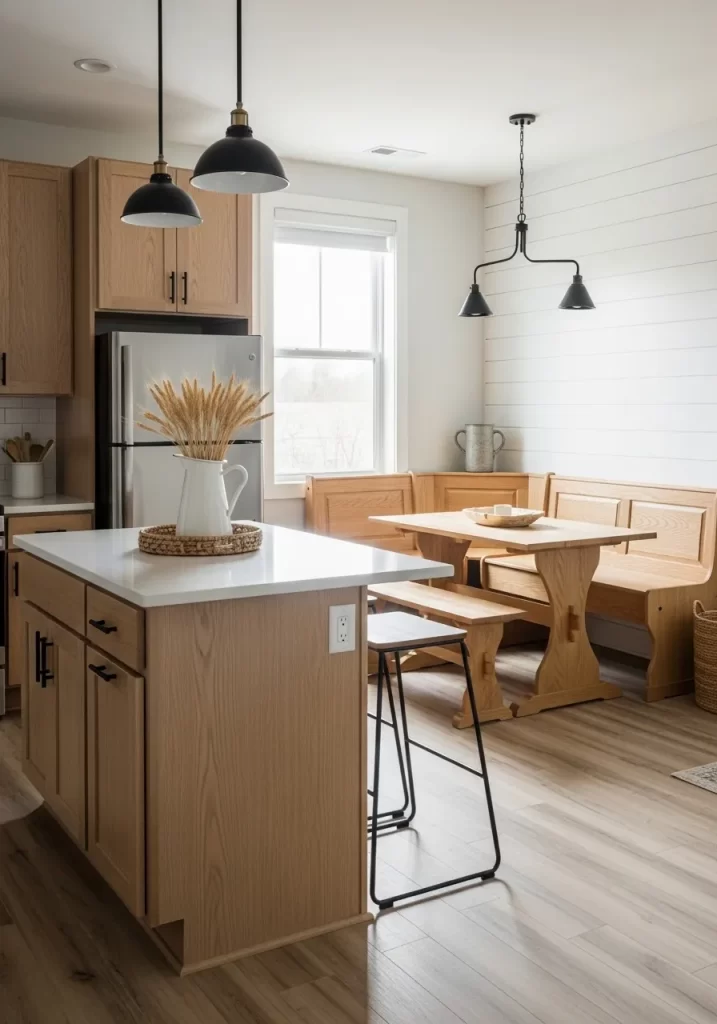
A corner breakfast nook is a brilliant space-saving solution for small apartment kitchens. This modern farmhouse aesthetic uses light oak wood and white shiplap walls to create a bright, clean atmosphere. The built-in wooden benches provide plenty of seating while tucked neatly into the corner.
Black pendant lights offer a sharp, industrial contrast to the warm wood tones of the furniture. A white pitcher filled with dried wheat or wildflowers adds a simple, rustic charm to the kitchen island. The open shelving and clean lines keep the kitchen looking organized and spacious. This design is for those who want a cozy, traditional home feel with a contemporary, high-contrast twist.
Material Required List
- L-shaped wooden corner bench
- Rectangular oak pedestal table
- Black metal pendant lights
- White shiplap wall panels or wallpaper
- White ceramic pitcher and dried wheat stems
Equipment Required List
- Power drill and wood screws
- Level tool
- Caulk gun (if installing shiplap)
- Measuring tape
- Stud finder
DIY Instruction Step by Step
- Measure your kitchen corner to ensure the L-shaped bench will fit without blocking doorways.
- Install white shiplap panels on the two corner walls to create a textured farmhouse backdrop.
- Assemble the wooden bench and secure it to the wall studs for maximum stability.
- Place your oak pedestal table in the center of the bench area so people can slide in easily.
- Mark the ceiling for your pendant lights, centering them over the table and island.
- Install the black pendant lights, making sure they hang at the same height for symmetry.
- Fill a white ceramic pitcher with dried wheat and place it on a woven tray on your island.
- Add some black hardware to your kitchen cabinets to match the new pendant lights.
- Place a few neutral-toned pillows on the bench to make the seating more comfortable.
15 Industrial Brick Warehouse Loft

Industrial aesthetics embrace raw materials like exposed brick and metal ductwork to create a cool, urban vibe. A cognac leather sofa adds warmth and a touch of luxury to the rugged concrete floors. The large multi-bulb spider chandelier serves as a dramatic centerpiece that provides ample light for the entire living area.
Open metal garment racks are a stylish way to store clothes when your apartment lacks closet space. A grey shag rug softens the hard floor and defines the seating area in an open-concept layout. This look is all about celebrating the unfinished beauty of a space, making it feel like a trendy downtown warehouse conversion.
Material Required List
- Cognac leather rectangular sofa
- Industrial pipe and wood garment rack
- Black multi-arm spider chandelier
- Grey plush shag area rug
- Glass-top coffee table with metal pipe legs
Equipment Required List
- Allen wrench and screwdriver
- Step ladder
- Drill and heavy-duty wall anchors
- Glass cleaner
DIY Instruction Step by Step
- Lay the grey shag rug in the center of your living space to ground the industrial elements.
- Assemble your cognac leather sofa and position it against the most prominent brick wall.
- Assemble the industrial garment rack and place it in the bedroom zone for an open closet look.
- Secure the garment rack to the wall using anchors to prevent it from leaning.
- Install the spider chandelier in the center of the ceiling to spread light across the room.
- Adjust the arms of the chandelier so they point in different directions for a custom look.
- Place the glass-top coffee table on the rug, making sure the metal legs match the garment rack.
- Organize your clothes on the rack by color to keep the open storage looking tidy.
- Add a few black metal side tables to hold books or small industrial-style lamps.
16 Moody Midnight Blue Lounge
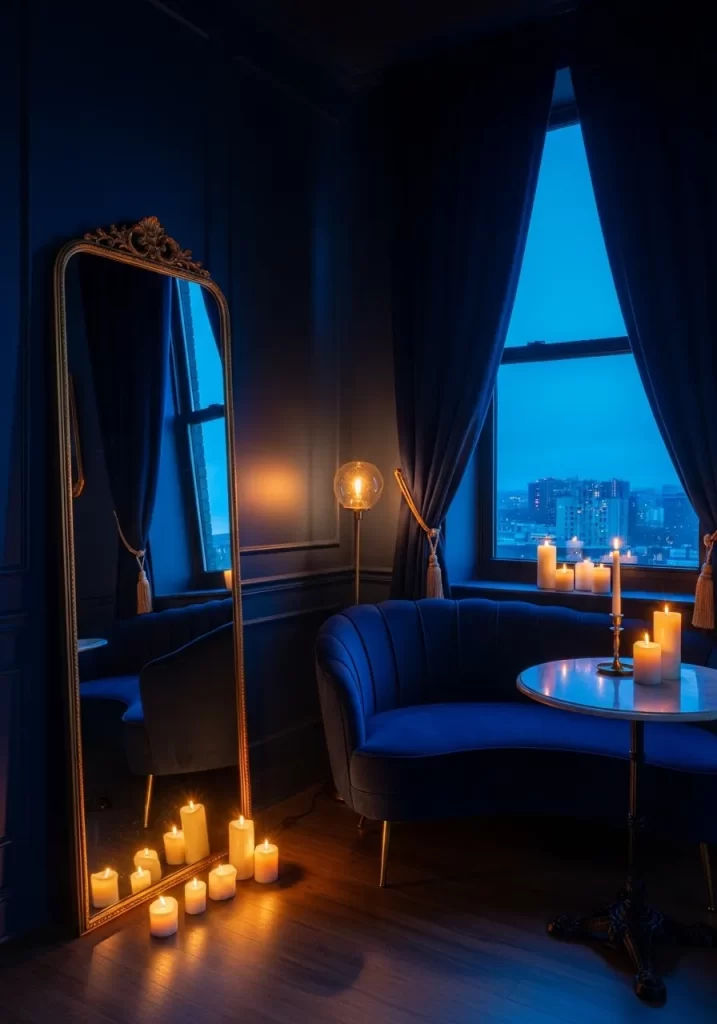
Deep blue walls create a dramatic and intimate aesthetic that is perfect for evening relaxation. A curved velvet sofa in matching sapphire blue blends into the wall, which actually makes the corner feel less interrupted. The gold-framed floor mirror adds a splash of luxury and reflects the warm glow of many candles.
Grouping candles of various heights on the floor and tables creates a soft, flickering light that overhead bulbs cannot replicate. A small marble-topped bistro table provides a sophisticated spot for a glass of wine or a book. This look is for the person who wants their apartment to feel like a high-end, secretive jazz club. The contrast between the cool blue shadows and the warm golden flames is breathtaking.
Material Required List
- Matte midnight blue interior paint
- Curved sapphire blue velvet sofa
- Ornate gold floor-length mirror
- Small marble-topped bistro table
- Bulk pack of white pillar and taper candles
Equipment Required List
- Paint rollers and painters tape
- Level tool
- Soft cloth for marble and glass
- Lighter or long matches
DIY Instruction Step by Step
- Paint your walls a deep, matte midnight blue to create a moody, immersive environment.
- Position your curved velvet sofa in the corner, leaving enough room for a side table.
- Lean the ornate gold mirror against the wall where it can reflect the most light from the window.
- Place the marble bistro table next to the sofa to act as a chic, compact surface.
- Arrange clusters of white pillar candles on the floor near the mirror and on the table.
- Use different heights of candles to create a more natural and interesting light display.
- Add a small gold floor lamp in the corner for when you need more focused light.
- Keep the curtains a similar blue shade to create a continuous wrapped feeling in the room.
- Light all the candles in the evening to transform the space into a cozy, glowing retreat.
17 Minimalist Art Gallery Studio
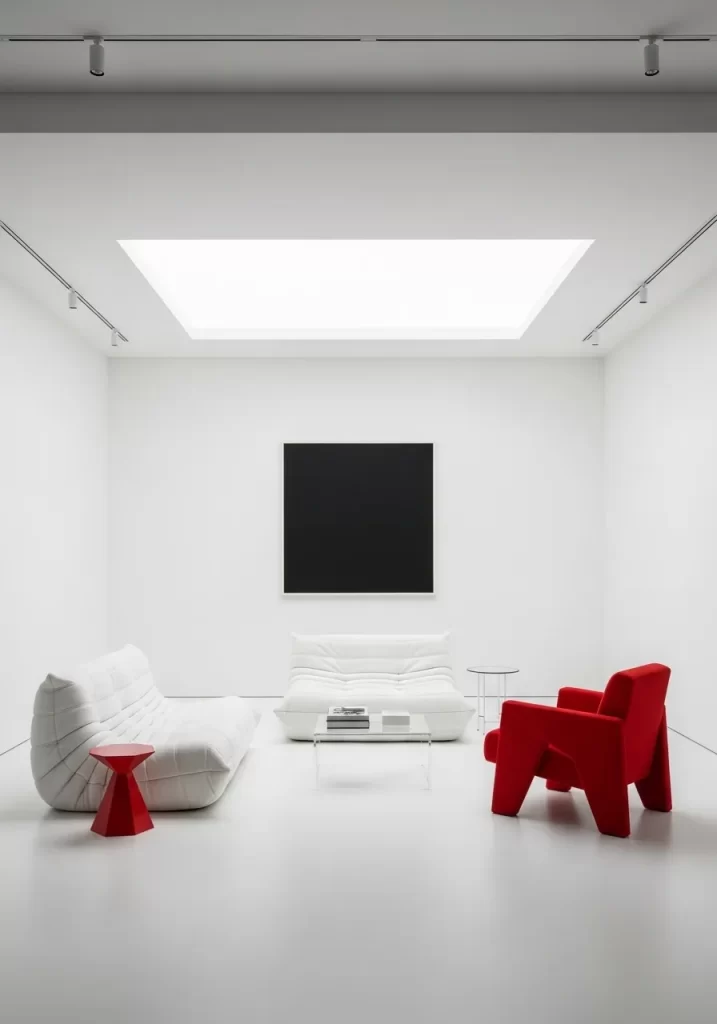
A purely white aesthetic can make even the smallest studio feel like a vast, open art gallery. This look uses white modular sofas that sit low to the ground, keeping the vertical space completely clear. A single, large black square painting provides a bold, minimalist focal point that demands attention.
Splashes of bright red, like a geometric side table or a sculptural armchair, add energy to the sterile environment. A large skylight or bright track lighting ensures the space remains crisp and shadow-free. This design is about precision, using a few high-quality pieces rather than many small decorations. It is a brilliant strategy for keeping a tiny apartment feeling organized and profoundly modern.
Material Required List
- White low-profile modular sofa sections
- Red sculptural accent chair
- Large canvas painted solid matte black
- Red geometric side table
- Clear acrylic coffee table
Equipment Required List
- Measuring tape
- Level tool
- Hammer and heavy-duty picture hook
- Cleaning cloth for white surfaces
DIY Instruction Step by Step
- Paint all your walls and your ceiling a crisp, pure white to maximize the feeling of space.
- Center the large black canvas on the main wall, making sure it is perfectly level.
- Arrange the white modular sofa sections in a U-shape facing the artwork.
- Place the red sculptural chair opposite the sofa to create a bold color balance.
- Set the clear acrylic coffee table in the center so it does not block the view of the floor.
- Position the red geometric side table next to the white sofa for a convenient pop of color.
- Install track lighting along the ceiling to mimic the look of a professional gallery.
- Point the lights toward the black art and the red chair to highlight the design features.
- Keep all clutter out of sight to maintain the clean, minimalist aesthetic of the room.
18 Pastel Pop Tropical Corner

Mixing bright pastels with tropical greenery creates a fun, high-energy aesthetic for a small apartment. A soft peach wall serves as a warm background for a vibrant turquoise shell-shaped chair. The large Monstera plant in a white tripod pot brings a necessary touch of life and nature to the corner.
A neon wall sign adds a modern, playful glow that is perfect for entertaining. The silver bar cart is a functional and stylish way to store colorful glassware without needing a full cabinet. A circular rug with teal and white rings ties the furniture together and defines the lounge area. This look is all about joy, personality, and embracing a retro-tropical vibe.
Material Required List
- Turquoise velvet shell chair
- Large Monstera Deliciosa plant
- White tripod plant stand
- Silver two-tier rolling bar cart
- Pink or white neon wall sign
- Teal and white circular striped rug
Equipment Required List
- Drill and wall anchors for neon sign
- Screwdriver for bar cart assembly
- Watering can
- Measuring tape
DIY Instruction Step by Step
- Paint one corner of your room in a soft peach or coral shade to create a warm pop wall.
- Lay the circular teal rug in front of the peach wall to define the seating area.
- Place your turquoise shell chair on the rug, facing toward the center of the room.
- Mount your neon sign on the peach wall at eye level, making sure to hide the power cord.
- Assemble the silver bar cart and place it next to the chair, filling it with colorful bottles and glasses.
- Place your Monstera plant in the white tripod stand and position it behind the chair.
- Fluff the leaves of the plant so they fan out and fill the corner space.
- Add a small wooden coffee table in front of the chair for a touch of natural warmth.
- Light the neon sign in the evening to create a fun, sunset-like atmosphere.
19 Japanese Minimalist Floating Bed
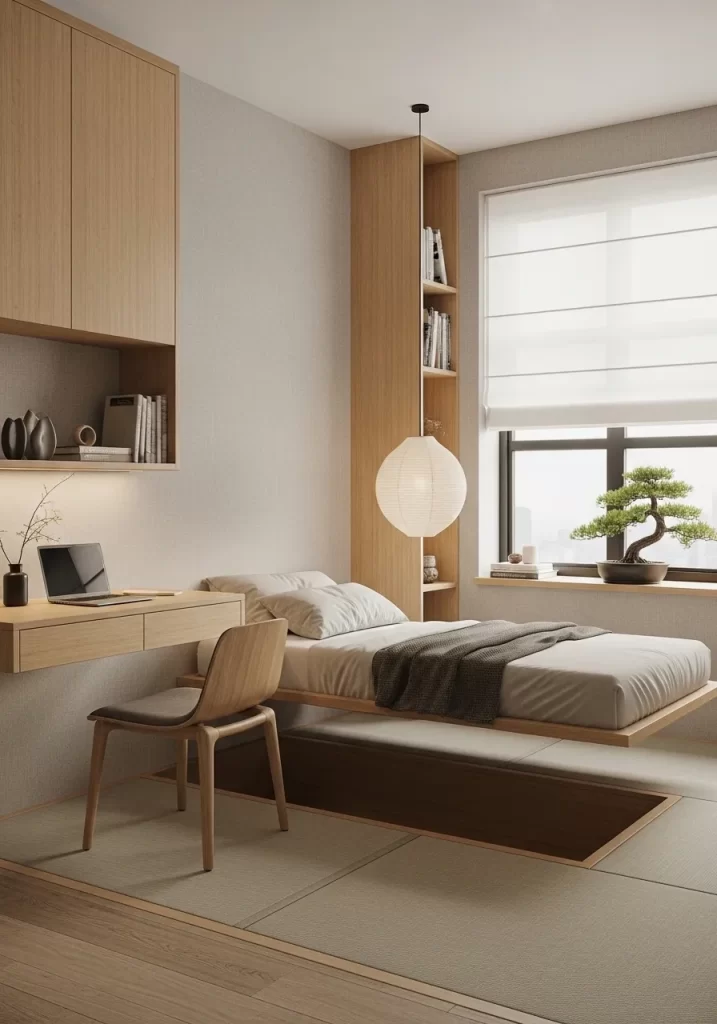
Japanese design is famous for making small spaces feel balanced and peaceful. This aesthetic uses a floating wooden bed frame that stays low to the ground to keep the room feeling open. The tatami-style floor mat adds texture and a traditional feel to a modern apartment.
Built-in wooden shelves and a hanging paper globe lamp provide soft, functional elements that do not overwhelm the space. A small bonsai tree on the windowsill brings a sense of discipline and natural beauty to the room. The neutral color palette and clean lines promote a restful environment, making it a perfect bedroom for a busy professional. This look proves that you can have everything you need in a tiny room without it feeling cluttered.
Material Required List
- Low-profile floating wooden bed frame
- Large paper globe pendant light
- Tatami-style woven floor mat
- Bonsai tree in a ceramic pot
- Light-colored wood floating desk and chair
Equipment Required List
- Power drill and wall anchors
- Level tool
- Measuring tape
- Step ladder
- Allen wrench
DIY Instruction Step by Step
- Clear your bedroom floor and lay down the tatami mat to create a textured foundation.
- Assemble your low-profile bed frame and position it in the center of the mat.
- Install a floating wooden desk on the wall next to the bed to save floor space.
- Use a level to make sure the desk is perfectly horizontal before securing it to the studs.
- Hang the paper globe lamp from the ceiling so it sits over the center of the bed.
- Place a small wooden chair at the desk, choosing a design with thin, clean lines.
- Position your bonsai tree on the window ledge where it will receive plenty of light.
- Install tall, narrow wooden bookshelves in the corner to hold your books and small decor.
- Keep your bedding in neutral tones like beige or light grey to match the natural wood.
20 Grand Library Reading Room

If you have high ceilings, utilize them by creating a floor-to-ceiling library aesthetic. This look uses a massive wooden shelving unit that covers an entire wall, turning your book collection into a stunning piece of decor. A rolling library ladder adds a touch of old-world charm and makes the top shelves accessible.
A tufted cognac leather sofa and a Persian rug create a classic, sophisticated atmosphere for reading. Small gold side tables are perfect for holding a glass of whiskey or a lamp. The contrast between the red brick wall and the dark wood shelves gives the room a rich, historical feel. This design is a dream for book lovers who want to maximize their storage and style in a small city apartment.
Material Required List
- Custom or modular floor-to-ceiling wooden bookshelves
- Rolling library ladder and track kit
- Tufted cognac leather Chesterfield sofa
- Large ornate Persian-style area rug
- Small round gold-finish side table
Equipment Required List
- Power drill and long wood screws
- Level tool
- Stud finder
- Step ladder
- Measuring tape
DIY Instruction Step by Step
- Measure your entire wall height and width to plan your bookshelf layout.
- Install the bookshelf units, securing them firmly to the wall studs to prevent tipping.
- Attach the metal track for the library ladder along the top edge of the shelves.
- Hang the rolling ladder on the track and test it to make sure it moves smoothly.
- Lay the large Persian rug in front of the shelves to define the reading area.
- Position the cognac leather sofa on the rug, facing toward the bookshelves.
- Fill the shelves with your books, arranging some horizontally and some vertically for variety.
- Place the gold side table next to the sofa and add a small, warm-toned reading lamp.
- Add a soft wool throw blanket to the sofa for extra comfort during long reading sessions.
21 Sunset Glow Futuristic Lounge
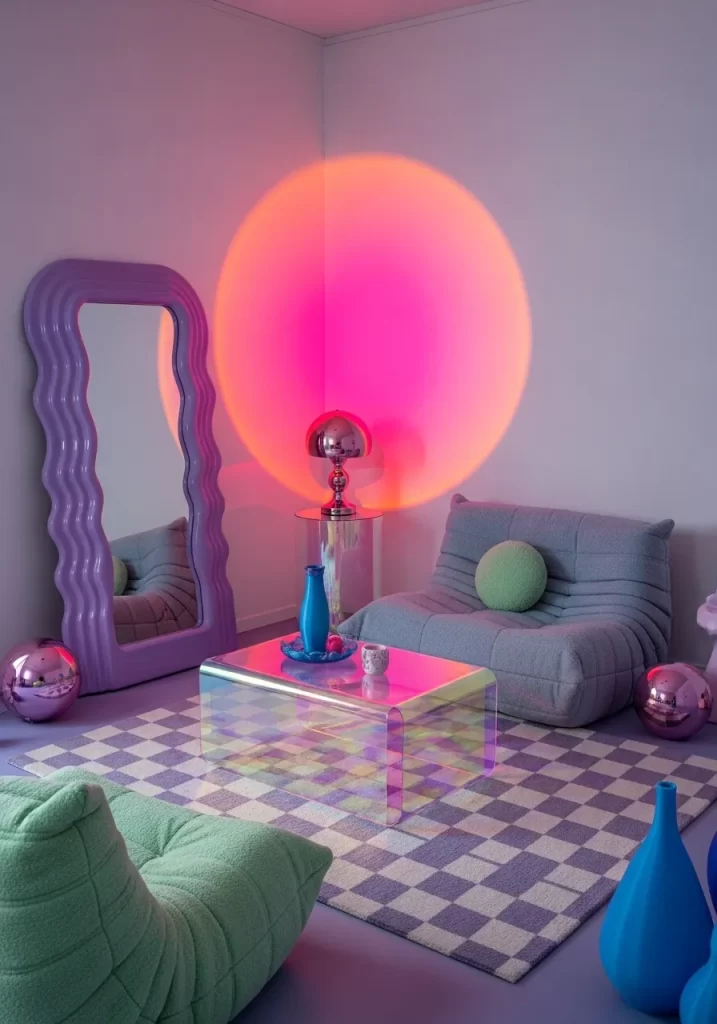
Bring the colors of a digital sunset into your living room with this futuristic aesthetic. A sunset projection lamp creates a massive, glowing orb of pink and orange light that transforms a plain corner into a dreamscape. The wavy purple floor mirror adds a surreal, liquid-like texture to the room.
Iridescent and clear acrylic furniture keeps the space feeling light and allows the colorful light to pass through. A grey modular lounge chair provides a soft, neutral spot to sit while you soak in the neon vibes. This design is for the apartment dweller who wants a high-tech, artistic atmosphere that feels straight out of a sci-fi movie. It utilizes light as a main decoration, which is a brilliant way to save physical floor space.
Material Required List
- Sunset projection lamp
- Wavy purple floor-length mirror
- Iridescent acrylic coffee table
- Grey modular low-profile lounge chair
- Purple and white checkered rug
Equipment Required List
- Microfiber cloth for acrylic surfaces
- Glass cleaner
- Level tool
- Measuring tape
DIY Instruction Step by Step
- Lay your checkered rug in the corner of the room to set a playful, geometric foundation.
- Lean the wavy purple mirror against the wall, ensuring it reflects the main part of the room.
- Place the grey modular lounge chair on the rug, angled toward the corner.
- Position the iridescent acrylic coffee table in front of the chair.
- Set up your sunset projection lamp on a small stand or the coffee table.
- Aim the lamp at the corner where two walls meet to create the largest light effect.
- Experiment with the distance of the lamp from the wall to find the best color intensity.
- Add a few colorful glass vases to the coffee table to catch the light reflections.
- Dim all other lights in the room to let the sunset glow become the main focus.
22 Living Moss Wall Garden
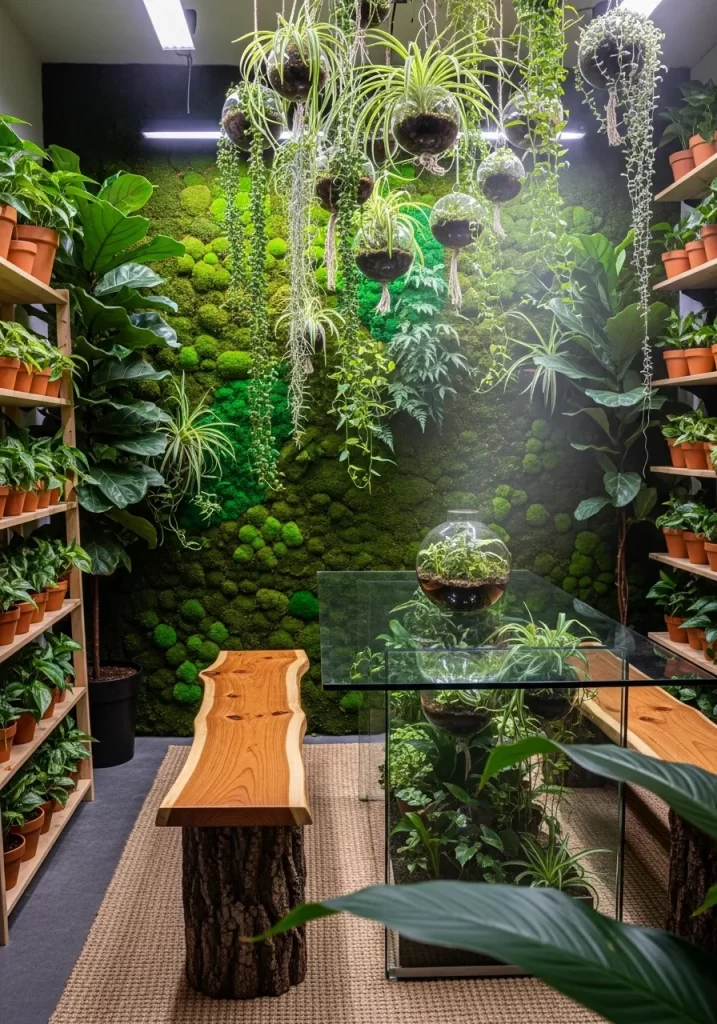
A vertical moss wall is the ultimate way to bring nature into a small apartment without losing floor space. This botanical aesthetic uses lush green moss and potted plants to create a living tapestry that purifies the air. Large glass dining tables and wooden benches keep the environment feeling raw and organic.
Hanging glass terrariums filled with spider plants add a whimsical, floating element to the kitchen or dining area. The contrast between the deep green moss and the light wood benches makes the room feel like a secret forest clearing. This design is excellent for creating a peaceful, oxygen-rich environment in the middle of a busy city.
Material Required List
- Preserved reindeer moss or sheet moss
- Large wooden frame or plywood backing
- Industrial strength spray adhesive
- Raw wood benches with log-style legs
- Glass terrariums and hanging twine
Equipment Required List
- Glue gun
- Measuring tape
- Level tool
- Scissors
- Drill and ceiling hooks
DIY Instruction Step by Step
- Measure the wall area where you want to install your living moss feature.
- Apply preserved moss to a wooden frame or plywood backing using spray adhesive or a glue gun.
- Mix different shades of green moss to create a natural, textured look on the board.
- Mount the finished moss panel securely to your wall using heavy-duty brackets.
- Place your raw wood benches along a glass table to keep the natural theme consistent.
- Drill hooks into the ceiling above your table for the hanging terrariums.
- Fill the glass terrariums with small plants like succulents or spider plants.
- Hang the terrariums at varying heights using twine or clear fishing line.
- Mist your hanging plants regularly, but leave the preserved moss wall alone as it requires no water.
23 Brutalist Concrete Minimalist Living

Brutalist aesthetics celebrate the raw, industrial beauty of unfinished concrete and sharp lines. This look uses a grey modular sofa that mimics the texture and color of the walls for a seamless, architectural feel. A cognac leather ottoman provides a single, bold pop of warmth against the cool grey environment.
Minimalist black floor lamps and concrete coffee tables reinforce the less is more philosophy of this design. Large windows without curtains allow natural light to highlight the subtle textures of the concrete. This aesthetic is for the person who loves clean, structural spaces that feel solid and permanent. It is a powerful way to make a small studio feel grand and intentional.
Material Required List
- Grey modular section sofa
- Cognac leather tufted ottoman
- Rectangular concrete or stone coffee table
- Tall black metal arch floor lamp
- Minimalist black ceramic bowls
Equipment Required List
- Level tool
- Measuring tape
- Soft cloth for stone surfaces
- Screwdriver
DIY Instruction Step by Step
- Clear your living area to allow the architectural lines of the room to stand out.
- Position the grey modular sofa sections to follow the shape of your longest wall.
- Place the concrete coffee table in the center of the seating area.
- Set the cognac leather ottoman opposite the sofa to provide a warm color contrast.
- Install the black arch floor lamp behind the sofa so it curves over the coffee table.
- Use a level to ensure any wall-mounted elements or low tables are perfectly straight.
- Arrange a few black ceramic bowls on the table for a touch of minimalist decor.
- Keep the floors bare or use a very thin, grey rug to maintain the industrial feel.
- Ensure your windows are clean to let in the maximum amount of natural light.
24 Equestrian Scholarly Bedroom
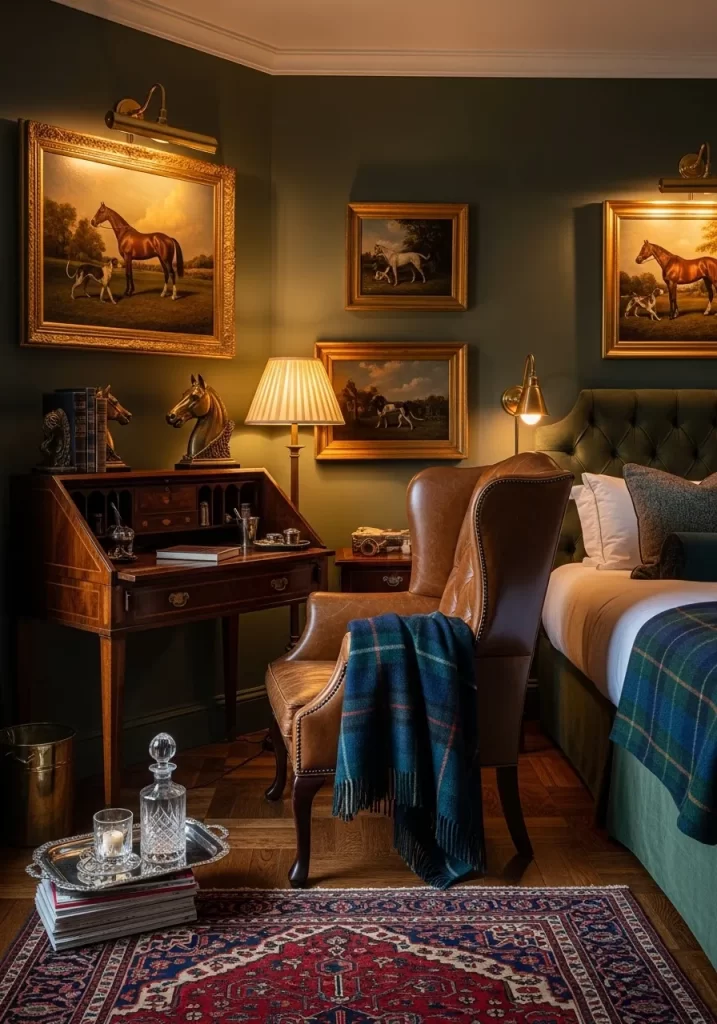
This aesthetic combines the cozy feel of a library with the classic elegance of an equestrian lodge. Deep green walls and gold-framed paintings of horses create a rich, historical atmosphere. A vintage wooden secretary desk serves as a functional workspace that doubles as a beautiful antique centerpiece.
Plaid wool blankets and leather wingback chairs add layers of texture and warmth to the room. Brass lamps and silver trays provide a touch of shine that makes the dark colors feel sophisticated rather than gloomy. This look is perfect for anyone who loves old-world charm and wants their bedroom to feel like a high-end country estate.
Material Required List
- Dark forest green interior paint
- Vintage wooden secretary desk
- Brown leather wingback chair
- Plaid wool throw blanket in navy and green
- Multiple gold-framed horse or nature paintings
Equipment Required List
- Paint rollers and brushes
- Hammer and picture nails
- Level tool
- Measuring tape
- Brass polish
DIY Instruction Step by Step
- Paint your bedroom walls a deep forest green for a moody, scholarly foundation.
- Place the vintage secretary desk in a corner near a window for the best light.
- Position the leather wingback chair next to the desk to create a cozy reading nook.
- Drape the plaid wool blanket over the chair for a touch of equestrian style.
- Mark the wall above the bed for a gallery of gold-framed paintings.
- Use a level to hang the paintings in an organized, slightly asymmetrical pattern.
- Place a brass lamp on the desk and another on the nightstand for warm, layered lighting.
- Arrange a silver tray on the desk to hold small items like pens or a glass of water.
- Use brass polish to keep your lamps and hardware shining bright against the dark walls.
25 Sunlit Mediterranean Alcove
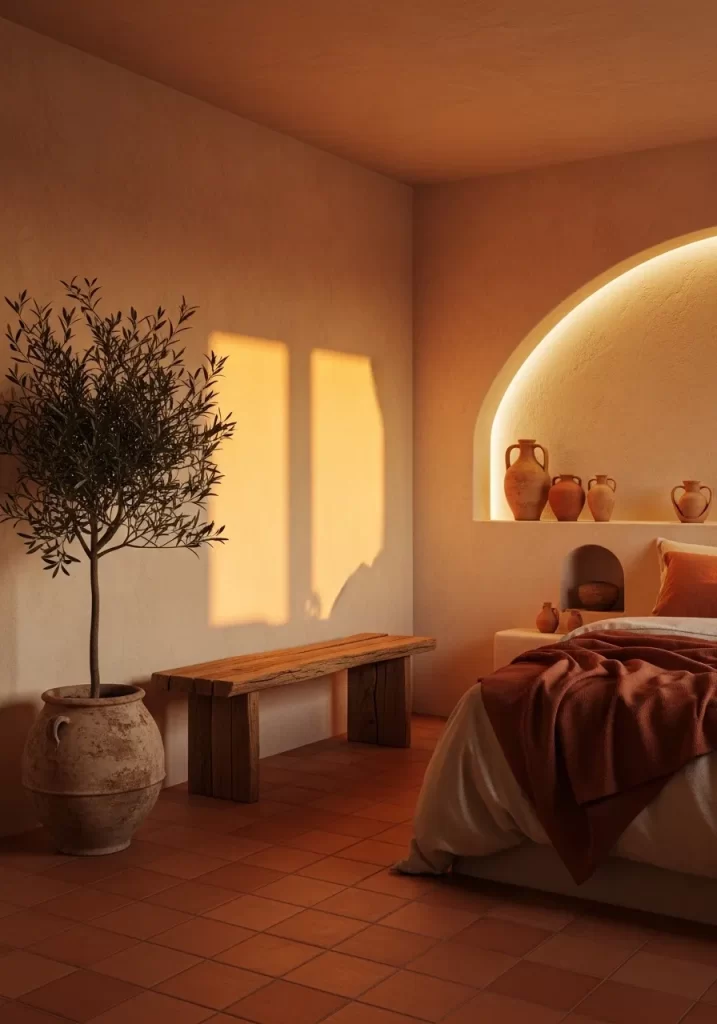
Capture the warmth of a Mediterranean summer with soft terracotta floors and arched architectural details. This aesthetic uses built-in benches and alcoves to maximize space in a small, sun-drenched room. A large olive tree in a rustic pot brings a touch of the outdoors into your living or sleeping area.
Natural sunlight creates beautiful shadows against the textured walls, making the room feel alive and changing throughout the day. Minimalist wooden benches and terracotta vases keep the focus on the simple, organic beauty of the materials. This design is excellent for creating a peaceful, vacation-like vibe in a small city apartment.
Material Required List
- Terracotta floor tiles or a large terracotta-colored rug
- Natural wood rustic bench
- Large clay or terracotta floor vase
- Potted indoor olive tree
- Multiple small terracotta jars and bowls
Equipment Required List
- Tile adhesive (if installing floors)
- Measuring tape
- Level tool
- Watering can
- Cleaning cloth for clay surfaces
DIY Instruction Step by Step
- Lay terracotta tiles or a large earthy rug to create a warm, Mediterranean foundation.
- Position a rustic wooden bench against your main wall to provide simple seating.
- Place a large potted olive tree in the corner where it can receive direct sunlight.
- Arrange a collection of terracotta jars in a built-in alcove or on a low shelf.
- Group the jars in odd numbers and varying sizes to create a natural, curated look.
- Use a level to ensure the bench and any shelving are perfectly straight.
- Keep the walls a soft cream or white to let the warm terracotta colors stand out.
- Place a few neutral linen pillows on the bench for a touch of soft comfort.
- Open the curtains fully to allow the sun to highlight the natural textures of the clay and wood.
26 Glamorous Obsidian Lounge
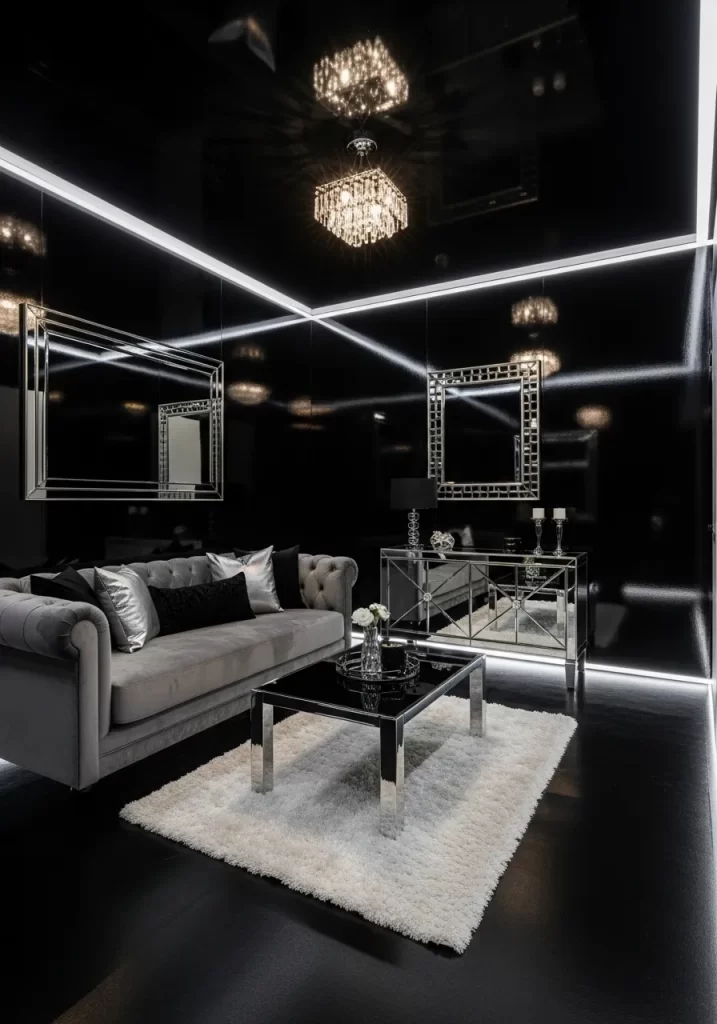
Dark and dramatic, this obsidian-inspired aesthetic uses black lacquered walls and mirrored furniture to create a high-fashion look. A grey tufted sofa and a white shag rug provide a necessary contrast to the deep, dark environment. Crystal chandeliers and silver accents add a brilliant sparkle that makes the room feel expensive and curated.
Large silver-framed mirrors reflect the light and help a dark room feel much larger than it actually is. The combination of black, silver, and grey creates a timeless, sophisticated palette for entertaining guests. This design is for the person who wants their small apartment to feel like a luxury penthouse in the heart of the city.
Material Required List
- High-gloss black interior paint or wall panels
- Grey tufted velvet sofa
- Mirrored sideboard or console table
- Large white plush shag rug
- Small crystal chandelier or silver pendant light
Equipment Required List
- Paint rollers for high-gloss finishes
- Glass cleaner
- Level tool
- Measuring tape
- Drill and ceiling hooks
DIY Instruction Step by Step
- Apply high-gloss black paint to your walls to create a dramatic, reflective backdrop.
- Lay the white shag rug in the center of the room to provide a bright, soft contrast.
- Position the grey tufted sofa on the rug, facing toward the main mirror or TV.
- Place the mirrored sideboard against a black wall to double the visual space.
- Install a crystal chandelier in the center of the ceiling to act as a sparkling focal point.
- Hang large silver-framed mirrors on opposite walls to bounce light across the room.
- Arrange a few silver trays and white flowers on the mirrored table for a touch of glam.
- Use a level to ensure all mirrors and wall-mounted art are perfectly aligned.
- Keep all surfaces polished with glass cleaner to maintain the high-shine look.
27 Scandi Minimalist Bedside
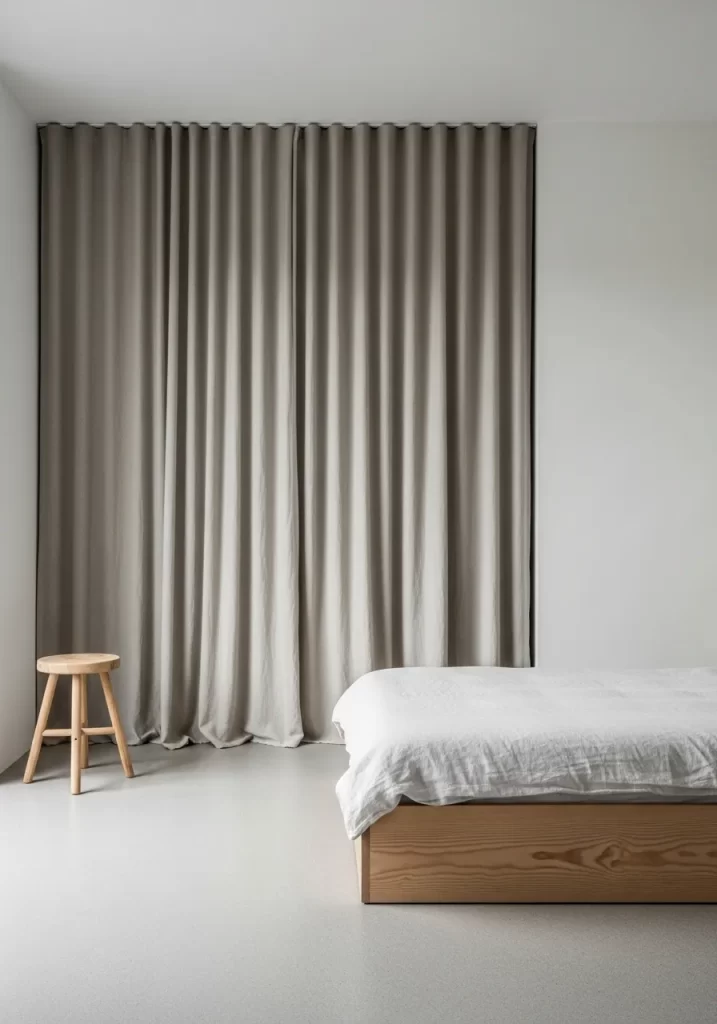
Scandinavian design is all about simplicity, functionality, and light. This aesthetic uses a soft grey curtain wall to create a clean, textured backdrop for a light wood bed. A simple wooden stool serves as a minimalist nightstand, saving space while providing a natural touch.
The white-on-white palette makes the room feel incredibly airy and large, even if it is a tiny studio. Natural wood elements, like the bed frame and stool, provide a warm contrast to the cool grey and white tones. This look is perfect for anyone who wants a clutter-free, peaceful bedroom that feels like a modern sanctuary.
Material Required List
- Light oak or pine platform bed frame
- Floor-to-ceiling light grey linen curtains
- Simple wooden three-legged stool
- White linen bedding set
- Tension rod or ceiling track for curtains
Equipment Required List
- Drill and wall anchors
- Measuring tape
- Level tool
- Steamer for linen curtains
DIY Instruction Step by Step
- Install a ceiling track or tension rod across the entire wall behind your bed.
- Hang floor-to-ceiling light grey linen curtains to create a soft, textured feature wall.
- Use a steamer to remove any wrinkles from the curtains for a clean, designer look.
- Assemble your light wood bed frame and position it in the center of the curtain wall.
- Place the wooden stool next to the bed to act as a compact, minimalist nightstand.
- Dress the bed with crisp white linen sheets and a matching duvet.
- Use a level to make sure the bed and stool are sitting flat on the floor.
- Keep the rest of the room white and clutter-free to maintain the Scandi vibe.
- Add a single small plant or a candle to the stool for a tiny touch of personality.
28 Pop Art Candy Shop Living Room

This high-energy aesthetic uses the bold colors and playful imagery of the Pop Art movement. Bright pink walls and a blue ceiling create a vibrant, candy shop atmosphere that is impossible to ignore. A large piece of comic-book-style art and a neon WOW sign serve as the energetic heart of the room.
Colorful modular shelving and a green jelly-like coffee table add to the fun, toy-like feel of the space. A black and white checkered floor provides a classic retro contrast to the explosion of color. This design is for the person who wants their apartment to be a place of pure joy, creativity, and bold self-expression.
Material Required List
- Bright pink interior paint
- Electric blue paint for the ceiling
- Neon pink WOW wall sign
- Large pop-art style canvas painting
- Colorful modular cube shelving unit
Equipment Required List
- Paint rollers and brushes
- Drill and wall anchors
- Level tool
- Measuring tape
- Screwdriver
DIY Instruction Step by Step
- Paint your main walls a vibrant pink and your ceiling a bold electric blue.
- Mark the center of your wall to hang the large pop-art canvas painting.
- Mount the neon sign next to the art to add a modern, glowing element.
- Assemble the colorful modular shelving and place it against a pink wall.
- Organize your favorite toys, books, or records on the shelves for a curated look.
- Lay a black and white checkered rug or floor tiles to ground the bright colors.
- Position an orange or bright-colored sofa in the center of the seating area.
- Place a transparent or colorful acrylic coffee table in front of the sofa.
- Use a level to ensure all wall-mounted art and signs are perfectly straight.
29 Safari Tent Luxury Bedroom
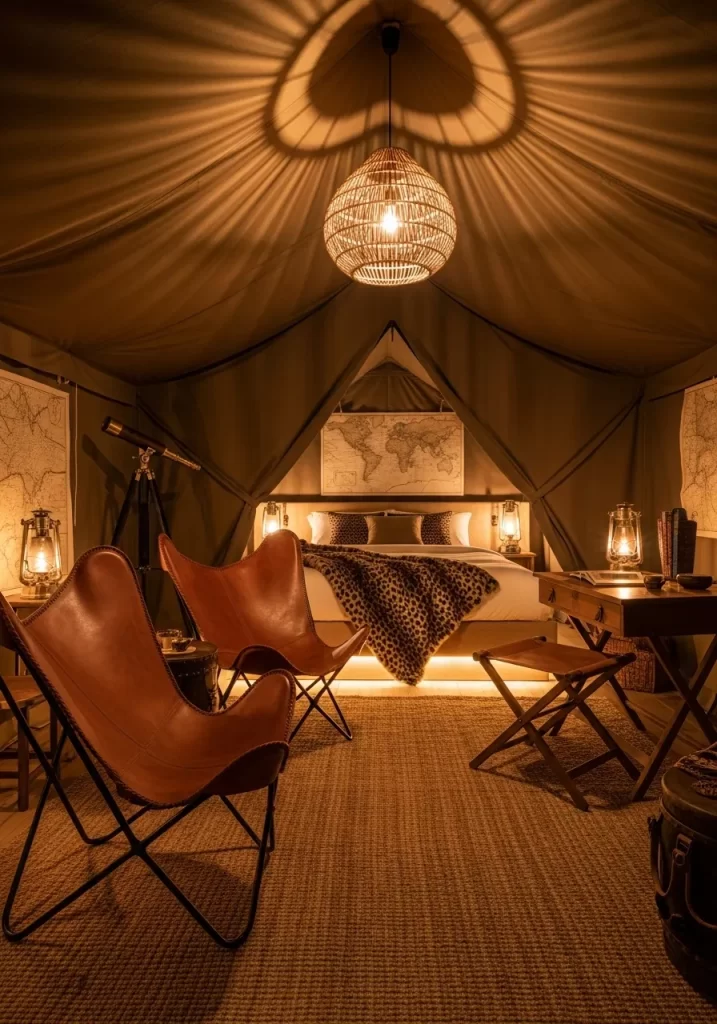
Turn your bedroom into a high-end safari retreat with draped canvas and warm, atmospheric lighting. This aesthetic uses khaki-colored fabric to create a tent effect over the bed, providing an instant sense of adventure and privacy. Brown leather butterfly chairs and leopard print rugs add to the wild, luxurious theme.
Multiple lanterns and a central woven light fixture create a soft, sunset-like glow that is incredibly relaxing. A vintage wooden desk and world map reinforce the explorer vibe of the room. This design is perfect for travelers who want their home to feel like a glamorous escape in the heart of the savannah.
Material Required List
- Large sheets of khaki or olive green canvas fabric
- Brown leather butterfly chairs
- Woven rattan globe pendant light
- Leopard or cheetah print throw blanket
- Set of decorative metal lanterns
Equipment Required List
- Ceiling hooks and heavy-duty twine
- Drill and wall anchors
- Measuring tape
- Level tool
- Scissors
DIY Instruction Step by Step
- Install hooks in the ceiling and use twine to drape canvas fabric over your bed like a tent.
- Secure the fabric to the walls at an angle to create a cozy, enclosed feeling.
- Hang the woven rattan pendant light in the center of the tent area.
- Position two leather butterfly chairs at the foot of the bed to create a lounge spot.
- Lay a leopard print blanket across the bed for a bold, safari-themed accent.
- Arrange several metal lanterns around the room, using battery-operated candles for safety.
- Place a vintage wooden desk in the corner and hang a large world map above it.
- Use a level to ensure the desk and map are perfectly positioned.
- Keep the lighting warm and low to maintain the intimate, campfire-like atmosphere.
30 Stealth Wealth Executive Lounge
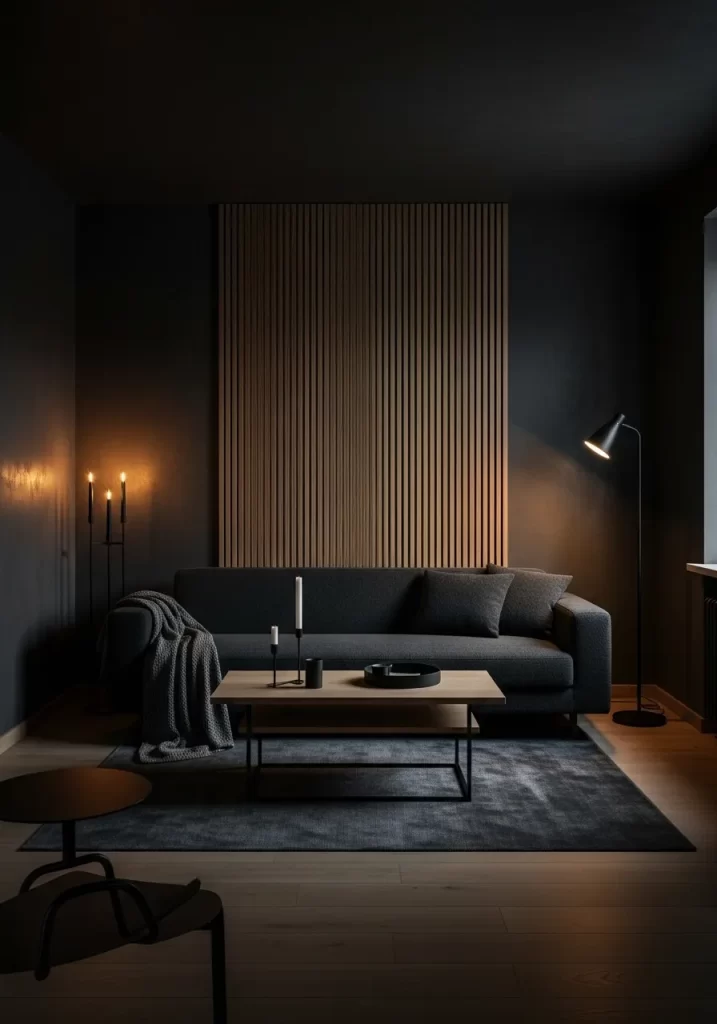
The stealth wealth aesthetic focuses on quiet luxury through high-quality materials and a muted, dark color palette. Charcoal walls and a matching dark sofa create a sophisticated, masculine environment that feels incredibly private. A vertical wooden slat panel adds a touch of natural warmth and serves as a refined architectural feature.
Minimalist black floor lamps and thin-legged wooden coffee tables keep the room looking sharp and organized. The focus here is on texture and lighting rather than bright colors or bold patterns. This design is for the person who values privacy, quality, and a space that feels both powerful and peaceful.
Material Required List
- Matte charcoal or deep grey interior paint
- Grey or black modern low-profile sofa
- Wooden slat wall paneling kit
- Minimalist black metal floor lamp
- Thin-legged oak coffee table
Equipment Required List
- Paint rollers and edging tools
- Level tool
- Measuring tape
- Adhesive or screws for wall panels
- Screwdriver
DIY Instruction Step by Step
- Paint your walls a deep, matte charcoal to create a sophisticated, quiet foundation.
- Measure the center of your main wall and install the wooden slat paneling vertically.
- Use a level to ensure every slat is perfectly straight as you secure them to the wall.
- Position your dark low-profile sofa in front of the new wood feature.
- Place the thin-legged coffee table in the center of the seating area.
- Set the black floor lamp in the corner to provide a soft, focused pool of light.
- Use a dark grey or black rug to define the lounge space without adding color.
- Arrange a few high-quality books and a single black ceramic tray on the table.
- Keep the room organized and free of clutter to maintain the stealth wealth look.
31 Earthy Organic Sculptural Corner

Embrace the beauty of imperfection with an organic aesthetic that focuses on raw textures and neutral tones. This corner uses a combination of smooth linen and rough stone to create a grounded, peaceful atmosphere. Arched wall niches provide a place to display sculptural ceramics without needing bulky furniture.
A low-profile daybed covered in grey linen offers a comfortable spot for daytime lounging. Using large, floor-sitting pillows encourages a relaxed, informal vibe in a small living area. The natural wood table with a gold-inlaid detail adds a touch of subtle luxury. This design is for someone who values slow living and a home that feels like a handcrafted retreat.
Material Required List
- Textured grey linen for a daybed or bench cover
- Collection of grey and beige floor cushions
- Large stoneware or ceramic floor vases
- Natural wood low-profile coffee table
- Set of small handmade clay bowls
Equipment Required List
- Sewing machine or fabric glue
- Measuring tape
- Level tool
- Soft cloth for cleaning stone and ceramics
DIY Instruction Step by Step
- Paint your walls a soft, matte grey or warm beige to set an earthy tone.
- If your room lacks built-in niches, install arched floating shelves to mimic the look.
- Position a low daybed or cushioned bench along a main wall for lounging.
- Layer several large floor cushions in front of the daybed to create extra seating.
- Place a natural wood coffee table in the center of the lounge area.
- Arrange large ceramic floor vases in the corners to add vertical texture.
- Place sculptural branches or a single dried lotus pod in one of the vases.
- Set handmade clay bowls on the table as simple, functional decorations.
- Use a level to ensure all shelving and the daybed are perfectly aligned.
32 Mid-Century Sunroom Urban Jungle
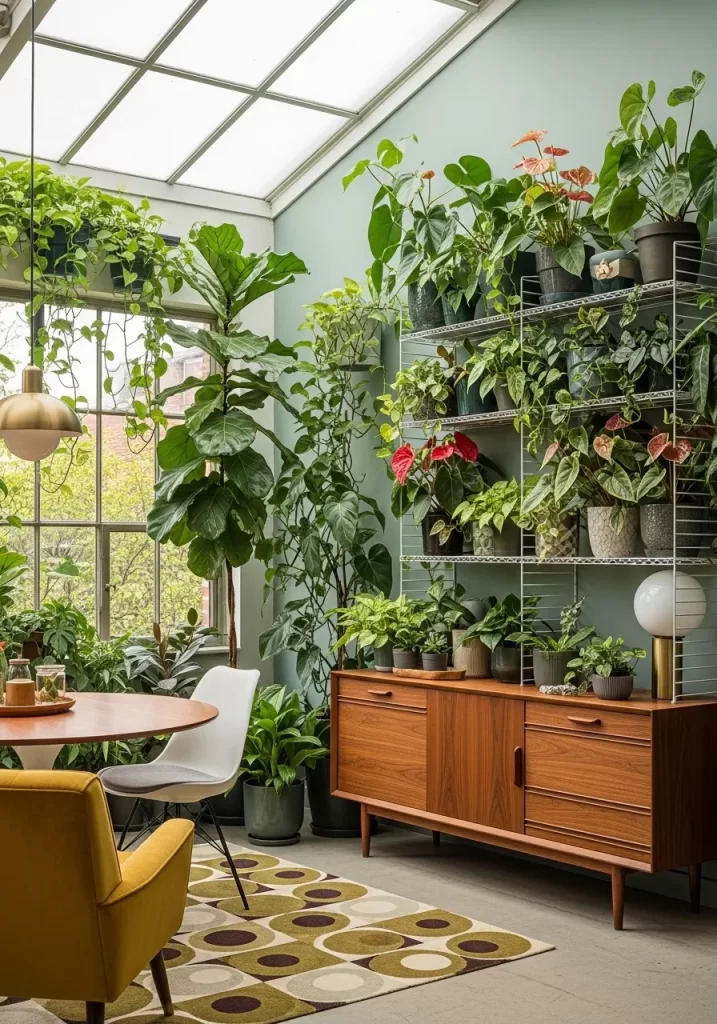
Small apartments with large windows can be turned into a lush urban jungle with a mid-century twist. This aesthetic uses a warm wood sideboard to ground the space while providing plenty of hidden storage. A vibrant yellow velvet armchair adds a sunny pop of color that pairs perfectly with deep green plants.
The wall-mounted wire shelving system allows you to display a massive collection of plants vertically. This strategy keeps your floor space clear while creating a stunning wall of living art. A geometric rug with mustard and brown tones ties the mid-century furniture and plants together. This design proves that you can have a massive garden even in a high-rise city apartment.
Material Required List
- Mid-century modern wood sideboard
- Yellow velvet sculptural armchair
- Wall-mounted white wire shelving system
- Mustard and brown geometric patterned rug
- Assortment of indoor plants
Equipment Required List
- Power drill and wall anchors
- Level tool
- Measuring tape
- Watering can
- Screwdriver for sideboard assembly
DIY Instruction Step by Step
- Position your wood sideboard under a large window to act as a plant base.
- Mount the white wire shelving system on the adjacent wall to create vertical height.
- Use a level to ensure the shelves are perfectly straight before securing them to the wall.
- Place your largest plants, like a Fiddle Leaf Fig, on the floor next to the sideboard.
- Fill the wire shelves with smaller, trailing plants like Pothos and colorful Anthuriums.
- Lay the geometric rug in the center of the room to define the seating area.
- Place the yellow velvet chair on the rug, angled toward the window view.
- Add a small brass lamp on the sideboard to highlight your plants in the evening.
- Group your plants according to their light needs to keep them healthy and vibrant.
33 Cyberpunk Neon Gaming Command
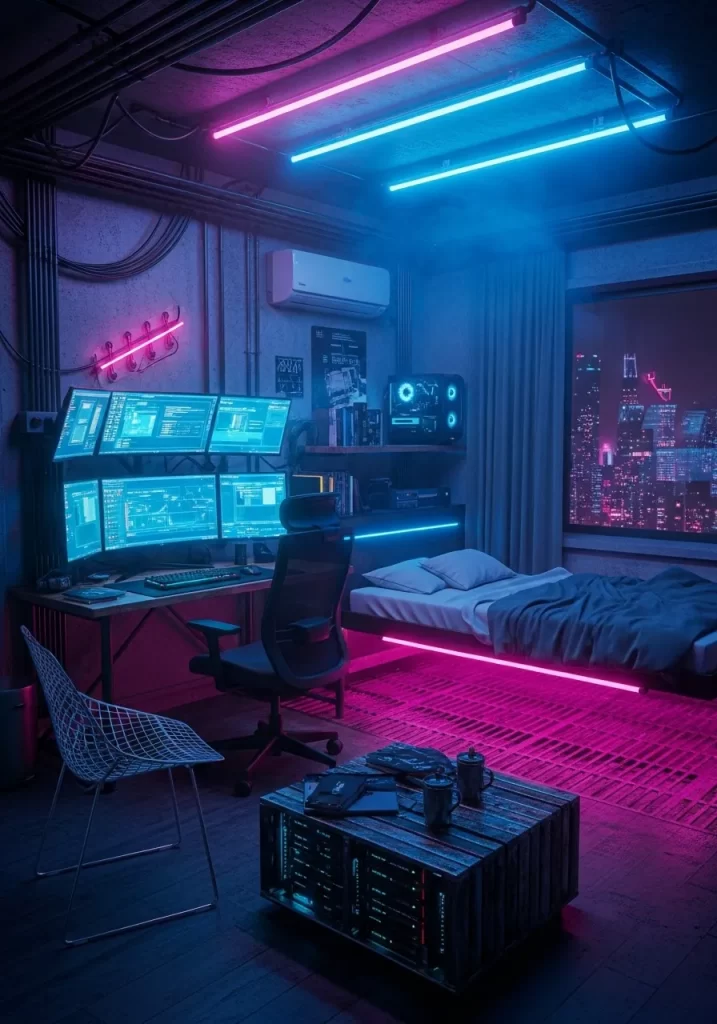
Turn a tiny studio apartment into a high-tech command center with a cyberpunk aesthetic. This look uses neon LED strips in pink and blue to define the space and provide a futuristic glow. A multi-monitor setup on a slim desk maximizes productivity while taking up minimal floor space.
The floating bed with pink under-lighting creates a dramatic effect and makes the room feel much larger. Industrial elements like exposed conduit and a corrugated metal coffee table reinforce the urban, tech-driven vibe. This design is for the digital native who wants a home that feels like a scene from a futuristic metropolis. It utilizes vertical lighting to draw the eye upward and create the illusion of height.
Material Required List
- Pink and blue LED neon strip lights
- Multi-monitor wall mounts or desk arm
- Low-profile bed frame with integrated lighting
- Industrial corrugated metal or wooden crate coffee table
- Mesh-back ergonomic gaming chair
Equipment Required List
- Drill and wall anchors for monitors
- Level tool
- Cable management clips
- Measuring tape
- Screwdriver
DIY Instruction Step by Step
- Install your neon LED strips along the ceiling and under your bed frame.
- Use cable clips to keep the light cords hidden and organized along the wall.
- Mount your monitors to the wall or a desk arm to free up valuable desk space.
- Position your slim desk against a wall with exposed conduit or dark paint.
- Place the low-profile bed in the center of the room, ensuring the neon under-light is visible.
- Assemble your industrial coffee table and place it in the lounge area.
- Set up your ergonomic chair at the desk, choosing a design with a sleek, tech look.
- Use a level to make sure the monitors and desk are perfectly aligned.
- Dim the main overhead lights and let the neon strips become the primary light source.
34 Shabby Chic Cottage Core Bedroom

Embrace the cozy, romantic charm of the cottage core aesthetic in your small bedroom. This look uses floral wallpaper and lace curtains to create a soft, feminine environment that feels like a rural retreat. A white-painted vintage bed frame and a matching side table add a touch of rustic elegance.
Dried flowers hanging from a wooden ladder and a crystal chandelier provide whimsical, antique-style decorations. Multiple crocheted rugs on the floor add layers of texture and warmth. This design is for the person who loves vintage tea sets, old-world lace, and a room that feels like a storybook cottage. It utilizes the height of the walls for hanging decor, which saves floor space in a tiny room.
Material Required List
- Floral patterned wallpaper or wall decals
- White-painted metal or wooden bed frame
- Lace or sheer white curtains
- Vintage wooden ladder for hanging dried flowers
- Collection of crocheted or lace-trimmed rugs
Equipment Required List
- Wallpaper smoothing tool
- Drill and curtain rod brackets
- Level tool
- Hammer and small nails
- Step ladder
DIY Instruction Step by Step
- Apply floral wallpaper to a single feature wall or throughout the entire room.
- Install a white curtain rod and hang lace curtains to soften the natural light.
- Assemble your white-painted bed frame and dress it with floral and lace bedding.
- Position a vintage wooden ladder against the wall and hang bundles of dried flowers from it.
- Mark the ceiling for a crystal chandelier and install it to act as a romantic centerpiece.
- Place a small white-painted side table next to the bed and add a floral tea set.
- Lay several small crocheted rugs on the floor in an overlapping pattern.
- Use a level to ensure the curtain rod and any wall-mounted art are straight.
- Add a basket of yarn or old books to the corner to complete the cottage core look.
35 Ultra-Modern Glass Penthouse Suite
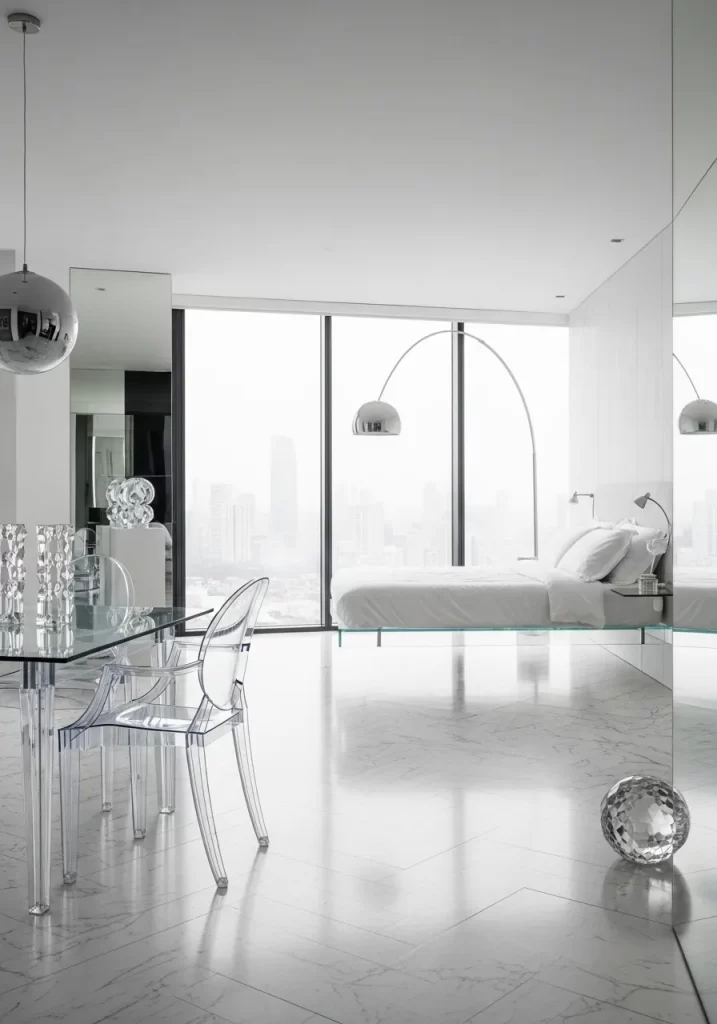
Small apartments can feel incredibly expansive if you embrace a purely modern, transparent aesthetic. This look uses mirrored walls and glass furniture to make the boundaries of the room virtually disappear. A floating glass bed and clear acrylic chairs keep the floor area completely visible.
The white marble floors reflect the bright city view, creating an airy, high-end atmosphere. A large chrome arch lamp provides focused light without the need for bulky floor lamps. This design is about extreme precision and a monochromatic palette that prioritizes light and reflection. It is the ultimate strategy for making a luxury studio feel like a grand penthouse suite.
Material Required List
- Mirrored wall panels or large floor-to-ceiling mirrors
- Floating glass bed frame with hidden supports
- Clear acrylic ghost dining chairs
- Large chrome or silver arch floor lamp
- White marble or high-gloss white floor tiles
Equipment Required List
- Glass cleaner and microfiber cloths
- Level tool
- Measuring tape
- Industrial strength mirror adhesive
- Screwdriver for furniture assembly
DIY Instruction Step by Step
- Install mirrored panels on one entire wall to instantly double the visual size of the room.
- Use a level to ensure the mirrors are perfectly vertical as you glue them in place.
- Position your floating glass bed in the center of the room to create an invisible furniture look.
- Set up your clear acrylic chairs around a glass dining or work table.
- Place the chrome arch lamp in the corner so it curves over the bed or table.
- Keep the walls and ceiling a bright, crisp white to maximize reflection.
- Use glass cleaner daily to keep all surfaces sparkling and free of fingerprints.
- Lay a thin, white rug under the bed if you need a touch of soft texture.
- Open all curtains to allow the natural light to bounce off the mirrors and glass.
36 Alchemist Dark Academia Study

If you love mystery and history, an alchemist-inspired dark academia look is perfect for your small study. This aesthetic uses floor-to-ceiling dark wood bookshelves and a vintage leather wingback chair to create a scholarly retreat. A green glass banker’s lamp and a brass telescope add to the antique laboratory feel.
Scattered old maps, quills, and leather-bound books turn your desk into a functional work of art. The brick fireplace and Persian rug add warmth and a sense of permanence to the room. This design is for the person who loves to get lost in a book and wants a home that feels like a secret museum. It utilizes the vertical space for storage, keeping the floor clear for comfortable seating.
Material Required List
- Dark wood floor-to-ceiling bookshelves
- Vintage brown leather wingback chair
- Green glass and brass banker’s lamp
- Large world map or architectural drawings
- Collection of old leather-bound books and glass vials
Equipment Required List
- Power drill and wall anchors
- Level tool
- Measuring tape
- Step ladder
- Hammer and nails for wall art
DIY Instruction Step by Step
- Install dark wood bookshelves along two walls to create a wrapped library feel.
- Secure the shelves to the wall studs to ensure they can hold the weight of your books.
- Position your leather wingback chair in the corner near a fireplace or a window.
- Place a vintage wooden desk in front of the shelves and add the banker’s lamp.
- Hang a large world map or a gallery of old sketches on the remaining wall.
- Use a level to ensure the map and any framed art are perfectly positioned.
- Arrange your books by size and add glass vials and quills to the shelves for texture.
- Lay a rich Persian-style rug in the center of the room to ground the dark furniture.
- Light a few candles in the evening to create a warm, mysterious atmosphere.
37 Retro Space Age Pop Lounge
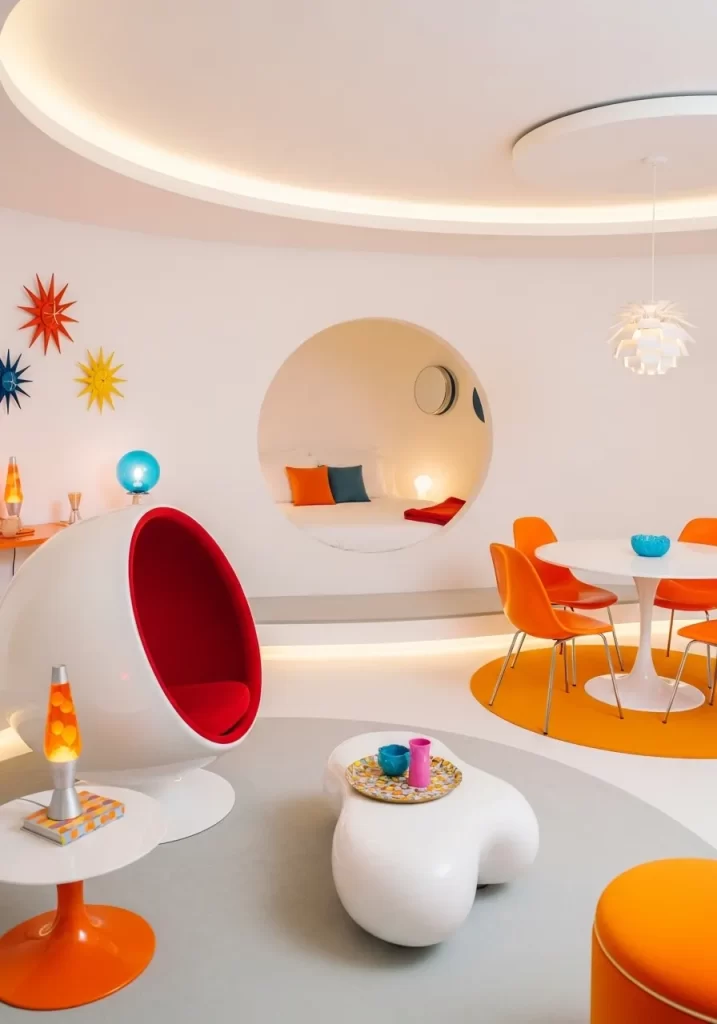
Small apartments become high-energy social hubs with a retro space age aesthetic. This look uses white curved furniture and bright orange accents to create a fun, futuristic vibe. The pod chair with a red interior serves as a dramatic centerpiece that offers a cozy, private spot to sit.
A circular wall cutout provides a view of the bedroom, making the apartment feel more connected and open. The glowing LED lights under the furniture and the lava lamps add a playful, psychedelic touch. This design is about bold shapes and high-contrast colors, making it perfect for the person who loves 1960s futurism. It utilizes circular forms to soften the sharp corners of a small, rectangular room.
Material Required List
- White spherical pod chair with red velvet interior
- Bright orange molded plastic dining chairs
- White pedestal dining table
- Orange lava lamp and retro wall clock
- Circular white coffee table
Equipment Required List
- Level tool
- Measuring tape
- Screwdriver for table assembly
- Step ladder
- Soft cloth for cleaning plastic surfaces
DIY Instruction Step by Step
- Paint your walls a crisp white to make the bright orange accents pop.
- If your walls allow, create a circular cutout to open up the view between rooms.
- Position your white pod chair in the center of the lounge area to act as a focal point.
- Set up the white pedestal table and surround it with orange plastic chairs.
- Install a circular white pendant light over the dining table for a cohesive look.
- Place an orange lava lamp on a side table to add a retro, glowing element.
- Use a level to ensure any wall-mounted clocks or art are perfectly straight.
- Lay a circular orange rug under the dining table to define that specific zone.
- Keep the furniture surfaces polished to maintain the sleek, space-age aesthetic.
38 Bohemian Jewel Tone Sanctuary
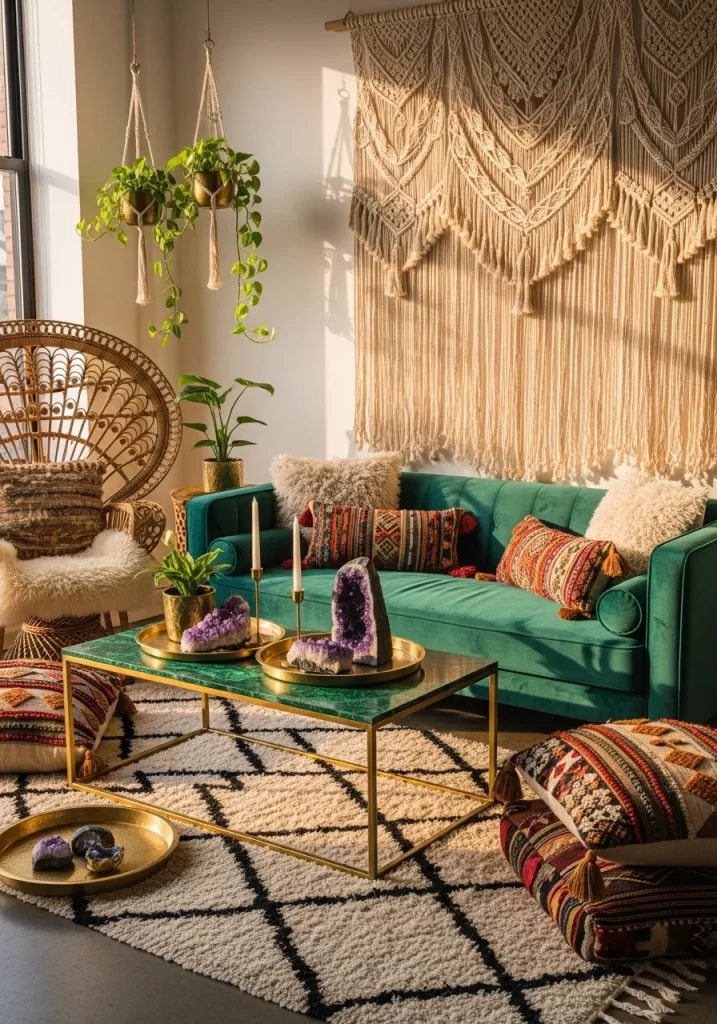
Bohemian aesthetics are perfect for small apartments because they embrace layers of texture and color. This look uses a deep emerald green velvet sofa and a massive macrame wall hanging to create a cozy, artistic sanctuary. Large amethyst geodes and gold trays add a touch of earthly luxury to the room.
Hanging plants and patterned floor cushions provide a relaxed, grounded feel that encourages lounging. The combination of green, gold, and wood creates a warm, natural palette that feels like a hidden garden. This design is for the person who loves to travel and wants a home that feels like a collection of beautiful memories. It utilizes wall art and hanging plants to save floor space while adding massive visual interest.
Material Required List
- Emerald green velvet tufted sofa
- Extra-large macrame wall hanging
- Gold metal and glass coffee table
- Multiple large amethyst or crystal geodes
- Collection of colorful patterned floor pillows
Equipment Required List
- Drill and wall anchors for macrame
- Level tool
- Measuring tape
- Watering can
- Soft brush for cleaning crystals
DIY Instruction Step by Step
- Position your emerald green sofa against the main wall of your living room.
- Mount the large macrame wall hanging directly above the sofa using a sturdy rod.
- Use a level to ensure the macrame rod is perfectly horizontal.
- Drill hooks into the ceiling and hang multiple potted plants at different heights.
- Place a gold and glass coffee table in front of the sofa to add a touch of shine.
- Arrange your amethyst geodes on gold trays on the table for a sculptural look.
- Layer colorful patterned pillows on the floor to provide extra seating for guests.
- Lay a textured neutral-toned rug under the coffee table to ground the space.
- Dim the lights and use a few small floor lamps to highlight the macrame and crystals.
39 Rustic Mountain Lodge Lounge
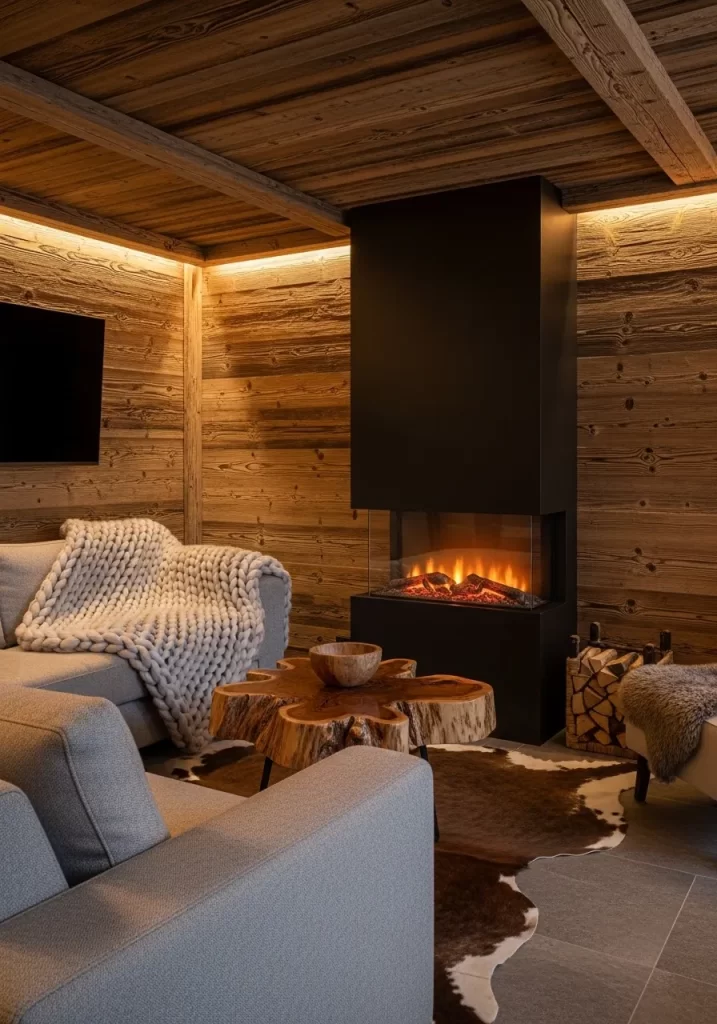
Small apartments can feel like a cozy mountain cabin with the right wood and stone elements. This aesthetic uses floor-to-ceiling wooden wall paneling and a raw-edge wood coffee table to create a warm, rustic environment. A sleek black modern fireplace provides a sharp contrast to the natural wood tones.
A chunky knit blanket and a cowhide rug add layers of texture that make the room feel incredibly inviting. The warm LED lighting hidden in the ceiling creates a soft, golden glow that mimics a sunset. This design is for the person who wants a home that feels like a peaceful getaway from the busy city. It utilizes the ceiling for hidden lighting, which frees up table and floor space for other decor.
Material Required List
- Natural wood wall paneling or reclaimed wood planks
- Modern black vertical fireplace unit
- Raw-edge wood slab coffee table
- Cowhide or faux-fur area rug
- Chunky knit weighted blanket in light grey
Equipment Required List
- Power drill and wood screws
- Level tool
- Measuring tape
- Adhesive for wood panels
- Saw for trimming planks
DIY Instruction Step by Step
- Install natural wood paneling on the walls and ceiling to create a cabin feel.
- Use a level to ensure the planks are straight as you glue or screw them in place.
- Center the black fireplace unit on your main wall to act as a cozy focal point.
- Position your grey sofa in front of the fireplace and drape it with the chunky blanket.
- Place the cowhide rug in the center of the lounge area to add a rustic texture.
- Set the raw-edge wood coffee table on the rug, making sure it is stable.
- Install warm LED strip lights behind a wooden ceiling trim for a hidden glow.
- Arrange a collection of real wood logs in a black metal holder next to the fireplace.
- Keep the rest of the furniture in neutral tones to let the wood remain the star.
40 Art Deco Emerald Speakeasy
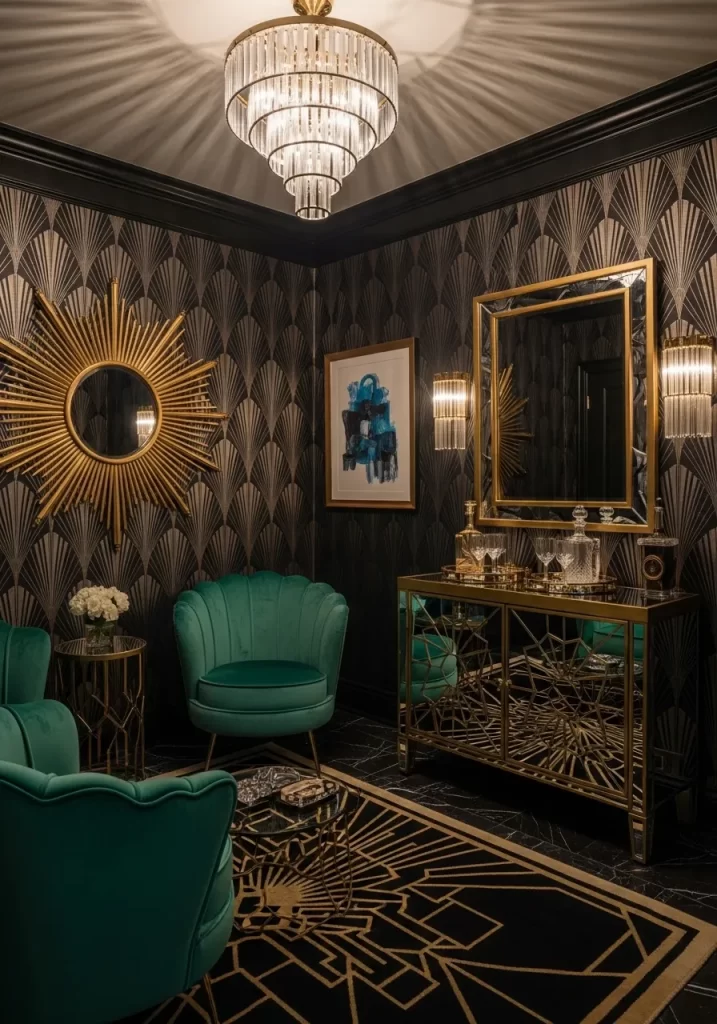
The Art Deco aesthetic is all about glamour, geometry, and rich colors. This look uses gold-patterned black wallpaper and emerald green shell-shaped chairs to create a high-end speakeasy vibe. A mirrored bar cabinet with geometric gold details serves as the perfect spot for entertaining guests.
The sunburst gold mirror and the tiered crystal chandelier add massive amounts of shine and luxury to a small room. A black and gold patterned rug defines the seating area and reinforces the geometric theme. This design is for the person who loves 1920s style and wants a home that feels like a sophisticated cocktail lounge. It utilizes mirrors and reflective surfaces to bounce light and make the room feel grand.
Material Required List
- Black and gold geometric patterned wallpaper
- Pair of emerald green velvet shell chairs
- Mirrored bar cabinet with gold metal frame
- Sunburst-style gold wall mirror
- Black and gold Art Deco patterned rug
Equipment Required List
- Wallpaper smoothing tool and paste
- Drill and wall anchors for the mirror
- Level tool
- Measuring tape
- Cleaning cloth for glass and gold surfaces
DIY Instruction Step by Step
- Apply the geometric wallpaper to your main wall to create a dramatic backdrop.
- Mark the center of the wallpapered wall and mount the sunburst mirror.
- Use a level to ensure the mirror is perfectly centered and straight.
- Position the mirrored bar cabinet against the wall, directly under the mirror.
- Arrange your emerald green shell chairs in front of the bar to create a seating zone.
- Install a tiered crystal chandelier in the center of the ceiling for maximum sparkle.
- Lay the black and gold patterned rug in front of the bar cabinet.
- Place a small gold coffee table on the rug to tie the seating area together.
- Keep the bar cabinet organized with gold trays and crystal glassware for a final touch.
41 Urban Greenery Sanctuary Bed
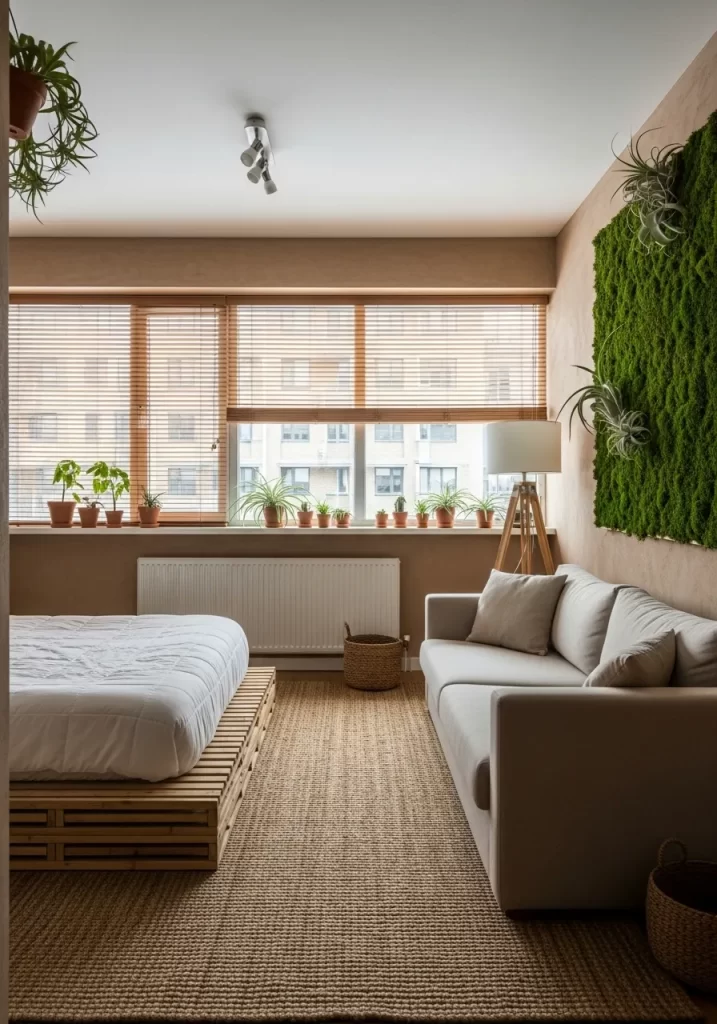
Small apartment living can often separate us from nature, but this aesthetic brings the outdoors inside. A living moss wall feature serves as a lush, oxygen-rich backdrop for your sleeping area. A low-profile pallet-style wooden bed frame keeps the visual height low, making the room feel more expansive.
By placing a variety of potted plants along the windowsill, you create a natural screen that provides both privacy and a garden view. The combination of warm terracotta-toned walls and a light grey sofa adds a soothing, modern feel to the studio. A natural jute rug grounds the space with organic fibers, reinforcing the peaceful, sanctuary vibe. This design is excellent for creating a calm, meditative bedroom in a busy urban environment.
Material Required List
- Natural wooden pallet or slat bed frame
- Preserved moss wall panel kit
- Collection of small indoor potted plants
- Large natural jute or seagrass rug
- Warm terracotta or soft beige interior paint
Equipment Required List
- Power drill and wall anchors
- Measuring tape
- Level tool
- Paint rollers and brushes
- Hammer and nails
DIY Instruction Step by Step
- Paint your walls a warm terracotta or soft beige to create a cozy, earthy foundation.
- Lay the large jute rug in the center of the room to define the floor space.
- Assemble your pallet-style bed frame and position it on the rug.
- Mount the preserved moss wall panel on the wall directly above the bed.
- Use a level to ensure the moss panel is perfectly straight before securing it.
- Clean your windowsill and arrange several small potted plants in a row.
- Position your light grey sofa opposite the bed to create a balanced seating area.
- Add a wooden tripod floor lamp in the corner for soft, warm lighting in the evening.
- Place a few woven baskets on the floor to hold extra blankets and keep the space organized.
Key Takeaways
- Vertical space is your best friend for storage and decor in tiny units.
- Natural light and mirrors make tiny rooms feel much larger than they are.
- Monochromatic palettes create a sense of calm and flow in open floor plans.
- Functional dividers can separate sleeping and living zones without using heavy walls.
- Greenery brings life and fresh air into any urban apartment setting.
Elevating a small space requires a bit of courage and a lot of creativity. You do not need a massive budget to see big results. Small changes in texture and light can alter the entire mood of a room.
Your apartment is your private escape from the busy world. Making it look beautiful helps you feel more relaxed and happy. Start with one area and see how much of a difference it makes.
Do not let a small square footage hold you back from great design. Use these ideas as a foundation for your own unique style. Your home is waiting for its new look.