Halloween does not always have to be orange and black. You can create a powerful and spooky atmosphere using a simpler palette. A black and white theme offers a look that is both modern and timeless. It is a choice for those who appreciate minimalist design and high-impact style.

This collection of ideas moves beyond the expected. You will find scenes that are elegant, artistic, and deeply mysterious. Each one relies on the stark contrast between light and shadow to create a memorable mood.
We explore 36 unique concepts for your home. Many of them include simple, step-by-step instructions. You can craft these decorations yourself using everyday materials. Get ready to transform your space with a touch of monochrome magic.
1. Graphic Illusion Table Runner

Create a striking visual for your Halloween dinner. This design uses strong lines to draw the eye down the length of the table. It creates a sense of depth and drama with very few items. The simple contrast of black on white feels modern and clean.
White pumpkins and tall, black candles follow the converging lines. This arrangement enhances the illusion of a vanishing point. The result is a tablescape that is both spooky and sophisticated. It transforms a simple meal into a memorable event.
DIY Instructions:
Here is how you can make your own version of this cool table runner.
What You’ll Need:
- A roll of white craft paper or a plain white paper tablecloth
- A long ruler or a yardstick
- A thick black permanent marker
- Tape
- White pumpkins (different sizes)
- Black taper candles and holders
Step-by-Step Guide:
- Lay Out Your Runner: Roll the white paper out to cover the length of your dining table. Let a little hang over each end. Use a small piece of tape on the underside of the table to hold it in place.
- Pick Your Point: Choose one end of the table to be your “vanishing point.” Use your marker to make a small, single dot right in the center at that end. All of your lines will go to this dot.
- Draw the Main Lines: Go to the opposite end of the table. Place your ruler so it connects one corner of the paper to the dot you just made. Carefully draw a straight line with your black marker. Do the same thing for the other corner. You should now have a big triangle shape.
- Fill in More Lines: Now, add more lines. Start them anywhere along the wide end of the paper and use the ruler to draw them all straight to your center dot. The more lines you add, the more dramatic it will look.
- Set the Scene: Arrange your white pumpkins down the middle of the runner. Place the largest pumpkin at the wide end (where you drew the lines from) and the smallest ones near the dot. Place your black candles in between the pumpkins to finish the look.
2. Hypnotic Patterns Tablescape

This table setting plays with perception. Bold, swirling patterns on the plates, coasters, and pumpkins create a dizzying effect. It’s a high-energy look that feels both playful and intense. The strict black and white color scheme keeps it from becoming chaotic.
The solid white pumpkins provide a calm spot for the eyes to rest. This contrast makes the spiraling designs pop even more. The entire scene has a funhouse quality, making any meal feel like an extraordinary event. It’s a testament to how patterns can transform a space.
DIY Instructions:
You can paint your own mesmerizing pumpkins to match this style.
What You’ll Need:
- White or black craft pumpkins
- Black and white acrylic craft paint
- Painter’s tape
- A pencil
- Paintbrushes in a few different sizes
Step-by-Step Guide:
- Prep Your Pumpkin: Make sure your pumpkin is clean and dry before you start painting.
- Draw Wavy Lines: For the wavy pumpkin, use a pencil to lightly sketch flowing, wiggly lines from the top to the bottom.
- Paint the Waves: Carefully fill in every other wavy section with black paint. Take your time to keep the lines crisp. Let it dry completely.
- Create Sharp Zig-Zags: For a different pattern, use painter’s tape. Create a zigzag pattern by tearing tape into strips and pressing them onto the pumpkin.
- Paint and Peel: Paint over the taped sections with your contrasting color. Before the paint is fully dry, gently peel off the tape to reveal your sharp lines.
3. Rorschach Test Dining

This decor is all about artistic expression. It feels like a page from a psychologist’s sketchbook brought to life. The random, beautiful inkblots on the table runner and wall art are mysterious. They invite guests to find their own shapes within the splatters.
A white pumpkin with black paint dripping down its sides is the clear centerpiece. This single, dramatic element ties the whole theme together. The setting is clean and uncluttered, which makes the messy, artistic details stand out. It’s a smart and spooky theme.
DIY Instructions:
Making a paint-drip pumpkin is fun and wonderfully messy.
What You’ll Need:
- A white craft pumpkin
- Black acrylic craft paint
- Newspaper or a plastic sheet to protect your workspace
- A small disposable cup
Step-by-Step Guide:
- Set Up Your Space: Lay down the newspaper. This project can get drippy, so you want to cover your table well. Place the pumpkin in the center.
- Prepare the Paint: Pour some black paint into your cup. If the paint is very thick, add just a few drops of water and stir it. This helps it drip better.
- Pour the Paint: Hold the pumpkin by its stem and tilt it slightly. Slowly begin to pour the black paint onto the very top of the pumpkin, right around the stem.
- Let It Drip: Turn the pumpkin slowly as you pour, letting the paint run down the sides naturally. The drips will create their own unique patterns.
- Let It Dry: Once you’re happy with how it looks, set the pumpkin down carefully on the newspaper. Let it dry completely for several hours before moving it.
4. Ghost Ship Centerpiece

Create a spooky seafaring tale on your table. This design uses natural textures to build a scene of a haunted coast. A piece of white driftwood looks like a strange sea creature, surrounded by smooth black stones. The scene feels misty and mysterious.
Pumpkins covered in black fishnet add to the nautical theme. A tiny ship in a glass bowl looks like it’s sailing on a sea of black sand. It is a creative approach that tells a story without using any classic Halloween monsters.
DIY Instructions:
You can easily wrap your own pumpkins in spooky netting.
What You’ll Need:
- A white or light-colored craft pumpkin
- A black mesh produce bag (like the kind onions come in) or a small piece of fishnet fabric
- Scissors
- A hot glue gun (ask an adult for help)
Step-by-Step Guide:
- Cut Your Netting: Place your pumpkin on the netting. Cut a square piece of the netting that is big enough to wrap all the way around your pumpkin with a little extra.
- Stretch It Over: Start at the top of the pumpkin. Stretch the netting over the stem and pull it down evenly on all sides.
- Gather at the Bottom: Once the netting is smooth against the pumpkin, gather all the loose ends together at the very bottom.
- Trim the Excess: Use your scissors to carefully trim off most of the extra netting you gathered.
- Glue It Down: Ask an adult to use the hot glue gun to place a few dabs of glue on the bottom of the pumpkin to hold the netting in place.
5. Shadowy Window Intruder

This idea uses light and shadow to create a chilling scene. It proves that what you can’t see is often the scariest. The simple silhouette of a person standing at the window creates instant suspense. It makes you feel like you are in an old black-and-white thriller.
The rest of the room is dark, with only a few lamps casting long shadows. This low light makes the bright window and the dark figure the main focus. It’s a powerful and effective way to create a spooky atmosphere with very little.
DIY Instructions:
Make your own spooky silhouette for any window in your house.
What You’ll Need:
- A large sheet of black poster board
- A pencil
- Scissors
- Clear tape
Step-by-Step Guide:
- Choose Your Shape: Decide what you want your shadow to look like. The simple shape of a person’s head and shoulders works very well.
- Draw Your Outline: On the black poster board, use a pencil to lightly draw the outline of your shape. Don’t worry about details, just the outside shape.
- Cut It Out: Carefully use your scissors to cut out the shape you drew. Follow your pencil line as best you can.
- Check the Size: Hold your cutout up to the window to make sure it’s a good size. You want people to be able to see it clearly.
- Tape It Up: Use a few small pieces of clear tape to stick your silhouette onto the inside of the window glass. At night, when you have a light on, it will look like a spooky shadow from the outside.
6. Eerie Audio Waves

This is a fresh and modern way to think about hauntings. Instead of showing ghosts, this theme shows the sounds they might make. The sharp, jagged lines of soundwaves are printed on the table runner, coasters, and even painted on the pumpkins.
The simple black and white design is very graphic and clean. A little ghost figure in one of the frames adds a playful touch. This decor is clever because it uses a scientific pattern to suggest something supernatural. It is an unexpected and stylish choice.
DIY Instructions:
You can paint your own soundwave pumpkins with just a marker.
What You’ll Need:
- A white craft pumpkin
- A thin black permanent marker
- A ruler (this is helpful but not required)
Step-by-Step Guide:
- Find Your Center: Imagine a perfectly straight line running around the middle of your pumpkin. This is the line your soundwave will move across. You can use a pencil and ruler to lightly draw this line if you need a guide.
- Draw the Wave: Using your black marker, draw a line that looks like a heartbeat on a monitor. Make it go up and down with sharp peaks and valleys.
- Vary the Line: Make some of the peaks really tall and some very short. This will make it look more like a real soundwave from a piece of music or a spooky sound.
- Connect the Line: Keep drawing the pattern all the way around the pumpkin until you meet back where you started.
- Let It Set: The permanent marker should dry very quickly, but give it a minute before you handle it too much.
7. Spooky Scrabble & Typewriter

This theme uses words and letters to build a spooky mood. The mix of framed words, pumpkins with stenciled letters, and Scrabble tiles creates a fun, literary display. It feels like a ghost is trying to send a message.
The old typewriter adds to the vintage feel. The long strip of paper with jumbled words looks like something from a classic horror movie. This setup is great because it’s not just scary; it’s also smart and engaging for guests.
DIY Instructions:
Stenciling words onto pumpkins is a simple craft with great results.
What You’ll Need:
- A white pumpkin (real or fake)
- Letter stencils (you can find these at a craft store)
- Black acrylic paint
- A small sponge or a stencil brush
- Painter’s tape
- A paper plate
Step-by-Step Guide:
- Position Your Stencil: Decide where you want your word. Place the first letter stencil onto the pumpkin and use a few pieces of tape to hold it in place.
- Get Your Paint Ready: Squirt a small amount of black paint onto your paper plate. Dab your sponge or brush into the paint, then dab most of it off onto a clean part of the plate. You want very little paint on your brush.
- Dab, Don’t Brush: Gently dab the paint over the stencil. Pouncing up and down works better than brushing side to side. Cover the whole letter.
- Reveal Your Letter: Carefully remove the stencil. You should have a clean letter.
- Repeat: Let the first letter dry for a few minutes. Then, position the next stencil beside it and repeat the process until you have spelled your spooky word.
8. Swarm of Origami Cranes

This decoration is simple, elegant, and a little unsettling. A large group of black paper cranes hangs from the ceiling, creating the illusion of a flock of birds or bats in flight. The way they cluster together feels like a natural swarm.
Placing a single white pumpkin below them creates a strong focal point. The contrast between the dark, delicate paper and the solid pumpkin is beautiful. This is a very artistic and graceful way to add a touch of Halloween mystery to a room.
DIY Instructions:
Folding and hanging your own paper birds is a relaxing project.
What You’ll Need:
- Several square sheets of black origami paper
- A needle
- Black thread
- Scissors
Step-by-Step Guide:
- Fold Your Cranes: Learn how to fold a traditional paper crane. There are many great, easy-to-follow videos online that show you every step. Fold as many cranes as you want for your swarm.
- Thread Your Needle: Cut a very long piece of black thread and thread it through your needle. Don’t tie a knot at the end yet.
- String the First Crane: Carefully push the needle through the center of a crane’s back, from bottom to top. Pull the thread through.
- Secure It: Decide where you want the lowest crane to hang. Tie a knot in the thread right underneath the crane so it can’t slide down.
- Add More Cranes: To add another crane above the first one, tie another knot in the thread a few inches higher up. Then, thread on your next crane and let it rest on that knot. Keep repeating this until your string of cranes is as long as you want.
9. Ceremonial Candle Path

This floor decoration creates a powerful sense of drama and ritual. Black lines on the white floor form a geometric path, drawing you in. The design is stark, symmetrical, and full of purpose. It feels like a scene set for an important, mysterious event.
The path is lined with tall black candles and small white pumpkins. This repetition adds to the formal, ceremonial feeling. Using smooth black stones to outline another symbol on the floor adds texture and reinforces the theme. This look is bold and unforgettable.
DIY Instructions:
You can create a temporary, safe floor design with tape and stones.
What You’ll Need:
- Black painter’s tape or washi tape (it’s easy to remove)
- Smooth black stones (from a craft store or garden center)
- Flameless LED candles for safety
Step-by-Step Guide:
- Safety First: This is very important. Never use real candles on the floor or near tape. Use battery-powered LED candles only.
- Plan Your Shape: Decide on a simple shape you want to make on the floor. A large square, a circle, or a diamond works well.
- Tape Your Outline: Use the black tape to create the outline of your shape on a hard floor. This works best on surfaces like wood or tile. Press the tape down so it’s smooth.
- Add the Stones: Carefully place your black stones directly on top of the tape line. Follow your shape all the way around.
- Finish the Scene: Arrange your flameless candles and some mini pumpkins inside or around your shape to complete your ceremonial look.
10. Ghostly Family Portraits

This display turns a mantel or shelf into a haunted family history. The core of the idea is the spooky ghost photos set in beautiful, old-fashioned frames. It makes it seem like the spirits of the house have come out to be seen.
Surrounding the photos with other antique-looking objects completes the story. A bowl of old skeleton keys, silver candlesticks, and a pumpkin with a crackled finish all add to the feeling of age and mystery. It is a sophisticated way to tell a ghost story.
DIY Instructions:
It is very easy to make your own ghostly portraits for frames.
What You’ll Need:
- A computer and a printer
- Plain white paper
- Scissors
- Some nice picture frames (you can find cheap, fancy-looking ones at a thrift store)
Step-by-Step Guide:
- Find a Ghost: Go online and search for an image of a “blurry ghost” or “ghost sheet figure.” Find one you think looks spooky.
- Save and Print: Save the picture to your computer. Measure the opening of your picture frame. Resize the ghost picture on your computer to fit that size, and then print it.
- Cut It Out: Use your scissors to carefully cut out the printed picture.
- Frame Your Ghost: Open the back of your picture frame. Remove any paper or photo that’s already in there. Place your new ghost picture inside.
- Display Your Spirit: Close up the back of the frame. Now you have a haunted portrait! Make a few more with different frames and different ghost pictures for a full family of spirits.
11. Friendly Table Ghost Centerpiece

This charming ghost brings a soft and sweet spirit to the table. Its simple form, created from sheer white fabric, feels light and airy. The ghost sits among a scattering of small white pumpkins, creating a gentle, unified look.
This decoration proves that Halloween decor doesn’t have to be loud or complex. A single, well-made centerpiece can set the entire mood. The soft glow of the candles nearby adds to the ghost’s friendly and welcoming presence.
DIY Instructions:
You can make this adorable ghost in just a few minutes.
What You’ll Need:
- A small balloon or a styrofoam ball
- A bottle (like a soda bottle) to hold the ball up
- A square piece of cheesecloth or white tulle fabric
- Stiffening spray or a mix of equal parts white glue and water
- Two small black felt circles or black paper dots for eyes
- A glue dot or a tiny bit of craft glue
Step-by-Step Guide:
- Create Your Ghost Form: Place the ball or the top of the balloon on the mouth of the bottle. This will be the head of your ghost.
- Drape the Fabric: Lay your piece of cheesecloth or tulle evenly over the ball. Let it hang down on all sides.
- Stiffen the Ghost: Spray the fabric all over with the stiffening spray until it’s damp. If you are using the glue mixture, use a paintbrush to coat the fabric. Shape the bottom of the fabric to look like it’s floating.
- Let It Dry: Leave your ghost to dry completely. This might take a few hours. When it’s dry, the fabric will be stiff and hold its shape.
- Give It Eyes: Gently lift the hardened fabric ghost off the form. Use a tiny bit of glue to stick the two black felt circles on for eyes.
12. Modern Witch’s Altar

This setup feels like a peek into a modern witch’s workspace. It is clean, bright, and full of interesting objects. Bundles of sage and sparkling crystals sit next to a polka-dotted pumpkin, mixing natural magic with a touch of playful design.
The arrangement feels personal and curated. Delicate baby’s breath flowers soften the look, while black books and coasters add a graphic punch. This is a stylish way to celebrate the mystical side of the season without any of the usual darkness.
DIY Instructions:
Painting a polka-dot pumpkin is a very simple and fun activity.
What You’ll Need:
- A white craft pumpkin
- Black acrylic craft paint
- A round sponge pouncer or a new pencil with a flat eraser on the end
- A paper plate
Step-by-Step Guide:
- Get Your Paint Ready: Squirt a small circle of black paint onto your paper plate.
- Pick Your Dot Maker: You can use a round sponge pouncer for large dots, or the eraser end of a pencil for smaller dots.
- Dip and Dot: Dip your dot maker straight down into the paint. You don’t need a lot of paint on it.
- Stamp the Pumpkin: Press the dot maker firmly and straight onto the surface of the pumpkin. Lift it straight off to get a clean circle.
- Keep Going: Continue making dots all over your pumpkin. You can place them in a neat pattern or randomly. Let the paint dry completely.
13. Mad Scientist’s Laboratory

This scene transforms a table into a creepy laboratory. It uses scientific equipment to create an intelligent and unsettling theme. Glass beakers and test tubes hold wilting flowers, suggesting experiments that have gone wrong.
Anatomical charts of the brain hang on the wall, and a pumpkin is carefully drawn with a brain on its surface. The tray of cold, steel surgical instruments adds a chilling final touch. This decor tells a story of a mind obsessed with strange science.
DIY Instructions:
You can draw a brain on a pumpkin to create your own lab specimen.
What You’ll Need:
- A white or light-colored craft pumpkin
- A thin black permanent marker
- A computer and printer to find a picture of a brain
Step-by-Step Guide:
- Find a Brain Picture: Search online for a “simple brain diagram” or “brain outline.” Find one that shows the different sections and print it out to use as a guide.
- Draw the Big Shape: Look at your guide picture. Use your black marker to draw the main outside shape of the brain on your pumpkin. It looks a bit like a big, wrinkly bean.
- Add the Middle Line: Draw a squiggly line down the center to divide the brain into two halves.
- Draw the Wrinkles: Now for the fun part. Fill in each half with lots of curvy, squiggly lines that connect to each other. Don’t worry about making it look exactly like the picture, just get the wrinkly look.
- Add a Label (Optional): You can even draw a little arrow and write a scientific-looking word like “Cerebrum” for an extra touch.
14. Elegant Gothic Skullscape

This tablescape is dark, dramatic, and very refined. A deep black tablecloth creates a moody backdrop for a collection of stark white skulls. The scene is a classic gothic still life, focusing on themes of life and mortality.
Black candles and dark, spiky flowers add height and texture to the arrangement. An hourglass with a tiny skull inside is a clever detail that reinforces the idea of time running out. This is a timeless and sophisticated way to embrace Halloween’s darker side.
DIY Instructions:
Create a spooky black and white floral bouquet.
What You’ll Need:
- A simple black vase
- A bunch of baby’s breath (a flower with lots of tiny white blossoms)
- A few interesting dried plants or branches, like thistle
- A can of black floral spray paint (make sure it’s for flowers)
Step-by-Step Guide:
- Work Outside: Spray painting can be messy, so do this part outdoors on some newspaper.
- Paint Your Plants: Take your dried plants, like the thistle, and spray them with the black paint. Cover them completely and let them dry. You can even paint a few stems of the baby’s breath black for more contrast.
- Start with White: Put all of the white baby’s breath into your vase first. This will be the main body of your bouquet.
- Add the Black: Carefully place your spray-painted black plants into the arrangement. Try to spread them out so you have pops of black all around.
- Arrange and Display: Adjust the flowers until you like how they look. Your beautiful, spooky bouquet is ready.
15. Silent Movie Monster Scene

Step back in time to the age of silent horror films. This clever setup uses black and white cutouts to create the feel of an old movie set. The jagged city skyline and creepy hand silhouettes look like they came straight from a classic German Expressionist film.
The pumpkins themselves become the movie monsters, with expressive, hand-painted faces. Title cards with dramatic phrases complete the scene, telling a story without a single word. This is a wonderfully creative theme for any movie lover.
DIY Instructions:
Make a spooky city skyline for a wall or table backdrop.
What You’ll Need:
- A few sheets of large black poster board
- A pencil
- A ruler
- Scissors or a craft knife (ask an adult for help)
Step-by-Step Guide:
- Draw Your Buildings: On the poster board, use your pencil and ruler to draw the shapes of tall, spooky buildings. Make them crooked and pointy. Don’t worry about making them straight. Old movie sets looked a little weird.
- Add Windows: Draw little squares for windows on some of the buildings. You can make some windows look like they have a light on by leaving them as empty squares.
- Cut Out Your City: Ask an adult to help you carefully cut out the top outline of your city skyline with the craft knife or scissors.
- Cut Out the Windows: An adult can also help cut out the little window squares. This part is optional but looks really cool.
- Set Up Your Scene: You can tape your skyline to a white wall or stand it up behind a table to create your spooky movie set.
16. Enchanted Forest Floor Runner

This table runner brings a piece of a magical, dark forest into your home. A bed of rich green moss creates a natural and textured base. The runner is dotted with small white pumpkins and strange, gnarled black gourds that look like they grew in a swamp.
Bare branches reach across the moss, adding to the feeling of a forest floor. Glass domes cover tiny scenes with mushrooms, creating miniature worlds. This design is earthy and imaginative, blending the beauty of nature with a sense of spooky enchantment.
DIY Instructions:
Paint fallen leaves to use in your decorations.
What You’ll Need:
- A few interesting-shaped leaves from your yard (maple leaves are great)
- White or black acrylic craft paint
- A paintbrush
- Newspaper
Step-by-Step Guide:
- Press Your Leaves: After you collect your leaves, place them between the pages of a heavy book for a day or two. This will flatten them and make them easier to paint.
- Set Up Your Workspace: Lay down some newspaper to protect your table from paint.
- Paint One Side: Lay a leaf flat on the newspaper. Use your paintbrush to cover the entire front of the leaf with paint.
- Let It Dry: Let the first side dry completely. This might take about 30 minutes.
- Paint the Other Side: Flip the leaf over and paint the back. Let it dry, and then your spooky painted leaves are ready to be scattered on a table or shelf.
17. Zen Garden Ghost

This decor is a beautiful example of quiet horror. It uses elements of Japanese design to create a scene that is both peaceful and unsettling. A ghostly shape is visible behind a translucent screen, suggesting a spirit without showing it clearly.
The foreground is arranged like a zen garden. A bare branch sits in a simple vase with a single flower. Smooth black stones are placed carefully on a wooden tray. The whole setup is very minimal, which makes the ghost behind the screen even more impactful.
DIY Instructions:
Create a ghost-behind-the-curtain effect in a doorway or window.
What You’ll Need:
- A plain white flat bedsheet or a long piece of thin white fabric
- A tension rod or a way to hang the sheet
- Black construction paper
- Scissors
- Removable tape or safety pins
Step-by-Step Guide:
- Hang Your Curtain: Put the sheet or fabric over the tension rod and hang it in a doorway or a large window.
- Cut Out a Face: From the black paper, cut out two ovals for eyes and a long, wavy shape for a sad mouth.
- Place the Face: Go behind the curtain. Decide where you want the face to be. Use a few small pieces of removable tape or safety pins to attach the paper shapes to the back of the sheet.
- Create a Body (Optional): You can also cut out simple hand shapes from the black paper and attach them to the back of the sheet.
- Reveal the Ghost: When you look at the sheet from the front, the black shapes will show through as a spooky, blurry silhouette.
18. Brutalist Concrete Still Life

This Halloween arrangement is strong, modern, and unexpected. It uses materials like concrete and slate to build a scene that feels like a piece of sculpture. The pumpkins are textured to look like they are carved from stone.
Broken pieces of dark slate are stacked to create jagged, mountain-like candle holders. Even a cinder block is used as a stand. This industrial look is a big departure from typical Halloween decor, offering a style that is both raw and incredibly sophisticated.
DIY Instructions:
You can give a craft pumpkin a faux concrete texture with paint.
What You’ll Need:
- An orange or white craft pumpkin
- Gray acrylic craft paint
- A little bit of baking soda or fine sand
- A disposable bowl or plate
- A paintbrush with stiff bristles
Step-by-Step Guide:
- Mix Your Paint: Squeeze some gray paint into your bowl. Sprinkle in a small amount of baking soda or sand and mix it all together. Keep adding a little more until the paint feels thick and gritty.
- Paint Your Pumpkin: Use your stiff brush to dab and spread the gritty paint all over the pumpkin. Don’t try to make it smooth. You want a rough, uneven texture like real concrete.
- Add a Second Coat: Let the first coat dry. If you can still see some of the pumpkin’s original color, add a second coat of your concrete paint mixture.
- Let It Dry: Let your pumpkin dry completely. It will feel rough and look just like it was made from stone.
19. Ominous Raven’s Nest

This centerpiece is wild and wonderfully creepy. A large, messy nest made of black twigs becomes the focal point. It looks like it belongs to a giant raven or some other mysterious creature. The tangled branches give it a chaotic and natural energy.
Inside the nest sit several white pumpkins and a clutch of speckled eggs. One pumpkin is wrapped in black string, adding another layer of texture. This decoration tells a story and makes you wonder what might have built such a strange and impressive home.
DIY Instructions:
You can build your own spooky nest for a table.
What You’ll Need:
- A bunch of twigs collected from your yard
- A can of black spray paint
- A shallow bowl to use as a base
- A hot glue gun (ask an adult for help)
- Newspaper
Step-by-Step Guide:
- Paint Your Twigs: On some newspaper outdoors, spread out your twigs and spray paint them all black. Let them dry completely.
- Start the Base: Ask an adult to help with the hot glue gun. Glue a few of the larger twigs to the outside rim of your bowl, pointing them outwards.
- Build It Up: Keep gluing more twigs onto the base twigs. Weave them over and under each other to create a messy, nest-like shape. Build the walls of the nest up and out.
- Let It Set: Once you are happy with the size and shape of your nest, let the glue cool and harden completely.
- Fill Your Nest: You can gently lift your twig nest off the bowl. Fill it with small pumpkins, painted eggs, or anything else you think a spooky bird would collect.
20. Gothic Scholar’s Desk

This scene is perfect for anyone who loves old books and mysteries. It looks like the desk of a gothic scientist studying the secrets of life and death. Pumpkins are decorated with detailed anatomical drawings of a human heart.
The desk is cluttered with old books, framed ferns, a human skull, and inkwells. Black candles have been left to burn down, with wax dripping over everything. This “dark academia” style is moody, intelligent, and full of fascinating details to discover.
DIY Instructions:
Transfer a printed image onto a pumpkin for a hand-drawn look.
What You’ll Need:
- A white craft pumpkin
- A printed picture of something you want to draw (like an anatomical heart)
- A pencil
- A ballpoint pen
- Clear tape
Step-by-Step Guide:
- Shade the Back: Take your printed picture. Turn it over. Use your pencil to scribble all over the back of the paper, right behind the drawing. Cover it completely with a thick layer of pencil lead.
- Tape It On: Place the picture onto your pumpkin where you want the drawing to be. Use a few pieces of tape to hold it in place so it doesn’t move.
- Trace the Image: Use your ballpoint pen to carefully trace over all the lines of the picture. Press down firmly as you trace. The pressure will transfer the pencil scribbles from the back of the paper onto the pumpkin.
- Reveal the Outline: Gently remove the paper. You should see a faint pencil outline of your drawing on the pumpkin.
- Make It Permanent: Now, just trace over the pencil lines with a black permanent marker to make your drawing dark and clear.
21. Ghostly Winter Branches

This tablescape is a beautiful blend of elegance and eeriness. Stark white branches, lightly dusted with fake spiderwebs, reach up from black vases. The effect is like seeing frosted trees on a cold, moonless night. The design feels clean and very intentional.
A single large white pumpkin sits as the centerpiece, grounding the tall branches. The rest of the table is kept simple with a black cloth and white dishes. This allows the dramatic, web-covered branches to be the star of the show.
DIY Instructions:
You can create your own spooky web-covered branches.
What You’ll Need:
- A few interesting-shaped branches from your yard
- A can of white spray paint
- A bag of stretchy spider web decoration
- Scissors
Step-by-Step Guide:
- Paint Your Branches: In a well-ventilated area or outside, lay your branches on some newspaper. Spray paint them completely white. Let them dry, then flip them over and paint the other side.
- Let Them Dry Fully: Make sure the branches are completely dry before you move on to the next step, or the webbing will get messy.
- Start Stretching: Take a small piece of the spider web material. Start at the bottom of a branch and hook it on a twig.
- Pull and Drape: Gently pull and stretch the webbing. The more you stretch it, the more realistic it looks. Drape it between the smaller twigs, letting it catch naturally.
- Less is More: You don’t need to cover the whole branch. A few delicate webs stretched in the corners will look more convincing than big clumps.
22. Rustic Farmhouse Halloween

This corner vignette has a cozy, rustic charm. It uses natural textures and classic farmhouse elements for a look that is warm and inviting. A white wooden crate holds birch logs, while a simple black lantern casts a soft, welcoming glow.
The black and white buffalo check napkins add a touch of classic country style. A dark grapevine wreath on the wall provides a spooky, tangled contrast to the clean lines of the decor. This style is great for a subtle, comfortable approach to Halloween.
DIY Instructions:
Making a spooky grapevine wreath is a quick and impactful project.
What You’ll Need:
- A plain grapevine wreath (from a craft store)
- A can of black spray paint
- Newspaper
- A hook or string for hanging
Step-by-Step Guide:
- Set Up Your Space: Lay down newspaper outside or in a well-ventilated area. Place your wreath in the center.
- Paint It Black: Spray paint the entire wreath black. Try to get the paint into all the little nooks and crannies of the woven vines.
- Let It Dry: Let the first side dry for about an hour.
- Flip and Repeat: Flip the wreath over and spray paint the other side. Let it dry completely.
- Hang It Up: Your beautifully stark and spooky wreath is ready to be hung on a wall or door.
23. Delicate Spiderweb Setting

This table setting captures a quiet, forgotten feeling. It looks like a table that has been sitting in an abandoned house for years. A delicate spiderweb, complete with a tiny spider, is stretched across a bare branch.
The colors are soft and muted, with grey linens and simple white plates. A bowl with a cracked pattern adds to the feeling of age and decay. This is a very subtle and artistic way to create a spooky atmosphere, focusing on texture and detail.
DIY Instructions:
You can create a beautiful, web-covered branch for your table.
What You’ll Need:
- A small, interesting branch
- Stretchy spider web decoration
- A tiny plastic spider
- A hot glue gun (ask an adult for help)
Step-by-Step Guide:
- Anchor Your Web: Take a very small piece of the spider web material. Hook one end onto a twig at one side of your branch.
- Stretch It Thin: Gently pull the webbing across an open space in the branch. The thinner you stretch it, the better it will look. Hook the other end on another twig.
- Create Layers: You can stretch a few more small pieces in different directions to create a more layered, realistic web.
- Add Your Spider: Ask an adult to use the hot glue gun to put a tiny dot of glue on the web where you want your spider to sit.
- Place the Spider: Gently press the tiny plastic spider onto the dot of glue. Hold it for a few seconds until the glue sets.
24. Solar Eclipse Dining

This dining setup is a stunning piece of graphic design. It feels like you are dining in outer space during a solar eclipse. The bold circles on the placemats and the wall create a powerful visual rhythm. The theme is futuristic and highly dramatic.
A single hanging bulb acts as the “sun,” while a delicate mobile suggests orbiting planets. A winding line of white pumpkins snakes across the table, adding an organic shape to the otherwise geometric scene. This is an incredibly creative and artistic concept.
DIY Instructions:
Create your own eclipse placemats with paper.
What You’ll Need:
- Large sheets of black paper
- Large sheets of white paper
- Scissors
- A compass or a few different sizes of round plates and bowls to trace
- A glue stick
Step-by-Step Guide:
- Cut the Base: Start with a large black sheet of paper for your placemat base. You can cut it into a large circle or leave it as a rectangle.
- Trace Your Circles: On the white paper, use your compass or trace around different sized bowls to create several white circles.
- Cut Them Out: Carefully cut out the white circles.
- Arrange and Glue: Arrange the white circles on your black placemat. You can layer them or place them off-center to look like different phases of an eclipse.
- Glue Them Down: Once you like the arrangement, use a glue stick to glue the white circles firmly onto the black paper.
25. Crystal Geode Centerpiece

This decor brings a natural, mystical energy to the table. It uses beautiful crystals and stones to create a scene that is both earthy and magical. Pumpkins are hollowed out to look like geodes, with sparkling crystals lining the inside.
Large, raw pieces of black tourmaline and sliced agate are scattered among the pumpkins. The candles are placed on stacked stones, adding to the natural, layered look. This is a unique idea that feels grounded and full of positive, spiritual energy.
DIY Instructions:
Make your own sparkling geode pumpkin.
What You’ll Need:
- A white craft pumpkin (the hollow, foam kind works best)
- A craft knife (ask an adult to do this part)
- Black or silver craft paint
- A paintbrush
- White craft glue
- A bag of crushed glass glitter or chunky glitter
Step-by-Step Guide:
- Carve the Opening: Ask an adult to use the craft knife to carefully cut an irregular, rocky-looking hole in the side of the pumpkin.
- Paint the Inside: Use your paintbrush to paint the entire inside of the hollow pumpkin. Black or silver paint works well to create a dark, cave-like look.
- Add the Glue: Once the paint is dry, coat the entire inside surface with a thick layer of white craft glue.
- Add the Sparkle: Hold the pumpkin over a piece of paper or a tray. Pour the crushed glass or chunky glitter all over the glue on the inside. Tilt the pumpkin around to make sure the entire inside is covered.
- Let It Dry: Gently shake out the extra glitter. Let the pumpkin sit for several hours until the glue is completely dry and the crystals are set.
26. Charred Remains and Ash

This tablescape has a stark and beautiful look, like the aftermath of a fire. It uses real pieces of charred wood to create a deep, matte black texture. This contrasts wonderfully with the clean white vases and tablecloth.
Pumpkins with black paint dripping from the top look like they are coated in tar or ash. The dried plants in the vases are delicate and skeletal. This design is very artistic and finds beauty in decay and destruction.
DIY Instructions:
Create a paint-dipped pumpkin effect.
What You’ll Need:
- A white craft pumpkin
- A can or a deep disposable bowl that is wider than your pumpkin
- Black craft paint
- A little bit of water
- Newspaper
Step-by-Step Guide:
- Set Up Your Space: Lay down plenty of newspaper. This can be a messy project.
- Prepare the Paint: Pour a good amount of black paint into your can or bowl. Add a little bit of water and stir until the paint is a bit thinner, about the consistency of melted ice cream.
- Dip the Pumpkin: Hold the pumpkin by its stem. You can either dip it straight down into the paint or turn it upside down and dip the bottom.
- Lift and Let Drip: Slowly lift the pumpkin out of the paint. The paint will start to drip down the sides. You can tilt the pumpkin to control where the drips go.
- Let It Dry: Place the pumpkin on the newspaper to dry completely. The drips will set as they are, creating a beautiful, natural pattern.
27. Victorian Cabinet of Curiosities

This table setting is dark, moody, and full of vintage mystery. It feels like you are looking at a collector’s prized possessions. Glass cloches, or domes, cover interesting objects like feathers and a small pumpkin, making them feel special and important.
The color palette is almost entirely black, with a velvet tablecloth, black candles, and even black roses. This creates a very luxurious and dramatic atmosphere. It’s a sophisticated style that hints at Edgar Allan Poe and old-world gothic romance.
DIY Instructions:
Display an object under a glass dome.
What You’ll Need:
- A glass cloche or an overturned glass vase
- A small plate or a stack of old books for the base
- An interesting object to display (a small pumpkin, a feather, a plastic skull)
Step-by-Step Guide:
- Choose Your Base: Your display needs a flat surface to sit on. A small, dark plate or a stack of a few old, dark-colored books works wonderfully.
- Arrange Your Object: Place your chosen spooky object in the center of your base.
- Cover It Up: Carefully lower the glass cloche or the overturned vase over your object.
- Create a Grouping: This look is very effective when you do it with a few different objects. Try putting a single feather under one cloche, and a tiny pumpkin under another.
- Display Your Collection: Arrange your covered curiosities on a shelf or table.
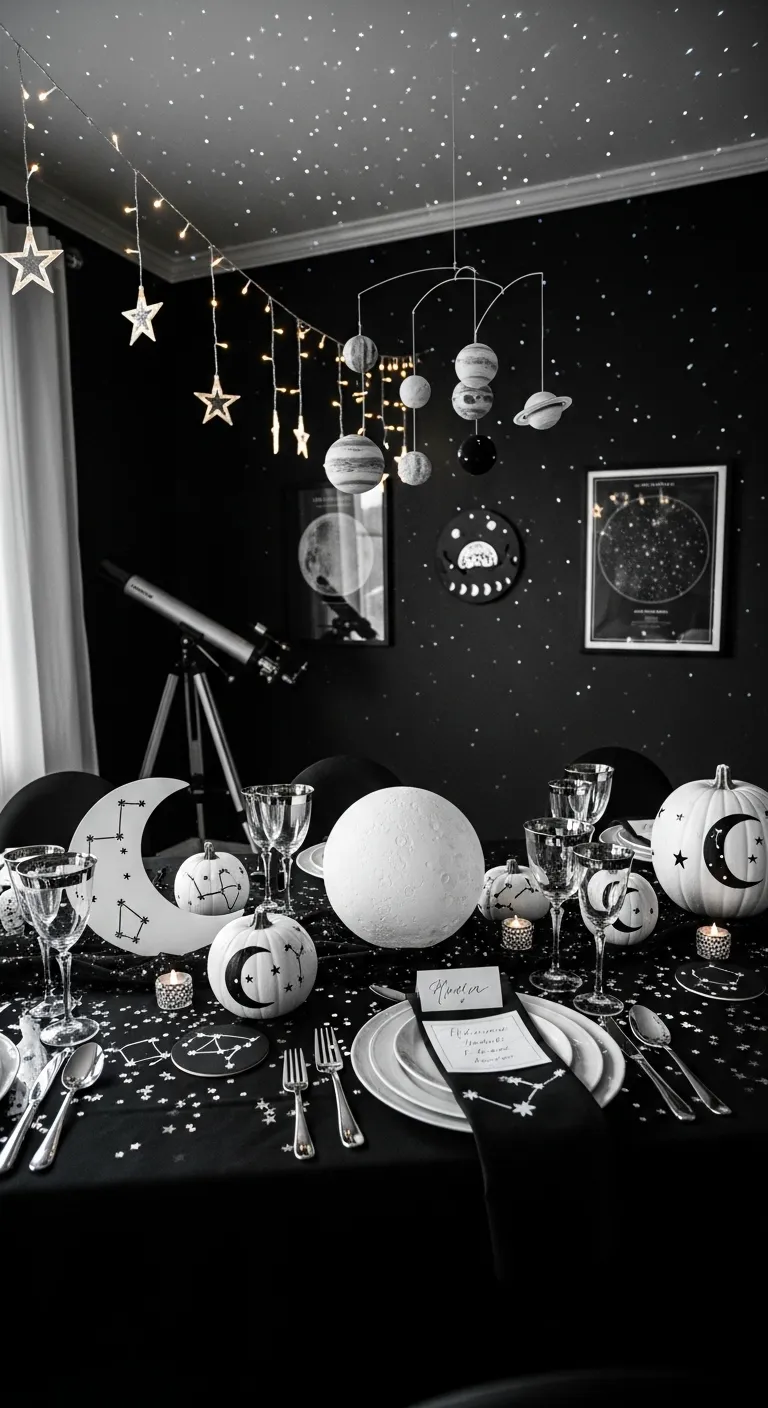
28. Celestial Starry Night

This theme transforms a room into a magical night sky. The walls and tablecloth are black and dotted with stars, creating an immersive cosmic experience. A mobile of the solar system hangs over the table, adding to the celestial wonder.
The pumpkins are decorated to look like the moon, with craters and texture. Other pumpkins have crescent moons painted on them. This is a dreamy and enchanting theme that moves away from spooky and into the realm of beautiful, mysterious space.
DIY Instructions:
You can paint a simple crescent moon on a pumpkin.
What You’ll Need:
- A white or dark blue craft pumpkin
- White or black craft paint (the opposite of your pumpkin color)
- A pencil
- A small paintbrush
Step-by-Step Guide:
- Draw Your Moon: Use your pencil to lightly sketch a crescent moon shape on your pumpkin. It’s like drawing the letter ‘C’.
- Add Some Stars: You can also draw a few small star shapes around the moon.
- Outline Your Shapes: Use your small paintbrush and paint to carefully go over the pencil outlines you drew.
- Fill Them In: Now, carefully fill in the moon and star shapes with paint. Try to make your brush strokes go in the same direction for a smooth look.
- Let It Dry: Let the paint dry completely before you display your celestial pumpkin.
29. Ghostly White Disappearance

This room is an exercise in minimalism and subtle horror. The entire scene is white on white, which creates a very ghostly and ethereal feeling. The lack of color makes you focus on the shapes and the feeling of emptiness.
White mannequin heads and empty picture frames add to the unsettling mood. A white dress hangs on the wall, suggesting a person who has vanished. The most powerful element is the mirror, which reflects a figure covered by a sheet, a ghost that only exists in the reflection.
DIY Instructions:
Create a wall of empty, ghostly frames.
What You’ll Need:
- A collection of picture frames in different sizes
- A can of white spray paint
- Newspaper
- Picture hanging strips
Step-by-Step Guide:
- Prepare the Frames: Take the glass and the backing out of all your picture frames. You only need the empty frames themselves.
- Paint Them White: On newspaper outdoors, lay out all the frames and spray paint them white. Let them dry, then flip them over and paint the other side.
- Plan Your Layout: Lay the empty frames out on the floor. Arrange them in a grouping that you find pleasing. A tight cluster often looks better than spreading them out too much.
- Hang Them Up: Use removable picture hanging strips to hang the empty frames on the wall, following the layout you planned on the floor.
- Enjoy the Emptiness: The collection of empty frames creates a surprisingly spooky and artistic statement on your wall.
30. Redacted Secrets

This theme is clever, modern, and very mysterious. It uses the idea of “redacted” or censored information to create a sense of conspiracy and hidden secrets. Black bars are placed over the eyes in family photos, making them look like classified documents.
The theme is carried through with a pumpkin that has a black bar across it, and books wrapped with black bands. The use of manila folders stamped with “REDACTED” completes the look. This is a very smart and graphic way to create a feeling of unease.
DIY Instructions:
You can easily “redact” your own photos for a spooky display.
What You’ll Need:
- A few black and white photos you have printed
- Picture frames
- A roll of thin black electrical tape or washi tape
- Scissors
Step-by-Step Guide:
- Frame Your Photo: Place your black and white photo into a picture frame.
- Cut the Tape: Cut a small strip of the black tape. Make it just wide enough to cover the eyes in the photo.
- Apply the Bar: Carefully place the strip of tape directly onto the glass of the picture frame, right over the eyes of the person in the photo. Press it down so it’s smooth.
- Display Your Secret: The tape is on the outside of the glass, so you haven’t ruined your photo. You can easily peel it off after Halloween. Create a few of these and display them together.
31. Spider Infestation Corner

This decor creates the feeling of a full-blown spider invasion. A massive, geometric web made of black string stretches across the corner of the ceiling, making a huge architectural statement. Smaller, fluffier webs are tangled in branches on the table below.
The scene is tied together with several large, black spiders crawling around the webs and the table. One spider is even captured under a glass dome, like a scientific specimen. This is a great way to use the entire space, from floor to ceiling, to create a cohesive and creepy theme.
DIY Instructions:
You can craft charming crocheted covers for your pumpkins.
What You’ll Need:
- Black yarn
- A crochet hook
- A measuring tape
- A small pumpkin
Step-by-Step Guide:
- Measure Your Pumpkin: Measure the circumference (the whole way around the middle) of your pumpkin.
- Crochet a Rectangle: Using a simple stitch like a double crochet, create a flat rectangular piece. Make it as long as the pumpkin’s circumference and wide enough to cover the pumpkin from top to bottom.
- Stitch It On: Wrap the crocheted piece around your pumpkin. Use a yarn needle to stitch the two short ends together at the back, creating a snug cover.
- Cinch the Top and Bottom: Weave a long piece of yarn in and out around the top opening. Pull it tight to gather the fabric around the stem and tie a knot. Do the same thing for the bottom.
32. Geometric Halloween Gallery Wall

This console table display is a masterclass in pattern and composition. A gallery wall of framed geometric art sets a modern and graphic tone. The art features skulls, bats, and spiders, all drawn in a clean, angular style.
Below the gallery wall, pumpkins are painted with a variety of bold black and white patterns, from simple stripes to complex triangles. The patterns are all different, but the consistent color scheme makes the whole arrangement feel unified and stylish. A little ghost mobile adds a touch of playful movement.
DIY Instructions:
Create a striped pumpkin with the help of tape.
What You’ll Need:
- A white craft pumpkin
- Black craft paint
- Painter’s tape or thin masking tape
- A paintbrush
Step-by-Step Guide:
- Tape Your Lines: Starting at the top of the pumpkin, press strips of tape down the sides, following the natural ridges. Space them out to create the stripes. Make sure the edges of the tape are pressed down firmly.
- Paint Between the Lines: Use your black paint to fill in the white spaces between the strips of tape. Don’t worry about being too neat near the tape.
- Peel While Damp: Let the paint dry for a few minutes, but not completely. Carefully and slowly peel off the tape strips to reveal your crisp, clean white stripes underneath.
- Let It Dry: Let the pumpkin finish drying completely before you handle it.
33. Industrial Jack-o’-Lanterns

This decor has a tough, industrial edge. It uses raw materials like metal pipes and unfinished wood to create a look that is both spooky and stylish. A candelabra made from plumbing pipes is a unique and clever centerpiece.
The pumpkins have a hand-drawn, sketchy quality that feels edgy and modern. Bare Edison bulbs hang from the ceiling, adding to the workshop or factory vibe. This is a great theme for a loft space or for anyone who appreciates a more rugged, masculine aesthetic.
DIY Instructions:
You can build a simple, industrial-style candelabra.
What You’ll Need:
- Several short pieces of black or dark gray PVC pipe in different lengths
- A few PVC connector pieces (T-shapes and elbow shapes)
- A strong glue suitable for plastic
- Flameless LED taper candles
Step-by-Step Guide:
- Plan Your Design: Lay out your pipe pieces on a table and figure out how you want to connect them to build your candelabra.
- Glue the Base: Start by gluing a few pieces together to create a stable base that will sit flat on the table.
- Build Upwards: Add more pipes and connectors, building your candelabra up. Make sure you leave some openings at the top pointing upwards to hold the candles.
- Let It Dry: Let the glue cure completely according to the instructions on the package.
- Add Your “Flames”: Once it’s sturdy, place your flameless LED taper candles into the openings at the top.
34. Digital Ghost in the Machine

This is a very clever and contemporary take on Halloween. The theme is “digital errors,” suggesting a ghost haunting a computer system. Screens are filled with static, and framed art reads “error 404: soul not found.”
Pumpkins are decorated with pixelated jack-o’-lantern faces and a QR code, which adds an interactive element. A chaotic sculpture made of black wire looks like a digital glitch brought to life. This is a fun and nerdy theme that is sure to be a conversation starter.
DIY Instructions:
Create your own pixelated pumpkin face.
What You’ll Need:
- A white craft pumpkin
- A ruler
- A pencil
- A small square-tipped paintbrush
- Black acrylic paint
Step-by-Step Guide:
- Draw a Grid: Use your pencil and ruler to lightly draw a grid of small squares where you want the face to be. This grid will be your guide for the pixels.
- Plan Your Face: Decide which squares you will fill in to make the eyes and mouth. You can sketch it out on a piece of paper first.
- Paint the Pixels: Use your square-tipped brush and black paint to carefully fill in the squares you chose for the face. The grid will help you keep the lines straight and the corners sharp.
- Let It Dry: Let the paint dry completely. You can gently erase any visible pencil lines if you need to.
35. Delicate Paper Creations

This window display is all about light, shadow, and delicate papercraft. A swarm of white paper bats hangs in the window, seeming to fly in from outside. The intricate, cutout haunted house silhouette creates a beautiful scene when backlit by the window.
The theme is continued with a garland of paper ghosts and a collection of honeycomb paper pumpkins. The entire look is soft, airy, and incredibly detailed. It shows how a simple material like paper can be transformed into something truly magical.
DIY Instructions:
You can fold your own simple paper bats.
What You’ll Need:
- A few squares of black or white paper
- Scissors
- A pencil
- String and tape for hanging
Step-by-Step Guide:
- Fold in Half: Fold your square piece of paper in half to make a triangle.
- Draw Half a Bat: On the folded paper, use your pencil to draw half of a bat shape. The center of the bat’s body should be on the folded edge of the paper.
- Cut It Out: While the paper is still folded, carefully cut out the shape you drew.
- Unfold Your Bat: Open up the paper. You should have a complete, symmetrical bat shape.
- Hang Them Up: Tape a small piece of string to the back of each bat and hang them in a window or from the ceiling.
36. Shadow Puppet Theater

This final idea uses the ancient art of shadow play to create a spooky and imaginative scene. A single spotlight is aimed at a collection of objects and puppets, which then cast large, distorted shadows on a blank wall.
The fun of this decor is in the contrast between the small, simple objects in the foreground and the huge, menacing shadows they create. A little cat puppet becomes a giant monster, and bare branches look like a terrifying forest. This is an interactive and endlessly creative way to decorate for Halloween.
DIY Instructions:
Create your own spooky shadow puppets.
What You’ll Need:
- Black cardstock or thin cardboard
- A pencil
- Scissors
- Thin wooden dowels or skewers
- Tape
Step-by-Step Guide:
- Draw Your Shape: On the black cardstock, draw the outline of a spooky shape. Classic Halloween figures like a witch’s hat, a black cat, or a ghost work very well.
- Cut It Out: Carefully cut out the shape you drew.
- Attach the Stick: Tape a wooden dowel or skewer to the back of your cutout shape. This will be the handle for your puppet.
- Set Up Your Stage: In a dark room, shine a bright flashlight or a lamp at a blank wall.
- Tell a Story: Stand between the light and the wall. Hold up your puppets so they cast shadows. You can move them around to tell a spooky shadow story.
You have now explored a full range of possibilities. Black and white decor can be anything you want it to be. It can be a quiet, ghostly whisper or a bold, graphic shout. This simple color scheme does not limit creativity; it focuses it.
These 36 ideas show the power of contrast, texture, and storytelling. From a haunted laboratory to a celestial dining room, your Halloween can be a sophisticated affair. We hope these concepts inspire you to pick up some paint, paper, or clay. Create a spooky scene that is uniquely your own this season.
Key Takeaways
- Embrace High Contrast: The core of this style is the dramatic play between solid blacks and clean whites. Use it to create focus and visual impact.
- Texture is Essential: Prevent a monochrome look from feeling flat by using varied textures like rough wood, soft fabric, smooth stone, and tangled branches.
- Tell a Simple Story: Each theme, whether it’s a mad scientist’s lab or a ghostly portrait gallery, creates its own narrative that makes the decor more engaging.
- DIY Elevates Your Decor: Many of the most effective ideas in this list can be made at home. This adds a personal touch that you cannot buy in a store.
- Think Symbolically: You don’t always need a monster to be spooky. An empty frame, a shadowy silhouette, or a single black feather can be just as chilling.