
Does your bedroom feel empty or dull? You might have the best mattress and softest sheets but still feel something is missing. The walls often remain an afterthought in many homes. This article will show you how to change that.

We will explore creative ways to dress up your space. These ideas go far beyond a simple headboard. You can add texture and color with ease. Let us transform your walls into a stunning focal point today.
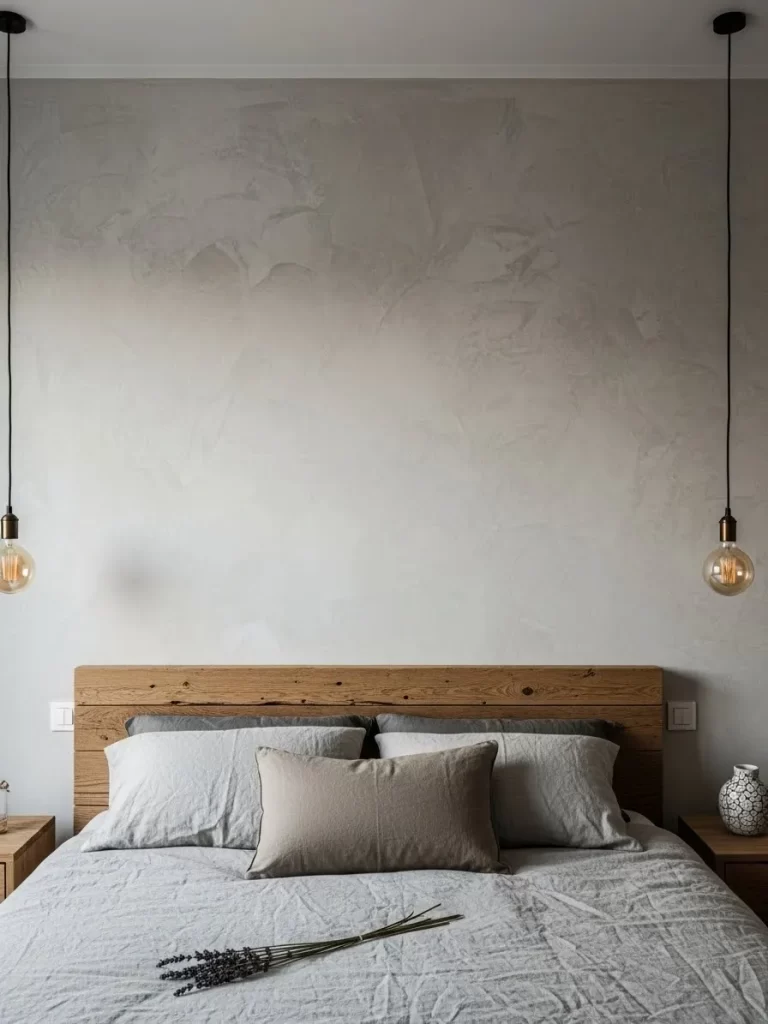
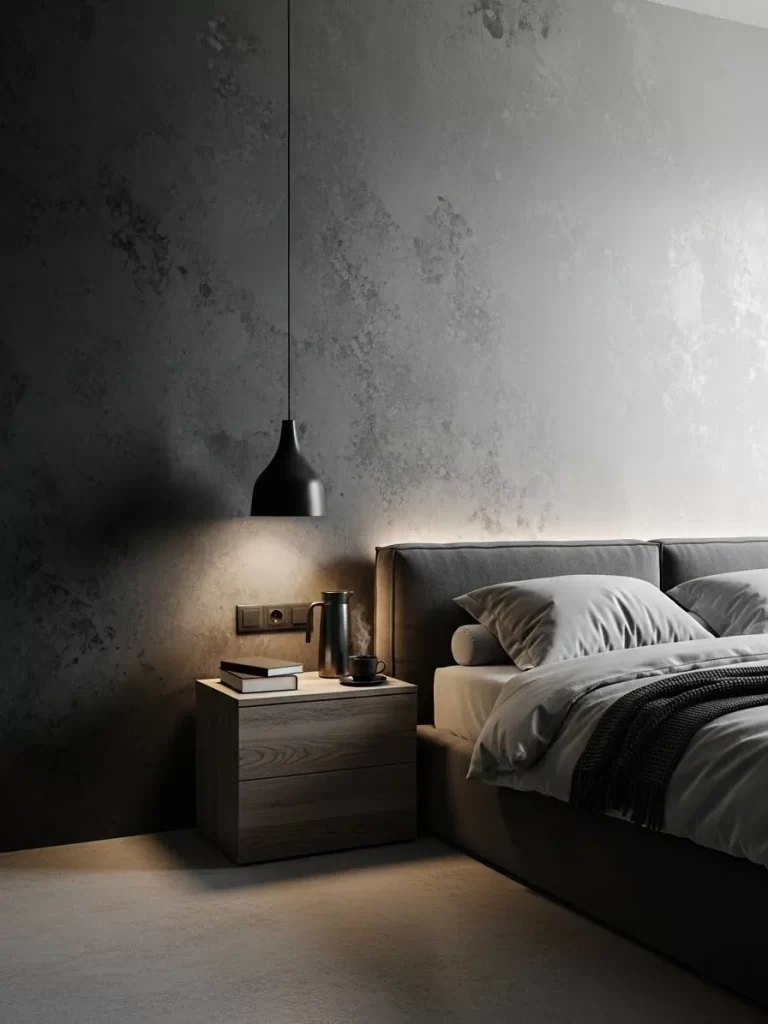
1 Sophisticated Backlit Vertical Wood Slat Wall
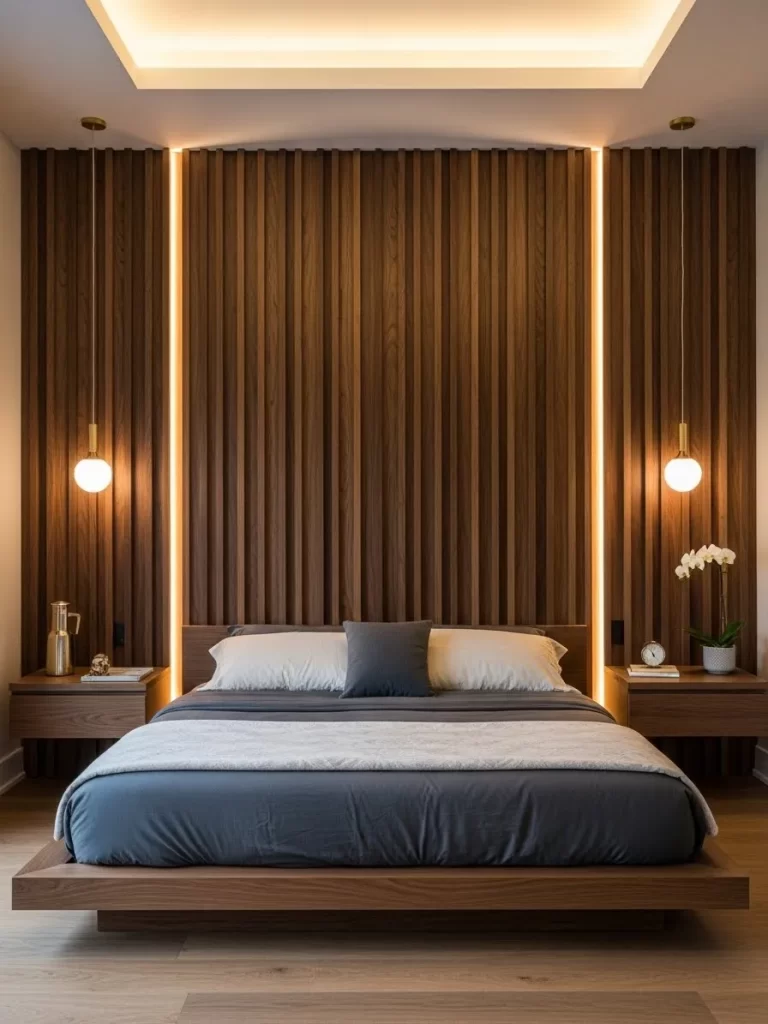
Vertical walnut wood slats stretch from the floor to the ceiling to create a bold architectural look. These lines add height to your room while providing a warm and organic texture. A central section sits slightly forward to hide soft LED lighting strips along the edges.
This glow provides a gentle ambient light that is excellent for winding down at night. Two elegant globe pendant lights hang symmetrically on both sides of the bed. This design removes the need for a basic headboard and makes the bedroom feel like a high end boutique hotel.
Material Required List
- Walnut wood slats
- Plywood backing sheets
- Wood stain or sealant
- High quality LED light strips
- Construction adhesive
- Finishing nails
Equipment Required List
- Measuring tape
- Level tool
- Miter saw or hand saw
- Power drill
- Caulking gun
- Hammer
DIY Instruction Step by Step
- Measure the height and width of your wall to calculate how many wood slats you should buy.
- Cut your plywood backing to fit the central area where you want the main accent feature.
- Apply a wood stain or clear sealant to all your slats and let them dry in a ventilated spot.
- Mount the plywood backing to the wall using sturdy screws and wall anchors for a strong hold.
- Attach the LED light strips along the back edges of the side slats before you fix them.
- Use a level tool to ensure the first slat is vertical and straight.
- Apply a line of construction adhesive to the back of each slat.
- Press the slat firmly onto the plywood or wall surface.
- Secure each piece with a few finishing nails at the top and bottom.
- Space the slats evenly using a small scrap piece of wood as a spacer between them.
2 Classic Picture Frame Wall Molding
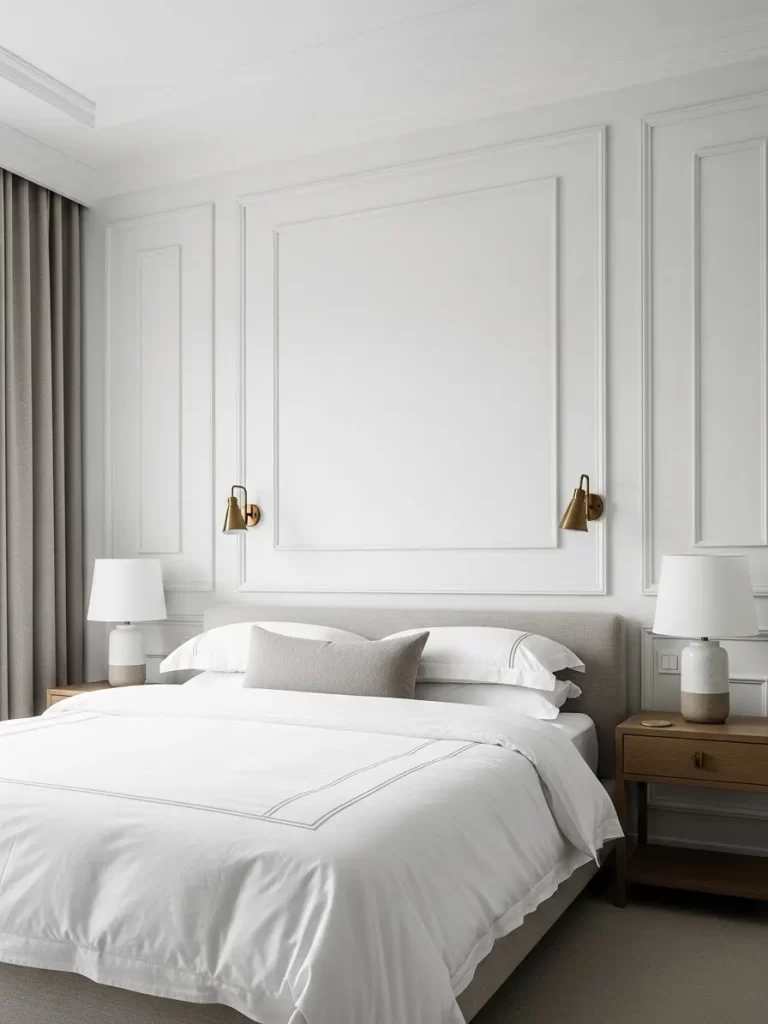
This design uses thin wooden strips to create a timeless and elegant look on a plain white wall. Large rectangular panels add depth and architectural interest without the high cost of a full renovation. It brings a refined atmosphere that looks expensive but stays very simple.
Symmetrical brass lamps sit inside the panels to provide a balanced and peaceful feel. Soft shadows fall across the molding to highlight the subtle texture during the day. Your bedroom will look sophisticated and calm with this clean approach. This method is a great way to fill large empty spaces.
Material Required List
- Thin wood molding trim
- Wood glue
- Paintable caulking
- White interior paint
- Fine sandpaper
Equipment Required List
- Measuring tape
- Miter box and saw
- Level tool
- Pencil
- Painter tape
DIY Instruction Step by Step
- Measure the width of your wall to plan how many rectangles you want to create.
- Use a pencil and level to draw the boxes directly on the wall surface.
- Cut your molding pieces at a forty five degree angle using a miter saw.
- Sand the edges of each wood piece until they feel smooth to the touch.
- Apply wood glue to the back of the trim and press it onto your pencil lines.
- Use painter tape to hold the pieces in place while the glue dries completely.
- Fill any small gaps at the corners with a tiny amount of caulking.
- Let the caulking dry and then sand it until the joints are invisible.
- Paint over the molding using the same color as your wall for a seamless look.
- Wipe away any dust with a damp cloth to finish the project.
3 Abstract Gold Foil Triptych Art
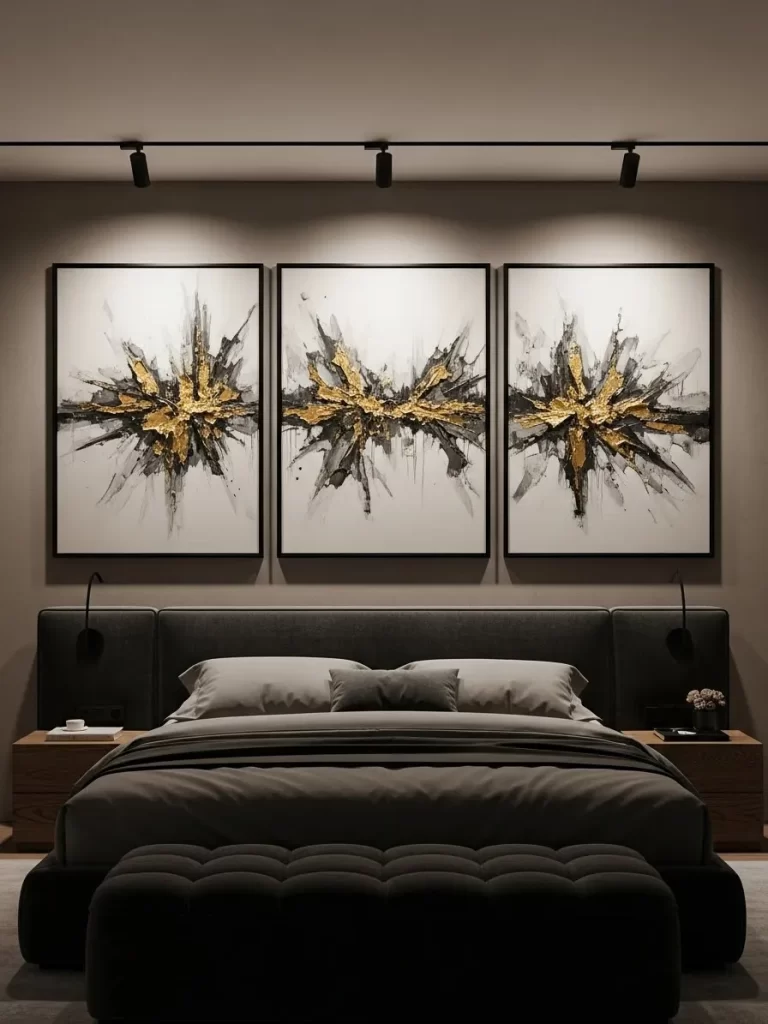
Three large canvases hang side by side to fill the empty space above the bed area. Bold black strokes meet shimmering gold accents in these unique abstract pieces. Each frame tells a story while keeping the room modern and edgy. The dark tones ground the bed and create a strong focal point.
Track lighting shines down from the ceiling to make the gold foil surfaces pop. This setup works well for anyone who loves contemporary art and luxury finishes. Your bedroom will feel like a curated gallery with this high impact display. It adds a professional touch to a minimalist room.
Material Required List
- Three large blank canvases
- Black acrylic paint
- Gold leaf sheets
- Metal leaf adhesive
- Black floating frames
Equipment Required List
- Large paint brush
- Soft brush for gold leaf
- Level tool
- Hammer
- Measuring tape
DIY Instruction Step by Step
- Lay your three canvases flat on the floor in a straight row.
- Paint large and flowing black shapes across all three pieces so the design looks connected.
- Wait for the black paint to dry for at least two hours.
- Apply the adhesive glue in random spots where you want the gold to shine.
- Place the gold leaf sheets over the glue and press them down very gently.
- Use a soft brush to sweep away the extra bits of gold leaf.
- Slide each canvas into a black floating frame for a professional finish.
- Use a level and pencil to mark the wall where the frames will sit.
- Drive a nail into the wall for each piece of art with even spacing.
- Hang the canvases and step back to check that the horizon line is straight.
4 Emerald Velvet Vertical Padded Wall
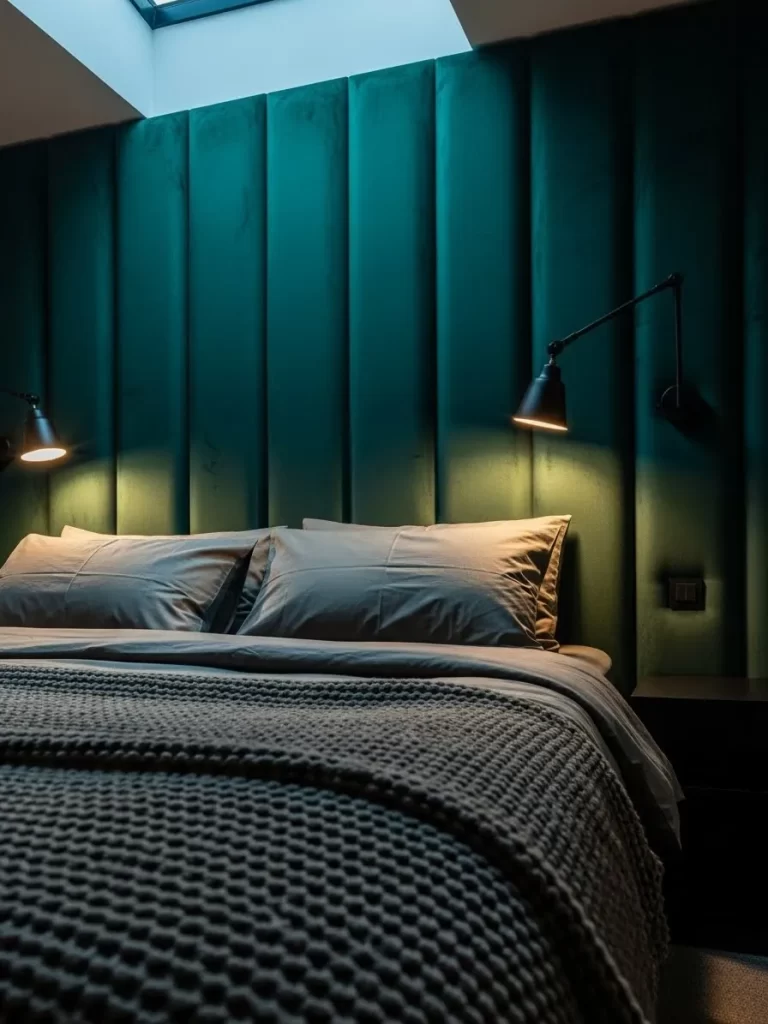
Luxurious emerald green velvet covers the entire wall behind the bed to create a plush backdrop. These soft vertical panels reach the ceiling and provide a moody and expensive atmosphere. The rich color adds a layer of comfort that a basic headboard cannot provide. It makes the room feel extra quiet by absorbing sound.
Modern black lamps are mounted directly onto the panels for a sleek and functional look. This design turns the entire wall into a piece of soft furniture. You can skip the traditional headboard entirely with this comfortable approach. It is an excellent choice for a bold and cozy primary bedroom.
Material Required List
- MDF boards cut into long strips
- Thick foam padding
- Green velvet fabric
- Heavy duty staples
- Spray adhesive
Equipment Required List
- Staple gun
- Fabric scissors
- Measuring tape
- Level tool
- Construction glue gun
DIY Instruction Step by Step
- Cut your MDF boards into long rectangles that reach from the floor to the ceiling.
- Glue the foam padding onto the front of each board using spray adhesive.
- Cut the velvet fabric so it is several inches wider than your board on all sides.
- Lay the fabric face down and place the padded board on top.
- Pull the fabric tight over the edges and staple it to the back of the MDF.
- Fold the corners neatly to avoid any bulky fabric bunches.
- Repeat this process until all your panels are covered in velvet.
- Apply a generous amount of construction glue to the back of the first panel.
- Press the panel against the wall and use a level to keep it straight.
- Fit the remaining panels tightly against each other until the wall is full.
5 Earthy Textured Venetian Plaster Wall
A textured plaster finish brings a raw and organic feel to this sleeping space. The light grey tones swirl together to mimic the look of natural stone. This technique provides a soft and cloudy background that feels very peaceful.
Minimalist bulb lights hang from the ceiling to illuminate the uneven surface. This style proves that you do not need bright colors to make a statement. The subtle movement in the plaster keeps the room from looking flat.
Material Required List
- Venetian plaster mix
- Wall primer
- Universal colorant
- Protective wax
- Sandpaper
Equipment Required List
- Steel trowel
- Putty knife
- Paint roller
- Mixing bucket
- Clean rags
DIY Instruction Step by Step
- Clean your wall and apply a layer of primer with a roller.
- Mix your plaster in a bucket and add a small amount of grey colorant.
- Use a trowel to apply a very thin layer of plaster across the wall.
- Use random and curved strokes to create a natural texture.
- Let the first coat dry for several hours before starting the next.
- Apply a second thin coat and fill in any large gaps.
- Sand the surface lightly once it is dry to make it smooth to the touch.
- Rub a layer of wax over the plaster with a rag to add a soft shine.
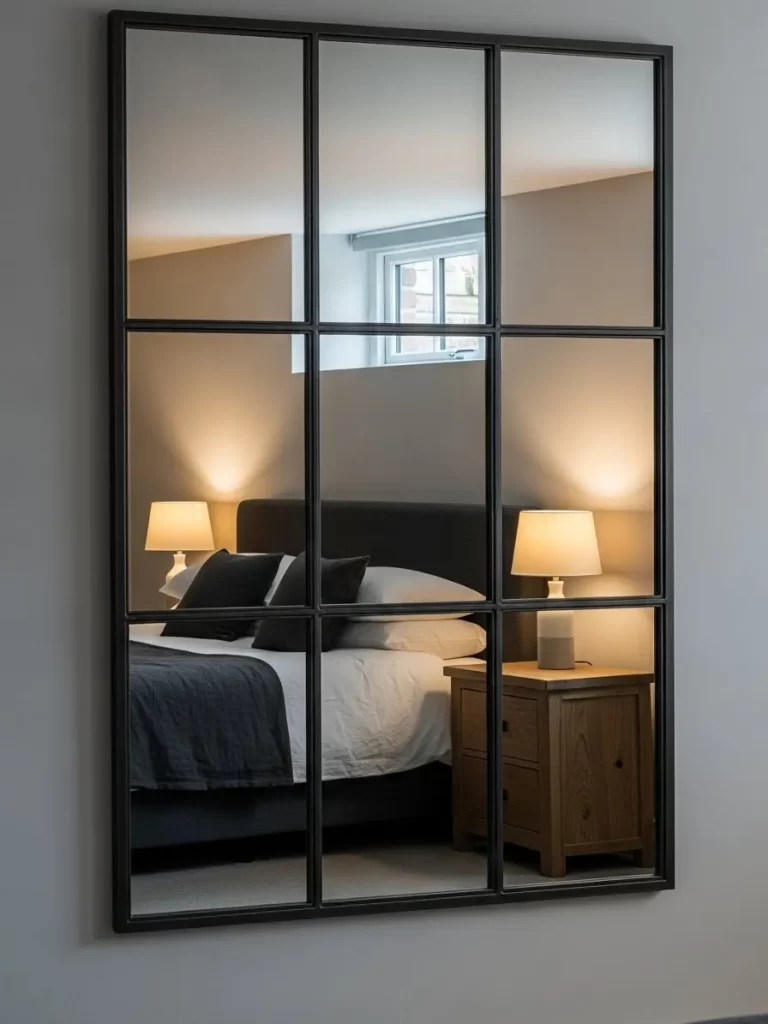
6 Industrial Antique Mirror Grid Wall
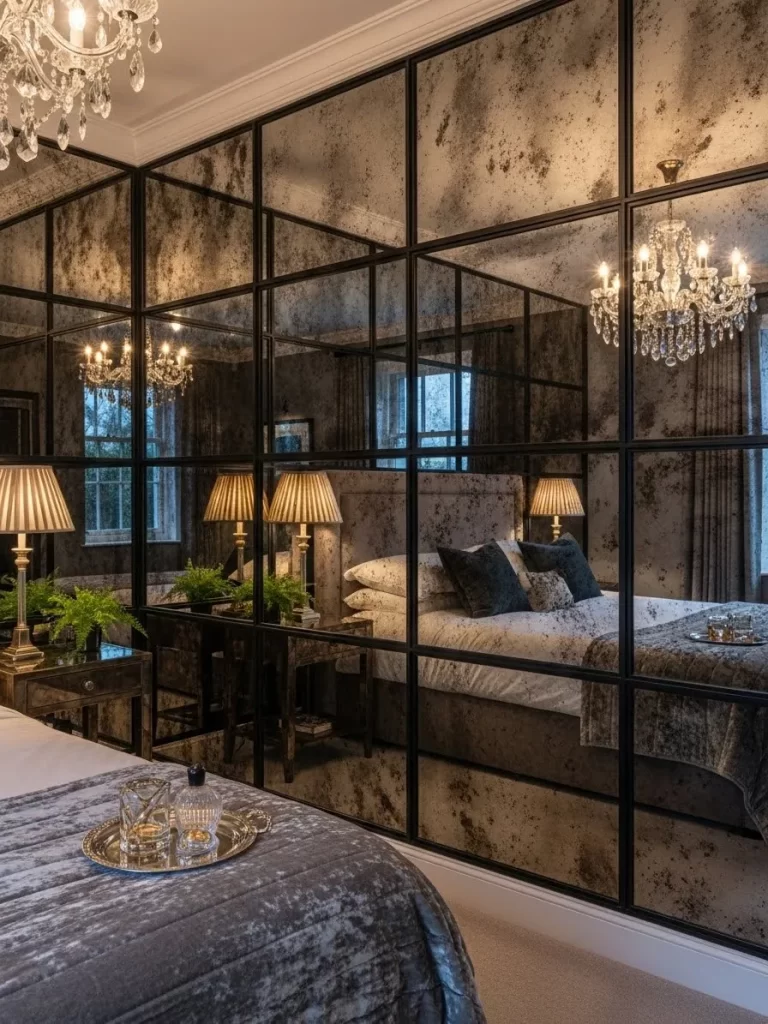
Large mirrored panels with a distressed finish cover the wall to double the size of the room. The dark grid lines add a touch of industrial charm to the elegant space. This feature reflects light from the chandelier to brighten every corner.
The aged look of the mirrors prevents the room from feeling too cold. It adds a vintage character that pairs well with velvet bedding. This setup is a smart choice for making a small bedroom feel like a grand suite.
Material Required List
- Antique mirror sheets
- Thin black wood laths
- Mirror adhesive
- Black paint
- Wood glue
Equipment Required List
- Glass cutter
- Caulking gun
- Level
- Measuring tape
- Miter saw
DIY Instruction Step by Step
- Measure your wall and decide how many mirror squares you want in your grid.
- Cut your mirror sheets to the desired size using a glass cutter.
- Paint your wood laths black and let them dry.
- Apply mirror adhesive to the back of each mirror piece.
- Press the mirrors onto the wall starting from the bottom corner.
- Leave a small gap between each mirror sheet for the wood grid.
- Glue the black wood laths over the gaps between the mirrors.
- Check with a level frequently to ensure the grid stays straight and even.
7 Minimalist Layered Art Shelf
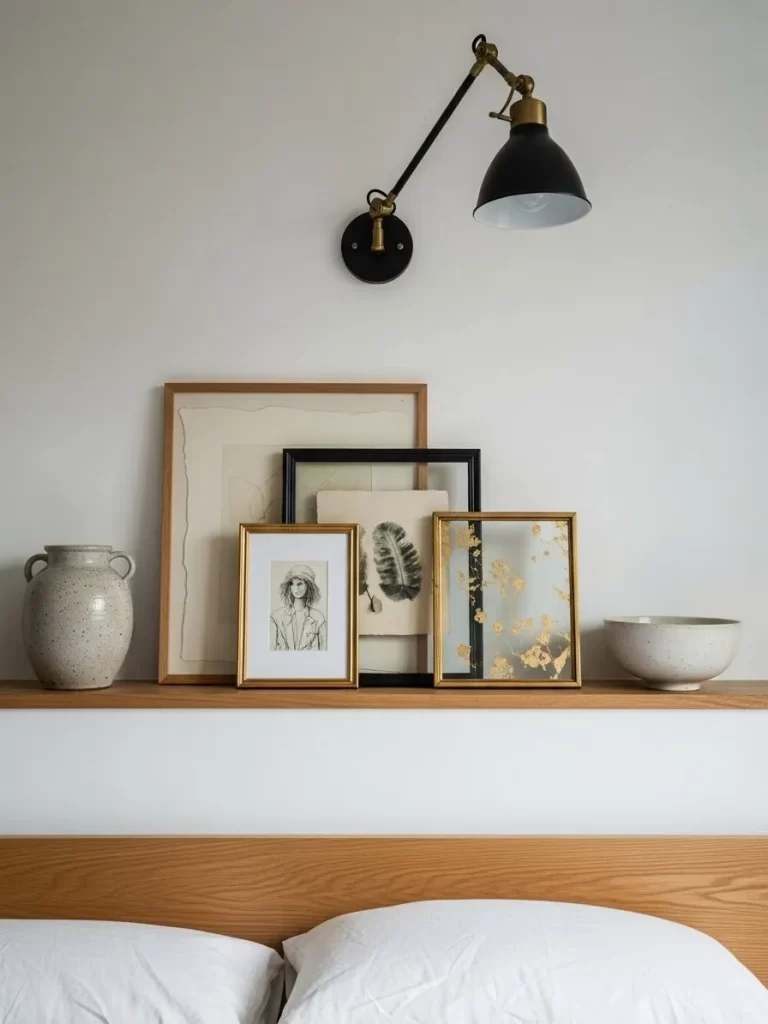
A long wooden shelf sits above the bed to hold a collection of framed art. Overlapping the frames creates a casual and lived in vibe. This allows you to change your decor easily without making new holes in the wall.
Earthy jars and bowls sit at the ends of the shelf for added height. A black swing arm lamp provides focused light for reading at night. This approach turns a plain wall into a personal gallery.
Material Required List
- Thick wooden board
- Heavy duty wall brackets
- Various picture frames
- Screws
- Wall anchors
Equipment Required List
- Power drill
- Level
- Stud finder
- Screwdriver
- Pencil
DIY Instruction Step by Step
- Find the wooden studs in your wall using a stud finder.
- Mark the height where you want your shelf to sit.
- Drill holes and attach the brackets into the wall studs for a strong hold.
- Place the wooden board on top of the brackets and screw it in place.
- Choose frames of different sizes and colors to create interest.
- Lean the largest frames against the wall first.
- Place smaller frames in front of the larger ones to create layers.
- Add a few pieces of pottery or small plants to fill the gaps between frames.
8 Botanical Print Fabric Canopy
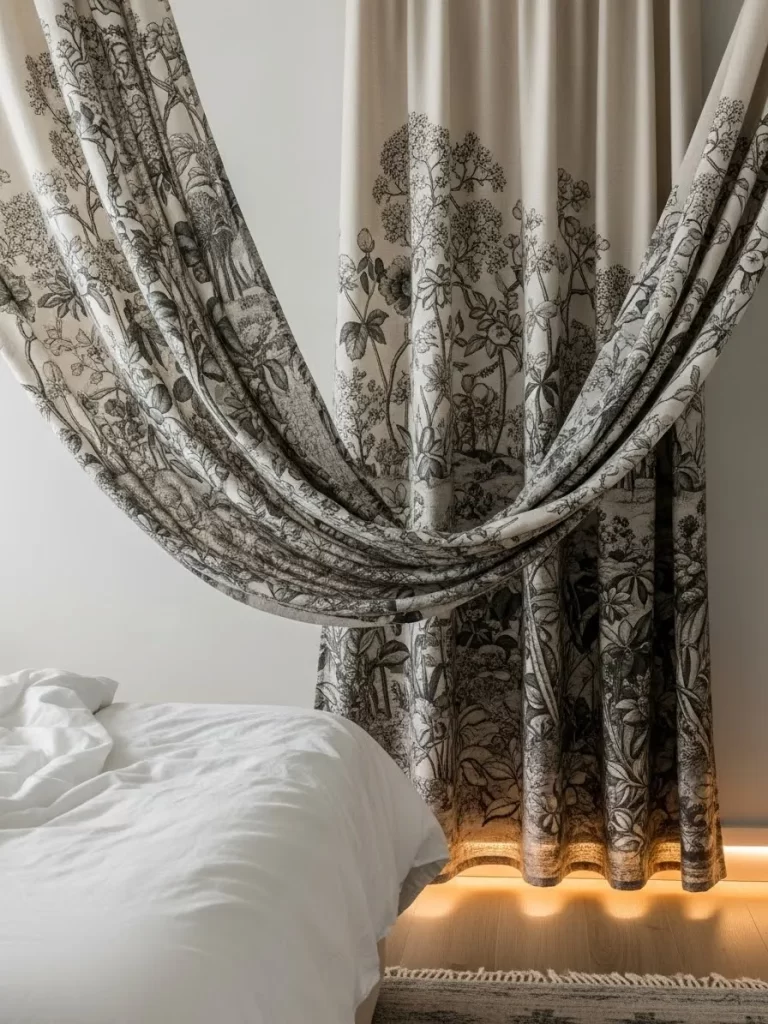
Flowing fabric with a black and white tree pattern hangs from the ceiling. This canopy adds a soft and romantic touch to the sleeping area. The fabric drapes naturally to create a sense of height and drama.
A hidden light strip at the bottom of the wall creates a warm glow behind the cloth. The botanical print brings a bit of nature indoors in a very stylish way. This is an easy way to add pattern without using wallpaper.
Material Required List
- Long piece of printed fabric
- Ceiling hooks
- Thin wooden dowel
- LED light strip
- Fabric tape
Equipment Required List
- Step ladder
- Power drill
- Measuring tape
- Scissors
- Pencil
DIY Instruction Step by Step
- Measure from your ceiling to the floor to see how much fabric you need.
- Hem the edges of your fabric using fabric tape if the ends are rough.
- Drill holes in the ceiling above the head of the bed.
- Install ceiling hooks into the holes securely.
- Slide a thin wooden dowel through a pocket in the top of the fabric.
- Hang the dowel from the hooks so the fabric falls down the wall.
- Pull the middle of the fabric forward and hook it to the side for a draped look.
- Place an LED light strip along the baseboard to light up the fabric from below.
9 3D Wave Textured Wall Panels
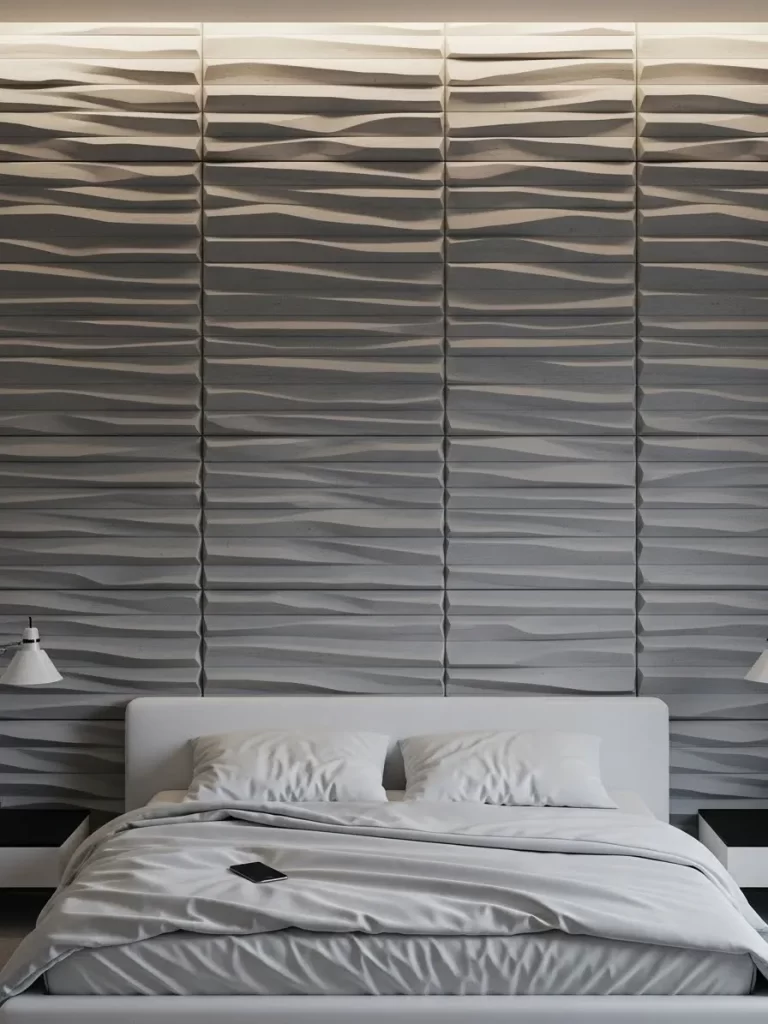
Grey panels with a deep wavy pattern create a striking modern accent. The three dimensional surface plays with light and shadow throughout the day. It looks like moving water and adds a calming energy to the bedroom.
The panels cover the entire wall to create a seamless and high tech appearance. A simple white headboard keeps the focus on the complex wall texture. This design is excellent for anyone who wants a futuristic and clean look.
Material Required List
- 3D wall panels
- Heavy duty adhesive
- White or grey paint
- Sandable caulk
- Painter tape
Equipment Required List
- Level
- Caulking gun
- Paint brush
- Measuring tape
- Utility knife
DIY Instruction Step by Step
- Clean your wall thoroughly to remove any dust or grease.
- Use a level to draw a straight line where the first row of panels will go.
- Apply adhesive to the back of the first 3D panel.
- Press the panel firmly onto the wall and hold it for a few seconds.
- Fit the next panel tightly against the first to keep the wave pattern aligned.
- Use a utility knife to trim any panels that need to fit around outlets.
- Fill the tiny seams between panels with caulk for a smooth look.
- Paint the entire wall in your chosen color once the adhesive is dry.
10 Radial Gold Metallic Wall Slats
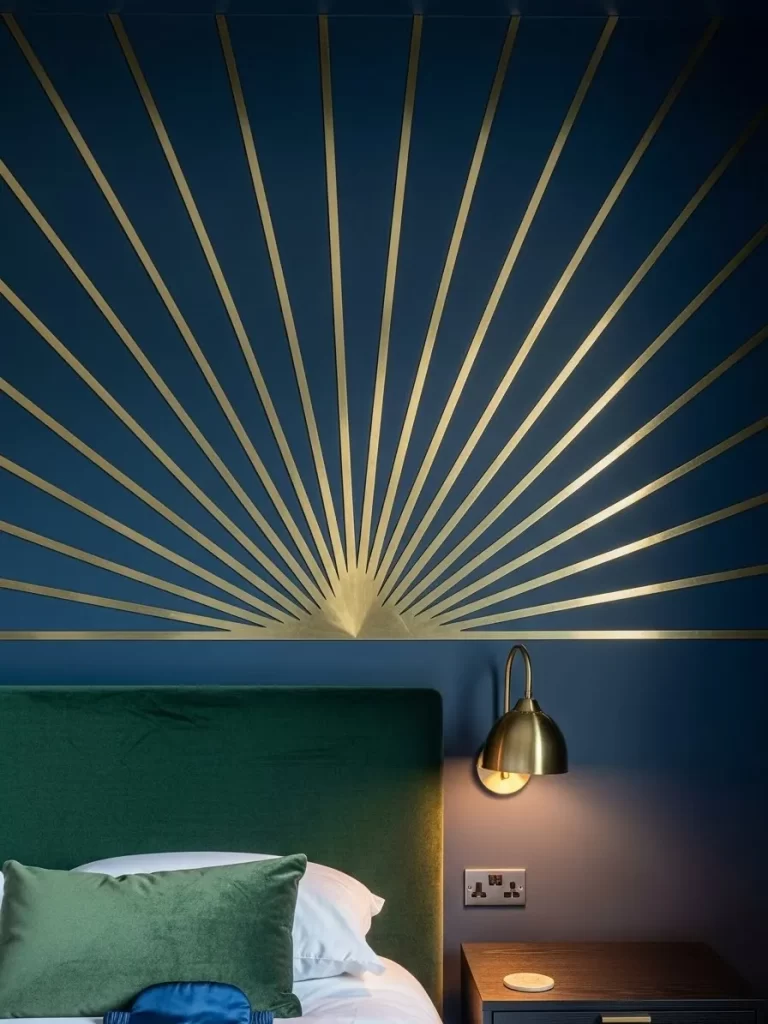
Golden metal strips spread out from behind the headboard like a sunburst. The dark navy blue wall provides a sharp contrast that makes the gold shine. This geometric pattern adds energy and a sense of luxury to the room.
A matching brass lamp on the nightstand completes the coordinated look. The thin lines of the sunburst draw the eye upward and make the ceiling feel higher. This wall decor acts as a piece of jewelry for your bedroom.
Material Required List
- Thin flat gold slats
- Construction adhesive
- Navy blue wall paint
- Sandpaper
- Painter tape
Equipment Required List
- Measuring tape
- Pencil
- Level
- Protractor
- Clean cloth
DIY Instruction Step by Step
- Paint your entire wall a deep navy blue and let it dry.
- Spray paint your slats with a gold metallic finish.
- Find the center point of your bed and mark it on the wall.
- Use a protractor to mark the angles for each ray of the sunburst.
- Measure and cut your slats to different lengths for a dynamic look.
- Apply a small amount of adhesive to the back of each gold slat.
- Place the slats on your marked lines starting from the center point.
- Hold each piece for one minute to ensure it sticks firmly to the wall.
11 Sophisticated Built In Library Wall
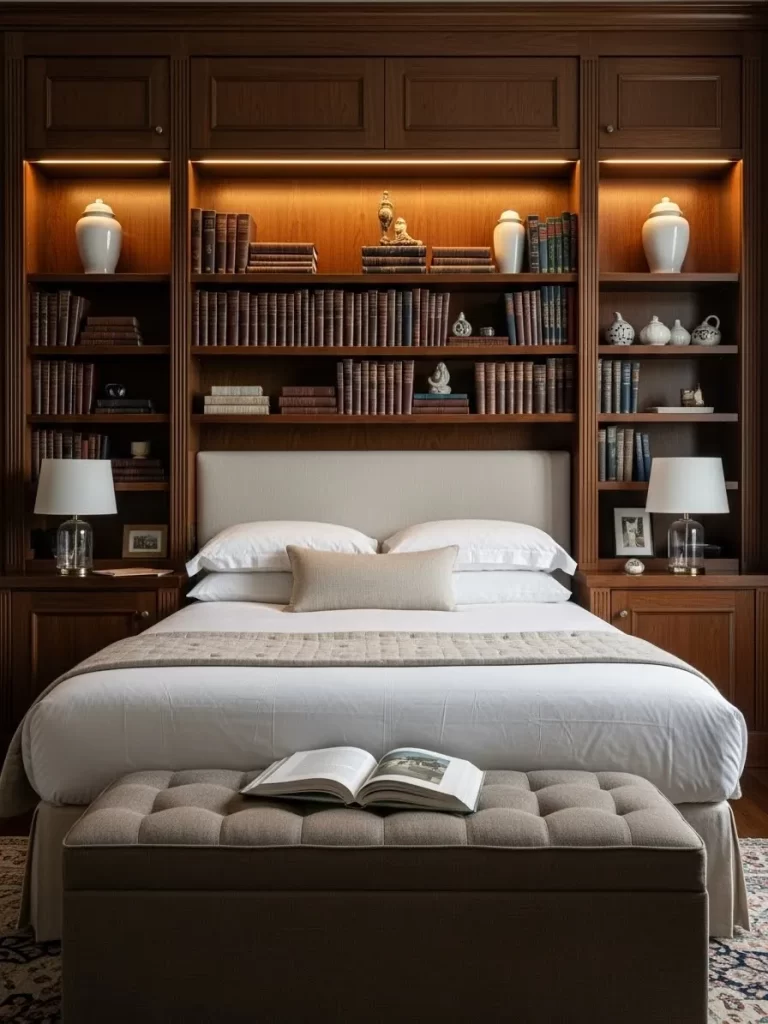
A floor to ceiling bookshelf creates a cozy and intellectual atmosphere in this bedroom. The dark wood finish surrounds the bed to provide a sense of security and warmth. You can display your favorite books and decorative jars within easy reach. The shelving acts as a functional headboard that offers endless storage.
Warm lights glow from the top to highlight your collection. The structure frames the bed and makes the large wall feel useful. A soft upholstered headboard sits in the middle to provide a comfortable place to rest. This design turns a simple sleeping area into a private study.
Material Required List
- Prebuilt bookshelves or MDF boards
- Wood screws
- Wood stain
- LED puck lights
- Finishing nails
Equipment Required List
- Power drill
- Stud finder
- Level
- Measuring tape
- Paint brush
DIY Instruction Step by Step
- Measure the width and height of your wall to plan the shelf layout.
- Use a stud finder to locate the wooden supports inside your wall.
- Build or buy bookshelves that fit the height of your ceiling.
- Position the shelves against the wall and screw them into the studs.
- Join the individual shelf units together with wood screws for stability.
- Apply a wood stain to all visible surfaces and let it dry.
- Install decorative trim at the top to hide any gaps at the ceiling.
- Drill small holes in the back to run wires for your puck lights.
- Mount the lights under the top shelves and arrange your books.
12 Woven Grasscloth Inset Molding
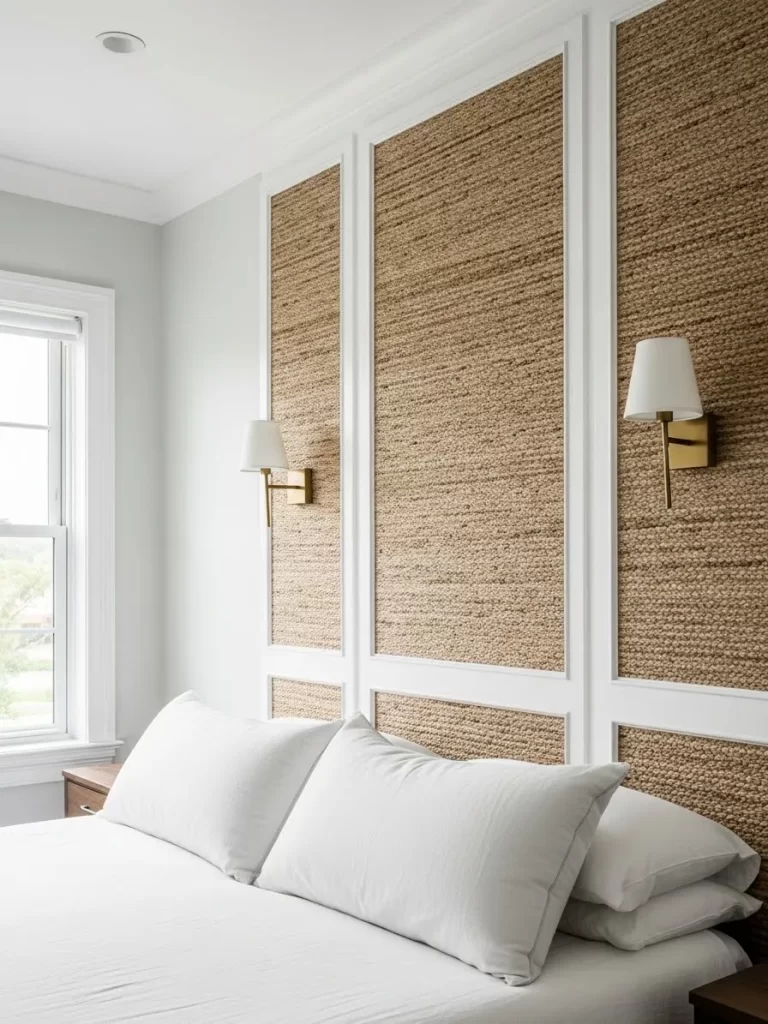
This design combines the elegance of white molding with the texture of natural grasscloth. Large rectangular panels feature a woven material inside the frames. It adds a coastal and organic feel to an otherwise formal room. The white frames keep the look clean and modern.
Symmetrical lamps are mounted on the wall to provide a balanced light. The contrast between the rough fabric and the smooth wood is very appealing. This approach brings a touch of nature into a sophisticated space. The panels create a focused area of interest behind the bed.
Material Required List
- Grasscloth wallpaper
- Wood trim molding
- Wallpaper paste
- White paint
- Wood glue
Equipment Required List
- Utility knife
- Level
- Measuring tape
- Paint roller
- Hammer
DIY Instruction Step by Step
- Paint your wood molding white and let it dry completely.
- Use a level and pencil to mark large rectangles on the wall.
- Apply wallpaper paste inside the marked areas on your wall.
- Cut the grasscloth to size and press it firmly into the paste.
- Use a roller to smooth out any air bubbles in the fabric.
- Cut your wood molding at forty five degree angles for the corners.
- Glue the molding strips around the edges of the wallpaper.
- Use small nails to hold the molding in place while the glue sets.
13 Framed Rattan Cane Wall Panels
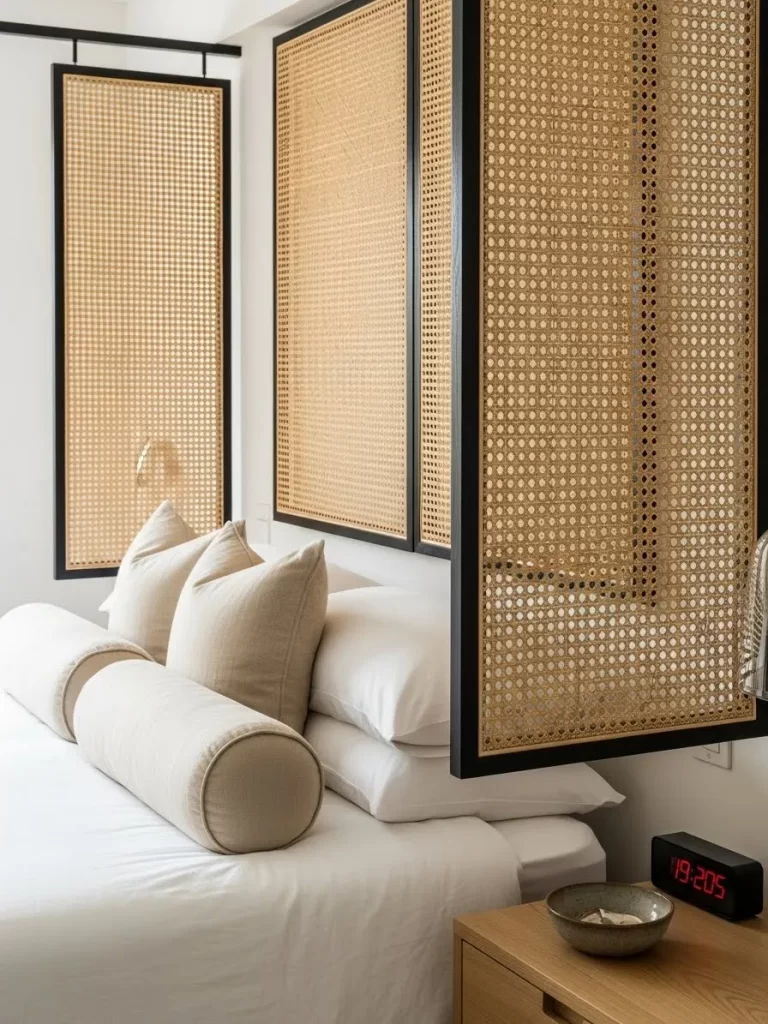
Black frames hold light colored rattan cane to create a modern tropical vibe. These panels hang symmetrically behind the bed to act as a light and airy headboard. The woven pattern allows the wall to breathe while adding beautiful texture. The black and tan color scheme looks sharp against the white wall.
The panels provide a soft background that pairs well with neutral bedding. This design is perfect for creating a vacation feel in your own home. It is a simple way to add a handmade element to your decor. The cane webbing is durable and easy to work with.
Material Required List
- Rattan cane webbing
- Black wooden frames
- Heavy duty staples
- Wood glue
- Picture hangers
Equipment Required List
- Staple gun
- Scissors
- Measuring tape
- Hammer
- Level
DIY Instruction Step by Step
- Buy or paint several wooden frames in a matte black finish.
- Soak the rattan cane in warm water for thirty minutes to make it soft.
- Cut the cane webbing so it is slightly larger than the frame opening.
- Lay the wet cane over the back of the frame and pull it tight.
- Staple the cane to the frame starting from the center of each side.
- Trim any extra cane that sticks out past the staples with scissors.
- Let the cane dry for twenty four hours so it tightens naturally.
- Attach hanging hardware to the back and mount them on your wall.
14 Grey Fabric Padded Grid Wall
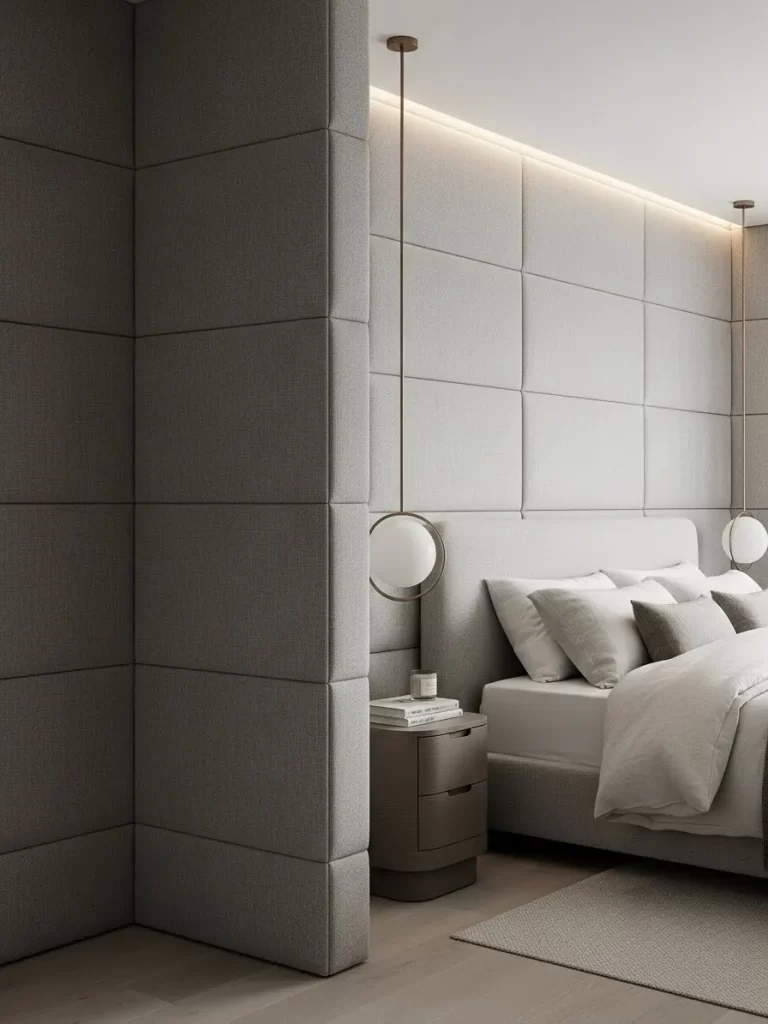
Soft grey fabric panels cover the wall to create a quiet and cozy atmosphere. This grid pattern provides a comfortable surface to lean against while reading in bed. It absorbs sound and makes the room feel like a sanctuary. The neutral grey color works with any bedding style you choose.
Integrated globe lights hang from the ceiling to illuminate the soft texture. This setup is a smart choice for creating a minimalist and peaceful bedroom. The panels give the wall a three dimensional look without being too busy. It feels very expensive and high end.
Material Required List
- Square plywood boards
- Foam padding
- Grey linen fabric
- Spray adhesive
- Mounting clips
Equipment Required List
- Staple gun
- Measuring tape
- Level
- Power drill
- Scissors
DIY Instruction Step by Step
- Cut your plywood into equal squares to create a grid.
- Glue the foam padding to the front of each plywood square.
- Wrap your grey fabric around the board and staple it to the back.
- Make sure the corners of the fabric are folded neatly and flat.
- Repeat this until you have enough panels to cover your wall area.
- Install the mounting clips on the wall in a straight line.
- Attach the corresponding clips to the back of each padded square.
- Slide the squares onto the wall clips starting from the bottom row.
15 Eclectic Basket and Art Gallery Wall
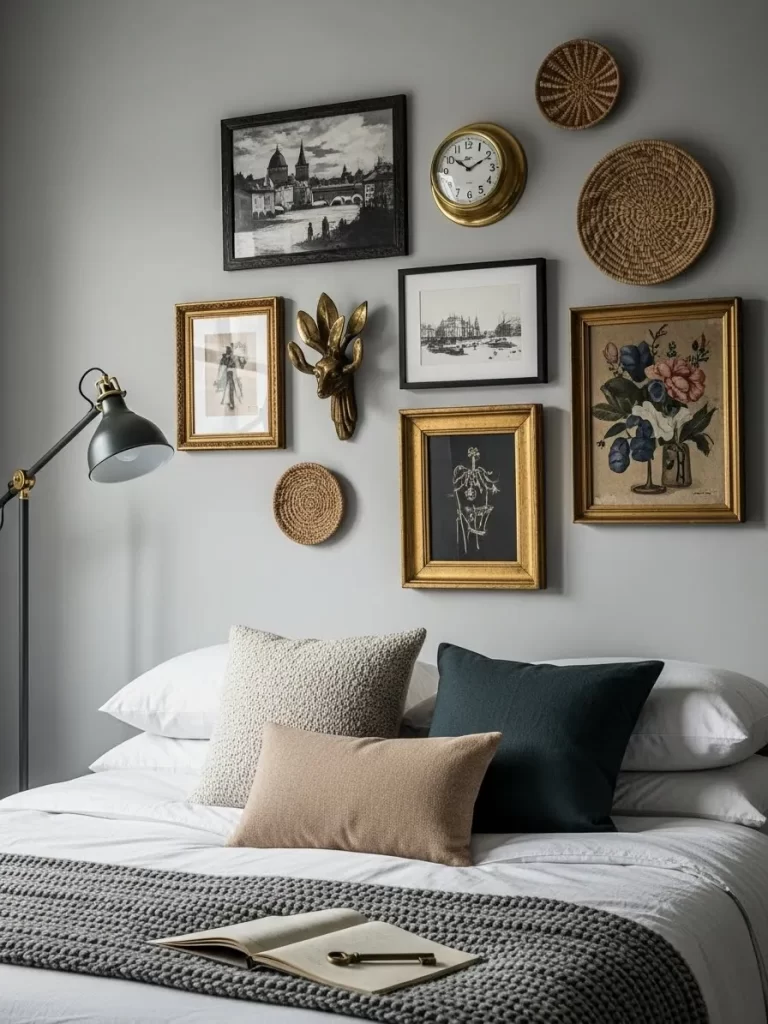
Woven baskets and vintage gold frames create a charming and personal wall display. This mix of materials adds warmth and a sense of history to the room. It feels collected over time rather than bought all at once. The different textures of the baskets contrast well with the smooth glass of the frames.
A black floor lamp provides a modern touch that balances the vintage items. This approach turns a plain wall into a personal gallery that tells a story. It is a flexible way to fill a large space without much money. Your bedroom will feel much more personal with this unique setup.
Material Required List
- Woven wall baskets
- Vintage gold frames
- Decorative wall clock
- Command strips
- Small nails
Equipment Required List
- Hammer
- Measuring tape
- Pencil
- Level
- Step ladder
DIY Instruction Step by Step
- Collect various baskets and frames that share a similar color palette.
- Lay all the items on the floor to plan your layout first.
- Start with the largest item in the center and build outward.
- Mark the top edge of each item on the wall with a pencil.
- Use small nails for the heavy frames and command strips for the baskets.
- Check the spacing between items to keep the wall looking balanced.
- Step back often to see the whole wall and make any changes.
- Add a few small decorative items like a clock to finish the look.
16 Lush Vertical Live Moss Wall Art
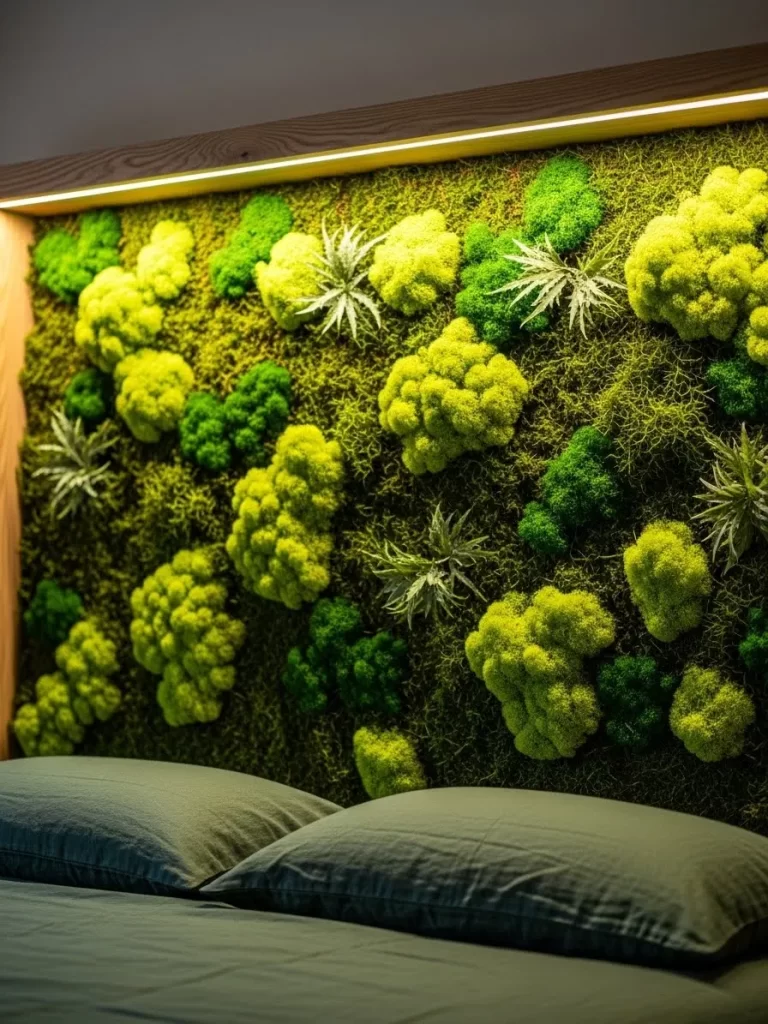
Bring the outdoors inside with a vibrant green moss feature wall. Different types of preserved moss create a 3D landscape that stays green without watering. It adds a splash of color and a natural energy to the bedroom. The texture is soft and inviting to the eye.
The moss sits inside a wooden frame and includes small silver plants for variety. A hidden light at the top makes the green colors look even brighter. This is a stunning focal point for any nature lover. It provides an organic element that contrasts with modern furniture.
Material Required List
- Preserved sheet moss
- Reindeer moss in various shades
- Wooden frame
- Hot glue sticks
- Plywood backing
Equipment Required List
- Glue gun
- Scissors
- Level
- Hammer
- Pencil
DIY Instruction Step by Step
- Build or buy a shallow wooden frame with a plywood back.
- Lay the frame flat on a table before you start gluing.
- Apply a large amount of hot glue to a small area of the plywood.
- Press a piece of sheet moss into the glue and hold it for a second.
- Mix in different colors of reindeer moss to create texture.
- Tuck in small silver air plants to add more visual interest.
- Fill every single gap so no plywood is visible through the moss.
- Let the glue cool and dry for at least one hour before hanging.
17 Natural Rough Grey Stone Feature Wall

A massive stone wall creates a rugged and powerful backdrop for the bed. The uneven surface and raw grey color look like a natural cliff side. It brings a sense of strength and permanence to the bedroom design. The stone adds a layer of sophistication that is very impressive.
A large skylight above allows natural light to wash over the stone texture. Dark bedding and minimalist furniture keep the room looking modern and clean. This design is a bold choice that will wow anyone who enters. It grounds the space and makes it feel very solid.
Material Required List
- Natural stone veneer panels
- Stone mortar or adhesive
- Protective stone sealer
- Wall primer
- Painter tape
Equipment Required List
- Notched trowel
- Wet saw or stone cutter
- Level
- Large sponge
- Bucket
DIY Instruction Step by Step
- Prepare the wall by cleaning it and applying a strong primer.
- Draw a level line at the bottom of the wall to start your first row.
- Mix the stone mortar in a bucket according to the package.
- Spread the mortar onto the wall using a notched trowel.
- Press the stone panels into the mortar and wiggle them into place.
- Use a wet saw to cut the panels to fit around the edges of the wall.
- Wipe away any extra mortar from the front of the stones with a wet sponge.
- Let the entire wall dry for forty eight hours before applying the sealer.
18 Hanging Mini Tapestry on Brass Rod
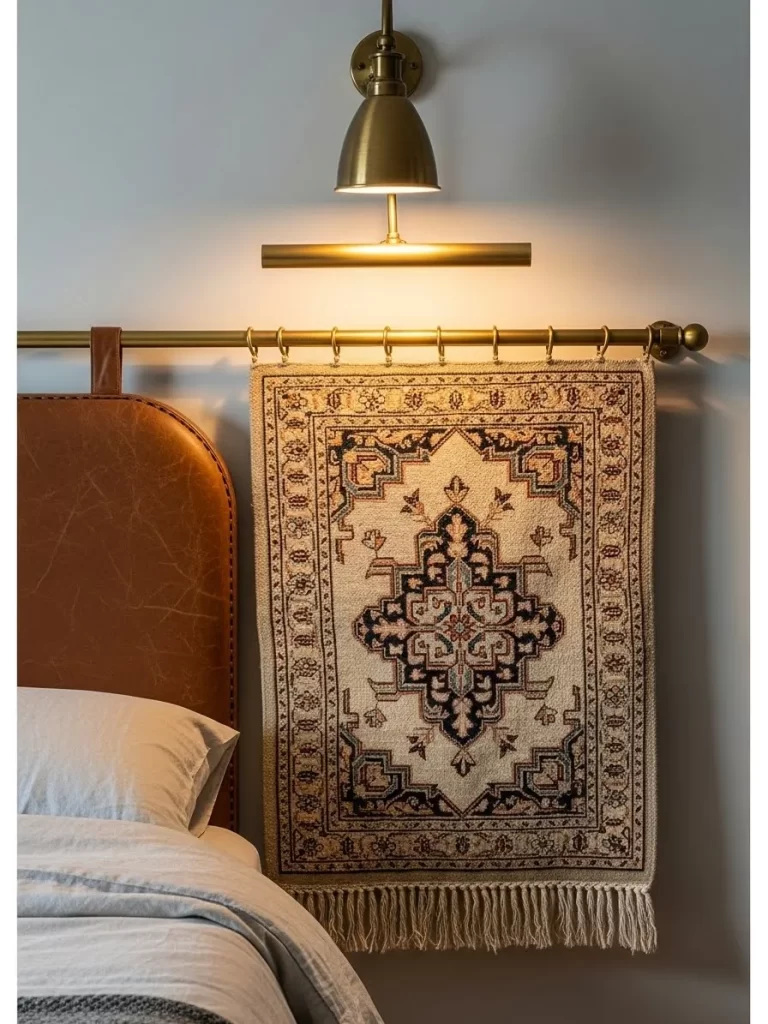
A small woven rug hangs from a sleek brass rod to add immediate warmth. This piece features a classic pattern with soft fringe at the bottom. It brings a cozy and layered feel to the wall without much effort. The textile adds a soft element to the hard surface of the wall.
Brass rings slide onto the rod to hold the fabric securely. A picture light glows from above to highlight the intricate weave. This is a great way to add textile art to a plain room. The brass finish adds a touch of elegance to the rustic rug.
Material Required List
- Small woven rug or tapestry
- Brass curtain rod
- Wall brackets
- Brass clips or rings
- Wall anchors
Equipment Required List
- Power drill
- Screwdriver
- Level
- Measuring tape
- Pencil
DIY Instruction Step by Step
- Pick a small rug that fits the width of the space above your bed.
- Measure the rod and mark the bracket locations on the wall.
- Use a level to ensure the marks are at the same height.
- Drill holes into the wall and insert the plastic wall anchors.
- Screw the brass brackets into the anchors until they are tight.
- Clip the brass rings onto the top edge of your woven rug.
- Slide the rings onto the brass rod and place the rod on the brackets.
- Tighten the small screws on the brackets to lock the rod in place.
19 Moody Mist Mountain Landscape Mural
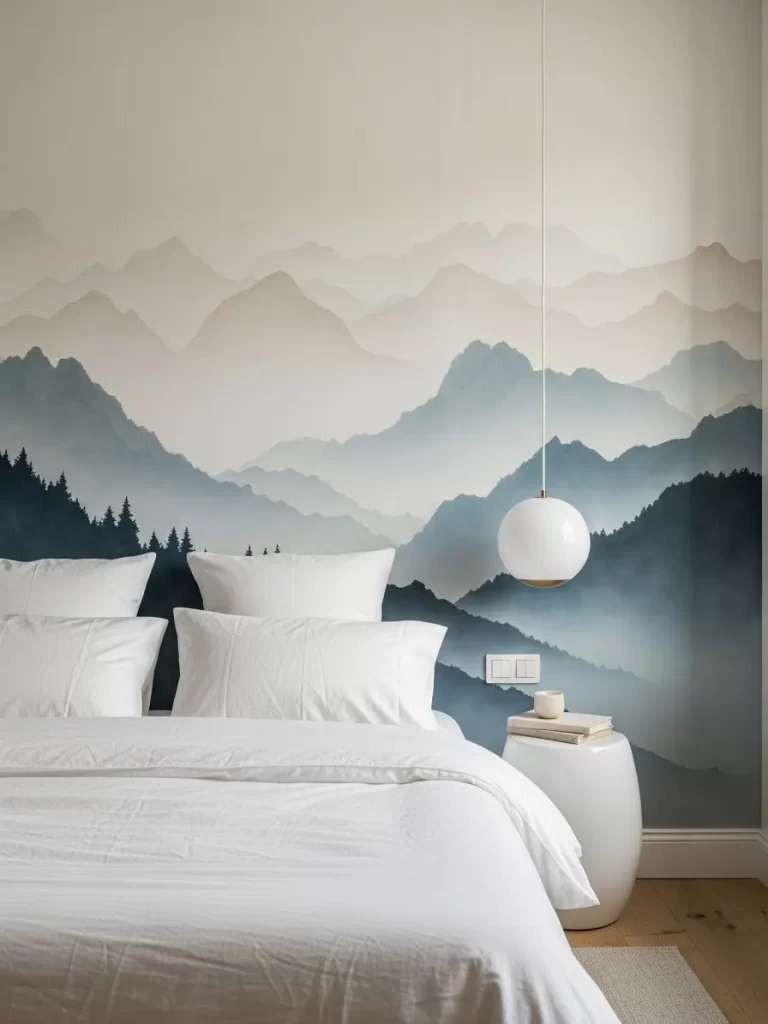
A large wall mural shows a peaceful mountain range covered in thick mist. The soft blue and grey tones create a very calm and quiet atmosphere. It feels like you are waking up in a cabin deep in the woods every morning. The art makes the room feel much larger.
A simple white pendant light hangs in front of the mural for a modern look. This design works best on a large wall with minimal furniture to let the art shine. It is a great way to bring a sense of adventure into your home. The soft colors are very relaxing for a sleeping space.
Material Required List
- Peel and stick mountain mural
- Soft cloth
- Painter tape
- Mild soap and water
- Wallpaper squeegee
Equipment Required List
- Step ladder
- Measuring tape
- Level
- Scissors
- Pencil
DIY Instruction Step by Step
- Clean the wall with a damp cloth and let it dry for one hour.
- Measure the center of the wall to align the middle of the mural.
- Peel off the top few inches of the first mural panel.
- Press the top of the panel onto the wall and check the level.
- Slowly pull the backing paper down while smoothing the mural with a squeegee.
- Push out any air bubbles toward the edges of the panel.
- Overlap the second panel slightly to match the mountain pattern perfectly.
- Trim the extra paper at the bottom with a sharp blade.
20 Backlit Minimalist Floating Wall Panel
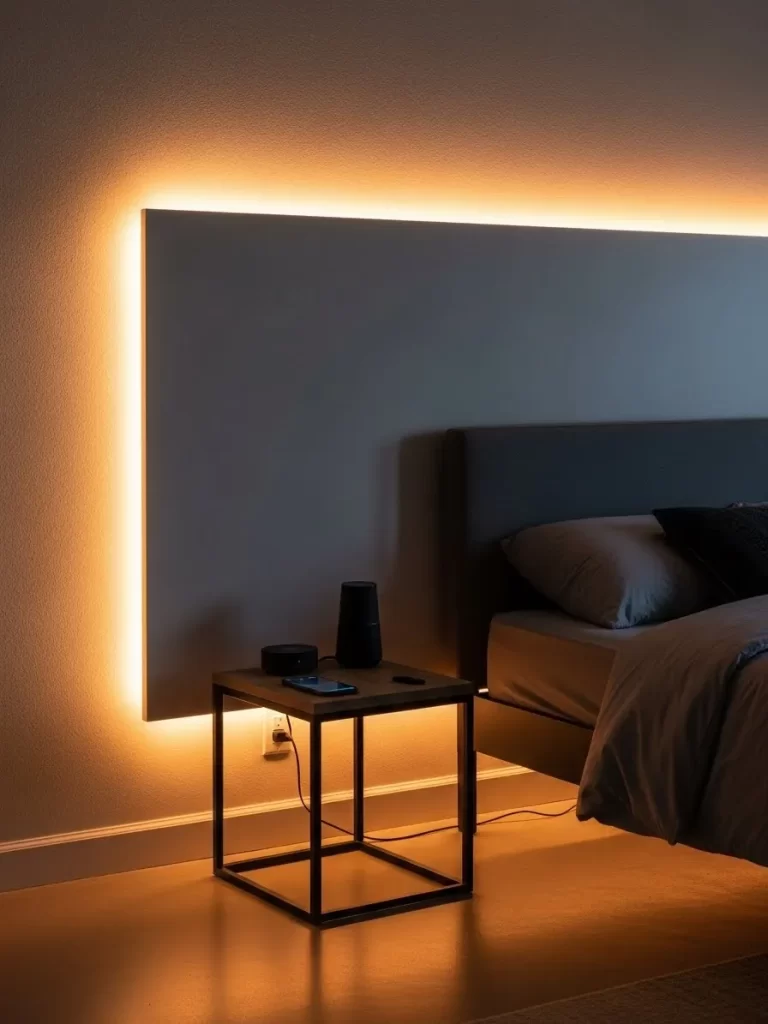
A large grey panel floats in front of the wall and glows from the back. This simple design uses hidden LED lights to create a halo effect around the bed. It adds a modern and clean touch to the room without needing many decorations. The panel makes the bed feel like it is part of the architecture.
The soft orange light provides a warm and inviting feel at night. A small wooden nightstand sits next to the bed to provide a bit of natural color. This setup is a smart choice for people who love a minimalist and tidy bedroom. The light is gentle enough to use as a nightlight.
Material Required List
- Large MDF board
- LED light strips
- Wooden spacer blocks
- Grey paint
- Wall screws
Equipment Required List
- Power drill
- Level
- Paint roller
- Measuring tape
- Screwdriver
DIY Instruction Step by Step
- Paint the large MDF board grey and let it dry on both sides.
- Screw four wooden blocks to the back of the board to act as spacers.
- Stick the LED light strips around the edges of the back of the board.
- Drill holes through the wooden blocks to prepare for wall mounting.
- Have a friend help you hold the board against the wall.
- Use a level to make sure the floating panel is straight.
- Screw the board into the wall through the wooden blocks.
- Plug the LED lights into the nearest power outlet.
21 Vertical Light Oak Slat Wall
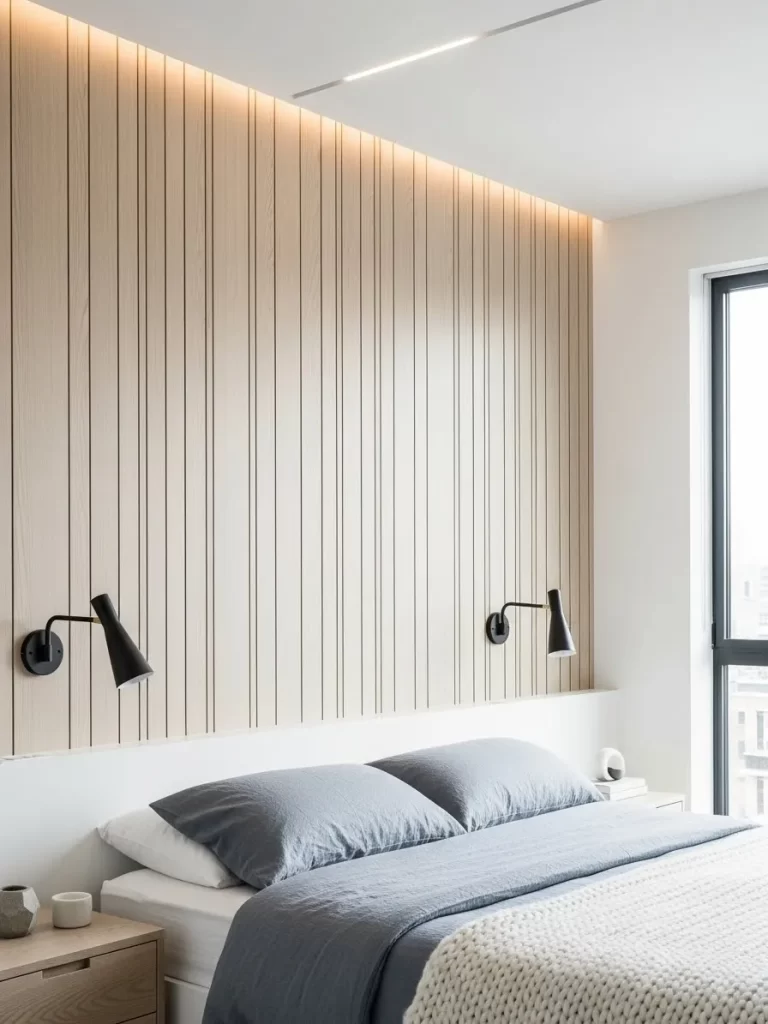
Thin oak slats create a clean and linear pattern across the entire wall. The light wood color makes the room feel bright and airy. It adds a touch of Scandinavian style to your bedroom. The vertical lines make the ceiling look higher.
Modern black sconces are mounted on the wall for a sharp contrast. A low profile bed with grey linens keeps the look minimalist and calm. This design is excellent for creating a textured background without being overwhelming. The result is a professional and high end look.
Material Required List
- Oak wood slats
- Construction adhesive
- Clear wood finish
- Finishing nails
- Sandpaper
Equipment Required List
- Measuring tape
- Miter saw
- Level
- Hammer
- Caulking gun
DIY Instruction Step by Step
- Measure the height of your wall and cut the oak slats to size.
- Sand each piece of wood until the surface is very smooth.
- Apply a clear finish to protect the wood and let it dry.
- Use a level to draw a straight vertical line on your wall.
- Apply a bead of construction adhesive to the back of the first slat.
- Press the slat against the wall and secure it with a finishing nail.
- Use a small wood block as a spacer to keep the gaps even.
- Repeat the process until the entire wall is covered in slats.
22 Large Round Gold Mirror
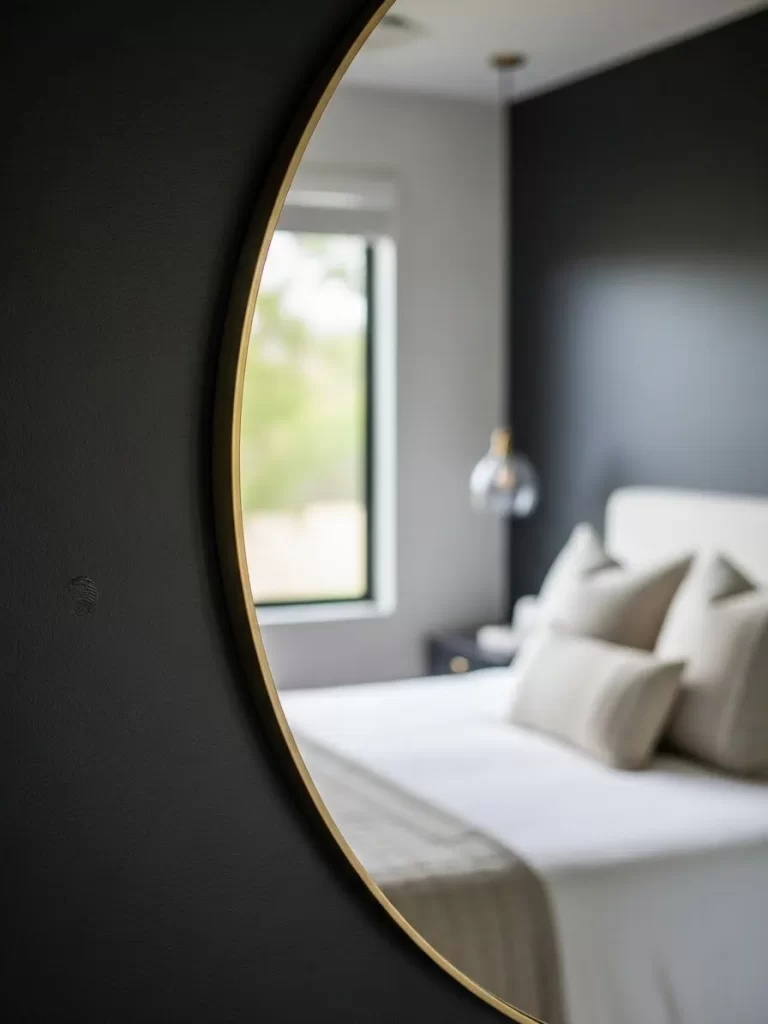
A massive round mirror with a thin gold frame hangs above the headboard. It reflects the light from the window to make the room feel much brighter. The circular shape breaks up the hard lines of the bed and nightstands. The gold finish adds a touch of elegance and shine.
The mirror acts as a piece of art while being very functional. It provides a focused point of interest that is both simple and bold. This approach is a great way to add light to a dark corner. The mirror is easy to hang and makes a big impact.
Material Required List
- Large round mirror
- Heavy duty wall anchor
- Picture hanging wire
- Gold spray paint
- Cleaning cloth
Equipment Required List
- Power drill
- Hammer
- Measuring tape
- Level
- Pencil
DIY Instruction Step by Step
- Buy a large round mirror that fits the scale of your bed.
- Spray paint the frame gold if you want a custom metallic look.
- Find the center point of your bed and mark it on the wall.
- Decide on the height you want the mirror to hang.
- Drill a hole into the wall and insert the heavy duty anchor.
- Screw the hanging hook into the anchor until it is secure.
- Attach the hanging wire to the back of the mirror frame.
- Lift the mirror carefully and hang it onto the wall hook.
23 Ceramic Plate Gallery Wall Art
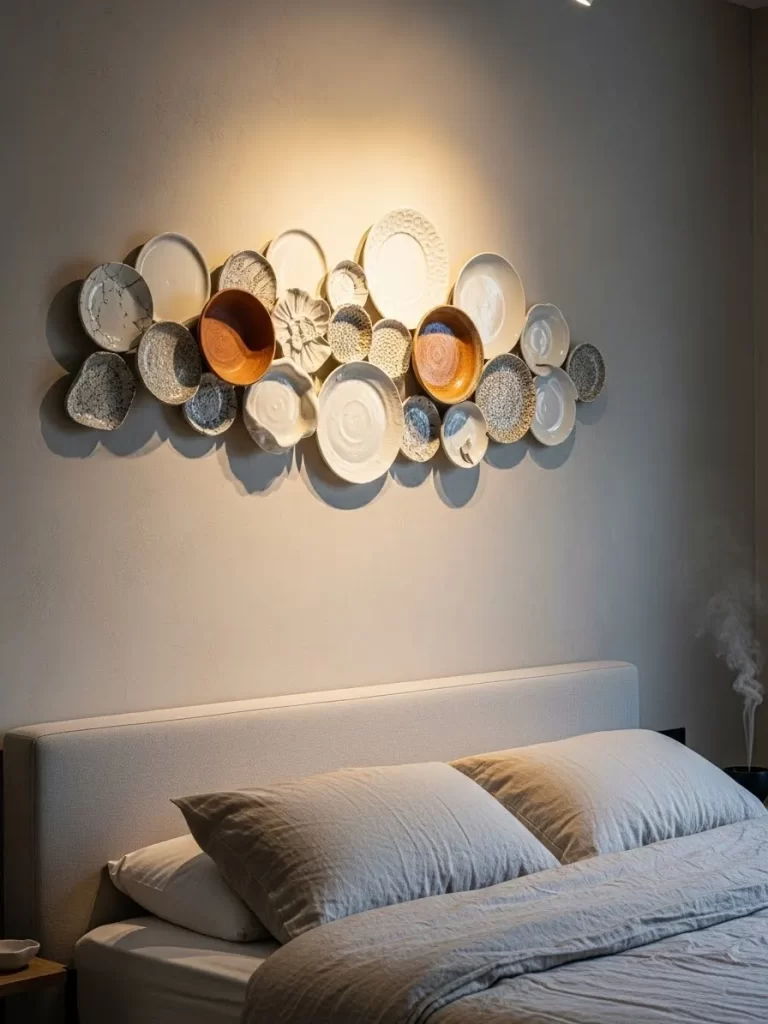
A collection of handmade ceramic plates is arranged in an organic cloud above the bed. The different sizes and textures create a soft and artistic focal point. Warm light from above highlights the subtle curves of the pottery. The earthy tones of the plates bring a grounded energy to the room.
The plates are arranged in a way that feels natural and flowing. This design is a great way to show off your love for handmade crafts. It adds a layer of depth that is very different from traditional art. It is a beautiful way to fill a large empty space.
Material Required List
- Various ceramic plates and bowls
- Adhesive wall hangers
- Small nails
- Cleaning alcohol
- Paper for templates
Equipment Required List
- Hammer
- Pencil
- Measuring tape
- Level
- Scissors
DIY Instruction Step by Step
- Clean the back of each plate with alcohol to remove any dust.
- Attach the adhesive hangers to the back of the plates and let them dry.
- Trace each plate onto paper and cut out the templates.
- Use painter tape to arrange the paper templates on your wall.
- Move the templates around until you like the overall shape of the cloud.
- Hammer a nail through the center mark of each paper template.
- Remove the paper and hang the corresponding plate on the nail.
- Adjust the plates slightly to ensure they are all hanging straight.
24 Cognac Leather Padded Grid Wall
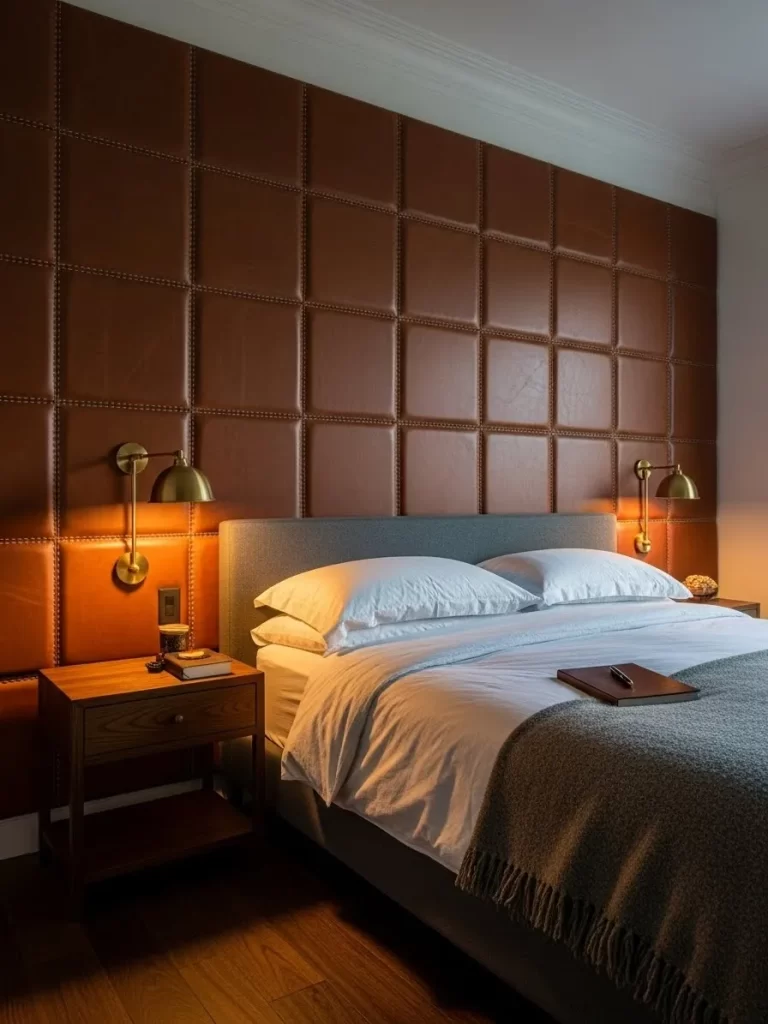
Deep cognac leather panels cover the wall to create a masculine and luxurious look. The grid pattern features small metal studs for an industrial touch. This design adds a lot of texture and warmth to the bedroom. The rich leather color pairs perfectly with dark wood furniture.
Symmetrical brass lamps provide a warm glow that makes the leather shine. This setup eliminates the need for a headboard while providing a comfortable surface. It is a bold and sophisticated choice for a modern home. The material is durable and easy to keep clean.
Material Required List
- Plywood squares
- Foam padding
- Faux or real leather fabric
- Decorative upholstery nails
- Construction adhesive
Equipment Required List
- Staple gun
- Hammer
- Level
- Measuring tape
- Scissors
DIY Instruction Step by Step
- Cut your plywood into equal squares for the grid pattern.
- Glue a layer of foam to the front of each plywood square.
- Wrap the leather fabric around the board and staple it to the back.
- Drive decorative nails into the corners for a classic look.
- Use a level to mark a straight line at the bottom of the wall.
- Apply a generous amount of adhesive to the back of the first panel.
- Press the panel against the wall and hold it for a few seconds.
- Fit the remaining panels tightly against each other until the wall is full.
25 Classic Damask Patterned Wallpaper

Light grey wallpaper with a subtle damask pattern adds a layer of elegance to this room. The intricate design provides a soft background that feels very traditional. It pairs well with a white tufted headboard for a romantic look. The neutral color keeps the room feeling calm and peaceful.
A classic brass sconce provides a warm light for reading in bed. This approach is a simple way to add a lot of style to a plain wall. It makes the space feel finished and well designed. The pattern adds interest without being too busy.
Material Required List
- Patterned wallpaper rolls
- Wallpaper paste
- Wallpaper primer
- Smoothing tool
- Painter tape
Equipment Required List
- Utility knife
- Paint roller
- Level
- Measuring tape
- Step ladder
DIY Instruction Step by Step
- Clean your wall and apply a layer of wallpaper primer.
- Measure the height of your wall and cut the wallpaper strips.
- Apply the paste to the back of the first strip or directly to the wall.
- Use a level to ensure the first piece is perfectly straight.
- Press the wallpaper onto the wall and smooth it out with a tool.
- Match the pattern of the second strip to the first one carefully.
- Trim the extra paper at the top and bottom with a utility knife.
- Wipe away any extra paste with a damp sponge immediately.
26 Vertical Air Plant Garden Wall
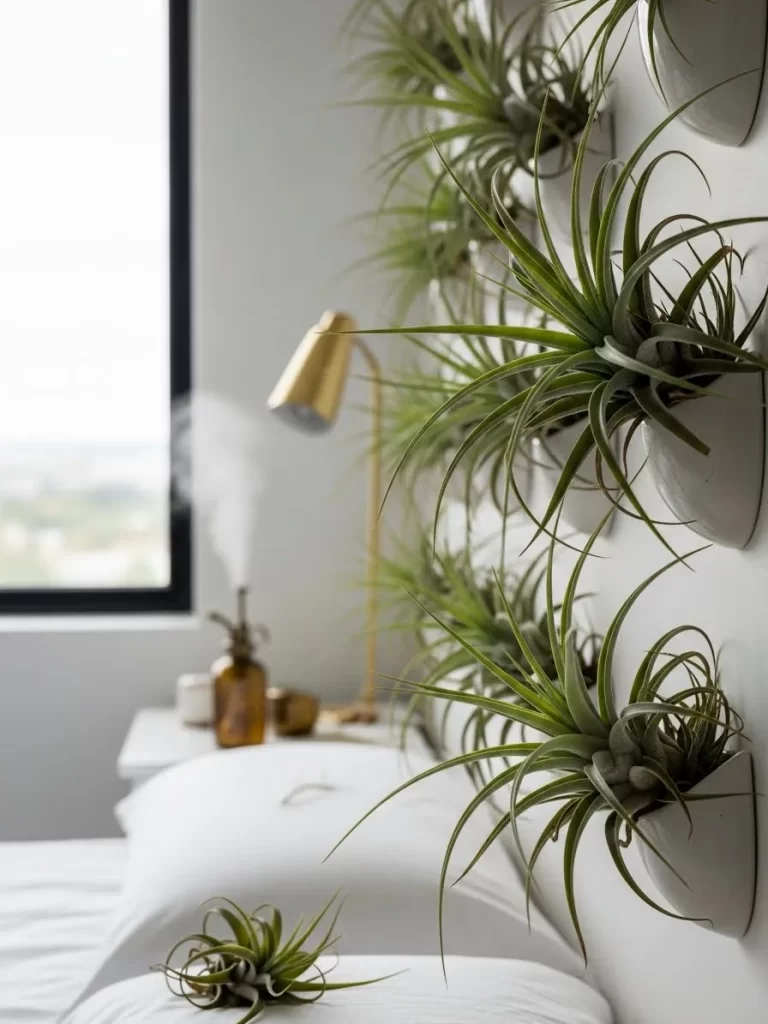
Small ceramic planters are mounted in a grid to hold a variety of air plants. This living wall adds a fresh and organic element to your bedroom. The green leaves bring a bit of nature into your daily life. The white wall makes the green colors look very vibrant.
A gold lamp on the nightstand adds a touch of shine to the natural scene. This design is excellent for someone who wants a green wall without a lot of work. The plants help to clean the air while you sleep. It is a peaceful and beautiful addition to any room.
Material Required List
- Small ceramic wall planters
- Air plants (Tillandsia)
- Wall screws
- Plastic wall anchors
- Plant mister
Equipment Required List
- Power drill
- Hammer
- Level
- Measuring tape
- Pencil
DIY Instruction Step by Step
- Decide how many plants you want and plan a grid on your wall.
- Use a level and pencil to mark the location of each planter.
- Drill holes into the wall at your marked spots.
- Insert the plastic anchors and screw the planters onto the wall.
- Place one air plant into each ceramic container.
- Make sure the plants are secure and not falling out.
- Mist the plants with water once a week to keep them healthy.
- Take the plants down once a month for a deep soak in water.
27 Large Black Grid Window Mirror
A tall mirror with a black metal grid looks like a large window on your wall. It reflects the entire room to create an illusion of extra space. The industrial style frame adds a modern and edgy touch to the decor. It brings in more light and makes the ceiling feel higher.
The black lines of the grid provide a strong architectural element. This mirror acts as a piece of furniture that is also very functional. It is a smart choice for a small bedroom that needs more light. The design is simple yet very high impact.
Material Required List
- Large black grid mirror
- Heavy duty wall anchors
- Mounting screws
- Level
- Glass cleaner
Equipment Required List
- Power drill
- Hammer
- Measuring tape
- Pencil
- Screwdriver
DIY Instruction Step by Step
- Find a large grid mirror that fits the height of your wall.
- Use a stud finder to locate the best spot for the mounting screws.
- Mark the height and width of the mirror on your wall.
- Drill holes into the wall and insert the heavy duty anchors.
- Have a friend help you lift the mirror into place.
- Screw the mirror into the wall anchors until it is secure.
- Use a level to ensure the mirror is hanging straight.
- Clean the glass with a soft cloth and glass cleaner.
28 Backlit Fabric Light Box Panel
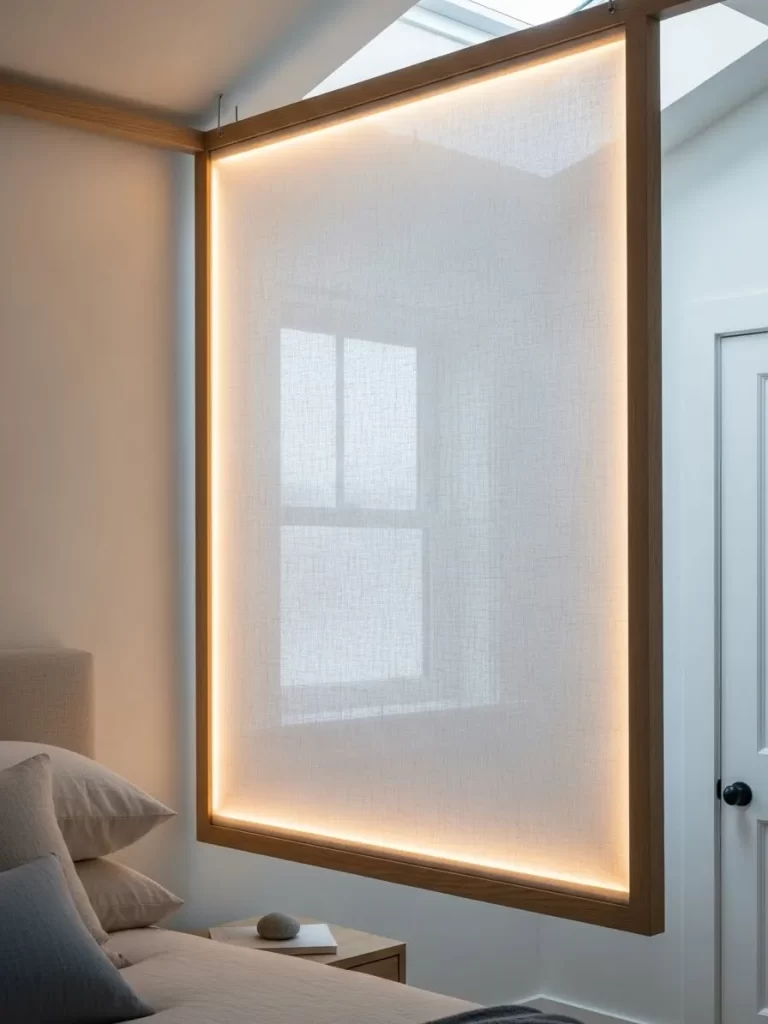
A large fabric panel is framed in wood and glows from the back. This design creates a soft and diffuse light that is very relaxing. The fabric hides the LED strips to provide a seamless glow around the edges. It serves as both a piece of art and a functional light source.
The wooden frame matches the natural tones of the bedroom furniture. This approach is a great way to add ambient light without using lamps. It makes the wall look like it is glowing from within. The light is soft enough to use as you fall asleep.
Material Required List
- Wooden lumber for the frame
- Light colored linen fabric
- LED light strips
- Wood glue
- Staple gun
Equipment Required List
- Miter saw
- Power drill
- Measuring tape
- Level
- Scissors
DIY Instruction Step by Step
- Build a large rectangular frame using the wooden lumber.
- Glue the corners and secure them with small screws.
- Attach the LED light strips to the inside edge of the frame.
- Stretch the linen fabric over the front of the frame.
- Staple the fabric to the back of the wood to keep it tight.
- Make sure there are no wrinkles in the fabric surface.
- Mount the light box to the wall using sturdy brackets.
- Plug the LED lights into a power source and enjoy the glow.
29 Driftwood Wall Sculpture with Lights

A large piece of natural driftwood is mounted on the wall to act as a unique sculpture. Small black spotlights are attached to the branches to illuminate the bed. This design brings a raw and coastal element into your bedroom. The lights highlight the natural beauty of the driftwood at night.
The sculpture adds a lot of character and drama to the wall. It is a one of a kind piece that you can find or build yourself. This approach is a great way to recycle natural materials into art. Your room will feel more adventurous and personal with this feature.
Material Required List
- Large piece of driftwood
- Small clamp on spotlights
- Heavy duty wall brackets
- Screws
- Wood sealer
Equipment Required List
- Power drill
- Stud finder
- Level
- Measuring tape
- Pencil
DIY Instruction Step by Step
- Clean the driftwood thoroughly and apply a clear wood sealer.
- Use a stud finder to locate the strongest part of your wall.
- Attach heavy duty brackets to the wall at the desired height.
- Position the driftwood on the brackets and screw it in place securely.
- Attach the small spotlights to different branches of the wood.
- Adjust the lights to shine down toward your bed.
- Hide the electrical wires along the back of the wood using clips.
- Turn on the lights to see the sculpture come to life.
30 Distressed White Brick Accent Wall
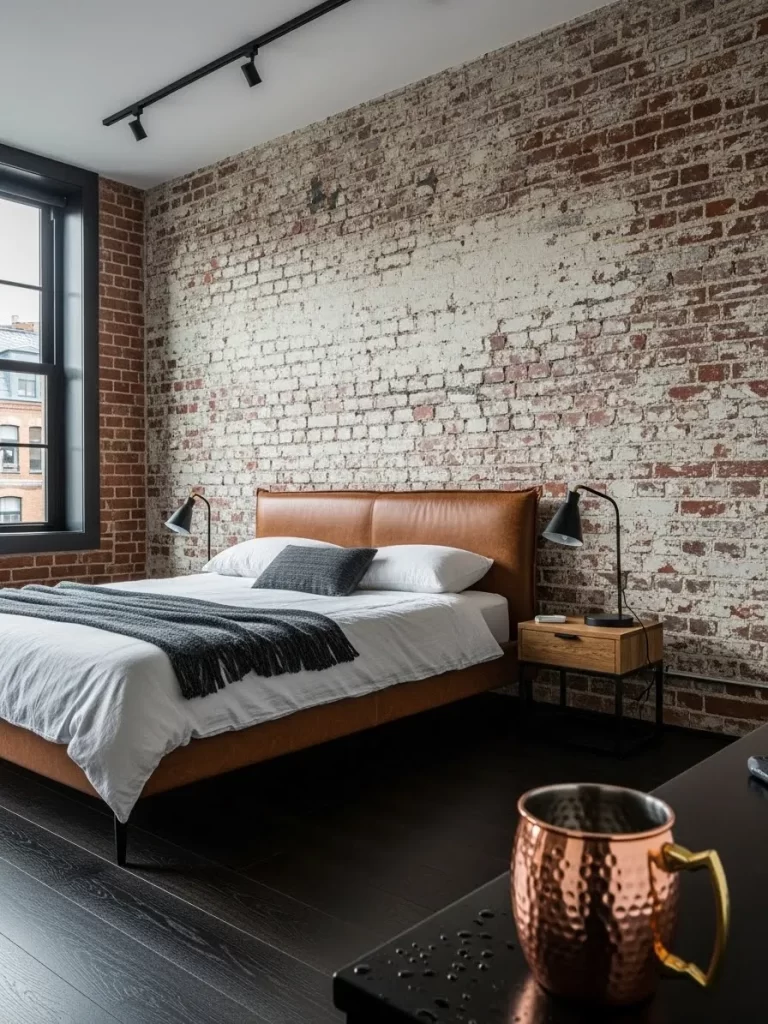
A wall of white bricks with a distressed finish adds an industrial and rustic feel. The uneven texture and peeling paint create a sense of history and charm. This design provides a cool and neutral background for your bedroom. It makes the room feel like a modern urban loft.
Modern black track lighting shines down to highlight the texture of the bricks. A leather headboard and grey bedding complete the industrial style. It is a durable and stylish solution for any large wall. It adds a layer of depth that is very visually interesting.
Material Required List
- Thin brick veneer panels
- Brick mortar or adhesive
- White paint
- Wall primer
- Sandpaper
Equipment Required List
- Notched trowel
- Wet saw
- Level
- Large sponge
- Bucket
DIY Instruction Step by Step
- Clean your wall and apply a layer of strong wall primer.
- Mix the brick mortar in a bucket according to the package.
- Spread the mortar onto the wall with a notched trowel.
- Press the brick veneers into the mortar starting from the bottom.
- Use spacers to keep the gaps between the bricks even.
- Cut any bricks to fit the edges using a wet saw.
- Once dry, apply a messy coat of white paint to the bricks.
- Sand away some of the paint to create a distressed and aged look.
31 Geometric Shadow Pattern Screen
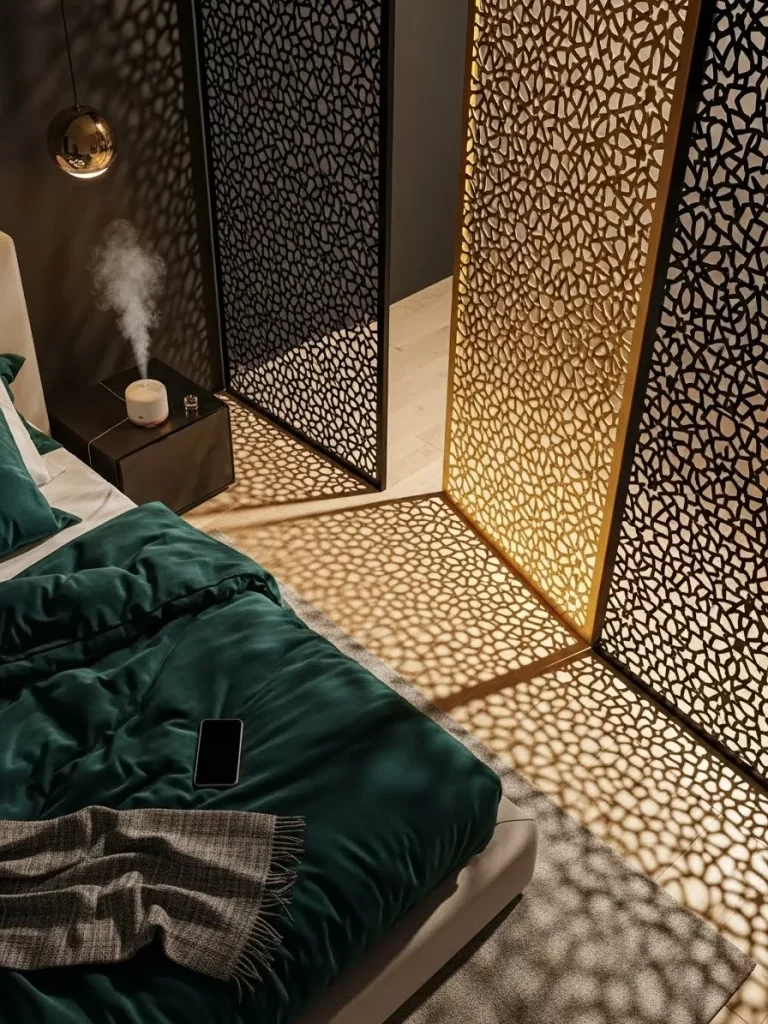
Laser cut panels create a complex shadow play on the floor and walls. This design uses a gold and black screen to add drama and privacy. Light shines through the intricate patterns to decorate the room with moving shadows. Emerald green bedding looks rich against the dark metallic screen.
Every movement of the light changes the look of the room. This approach adds an architectural layer to a plain bedroom corner. It allows light to pass through while still providing a sense of enclosure. This is a creative way to use metal screens as art.
Material Required List
- Laser cut metal or wood panels
- Black floor tracks
- Gold spray paint
- LED floor light
- Mounting screws
Equipment Required List
- Power drill
- Level
- Measuring tape
- Screwdriver
- Pencil
DIY Instruction Step by Step
- Buy laser cut panels with a geometric floral pattern.
- Spray paint the panels a shimmering gold and let them dry.
- Mark the floor where the screen panels will stand tall.
- Install black tracks on the floor and the ceiling above.
- Slide the panels into the tracks and secure them with screws.
- Check with a level to ensure the panels are straight.
- Place an LED light on the floor behind the screen.
- Aim the light so it casts shadows across the bedding.
- Adjust the angle of the light for the best shadow effect.
- Clean the panels with a soft duster every few days.
32 Backlit Natural Onyx Wall Panel
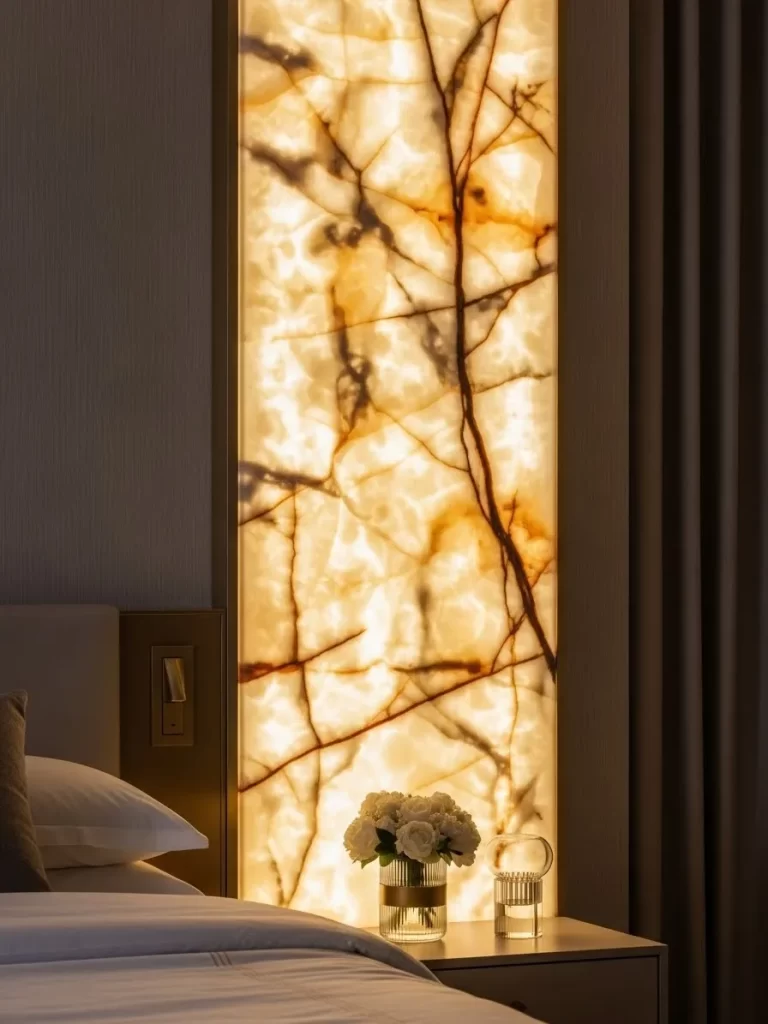
A tall slab of natural onyx glows with a warm light from within. The orange and brown veins look like a map of the earth. This feature provides a luxurious and calming focal point for sleep. The light is soft enough to use as a nightly light source.
Modern furniture keeps the room feeling very tidy and high end. This design is a bold way to use stone in your home decor. The translucent quality of the onyx creates a unique and warm atmosphere. It is an investment piece that defines the entire room.
Material Required List
- Onyx or translucent stone slab
- LED light panel
- Metal mounting frame
- Heavy duty wall anchors
- Stone sealer
Equipment Required List
- Power drill
- Level
- Suction cups for stone
- Screwdriver
- Measuring tape
DIY Instruction Step by Step
- Order a thin slab of onyx cut to your specific size.
- Apply a stone sealer to the front and the back of the slab.
- Build a metal frame that will hold the stone weight securely.
- Mount the LED light panel directly onto the bedroom wall.
- Secure the metal frame over the light panel with anchors.
- Use suction cups to lift the stone slab into place safely.
- Slide the stone into the frame and lock it tightly.
- Ensure the stone is not touching the LED bulbs directly.
- Plug in the lights and check for an even glow.
- Wipe the stone with a damp cloth for a clean shine.
33 Vertical Grey Felt Sound Panels
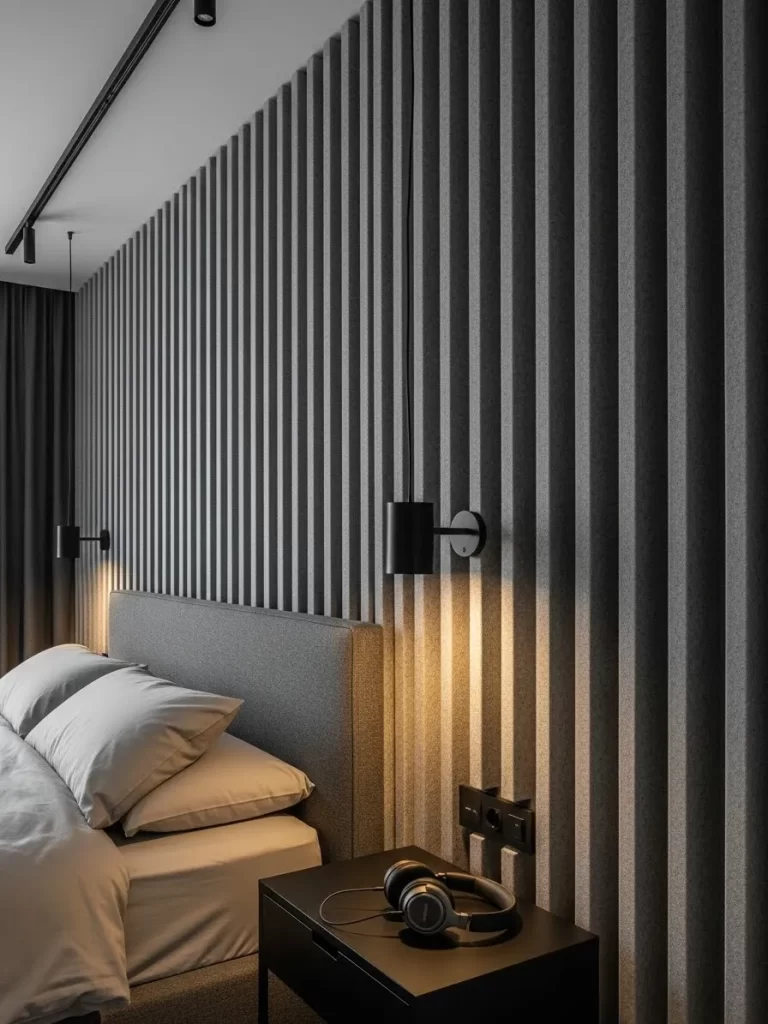
Thin felt slats cover the wall for a modern and textured look. This design helps to reduce noise for a better and deeper sleep. Every vertical line makes the ceiling feel much higher. Minimalist black lamps are mounted directly on the felt slats for a clean look.
The grey color is neutral and works with many different room styles. This is a smart choice for a quiet and stylish bedroom environment. The felt provides a soft and tactile surface that warms up the space. It is a functional way to add architectural detail.
Material Required List
- Acoustic felt panels
- Construction adhesive
- Black wood trim
- Finishing nails
- Mounting tape
Equipment Required List
- Utility knife
- Level
- Measuring tape
- Caulking gun
- Pencil
DIY Instruction Step by Step
- Measure the wall to see how many panels you need.
- Cut the felt panels into long thin vertical slats.
- Use a level to draw a straight line on your wall.
- Apply adhesive to the back of the first felt slat.
- Press the slat onto the wall and hold it firmly.
- Space the next slats evenly for a clean linear look.
- Trim the top and bottom of the panels with a sharp knife.
- Use finishing nails for extra hold at the very top.
- Mount your black lamps over the slats using wall anchors.
- Vacuum the felt once a month to remove any lint.
34 Round Oak Wall Hook Gallery
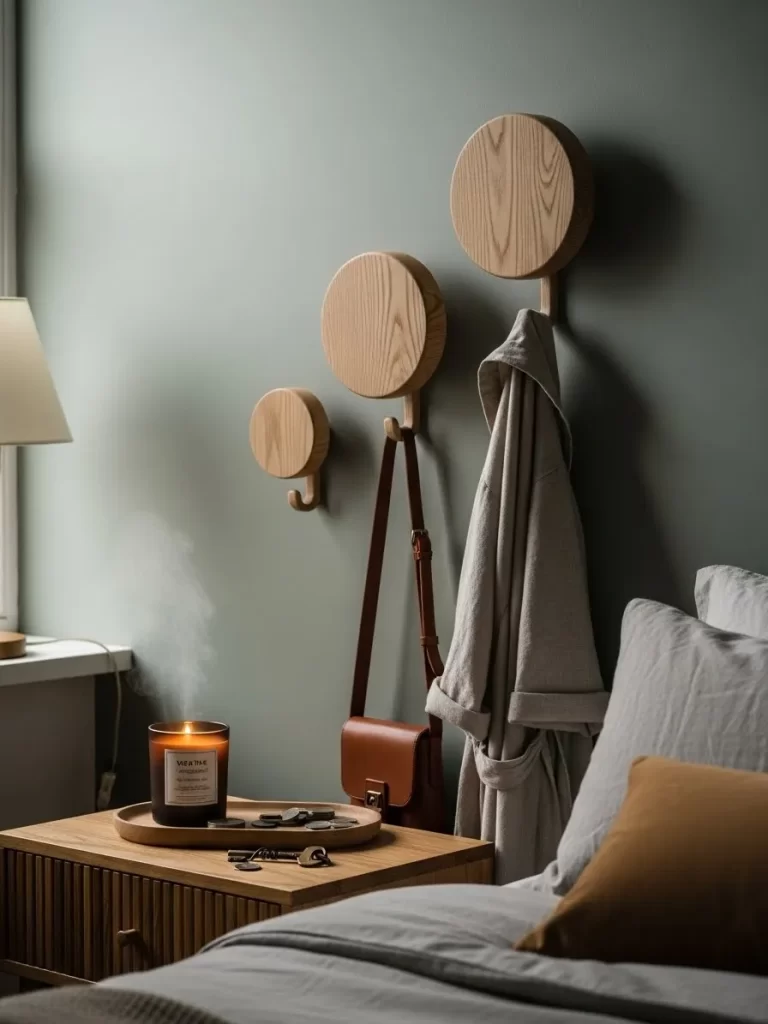
Three round wooden hooks of different sizes hold your items and act as art. These hooks create a sculptural element on a muted sage green wall. They provide a place to hang bags and soft robes within reach. Natural oak wood looks warm against the green paint.
This approach is both functional and very decorative for any room. You can arrange the hooks in any pattern on the wall that you like. It keeps your floor clear while adding a modern touch. The simplicity of the round shapes is very calming.
Material Required List
- Round oak wall hooks
- Heavy duty wall anchors
- Wood oil
- Screws
- Sandpaper
Equipment Required List
- Power drill
- Level
- Measuring tape
- Pencil
- Screwdriver
DIY Instruction Step by Step
- Buy round oak hooks in small, medium, and large sizes.
- Sand the hooks and apply wood oil for a natural shine.
- Decide on a playful arrangement for the hooks on your wall.
- Mark the spots on the wall with a pencil clearly.
- Drill holes at the marks and insert sturdy wall anchors.
- Screw the mounting base into the wall anchors until tight.
- Twist the oak hook onto the base until it is snug.
- Ensure the hooks are level and not tilting to the sides.
- Hang a light bag or robe to test the mounting strength.
- Wipe the wood with a soft cloth for a finished look.
35 Arched Stone Sculpture Wall Niche
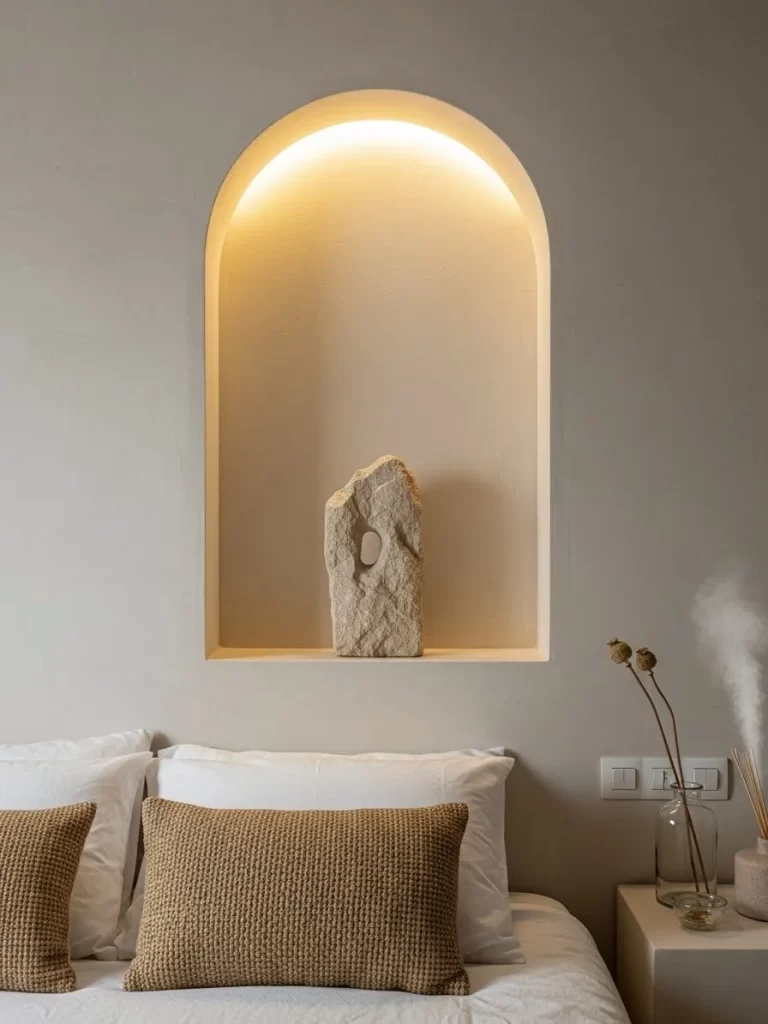
A tall arched niche holds a single piece of rough stone as a focal point. This design creates a museum look in your own private bedroom. Warm light from the top of the arch highlights the natural stone texture. Neutral wall colors make the piece pop.
This setup is a peaceful and minimalist way to decorate your room. It turns a simple wall into a focused work of fine art. The arch shape adds a soft architectural curve to the space. It is a great way to display a special found object.
Material Required List
- Drywall for the niche
- Metal corner beads
- Joint compound
- Rough stone sculpture
- LED puck light
Equipment Required List
- Drywall saw
- Putty knife
- Sanding block
- Power drill
- Measuring tape
DIY Instruction Step by Step
- Mark an arch shape on your bedroom wall with a pencil.
- Cut out the drywall carefully with a sharp hand saw.
- Build a small wooden box inside the wall for depth.
- Attach metal corner beads to the edges of the arch.
- Apply joint compound to the seams and let it dry.
- Sand the surface until it is perfectly smooth to the touch.
- Paint the inside of the niche a soft and creamy color.
- Install a battery light at the top of the arch.
- Place your rough stone sculpture in the center of the niche.
- Step back to ensure the stone is properly lit up.
36 Industrial Copper Netting Screen
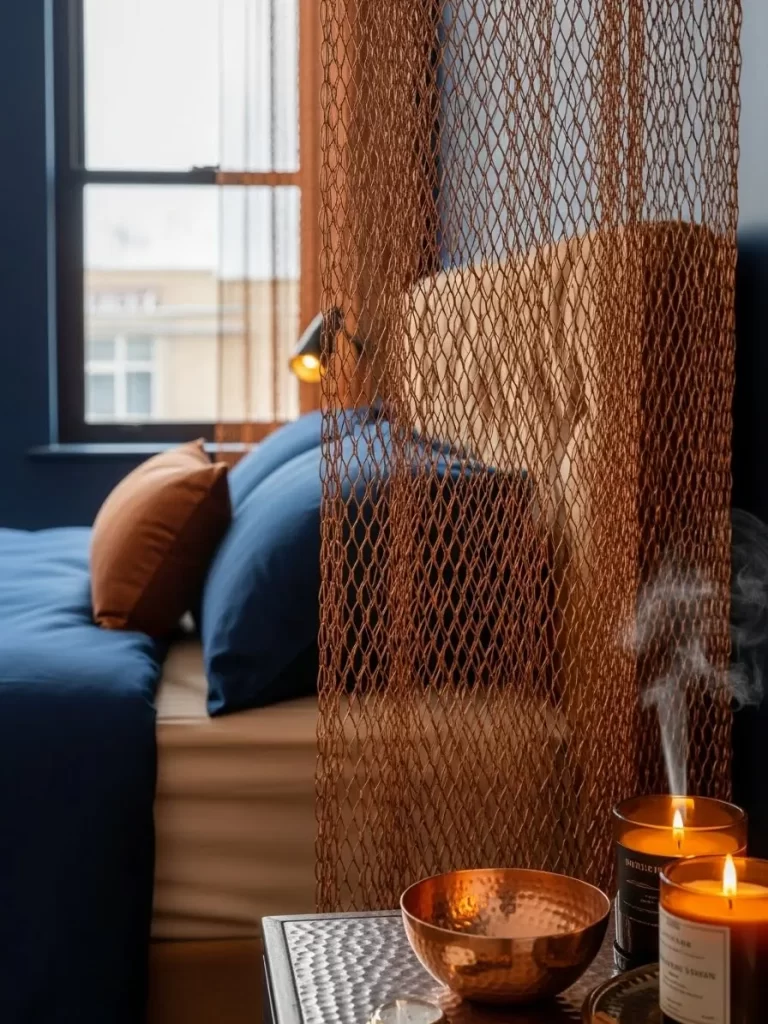
A copper mesh screen acts as a unique room divider near the bed. The metal texture adds an industrial and warm feel to the space. It catches the light from nearby candles for a gentle glow. Deep blue bedding contrasts with the warm copper color.
This design allows light to pass through while providing a sense of privacy. It is a creative way to use metal materials in a bedroom. The netting adds a layer of fine detail that is very modern. It separates the sleeping area without blocking the view.
Material Required List
- Copper mesh or wire netting
- Wooden frame lumber
- Copper staples
- Wood stain
- Mounting hinges
Equipment Required List
- Staple gun
- Miter saw
- Level
- Measuring tape
- Wire snips
DIY Instruction Step by Step
- Build a tall wooden frame using your miter saw.
- Stain the wood a dark color and let it dry completely.
- Unroll the copper mesh and cut it with sharp wire snips.
- Lay the mesh over the frame and pull it very tight.
- Staple the copper to the wood using copper staples.
- Ensure there are no sharp edges sticking out at all.
- Repeat this for the second panel of the room screen.
- Join the panels together with small metal hinges.
- Stand the screen near the bed for a decorative look.
- Clean the copper with a dry cloth to keep its shine.
37 Large Golden Sunburst Mirror Art
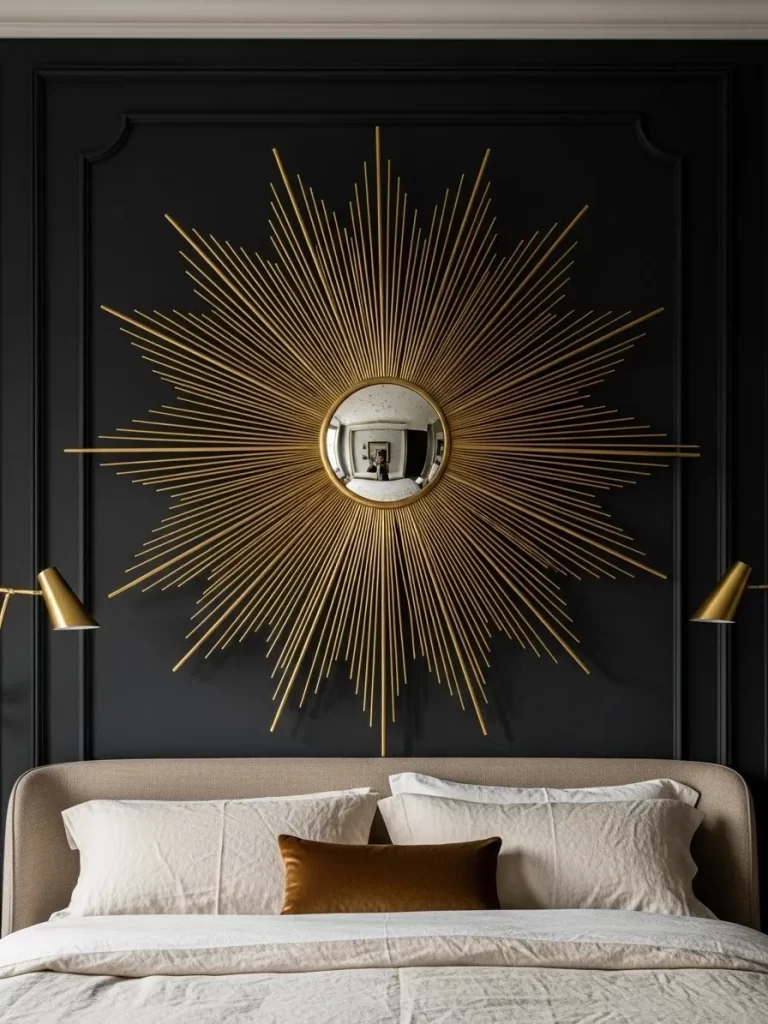
A massive sunburst mirror hangs on a black accent wall to create drama. Hundreds of thin gold rays spread out to fill the wall space. This piece adds a sense of power and luxury to your bedroom. Black wall molding frames the mirror for a classic feel.
The reflection in the center adds light to the dark accent wall. This design is a bold statement for a primary bedroom. The gold finish makes the black background look even more sophisticated. It is a timeless piece of decor that works in many styles.
Material Required List
- Large sunburst wall mirror
- Heavy duty wall hooks
- Black wall paint
- Gold touch up paint
- Level
Equipment Required List
- Power drill
- Hammer
- Measuring tape
- Stud finder
- Pencil
DIY Instruction Step by Step
- Paint your accent wall a deep matte black color.
- Locate a wall stud in the center of the bed area.
- Mark the spot for the heavy duty wall hook clearly.
- Drill a hole and install the hook into the wall stud.
- Check the sunburst rays for any bent gold pieces.
- Lift the mirror and hang it onto the wall hook.
- Adjust the mirror so the center is perfectly level.
- Clean the small round glass for a bright reflection.
- Use gold paint to hide any small scratches on the rays.
- Step back to ensure the mirror is centered correctly.
38 Floating Plant Shelf with Grow Light
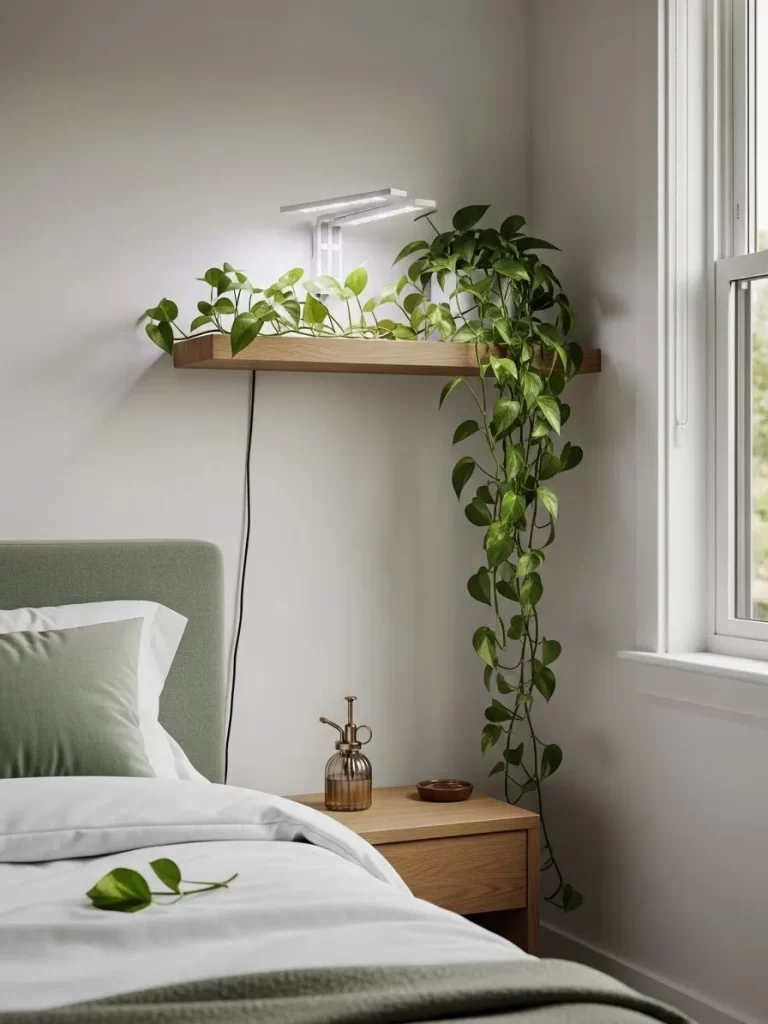
A wooden shelf holds a long trailing plant directly above the bed. A white grow light ensures the plant stays healthy and vibrant. This design brings a living element to your indoor sleeping space. Natural oak wood matches the other furniture in the room.
The green leaves fall down the wall for a soft and romantic look. This is a smart way to keep plants in a bedroom without a window. It helps to purify the air while you sleep. The light also acts as a soft reading lamp at night.
Material Required List
- Wooden floating shelf
- Pothos or trailing plant
- LED grow light strip
- Wall anchors
- Plant mister
Equipment Required List
- Power drill
- Level
- Screwdriver
- Measuring tape
- Pencil
DIY Instruction Step by Step
- Buy a sturdy wooden shelf with hidden wall brackets.
- Mark the bracket spots on the wall with a pencil.
- Drill holes and insert the plastic wall anchors securely.
- Screw the brackets into the wall and slide the shelf on.
- Ensure the shelf is level before adding any weight to it.
- Place your plant in a pretty pot on the wooden shelf.
- Attach the grow light to the wall directly above the plant.
- Hide the light cord along the corner of the wall.
- Mist the plant once a week to keep it very fresh.
- Trim any long vines that grow too close to the bed.
39 Arched Terracotta Paint Mural
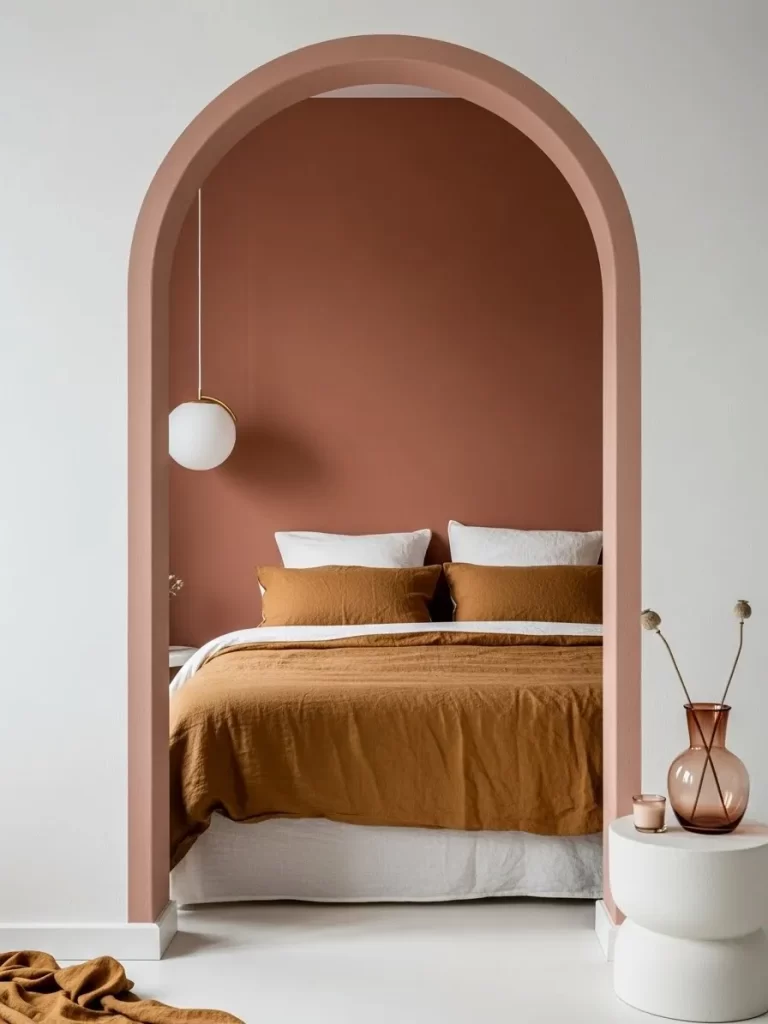
A large painted arch creates a focal point behind the bed area. The terracotta color adds warmth to the white bedroom wall. This simple shape mimics the look of a grand architectural doorway. White globe lights hang in front of the arch for contrast.
Matching bedding keeps the color palette very tight and clean. This is an affordable way to add architectural interest today. It creates a sense of depth without any construction. The soft curve of the arch is very inviting and modern.
Material Required List
- Terracotta interior paint
- Painter tape
- Small piece of string
- Pencil
- Paint roller
Equipment Required List
- Measuring tape
- Level
- Paint tray
- Step ladder
- Small brush
DIY Instruction Step by Step
- Find the center of the wall behind your bedroom bed.
- Mark the width of the arch with two pencil dots.
- Use a string and pencil to draw a perfect top arch.
- Tape the straight sides of the arch with painter tape.
- Paint the edges of the arch with a small hand brush.
- Fill in the center of the arch using a paint roller.
- Apply a second coat for a solid and even color look.
- Remove the tape while the paint is still slightly damp.
- Clean up any messy edges with a tiny artist brush.
- Let the paint dry for a day before moving the bed.
40 Dark Textured Concrete Accent Wall
A dark grey wall with a concrete finish adds a modern feel. This texture looks raw and edgy against the warm room lights. It provides a moody background that is perfect for resting. A small black lamp highlights the swirling patterns on the wall.
This design proves that dark colors can be very inviting and cozy. It is a durable and stylish look for a contemporary home. The concrete texture adds a layer of sophistication that paint cannot match. It grounds the room with a sense of strength.
Material Required List
- Concrete finish plaster
- Wall primer
- Dark grey colorant
- Protective sealer
- Sandpaper
Equipment Required List
- Steel trowel
- Putty knife
- Paint roller
- Bucket
- Clean cloth
DIY Instruction Step by Step
- Clean the wall and apply a coat of strong primer.
- Mix the concrete plaster in a bucket with the color.
- Use a trowel to apply a thin layer over the wall.
- Use messy strokes to create a natural concrete look.
- Let the first layer dry for several hours before the next.
- Apply a second layer to add more depth and texture.
- Sand the wall lightly once the plaster is fully dry.
- Wipe away the dust with a damp cloth very carefully.
- Apply a clear sealer to protect the concrete finish.
- Buff the surface with a dry cloth for a soft shine.
41 Natural Macrame Wall Hangings
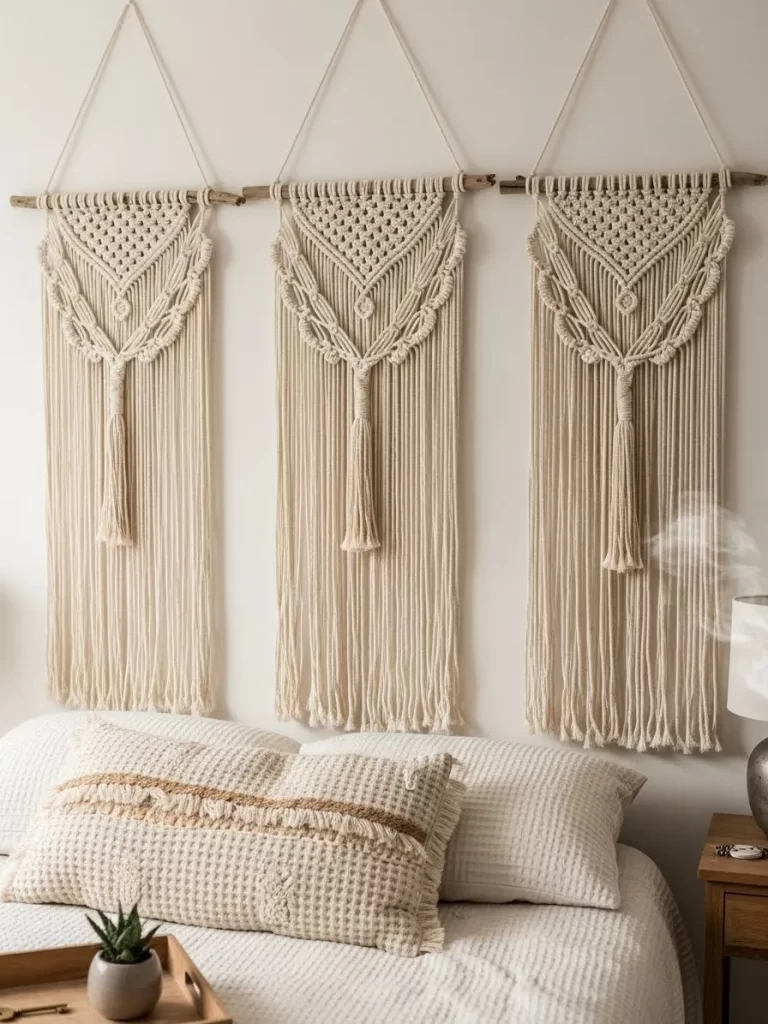
Three large macrame pieces hang side by side to add texture. The woven cotton ropes bring a bohemian and soft feel to the wall. This design uses natural materials to create a cozy atmosphere. The patterns are intricate yet the neutral color keeps them calm.
The hangings are mounted on natural wood branches for a rustic touch. This approach is a great way to add a handmade element to your room. It softens the look of the wall and adds a layer of warmth. Your bedroom will feel very peaceful with this textile art.
Material Required List
- Macrame cord
- Natural wood branches
- Cotton string
- Wall hooks
- Scissors
Equipment Required List
- Measuring tape
- Level
- Hammer
- Pencil
- Step ladder
DIY Instruction Step by Step
- Cut your macrame cord into many long and equal pieces.
- Tie the cords onto a natural wood branch using a basic knot.
- Weave the cords together to create a geometric pattern.
- Use a level to ensure the pattern stays straight as you work.
- Tie off the bottom of the cords and trim the extra string.
- Repeat this process to create three matching wall hangings.
- Mark three even spots on your wall with a pencil.
- Install small wall hooks at the marked spots securely.
- Hang the branches on the hooks and adjust the cords.
- Comb through the bottom fringe for a neat and finished look.
Your bedroom is the most personal room in your house. It should inspire you every morning and calm you every night. You now have forty one distinct paths to refresh your drab walls.
These projects range from simple paint tricks to complex wood designs. Choose one that speaks to your heart. You will notice the difference in your mood immediately. A stylish room helps you relax and recharge after a long day.
Key Takeaways
1 Texture adds immediate visual interest to flat surfaces.
2 Hidden lighting creates a soft and inviting atmosphere.
3 Recycled materials can look very expensive with the right care.
4 Art does not always have to sit in a frame.
5 Greenery brings life and fresh energy into your home.