Your bedroom should be a peaceful retreat at the end of a long day. It is your personal sanctuary. Too often, it becomes a catch-all for clutter. Piles of clothes, tangled cords, and overflowing drawers can create stress instead of calm.

This guide is here to help you reclaim your space. We have gathered 40 practical hacks to bring order back to your bedroom. These are not complicated, expensive makeovers. They are simple, clever ways to store your belongings and create a tidy environment.
Many of these ideas are easy projects you can do yourself. From using hidden spaces to turning everyday items into storage solutions, there is something here for everyone. It is time to create a room that feels calm and orderly.
1. Floating Bedside Shelf

A small bedroom often means no room for a proper nightstand. A floating shelf is a clever solution that gives you a spot for essentials without taking up any floor space.
This simple, clean design keeps your phone, a book, and a glass of water right where you need them. It creates a light, airy feel in the room, making it feel less crowded. Installing one is a quick project that adds a lot of convenience.
DIY Instructions: How to Install a Floating Shelf
Important: A grown-up should help with this because it uses a drill.
What You’ll Need:
- A floating shelf kit (this includes the shelf, bracket, and screws)
- A drill
- A level (the tool with the little bubble)
- A pencil
Step-by-Step Guide:
- Pick a Spot: Decide where you want your shelf to go next to your bed. Hold the metal bracket against the wall and use a pencil to mark where the screw holes are.
- Make it Straight: Ask a grown-up to place the level on top of the bracket. They need to move it until the bubble is exactly in the middle. This means it’s straight.
- Mark the Holes Again: Once the bracket is level, use the pencil to make new marks in the screw holes.
- Drill the Holes: A grown-up will use the drill to make small holes where you made your pencil marks.
- Attach the Bracket: A grown-up will hold the bracket up to the wall again, lining up the holes. Then, they will use the drill to put the screws in tight.
- Slide on the Shelf: The wooden shelf is hollow on one side. Just slide the shelf onto the metal bracket until it is snug against the wall. Now you have a nightstand!
2. Smart Storage Headboard

Your headboard can be more than just a decoration. A headboard with built-in shelves turns the space behind your bed into a powerhouse of organization.
It’s a great home for your books, alarm clock, and a few favorite photos. Everything is kept off the floor and within easy reach from your pillow. This is a smart way to gain extra storage in a small room without adding more furniture.
DIY Instructions: How to Build a Storage Headboard
Note: This is a big project for a grown-up who is good at building things.
What You’ll Need:
- Three large pieces of plywood or sturdy wood boards
- A few smaller pieces of wood for the shelves
- A drill and screws
- Wood glue
- A measuring tape
- A saw (for a grown-up)
Step-by-Step Guide (for a Grown-Up):
- Measure Your Bed: A grown-up will measure how wide your bed is. The headboard should be the same width or a little wider.
- Build the Box: A grown-up will use the wood to build a tall, skinny, open-front box. It will have a back piece, a top piece, and two side pieces. They will use wood glue and screws to make it very strong.
- Add the Shelves: Now, a grown-up will measure and cut the smaller pieces of wood to be the shelves. They will slide them into the big box.
- Secure the Shelves: A grown-up will use screws to attach the shelves to the inside of the box. They can put them at different heights to fit different-sized books.
- Finishing Touches: You can paint the headboard or leave it as natural wood.
- Attach to the Bed: A grown-up will need to securely attach the new headboard to your bed frame or to the wall behind your bed so it is safe and won’t fall over.
3. Rustic Jewelry Frame

Tangled necklaces and missing earrings can make getting ready frustrating. A DIY jewelry holder made from an old picture frame is a beautiful and practical fix.
The chicken wire provides plenty of spots to hang earrings and necklaces, keeping them separate and easy to see. This turns your accessory collection into a piece of wall art. It adds a touch of rustic charm to your room while solving a common clutter problem.
DIY Instructions: How to Make a Jewelry Frame
What You’ll Need:
- An old picture frame (without the glass or backing)
- A roll of chicken wire or hardware cloth
- A staple gun (for a grown-up)
- Wire cutters (for a grown-up)
- Small hooks (optional)
Step-by-Step Guide:
- Prepare the Frame: Make sure your picture frame is empty. You just want the wooden frame itself.
- Cut the Wire: A grown-up will unroll the chicken wire. They will place the frame on top of it and use wire cutters to cut a piece of wire that is a little bigger than the opening of the frame. Be careful, the cut edges of the wire can be sharp!
- Staple One Side: A grown-up will lay the wire over the back of the frame. They will use the staple gun to put one staple in the middle of one side, attaching the wire to the frame.
- Pull it Tight: Go to the opposite side of the frame. Pull the wire really tight, like a little trampoline. A grown-up will put a staple in the middle of that side.
- Keep Stapling: Keep pulling the wire tight and adding staples. Go all the way around the frame until the wire is secure and doesn’t sag.
- Add Hooks (Optional): You can screw small cup hooks into the bottom of the frame to hang bracelets or chunkier necklaces.
- Hang and Organize: Hang your new jewelry frame on the wall. Now you can hang your earrings right on the wire and drape your necklaces through the holes.
4. Under-Bed Rolling Crates

The large, empty space under your bed is a prime spot for storage. Instead of letting dust bunnies live there, use rolling wooden crates to keep things organized and easy to access.
These crates are great for storing extra blankets, shoes, or clothes that are out of season. The wheels make it simple to roll them out when you need something and slide them back out of sight. It’s a rustic and clever way to use hidden space.
DIY Instructions: How to Make Rolling Crates
What You’ll Need:
- Wooden crates (from a craft store or hardware store)
- Four small wheels (called casters) for each crate
- A drill or a screwdriver
- The small screws that come with the wheels
Step-by-Step Guide:
- Flip the Crate: Turn one of your wooden crates upside down so the bottom is facing up.
- Place the First Wheel: Take one of your little wheels. Place it in one of the corners on the bottom of the crate.
- Screw it On: The wheel will have a flat plate with little holes in it. A grown-up can help you use a drill or a screwdriver to put the small screws through the holes and into the wood. Make sure it’s on tight!
- Do the Other Corners: Do the same thing for the other three corners of the crate. Make sure all four wheels are pointing in the same direction.
- Flip it Over: Carefully turn your crate back over. It now has wheels! Give it a little push to make sure it rolls smoothly.
- Repeat for Other Crates: If you have more crates, just do these steps again for each one.
- Fill Them Up: Now you can fill your new rolling crates with your folded sweaters, shoes, or toys and slide them right under your bed.
5. Space-Saving Scarf Hanger

A collection of scarves can quickly become a messy jumble in a drawer. This special kind of hanger is designed to keep them all neat, tidy, and visible in your closet.
With lots of individual rings, it lets you hang many scarves on a single hanger. You can see all the colors and patterns at once, making it easy to choose the right one. This simple tool saves a lot of drawer space and keeps your scarves from getting wrinkled.
DIY Instructions: How to Make a Scarf Hanger
What You’ll Need:
- A sturdy wooden hanger
- A package of shower curtain rings (the simple plastic ones that snap shut)
Step-by-Step Guide:
- Get Your Hanger: Start with your wooden hanger. Make sure it’s a strong one that won’t bend.
- Open a Ring: Take your first shower curtain ring. Find the little opening and unsnap it so it opens up.
- Clip it On: Clip the ring around the bottom bar of the hanger and snap it shut. It should be able to slide back and forth.
- Add More Rings: Keep adding shower curtain rings to the hanger. You can probably fit 10 to 15 rings on one hanger.
- Time to Organize: Now, get your pile of scarves.
- Loop Them Through: Take a scarf and fold it in half. Push the folded end through one of the rings, and then pull the two tail ends of the scarf through the loop you made. Gently pull it snug.
- Fill it Up: Do this for all of your scarves, giving each one its own ring. Now you can hang it in your closet, and all your scarves will be neat and tidy!
6. Clever Corner Shelves

The corners of a room are often wasted space. A set of small, floating corner shelves can turn that empty area into a useful and attractive storage spot.
This is a great place to create a charging station for your phone, a home for your keys, or a display for small plants and trinkets. It draws the eye to an often-ignored part of the room. This makes your space feel more complete and organized.
DIY Instructions: How to Install Corner Shelves
Important: This project needs a grown-up’s help, especially with the drill.
What You’ll Need:
- A set of corner shelves (they usually come with all the hardware)
- A drill
- A level
- A pencil
Step-by-Step Guide:
- Choose Your Corner: Pick the corner of the room where you want to add shelves.
- Mark the Height: Decide how high you want your first shelf. Hold it in the corner. Ask a grown-up to place the level on top and wiggle it until the bubble is in the very middle.
- Mark the Holes: While the grown-up holds the shelf straight, use a pencil to make a mark on the wall inside each of the screw holes on the shelf brackets.
- Drill and Anchor: A grown-up will take the shelf down and use the drill to make small holes on your pencil marks. Then, they will gently tap a plastic wall anchor (a little plastic tube) into each hole until it’s flat against the wall.
- Attach the Shelf: Hold the shelf back up in the corner, lining up the holes with the anchors you just put in. A grown-up will use the drill to put the screws in until the shelf is held tightly to the wall.
- Add More Shelves: You can add more shelves above or below your first one. Just repeat the same steps to make sure they are all level and secure.
7. Double-Up Closet Rod

Most closets only have one rod, which leaves a lot of wasted space underneath your hanging clothes. You can instantly double your hanging space by adding a second, lower rod.
This is great for hanging shorter items like shirts, folded pants, and skirts on two levels. It makes better use of the full height of your closet. This simple addition can often solve the problem of an overstuffed closet.
DIY Instructions: How to Add a Second Closet Rod
What You’ll Need:
- An adjustable closet rod expander (you can find these at most big box stores)
Step-by-Step Guide:
- Unpack the Expander: Take your new closet rod expander out of the box. It should have two long vertical bars with hooks at the top, and one horizontal bar that will be your new, lower rod.
- Hang the Hooks: Take the two long vertical bars and simply hang their hooks over your existing closet rod. Hang one on the left and one on the right.
- Adjust the Height: The vertical bars can usually be made longer or shorter. Adjust them so the bottom rod will be at a good height for you. You want to make sure the clothes on the top rod don’t hang down too far and cover the clothes on the bottom rod.
- Install the Bottom Rod: The horizontal bar can also be made longer or shorter. Pull it out so it’s wide enough to reach between the two vertical bars.
- Connect and Secure: There will be holes or special connectors on the vertical bars. Fit the ends of the horizontal rod into these connectors. Some models might have a small screw you need to tighten to hold it in place.
- Start Hanging: That’s it! Your closet now has two levels for hanging clothes. You can hang your shirts and jackets on the bottom rod and keep your longer coats and dresses on the top rod.
8. Fold-Away Wall Desk

If you need a workspace in your bedroom but are short on space, a fold-away desk is a brilliant solution. This clever piece of furniture is a shallow cabinet on the wall that folds down to become a sturdy desk.
When you’re done working, it folds back up, freeing up your floor space completely. Many models also have small shelves inside for storing supplies. It’s a great way to have a dedicated spot for homework or hobbies, even in the smallest of rooms.
DIY Instructions: How to Install a Fold-Away Desk
Warning: This is an advanced project for a grown-up. The desk must be attached to the strong wooden studs inside the wall to be safe and hold weight.
What You’ll Need:
- A fold-away wall desk kit
- A stud finder
- A level
- A drill and strong screws
Step-by-Step Guide (for a Grown-Up):
- Find the Studs: A grown-up MUST use a stud finder to locate the strong vertical wood beams inside the wall. They will mark the locations of the studs with a pencil. The desk must be attached to at least two of these.
- Choose the Height: Decide on a comfortable height for the desk when it’s open. This is usually around 29-30 inches from the floor. A grown-up will make a mark on the wall for the bottom of the desk cabinet.
- Draw a Level Line: Using the level, a grown-up will draw a perfectly straight line across the wall at the height they just marked.
- Mark the Holes: A grown-up will hold the main cabinet of the desk up to the wall, resting it on the level line. They will make sure it is centered over the stud marks they made. Then, they will use a pencil to mark where the mounting screws need to go inside the cabinet.
- Drill Pilot Holes: They will take the desk down and drill small “pilot” holes on the marks they just made.
- Mount the Desk: They will hold the desk back up to the wall and use the drill to drive the long, strong screws through the back of the cabinet and into the wall studs. This must be done very securely.
- Check the Function: Once it’s mounted, carefully open and close the desk a few times to make sure it moves smoothly and the hinges and latches all work correctly.
9. Bedside Tech Drawer

A nightstand can quickly become a tangled mess of charging cables and gadgets. By dedicating one drawer to be your tech hub, you can keep everything charged and out of sight.
Using a drawer organizer helps create specific spots for your phone, watch, and tablet. You can even place a small power strip inside the drawer for a super clean setup. This keeps your nightstand surface clear and your morning routine more organized.
DIY Instructions: How to Make a Charging Drawer
What You’ll Need:
- A drawer organizer or small bins that fit in your nightstand drawer
- A small power strip with a flat plug, if possible
- Adhesive hooks or clips
- A drill with a large drill bit (a job for a grown-up!)
Step-by-Step Guide:
- Empty the Drawer: Take everything out of your nightstand drawer and give it a good wipe.
- Create an Exit: A grown-up will need to drill a hole in the back of the nightstand, near the back of the drawer. The hole needs to be big enough for the plug of your power strip to fit through. This is how the power gets into your drawer.
- Place the Power Strip: Feed the plug of the power strip through the new hole from inside the drawer. Place the power strip at the back of the drawer. You can use some double-sided tape to hold it in place.
- Arrange Your Organizer: Put your drawer organizer in the drawer. Arrange it so you have a spot for your phone, your watch, and any other gadgets.
- Plug Everything In: Plug the chargers for your devices into the power strip inside the drawer.
- Manage the Cords: Use small adhesive hooks or clips on the inside of the drawer to guide the cables neatly to their spots. This stops them from becoming a tangled mess.
- Plug it In: Plug the other end of the power strip into the wall outlet behind your nightstand. Now you can close the drawer and have all your devices charging neatly out of sight!
10. Shrink-and-Store Vacuum Bags

Bulky items like winter coats, comforters, and extra pillows can take up a huge amount of closet space. Vacuum storage bags are a genius way to shrink these items down to a fraction of their size.
By sucking all the air out with a regular vacuum cleaner, you can compress puffy items into flat, stackable packages. This not only saves an incredible amount of space but also protects your belongings from dust, moisture, and pests while they are in storage.
DIY Instructions: How to Use Vacuum Storage Bags
What You’ll Need:
- A vacuum storage bag
- Your bulky items (like sweaters or a blanket)
- A vacuum cleaner with a hose attachment
Step-by-Step Guide:
- Fill the Bag: Open your vacuum bag. It works like a giant zip-top bag. Neatly fold your sweaters, blankets, or coats and place them inside. Don’t fill it past the “fill line” marked on the bag.
- Seal it Shut: Press the top of the bag together firmly. Slide the little plastic zipper that comes with the bag across the seal two or three times. It’s very important that this seal is completely closed.
- Find the Valve: Look on the side of the bag for a round cap. Unscrew this cap, but don’t lose it!
- Connect the Vacuum: Take the hose of your vacuum cleaner. Press the end of the hose firmly over the valve on the bag.
- Start Shrinking: Turn your vacuum cleaner on. You will immediately see the bag start to shrink and get smaller and smaller as the vacuum sucks all the air out. It’s really cool to watch!
- Keep Going: Keep the vacuum on until the bag stops shrinking and is flat and hard.
- Seal the Valve: Turn the vacuum off and quickly pull the hose away. Immediately screw the cap back onto the valve very tightly. This stops any air from getting back in.
- Store it Away: Your bulky items are now a flat package that you can easily slide under a bed or stack on a high closet shelf. You just saved a ton of space!
11. Versatile Pegboard Wall Organizer

A pegboard is a fantastic way to organize many different kinds of items on your wall. It uses vertical space, freeing up your desk and drawers. With hooks, baskets, and small shelves, you can create a custom spot for everything.
This system can hold makeup, craft supplies, jewelry, or school supplies. Because you can move the accessories around, the board changes as your needs change. It’s a flexible solution that puts everything you use in plain sight and within easy reach.
DIY Instructions: How to Create a Pegboard Organizer
What You’ll Need:
- A pegboard (you can find this at a hardware store)
- Four pieces of wood for the frame (ask a grown-up to cut them to fit)
- Small wood strips (called furring strips or spacers)
- A drill and screws (for a grown-up)
- A level
- Pegboard hooks, baskets, and other accessories
Step-by-Step Guide:
- Build the Frame: A grown-up will lay the four frame pieces on the floor to make a rectangle. They’ll use wood glue and screws to connect the corners and make a sturdy frame.
- Add the Spacers: For the pegboard hooks to work, there needs to be a small gap between the pegboard and the wall. A grown-up will attach the small wood spacer strips to the back of the frame, all the way around.
- Attach the Pegboard: Place the pegboard on top of the spacers on the back of the frame. A grown-up will use screws to attach the pegboard to the frame and the spacers.
- Find the Wall Studs: This is very important. A grown-up will use a special tool called a stud finder to locate the strong wooden beams inside your wall. The pegboard must be attached to these to be safe.
- Hang the Organizer: A grown-up will hold the finished pegboard frame against the wall. They’ll use the level to make sure it’s straight. Then, they will use long, strong screws to attach the frame directly to the wall studs they found.
- Add Your Accessories: Now for the fun part! Push the hooks, shelves, and baskets into the pegboard holes. You can arrange them any way you want to hold all your things.
12. Over-the-Door Pocket Organizer

The back of your bedroom or closet door is valuable, unused space. An over-the-door organizer with clear pockets can hold a surprising amount of stuff. It’s most famous for storing shoes.
You can also use the pockets for scarves, belts, craft supplies, or small toys. The clear plastic makes it easy to see what’s inside, so you don’t have to guess. This is a very simple way to get a lot of small items up off the floor and out of your way.
DIY Instructions: How to Use Your Door Organizer
What You’ll Need:
- An over-the-door pocket organizer (it comes with everything you need)
Step-by-Step Guide:
- Unpack the Organizer: Take your new organizer out of its package. It will probably be folded up, so lay it out flat on your bed or the floor.
- Find the Hooks: In the package, you will find a few flat metal hooks. They usually have a bend at the top and another bend at the bottom.
- Attach the Hooks: Look at the very top edge of the fabric organizer. You will see a few small holes or loops. Slide the bottom part of a metal hook through each of these holes.
- Hang It Up: Open your bedroom or closet door. Take the organizer, with the hooks attached, and simply lift it up. Hang the top part of the metal hooks over the top edge of the door.
- Check the Fit: Close the door to make sure it shuts properly with the hooks in place. The hooks are very thin so it should close just fine.
- Start Organizing: Now you can start filling the pockets! Put one shoe in each pocket, or roll up your scarves and belts and slide them in. It’s ready to use in just a few minutes!
13. Clearly Labeled Storage Bins

When you store clothes for the next season, it’s easy to forget what’s in which box. Using clear bins helps, but adding labels makes finding things much faster. You’ll know exactly where your winter sweaters are.
This system saves you from having to open every single bin to find one item. It looks neat and tidy on a closet shelf and makes rotating your wardrobe a simple task. A few minutes of labeling now can save you a lot of time later.
DIY Instructions: How to Organize with Labeled Bins
What You’ll Need:
- Clear plastic storage bins with lids
- Labels (you can use sticker labels or paper and tape)
- A marker or pen
- The clothes you want to store
Step-by-Step Guide:
- Sort Your Stuff: First, make piles of the things you want to put away. Make one pile of sweaters, one pile of thick socks, one pile of winter hats, and so on.
- Fold Neatly: Carefully fold everything in your piles. If you stack them neatly, you can fit more into each bin.
- Fill a Bin: Take one of your sorted piles, like the sweaters, and place them in a clear bin. Put the lid on.
- Write the Label: Take one of your labels and a marker. In big, clear letters, write what is inside the bin. For example, you could write “WINTER SWEATERS” or “HATS & GLOVES”.
- Stick it On: Peel the back off your sticker label and stick it on the front of the bin where it’s easy to see. If you are using paper and tape, just tape the paper label securely to the bin.
- Repeat and Stack: Do the same thing for all your other piles of clothes. Fill a bin, write a label, and stick it on.
- Store Them Smartly: Stack your labeled bins on a shelf in your closet or under your bed. Next time you need something, you can just read the labels instead of making a big mess!
14. The File-Folding Drawer Method

Are your T-shirt drawers a jumble? Try folding your clothes so they stand up instead of stacking them. This method, sometimes called file folding, lets you see every single shirt at once.
When you fold this way, nothing gets lost at the bottom of a pile. You can pull one shirt out without messing up all the others. It saves space and makes your drawers look incredibly neat. Finding your favorite shirt in the morning becomes quick and easy.
DIY Instructions: How to File-Fold a T-Shirt
What You’ll Need:
- A T-shirt
- A flat surface, like your bed or the floor
Step-by-Step Guide:
- Lay it Flat: Lay your T-shirt flat on the bed, with the front facing up. Smooth out any wrinkles.
- First Fold: Imagine a line going down the middle of your shirt. Take the right side of the shirt and fold it over to that middle line. Lay the sleeve flat on top.
- Second Fold: Now, do the same thing with the left side. Fold it over to the middle. The shirt should now be a long, skinny rectangle.
- Fold in Half: Take the bottom of the rectangle and fold it up to the top, so you have a shorter, thicker rectangle.
- The Final Fold: Fold it in half one more time. The shirt should now be a small, chunky rectangle that can stand up on its own.
- “File” it Away: Place your folded shirt into your drawer standing up on its folded edge, like a file in a filing cabinet.
- Do the Rest: Do this for all your other shirts. Line them up in rows from front to back. Now when you open your drawer, you can see all your shirts at once!
15. Magnetic Makeup Board

Makeup collections can easily take over a bathroom counter or a vanity drawer. A magnetic board is a creative way to store your favorite products right on the wall.
This turns your makeup into a colorful piece of art that is also very functional. You can grab your blush or eyeshadow without digging through a messy bag. It keeps your daily essentials visible and within arm’s reach.
DIY Instructions: How to Make a Magnetic Makeup Board
What You’ll Need:
- A picture frame
- A thin sheet of metal from a hardware store (a grown-up must help with this!)
- A hot glue gun (for a grown-up)
- Small, strong magnets
- Your makeup
Step-by-Step Guide:
- Get the Metal Sheet: A grown-up will need to measure the opening in the back of your picture frame. They will need to buy a sheet of metal (like galvanized steel) and have it cut to that size at the hardware store. The edges of cut metal can be sharp, so only a grown-up should handle it.
- Prepare the Frame: Take the glass and backing out of your picture frame. You just want the empty frame.
- Glue in the Metal: A grown-up will carefully place the metal sheet into the back of the frame where the glass used to be. They will use the hot glue gun to put a line of glue all around the edges to hold the metal in place. Let it dry completely.
- Make Your Makeup Magnetic: This is the fun part! Take one of your small magnets. A grown-up will put a dot of hot glue on the magnet and then press it firmly onto the back of a makeup item, like a blush compact.
- Let it Cool: Hold the magnet in place for about 30 seconds until the glue cools down and gets hard.
- Repeat for All Makeup: Do this for all the makeup items you want to put on your board.
- Hang and Organize: Hang your new magnetic board on the wall. Now you can stick your makeup right onto it! You can arrange it in any pattern you like.
16. Multipurpose Storage Bench

A bench at the end of your bed is more than just a place to sit. Choosing one with built-in shelves or a hollow inside gives you a powerful storage tool.
It’s a great spot to line up your shoes, stack folded blankets, or keep board games. The top surface can hold decorative items or a tray for your books. This single piece of furniture serves multiple purposes, helping you keep your room tidy and functional.
DIY Instructions: How to Best Use a Storage Bench
Note: This guide is about organizing a bench you already have, not building one from scratch.
What You’ll Need:
- A storage bench
- The items you want to store (shoes, blankets, games, etc.)
- Small baskets or bins (optional)
Step-by-Step Guide:
- Decide its Job: First, what do you need to store the most? Is it shoes? Extra bedding? Books? Decide the main purpose of your bench.
- Organize the Shelves: If your bench has open shelves, think about how to make it look neat. Line up your shoes with the toes pointing the same way. Fold your blankets so they are all the same size before stacking them.
- Use Baskets for Small Stuff: If you want to store smaller, messier things like video game controllers or art supplies, put them in small baskets first. Then, you can slide the whole basket onto the shelf. This makes it look much cleaner.
- Use the Inside Space: If your bench has a lid that lifts up, that’s a great spot for things you don’t use every day, like a thick winter comforter or extra pillows. Fold them neatly before placing them inside.
- Keep the Top Tidy: Try not to let the top of the bench become a clutter spot. Use it for a few nice things, like a couple of books, a small plant, or a tray to hold your remote control.
- Sit on It! Don’t forget, it’s also a seat! It’s a handy place to sit down to put on your shoes in the morning.
17. High and Mighty Closet Shelf

The highest part of the closet is often just empty air. Installing a sturdy shelf high up on the wall gives you a new storage zone for things you don’t use very often.
This is a wonderful place for luggage, boxes of seasonal decorations, or extra bedding. It gets these bulky items out of the way, freeing up more accessible spots for your everyday clothes and shoes. A high shelf uses every last inch of your closet’s potential.
DIY Instructions: How to Install a High Closet Shelf
Important: This is a job that needs a grown-up who is very comfortable and safe using tools. A shelf falling down can be dangerous.
What You’ll Need:
- A long wooden shelf board
- Heavy-duty shelf brackets
- A stud finder
- A level
- A drill and long, strong screws
Step-by-Step Guide:
- Find the Strong Spots: A grown-up must use a stud finder to locate the solid wood beams inside the closet walls. They will mark them with a pencil. The shelf must be attached to these, or it will not be strong enough.
- Choose the Height: Decide how high you want the shelf. It should be high enough to be out of the way, but not so high that you can’t reach it with a safe step stool.
- Mark a Straight Line: A grown-up will make a mark on the wall for the bottom of the brackets. Then they will use the level to draw a perfectly straight line across the wall so the shelf won’t be crooked.
- Attach the Brackets: The grown-up will hold the first heavy-duty bracket on the line and over a stud mark they made. They will use the drill and long screws to attach it very securely to the wall. They will do this for all the brackets, making sure they are spaced out evenly along the stud marks.
- Place the Shelf: Carefully lift the wooden shelf board and place it on top of the brackets.
- Secure the Shelf: From underneath, the grown-up will use more screws to attach the shelf board to the brackets. This is a very important step that stops the shelf from sliding or tipping.
- Store Your Items: Now you can store your suitcases and other bulky items on your new, strong shelf. Just be sure to use a safe step stool when getting things up and down.
18. Bedside Storage Caddy

If you don’t have room for a nightstand, a bedside caddy is a smart alternative. This fabric organizer has pockets and hangs right off the side of your bed frame or mattress.
It’s a great place to keep your tablet, book, phone, glasses, and remote control. Everything you need for relaxing in bed is kept safe and within arm’s reach. This simple addition prevents your essentials from getting lost in the covers or falling on the floor.
DIY Instructions: How to Set Up Your Bedside Caddy
What You’ll Need:
- A bedside storage caddy
Step-by-Step Guide:
- Find the Flap: Unfold your new caddy. You’ll see the pocket part on the front and a long, flat piece of fabric on the back. This flat part is called the flap.
- Lift Your Mattress: Go to the side of your bed where you want the caddy to hang. Carefully lift up the corner of your mattress. You don’t need to lift the whole thing, just a few inches.
- Slide it Under: Take the long flap of the caddy and slide it underneath the mattress. Make sure most of the flap is under the mattress so it will be held down by the weight.
- Adjust the Height: Let the pocket part hang down the side of your bed. You can pull the flap further in or out from under the mattress to get the pockets at just the right height for you to reach.
- Lower the Mattress: Gently lower your mattress back down. The weight of the mattress will hold the caddy securely in place.
- Fill the Pockets: Now you can fill the pockets with your things! Put your tablet in the big pocket and your phone or glasses in the smaller ones. Everything is now organized right next to you.
19. The Donation Box Rule

One of the biggest parts of organizing is getting rid of things you no longer need. A simple way to do this is to keep an empty box labeled “DONATION” in your closet at all times.
Whenever you try on an outfit that doesn’t fit or you find a book you won’t read again, put it directly into the box. You don’t have to make a big decision; just place it inside. When the box is full, seal it up and take it to a charity. This makes decluttering a slow and steady habit.
DIY Instructions: How to Start a Donation Box Habit
What You’ll Need:
- An empty cardboard box (any size will work)
- A thick marker
Step-by-Step Guide:
- Find a Box: Get an empty box. A medium-sized one is good to start with because it won’t be too heavy when it’s full.
- Label It: Take your marker and, in big, clear letters, write “DONATION” on at least two sides of the box. This reminds you what the box is for.
- Find a Home for It: Place the box in a spot that’s easy to get to but out of your way. A corner of your closet or next to your dresser are good places.
- Start Using It: The next time you are getting dressed and you find a shirt that is too small, don’t put it back in the drawer. Walk over to your donation box and drop it in.
- Add More Things: Did you get a new game and know you won’t play the old one anymore? Put the old one in the box. Found a book on your shelf you’ve already read three times? Into the box it goes.
- Don’t Overthink It: The rule is simple: if you know you don’t need it, use it, or love it anymore, put it in the box right away. Don’t wait.
- When it’s Full: Once the box is full, ask a grown-up to help you tape it shut. They can then help you take it to a place that accepts donations, so your old things can get a new home with someone who needs them. Then, start over with a new empty box!
20. Customizable Cabinet Shelving

The inside of a deep cabinet or armoire can become a mess quickly. An adjustable shelving unit lets you create custom storage that fits your exact needs.
These units often use tension rods, so you can change the height and number of shelves without any tools. They are great for organizing folded clothes, shoes, or bins. You can finally use all of that vertical space inside a cabinet, making sure no inch goes to waste.
DIY Instructions: How to Install Adjustable Shelves
What You’ll Need:
- An adjustable or expandable cabinet shelving kit
Step-by-Step Guide:
- Measure Your Cabinet: Before you buy a kit, open your cabinet and use a tape measure to see how wide and deep it is. Make sure you get a shelf kit that will fit inside.
- Unpack the Pieces: Lay out all the pieces of your new shelving unit. You should see poles, shelves, and little plastic clips or screws.
- Build the Sides: Start by assembling the side poles. Many of them screw together to get to the right height. You want them to be just a little shorter than the inside of your cabinet.
- Add the Shelf Supports: Look for small plastic pieces that clip onto the poles. These will hold up your shelves. Decide where you want your first shelf to be and clip the supports onto all the poles at the exact same height.
- Slide on the Shelf: Take one of your shelf pieces and carefully slide it down over the poles until it rests firmly on top of the supports you just attached.
- Expand the Shelf: Many of these shelves can be pulled to get wider. Pull the shelf until it reaches from one side of your cabinet to the other.
- Repeat for More Shelves: Keep adding supports and shelves until you have built the organizer the way you want it.
- Place it Inside: Carefully lift your new shelving unit and place it inside your cabinet. Some kinds are built right inside the cabinet using tension—where the top and bottom poles are twisted until they push against the top and bottom of the cabinet and hold themselves up. A grown-up can help with this part! Now you can organize your things on your new custom shelves.
21. Floating Picture Ledge Bookshelves

Traditional bookshelves can be bulky. Use shallow picture ledges to create a modern, space-saving library on your wall. This method turns your books into a design element, showcasing their covers like art.
The slim profile of the shelves keeps your room feeling open and uncluttered. It’s a wonderful way to display your favorite reads, keeping them off the floor and in easy reach. You can arrange them in creative patterns to build a unique feature wall.
DIY Instructions: How to Install Picture Ledge Shelves
What You’ll Need:
- Picture ledge shelves
- A drill (a job for a grown-up!)
- A level (the tool with the bubble)
- A pencil
- Screws and wall anchors (usually come with the shelves)
Step-by-Step Guide:
- Choose Your Wall: Decide where you want your new bookshelves to go. You can hang one, or hang a few in a cool pattern.
- Mark the Height: Hold the first shelf against the wall. When you like where it is, use your pencil to make a light mark on the wall right where one of the screw holes is.
- Make it Straight: Ask a grown-up to place the level on top of the shelf. They will tilt the shelf until the bubble is exactly in the middle. Now the shelf is straight.
- Mark All the Holes: While the grown-up holds the shelf straight, use your pencil to make a mark inside all the other screw holes on the shelf.
- Drill and Anchor: A grown-up will take the shelf away and drill small holes on your pencil marks. Then, they’ll gently tap the plastic wall anchors into the holes until they are flush with the wall. The anchors help the screws hold tight.
- Attach the Shelf: Hold the shelf up to the wall again, lining up the holes in the shelf with the new anchors. A grown-up will use the drill to put the screws in, making them nice and snug.
- Add Your Books: Once the shelf is secure, you can start lining up your books. The little lip on the front of the shelf will keep them from sliding off.
22. Woven Elastic Grid Organizer

Cables, chargers, sunglasses, and tools can create a tangled mess. An elastic grid organizer holds all these oddly shaped items securely against a board.
The strong, stretchy bands create a web that you can tuck things into. It keeps everything visible and easy to grab. This is a modern and clever way to conquer the clutter of small gadgets and accessories that don’t have a natural home.
DIY Instructions: How to Make an Elastic Grid Organizer
What You’ll Need:
- A sturdy board (like corkboard or plywood)
- A long roll of wide, strong elastic
- A staple gun (only for a grown-up to use!)
- Scissors
- A ruler or measuring tape
Step-by-Step Guide:
- Plan Your Grid: Lay your board flat. Decide if you want your elastic bands to go straight across or in a cool crisscross pattern.
- First Vertical Strap: Start with the elastic at the top of the board, leaving a little extra hanging off the back. A grown-up will use the staple gun to put two or three staples in it to hold it tight.
- Stretch and Staple: Pull the elastic down to the bottom of the board. It should be stretched tight, like a guitar string. A grown-up will staple it securely on the back of the bottom edge, then cut the elastic.
- Add More Straps: Continue this process, adding more vertical (up and down) straps. You can space them an inch or two apart.
- Start Weaving: Now it’s time to do the horizontal (side to side) straps. A grown-up will staple the elastic to the back of one side.
- Go Over and Under: Weave the horizontal elastic through the vertical straps. Go over the first strap, under the second, over the third, and so on.
- Stretch and Secure: When you get to the other side, pull the elastic tight. A grown-up will staple it to the back and cut it.
- Keep Weaving: Continue adding horizontal straps, but alternate the pattern. If the first row started by going “over,” the second row should start by going “under.” Fill the whole board, then hang it on the wall and start organizing!
23. The Pro Folding Board

Want your folded shirts to look like they do in a store? A simple folding board is the secret. This tool helps you fold every shirt, sweater, and polo to the exact same size.
Using a board creates perfectly neat stacks that save space in your drawers and on your closet shelves. It takes the guesswork out of folding, making laundry day a little faster and a lot more satisfying. A tidy stack of clothes can make your whole room feel more organized.
DIY Instructions: How to Make a Cardboard Folding Board
What You’ll Need:
- A large cardboard box, flattened
- A ruler
- A pencil or marker
- A box cutter or strong scissors (for a grown-up)
- Strong tape (like duct tape)
Step-by-Step Guide:
- Cut Your Panels: Ask a grown-up to help you cut six identical rectangle pieces from the cardboard. A good size to start with is about 9 inches wide and 12 inches tall for each piece.
- Lay Them Out: Place the six cardboard panels on the floor in two columns and three rows, like a window with six panes. Leave a tiny gap (about the thickness of the cardboard) between each piece. This gap will become the hinge.
- Tape the Middle: Run a long piece of duct tape down the center gap, connecting the left and right columns.
- Tape the Horizontal Gaps: Now, run pieces of tape across the horizontal gaps, connecting the top and middle rows, and the middle and bottom rows. Do this for both the left and right columns.
- Flip and Reinforce: Carefully flip the whole thing over. Now, tape all the gaps on this side, too. This makes your hinges strong.
- Time to Fold: Lay a shirt face down on the open board. Flip the right panel in, then out. Flip the left panel in, then out. Finally, flip the bottom panel up, then out. You have a perfectly folded shirt!
24. Hide It All With a Bed Skirt

Using the space under your bed for storage is a great idea, but seeing the boxes and bins can look messy. A bed skirt is a simple and stylish solution to hide everything.
This long piece of fabric drapes from the mattress down to the floor, creating a clean, uniform look. It instantly conceals any clutter stored beneath the bed. This makes your whole room feel calmer and more put-together, while still letting you use that valuable storage space.
DIY Instructions: How to Install a Bed Skirt
What You’ll Need:
- A bed skirt that is the right size for your bed (like Twin, Queen, etc.)
- A grown-up to help you lift
Step-by-Step Guide:
- Get Ready: First, take all the pillows, blankets, and sheets off your bed. You want to see just the mattress.
- Lift the Mattress: Ask a grown-up to help you with this part. You need to lift the mattress completely off the box spring (the big fabric-covered box your mattress sits on) and lean it against a wall.
- Lay Out the Skirt: A bed skirt has a big, flat white sheet part in the middle and the pretty, dangly fabric on three sides. Lay the bed skirt on top of the box spring.
- Position it Just Right: Make sure the flat white part is smooth and covers the whole top of the box spring. Adjust it so the fabric “skirt” part hangs down evenly on the left side, the right side, and the foot of the bed.
- Put the Mattress Back: This is another job for a grown-up. Carefully lift the mattress and place it back on top of the box spring and the bed skirt. The weight of the mattress will hold the bed skirt in place.
- Final Touches: Make sure the skirt is hanging straight and isn’t tucked under the mattress anywhere. Now you can make your bed again. All the storage underneath is now completely hidden!
25. Secret Window Seat Storage

A window seat adds a cozy spot for reading and relaxing. If it’s built with a hinged lid, it also becomes a secret storage chest. This is a brilliant way to hide away bulky items.
You can fill it with extra blankets, pillows, board games, or seasonal clothes. The clutter disappears inside, but it’s still easy to get to when you need it. This piece of furniture works twice as hard, providing both comfort and organization.
DIY Instructions: How to Build a Simple Storage Bench
Warning: This is a big project for a grown-up who is good at building things.
What You’ll Need:
- Sheets of plywood
- A drill and screws
- Wood glue
- A measuring tape
- A piano hinge (a very long hinge)
- A saw (for a grown-up)
Step-by-Step Guide (for a Grown-Up):
- Build a Box: The basic idea is to build a strong, open-topped box out of plywood. Measure the space where the bench will go. A grown-up will need to cut five pieces of wood: a bottom, a front, a back, and two sides.
- Assemble the Box: Using wood glue and screws, a grown-up will attach the front, back, and side pieces to the edges of the bottom piece. It’s very important to make sure the box is “square” (has perfect corners) and is very strong.
- Cut the Lid: A grown-up will cut one more piece of plywood to be the lid. It should be just a tiny bit bigger than the top of the box, so it hangs over the edge just a little.
- Attach the Hinge: The piano hinge will connect the lid to the back of the box. A grown-up will line it up and use lots of small screws to attach one side of the hinge to the box, and the other side to the lid.
- Add a Support: A grown-up should also install a special hinge on the inside that holds the lid open so it doesn’t slam shut on anyone’s fingers.
- Finish and Paint: You can sand the wood to make it smooth and then paint the bench to match your room. Add a cushion and some pillows on top, and no one will know it’s full of your stored treasures!
26. The S-Hook Jean Solution

Folding jeans can be difficult, and they take up a lot of space in drawers. Hanging them is a better option, and using S-hooks is a clever way to do it.
Instead of trying to fold them over a hanger, just slip an S-hook through a belt loop. This method keeps your jeans hanging straight, which helps prevent wrinkles. You can fit many pairs in a small amount of closet space, and it’s easy to see all your options at once.
DIY Instructions: How to Hang Jeans with S-Hooks
What You’ll Need:
- A package of medium or large S-hooks (from a hardware store)
- Your jeans
- A closet rod
Step-by-Step Guide:
- Get Your Hooks: Open your package of S-hooks. They are just simple metal hooks shaped like the letter “S”.
- Hook them On: Take one S-hook and hang it over the clothes rod in your closet. The hook should sit securely on the rod.
- Add the Rest: Hang all of your S-hooks on the rod. You can space them out a little bit for now.
- Grab Your Jeans: Take your first pair of jeans. Find one of the belt loops on the side or the back of the waistband.
- Hang Them Up: Simply slip the bottom part of an S-hook through the belt loop. That’s it! The jeans will hang straight down.
- Fill the Rod: Do this for all of your jeans, giving each pair its own S-hook. You’ll be surprised how neat they look and how much drawer space you just saved.
27. Digitize Your Sentimental Clutter

Old photographs, concert tickets, and your childhood drawings are precious memories. But the boxes they live in can take up a lot of space. By scanning them, you can keep the memory without the physical clutter.
Creating digital copies protects these items forever and lets you organize them into folders on a computer. You can easily share them with family or even create a digital photo frame. This frees up shelves and drawers while keeping your treasures safe.
DIY Instructions: How to Digitize Your Memories
What You’ll Need:
- Your old photos, drawings, and papers
- A scanner OR a smartphone with a good camera
- A computer
Step-by-Step Guide:
- Sort Your Piles: Go through your boxes and make piles. Put all the old photos together, all the drawings together, and so on.
- Get Ready to Scan: If you have a scanner, turn it on and connect it to your computer. If you are using a smartphone, find a spot with lots of bright, natural light, like near a window. A plain white background is best.
- Scan or Photograph:
- With a Scanner: Place a photo face down on the scanner glass, close the lid, and press the scan button on your computer.
- With a Phone: Lay one item flat on your background. Hold your phone directly above it, making sure there are no shadows. Use a scanning app or just your camera to take a clear, straight picture.
- Save and Name: As you scan each item, a new file will appear on your computer. Give it a name that will help you remember what it is, like “Beach Trip 1995” or “First Grade Drawing of a Dog”.
- Make Digital Folders: On your computer, create folders to organize your scanned memories. You could make a folder for “Family Vacations,” “School Art,” or “Old Letters.”
- Drag and Drop: Move your newly scanned files into the correct folders.
- Back It Up: Ask a grown-up to help you save a copy of your new digital folders to a safe place, like an external hard drive or a cloud service like Google Drive. Now your memories are safe forever, and you can clear out all those old boxes!
28. The Disappearing Murphy Bed

For a room that needs to be both a bedroom and a playroom or office, a Murphy bed is an amazing solution. This type of bed cleverly folds up into a cabinet on the wall.
During the day, you have a huge amount of open floor space for other activities. At night, it pulls down easily to become a comfortable bed. It’s a transformative piece of furniture that makes one room feel like two.
DIY Instructions: How to Safely Use a Murphy Bed
Important Safety Note: A Murphy bed is not a DIY project. It must be professionally and securely installed by an expert. The powerful springs or pistons can be very dangerous if handled incorrectly. These instructions are for using one that is already installed.
Step-by-Step Guide:
- Prepare the Area: Before you lower the bed, make sure the floor space in front of the cabinet is completely clear. Move any chairs, tables, or toys out of the way.
- Unlock the Bed: Most Murphy beds have safety latches on the side or top to keep them from accidentally opening. Undo these latches.
- Pull it Down: Grab the handle on the front of the bed cabinet. Pull firmly but slowly towards you. The bed is heavy, but the special springs or pistons will help you, so you don’t have to carry the whole weight.
- Lower the Legs: As the bed comes down, the legs that will support the end of the bed will usually fold out automatically. Make sure these legs are fully extended and sitting flat on the floor before you let go.
- Make the Bed: The bed usually has straps to hold the mattress and blankets in place when it’s folded up. You might just need to fluff your pillows, and it’s ready for sleep!
- Putting it Away: In the morning, take the pillows off. Make sure the blankets are smooth and secure them with the straps.
- Lift and Lock: Grab the handle at the foot of the bed and lift. The mechanisms will help you push it back up into the cabinet. Make sure it closes completely and re-engage the safety latches. Now your room is big again!
29. Industrial Hanging Clothes Rack

If your closet is bursting at the seams, you can add more hanging space with an industrial-style rack. Made from metal pipes and suspended from the ceiling, this solution looks modern and keeps your floor clear.
It’s a sturdy and stylish way to store your clothes out in the open. This is a great option for a room without a built-in closet. It turns your clothing collection into a part of the room’s decor.
DIY Instructions: How to Build a Hanging Pipe Rack
Warning: This is an advanced project for a grown-up. It must be attached to the strong wooden joists in the ceiling to be safe.
What You’ll Need:
- Metal pipes and fittings (from a hardware store)
- Two ceiling flanges
- Rope or chain (optional)
- A stud finder
- A drill and very strong screws
Step-by-Step Guide (for a Grown-Up):
- Design Your Rack: Decide how long and how wide you want your rack to be. You can screw pipes and fittings together in many shapes. The simplest is one long bar.
- Assemble the Pipe: Screw all the pipe pieces and elbow fittings together on the floor. Make sure every connection is twisted as tightly as possible. For the simplest design, you’ll have a long horizontal bar with two elbow pieces pointing up at the ends.
- Find the Ceiling Joists: This is the most important step. A grown-up must use a stud finder to locate the strong wooden beams in the ceiling. The rack must be anchored into these. Mark the joist locations with a pencil.
- Attach the Flanges: A ceiling flange is a flat, round metal piece with screw holes. The grown-up will hold the flanges up to the ceiling on the marks they made and use the drill and very strong screws to attach them securely to the joists.
- Connect to the Ceiling: Now, connect the assembled pipe rack to the flanges. You might screw vertical pipes directly into the flanges. Or, you can attach strong rope or chain to the flanges and then loop it around the rack for a different look.
- Check for Strength: Once it’s all connected, a grown-up should pull down on the rack firmly to make sure it is completely secure and safe.
- Hang Your Clothes: Once you are sure it’s safe, you can start hanging your clothes on your cool new industrial rack.
30. Customizable Drawer Dividers

Even when you fold your clothes neatly, they can still slide around and get mixed up in a drawer. Adjustable dividers are the solution. They create separate, small compartments for everything.
You can make a section for socks, a section for T-shirts, and another for shorts. The dividers hold everything in its place, keeping your organized drawer from becoming a jumbled mess. Many are spring-loaded, so they are easy to install and adjust.
DIY Instructions: How to Use Drawer Dividers
What You’ll Need:
- Adjustable drawer dividers that match the height of your drawer
- A measuring tape
Step-by-Step Guide:
- Empty the Drawer: Take everything out of the drawer you want to organize. This is a good time to get rid of any socks without a match!
- Measure Your Drawer: Use your measuring tape to see how long your drawer is from front to back or from side to side, depending on which way you want your dividers to go.
- Adjust the Divider: Most adjustable dividers work in one of two ways.
- Spring-Loaded: You just squeeze the divider to make it shorter, place it in the drawer, and let it go. The spring inside will push the ends against the front and back of the drawer to hold it tight.
- Tension Lock: These have a little lever or button. You place the divider in the drawer, extend it until it’s snug, and then push the lever to lock it in place.
- Place Your First Divider: Put your first divider in the drawer to create your first big section.
- Add More Dividers: Add as many dividers as you need to create compartments that are the right size for your clothes. You can create several long rows or make smaller square sections.
- Fill it Back Up: Neatly fold your clothes and place them inside their new, dedicated compartments. Now everything has its own spot and will stay tidy!
31. Adhesive Hook Hat Display

A collection of baseball caps can end up in a messy pile or get crushed on a shelf. Use simple adhesive hooks to turn an empty wall or the back of a door into a hat gallery.
This method keeps your hats in great shape, preserving their form. It also turns your collection into a cool piece of wall decor. You can easily see all your hats and grab the one you want on your way out the door.
DIY Instructions: How to Create a Hat Wall
What You’ll Need:
- A package of small, lightweight adhesive hooks (like Command hooks)
- A ruler or measuring tape
- A pencil
- A cleaning cloth
Step-by-Step Guide:
- Clean the Surface: Decide where you want to hang your hats, like on a wall or the back of your door. Use a cleaning cloth to wipe the surface so it’s free of any dust. This helps the hooks stick better.
- Plan Your Layout: Think about how you want your hats to look. Do you want them in straight rows? A checkerboard pattern? Use your ruler and pencil to make tiny, light dots on the wall where each hook will go.
- Prep the Hook: Take your first adhesive hook. It will come with a sticky strip that has two different paper backings. Peel the paper off one side of the strip.
- Stick it to the Hook: Press the sticky side you just uncovered firmly onto the back of the plastic hook.
- Attach to the Wall: Now, peel the other paper backing off the strip. Press the hook firmly onto one of the pencil dots you made on the wall. Hold it there for about 30 seconds.
- Let it Set: It’s a good idea to wait about an hour before you hang anything on the hooks. This gives the adhesive time to get a really strong grip.
- Hang Your Hats: After waiting, you can hang your hats! Just loop the little strap on the back of the hat over the hook. Do this for all your hats, and your cool new display is complete!
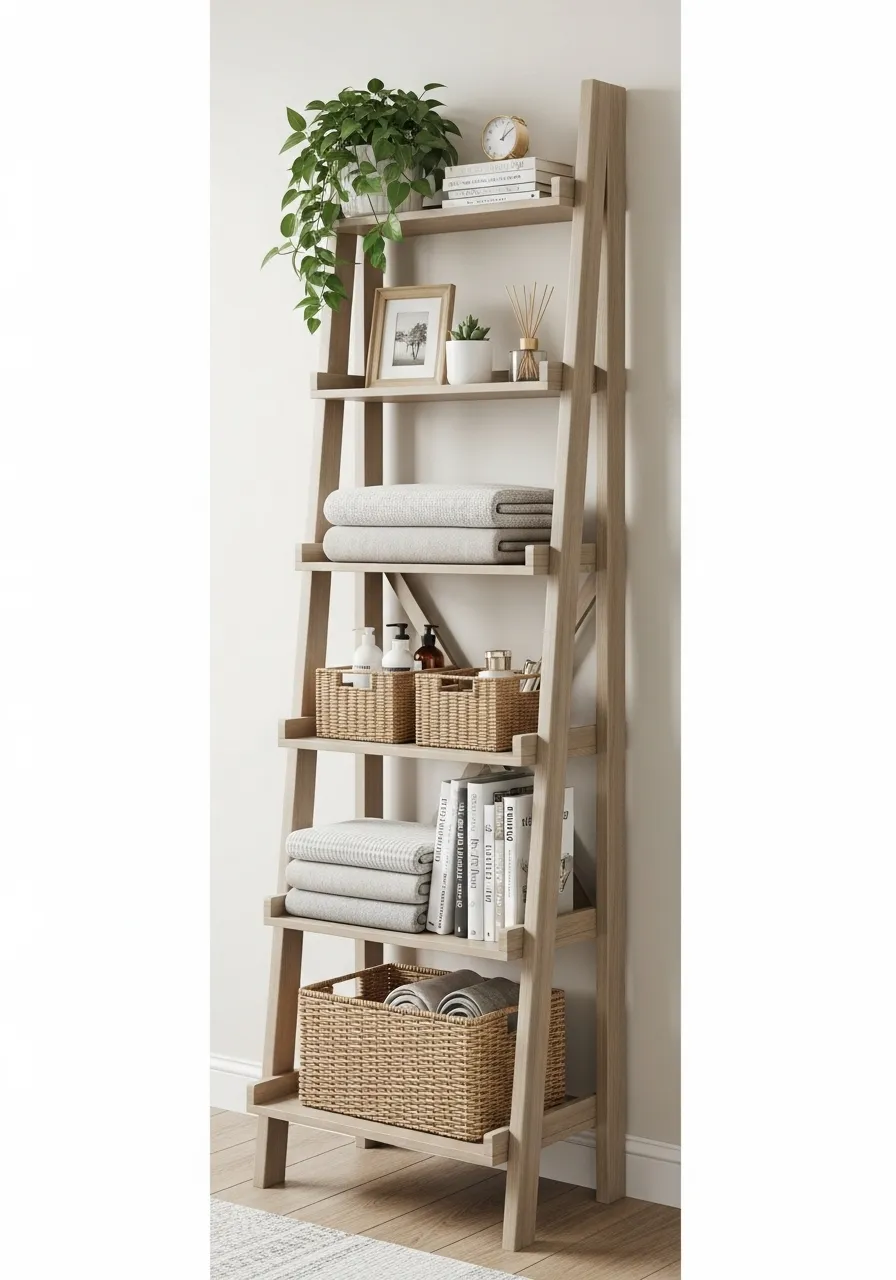
32. Stylish Leaning Ladder Shelf

A leaning ladder shelf is a trendy and practical way to add storage without making a room feel crowded. Its open design uses vertical space, drawing the eye upward.
This type of shelf is incredibly versatile. You can use it in the bedroom for folded blankets, books, and small plants. It’s also great for holding baskets of toiletries or rolled-up towels. It adds a touch of style while keeping your essentials neat and accessible.
DIY Instructions: How to Style a Ladder Shelf
Note: This is a guide for organizing a shelf you already have, not for building one.
What You’ll Need:
- A ladder shelf
- Your items to store (books, plants, baskets, etc.)
- A clean cloth
Step-by-Step Guide:
- Find the Right Spot: Place your ladder shelf against an empty wall. Make sure it’s leaning securely and doesn’t wobble.
- Wipe it Down: Before you start, give all the shelves a quick wipe with a clean cloth to remove any dust.
- Heavy on the Bottom: The shelves on a ladder get smaller as they go up. Always put your heaviest and biggest items on the bottom shelves. This is a good spot for a large basket or a stack of thick books. This keeps the shelf stable.
- Use Baskets for Clutter: If you have lots of small things, like lotions, chargers, or socks, group them together in a basket. A basket always looks neater than a pile of little items.
- Mix Textures and Shapes: To make it look nice, don’t put all the same things together. On one shelf, you could have a stack of books, a small plant, and a framed picture. Fold some fluffy towels on another shelf.
- Don’t Overcrowd: The best-looking ladder shelves have a little bit of empty space. Don’t try to cram something into every single inch. Leaving some room helps it feel calm and organized.
- Step Back and Look: After you’ve placed everything, take a few steps back and look at it. Does it feel balanced? Move things around until you love how it looks.
33. Vertical Purse and Clutch File

Clutch purses and small handbags often end up in a shapeless pile on a closet shelf or in a deep drawer. A simple metal file organizer, like one used for pot lids or office folders, is a great solution.
This tool allows you to store your purses vertically, like books on a shelf. It protects them from getting squished and makes it incredibly easy to see every option. You can slide one out without causing an avalanche.
DIY Instructions: How to Organize Your Purses
What You’ll Need:
- A sturdy metal rack with vertical dividers (a pot lid organizer or a heavy-duty file sorter works well)
- Your collection of clutch purses and small handbags
Step-by-Step Guide:
- Clear a Shelf: Find a shelf in your closet or on a bookcase. Take everything off it so you have a clean, flat space to work with.
- Place the Organizer: Put your metal rack on the shelf. Push it towards the back so it’s out of the way but still easy to reach.
- Gather Your Purses: Collect all your small handbags and clutches from wherever they are hiding.
- File Them Away: Take your first purse and simply slide it into one of the slots in the rack. It should stand up straight.
- Continue Sorting: Place your other purses in the remaining slots. You can organize them in any way you like. Maybe you want to put all the black purses together, or arrange them by size.
- Enjoy the View: That’s it! Now when you need a purse, you can see them all at a glance and pick the right one for your outfit.
34. Hanging Bedside Storage Baskets

For loft beds, bunk beds, or any bed frame without room for a nightstand, hanging baskets are a game-changer. These simple containers keep your nighttime essentials close by.
Using sturdy S-hooks, you can hang wire or fabric baskets right from the bed rail. They’re a handy home for a book, your tablet, the TV remote, or your glasses. This keeps your things off the floor and from getting lost in your blankets.
DIY Instructions: How to Set Up Hanging Baskets
What You’ll Need:
- One or two wire baskets
- Two S-hooks for each basket
Step-by-Step Guide:
- Get Your Hooks Ready: Take your S-hooks. They are already in the perfect shape, so there’s nothing you need to do to them!
- Attach Hooks to Basket: Take your first basket. Hook the bottom part of an S-hook over the top rim of the basket. Do the same thing with the second S-hook on the other side of the basket.
- Hang on Your Bed: Now, just lift the basket and hook the top part of the S-hooks over the side rail of your bed. The basket should hang securely.
- Add a Second Basket: If you have another basket, repeat the process so you have one for each side of the bed, or two next to each other.
- Fill Them Up: You’re ready to organize! Place your book, tablet, phone, and anything else you like to have near you at night into your new hanging nightstands.
35. Binder Clip Cable Management

Phone chargers and laptop cords have a habit of sliding off your desk and falling to the floor. A common office supply provides a nearly free and brilliant fix: the binder clip.
By clipping a few binder clips along the edge of your desk or nightstand, you can create a simple cord-catching system. The cables stay right where you need them, ready to be plugged in. This tiny hack can solve one of the most annoying daily clutter problems.
DIY Instructions: How to Make a Cable Holder
What You’ll Need:
- A few metal binder clips (the black ones with silver wire arms)
Step-by-Step Guide:
- Choose Your Spot: Find the edge of your desk or nightstand where your cables always seem to fall down.
- Prep the Clip: Take one binder clip. Squeeze the two silver wire arms together and pull one of them out of the clip. You only need one arm for this to work.
- Clip it On: Clip the black part of the binder clip onto the edge of your desk.
- Thread the Cable: Take the end of your charging cable. Feed it through the remaining silver wire loop on the binder clip. The plug at the end of the cable is bigger than the loop, so it will stop the cable from falling all the way through.
- Repeat as Needed: Add a few more binder clips along the edge of your desk for your other cables. Now they will always be exactly where you left them.
36. Wall-Mounted Fitness Gear Station

Yoga mats, foam rollers, and resistance bands can create a clumsy pile in the corner of your room. Getting them up on the wall not only saves floor space but also creates a tidy, motivating workout zone.
Using a combination of sturdy hooks and small shelves, you can give every piece of equipment its own home. This keeps everything organized, clean, and ready for your next workout. A neat space can make you more excited to exercise.
DIY Instructions: How to Create a Fitness Wall
What You’ll Need:
- A variety of strong wall hooks (some U-shaped, some simple hooks)
- A drill (for a grown-up!)
- A pencil
- A level
- Wall anchors and screws
Step-by-Step Guide:
- Plan Your Layout: Decide where on the wall each piece of equipment will go. Hold your yoga mat, foam roller, and bands up to the wall to see what looks best and is easiest to reach. Use a pencil to make a small mark where your hooks will go.
- Drill the Holes: A grown-up will use the drill to make a small hole on each of your pencil marks.
- Insert Wall Anchors: Gently tap the plastic wall anchors into the holes until they are flat against the wall. The anchors will help the screws hold a lot of weight safely.
- Attach the Hooks: Hold your first hook over one of the anchors. A grown-up will use the drill to put a screw through the hook and into the anchor until it’s very tight. Do this for all your hooks. Use a level for any hooks that need to be even, like the ones for a foam roller.
- Hang Your Gear: Once all the hooks are securely on the wall, you can hang up your equipment. Use a large hook for your yoga mat carrier. Use two U-shaped hooks placed horizontally for your foam roller. Use smaller hooks for jump ropes and resistance bands.
37. Motorized Tie and Belt Rack

For those with a large collection of ties and belts, finding the right one can be a hassle. A motorized rack brings your accessories to you with the push of a button.
This clever closet gadget holds dozens of ties and belts on a rotating carousel. It often includes a small light to help you see in a dark closet. It neatly organizes your collection in a small amount of space, making your morning routine a little smoother.
DIY Instructions: How to Install Your Motorized Rack
What You’ll Need:
- A motorized tie rack
- The batteries it requires
Step-by-Step Guide:
- Insert the Batteries: Find the battery compartment on the main unit of the rack. Open it up and insert the batteries, making sure the plus (+) and minus (-) sides are facing the right way. Close the compartment.
- Find a Spot: The rack needs to clamp onto your closet rod. Find an empty spot on your rod with enough space below it for your ties to hang without touching the floor or a shelf.
- Attach to the Rod: The rack will have a clamp or a hook mechanism at the top. Loosen the screw or open the clamp. Place it over the closet rod.
- Tighten it Up: Tighten the screw or lock the clamp so the unit is held firmly onto the closet rod and does not slide around.
- Hang Your Items: Start hanging your ties and belts on the small hooks that stick out from the carousel. Give each item its own hook.
- Test it Out: Press the “forward” or “reverse” button. The carousel should start to spin, bringing all your ties and belts into view. Press it again to stop it when you find the one you want.
38. Closet Door Packing Station

Packing for a trip can be stressful. You can make it much easier by creating a dedicated “packing station” inside your closet. This keeps all your travel essentials in one spot.
By combining clearly labeled bins for toiletries and travel gear with a master checklist, you can pack in minutes. Attaching a corkboard or whiteboard to the inside of the door keeps your list visible. This system ensures you never forget your toothbrush or phone charger again.
DIY Instructions: How to Make a Packing Station
What You’ll Need:
- Two clear plastic bins with lids
- A label maker or stickers and a marker
- A small, thin corkboard or whiteboard
- Strong double-sided adhesive strips
- The items you use for travel
Step-by-Step Guide:
- Gather Your Travel Stuff: Find all your travel-sized toiletries, your travel adapter, packing cubes, and anything else you only use for trips.
- Organize into Bins: Sort your items into two piles, like “Toiletries” and “Travel Gear.” Place each pile into its own clear plastic bin.
- Label the Bins: Use your label maker or a sticker to create a clear label for each bin. Stick one on the front of each bin so you can easily read what’s inside.
- Create Your Master List: Write or type up a list of everything you need to pack for a typical trip. A grown-up can help you print it out.
- Make the Checklist Board: Attach your printed list to the corkboard with a thumbtack. If you’re using a whiteboard, you can write your list directly on it with a dry-erase marker.
- Mount the Board: Clean the inside of your closet door. Use the strong adhesive strips to mount your checklist board to the door.
- Assemble the Station: Place your labeled bins on a shelf right near the door. Now, when it’s time to pack, your gear and your checklist are all in one convenient place!
39. Front-Facing Kids’ Bookshelf

Children are more likely to pick up a book when they can see the fun, colorful cover. Standard bookshelves hide this by only showing the thin spine.
A front-facing, wall-mounted bookshelf displays books like they’re in a library or bookstore. This makes reading more inviting for kids. It also serves as a lovely, rotating art display in a child’s bedroom or playroom, all while keeping books from ending up in a pile on the floor.
DIY Instructions: How to Install a Kids’ Bookshelf
What You’ll Need:
- A wall-mounted, front-facing bookshelf
- A drill (for a grown-up)
- A pencil
- A level
- Wall anchors and screws (often included with the shelf)
Step-by-Step Guide:
- Choose the Right Height: Hold the shelf up against the wall. You want it to be low enough for a child to see the books and reach for them safely.
- Mark the First Hole: Once you find a good height, use your pencil to make a small mark on the wall through one of the screw holes in the back of the shelf.
- Level the Shelf: A grown-up will place a level on the top edge of the shelf. They will adjust it until the bubble is perfectly in the center.
- Mark the Other Holes: While the grown-up holds the shelf level, mark the rest of the screw holes with your pencil.
- Drill and Anchor: A grown-up will drill holes on your pencil marks. Then, they will gently push the plastic wall anchors into the holes until they are flush with the wall. These anchors make the shelf much stronger.
- Attach the Shelf: Line the shelf up with the holes you just made. A grown-up will use the drill to drive the screws through the shelf and into the anchors until it is held tightly and securely against the wall.
- Add the Books: Now for the best part! Choose your favorite books and slide them into the shelf with their covers facing out.
40. The Two-Basket Laundry System

A pile of dirty clothes on the floor can make even the cleanest room look messy. A simple but highly effective trick is to use two laundry baskets instead of one.
This allows you to sort your clothes as you take them off. Use one basket for lights and whites, and the other for darks and colors. This pre-sorting saves a huge amount of time and effort on laundry day. It’s a small habit that makes a big difference in keeping your room tidy.
DIY Instructions: How to Set Up Your Sorting System
What You’ll Need:
- Two laundry baskets or hampers
- A label maker or marker and tape (optional)
Step-by-Step Guide:
- Choose Your Baskets: Find two laundry baskets. It can be helpful if they look different from each other—maybe one is a different color, or one is wire and one is wicker. This will help you remember which is which.
- Decide on Your System: How do you want to sort? The most common way is “LIGHTS” and “DARKS”. You could also do “CLOTHES” and “TOWELS & SHEETS”. Choose the system that makes the most sense for you.
- Label Them (Optional): If you want to make it super clear, you can make labels for your baskets. Use a label maker or just write on a piece of tape with a marker and stick it on the front of each basket.
- Find a Home for Them: Place your two baskets side-by-side in the spot where you usually drop your dirty clothes, like in your closet or near your dresser.
- Start the Habit: This is the most important step! From now on, whenever you take off a piece of clothing, don’t throw it on the floor. Take two extra seconds to walk over and put it in the correct basket. A white T-shirt goes in the “LIGHTS” basket. Your blue jeans go in the “DARKS” basket.
- Enjoy Laundry Day: When the baskets are full, you don’t have to spend time sorting through a giant pile. You can just grab one basket and take it right to the washing machine. Your future self will thank you!
Organizing your bedroom does not have to be a huge, difficult task. As these 40 hacks show, it is about making small, smart changes that add up to a big difference. A tidy room helps create a peaceful mind.
Start with the idea that inspires you the most. Whether it’s finally tackling the space under your bed or creating a simple system for your charging cables, every small step helps. Consistency is more important than a massive one-time purge.
Choose a few hacks to start with this weekend. See how a little organization can improve your daily routine. Your serene, clutter-free bedroom is waiting for you.
Key Takeaways
- Start Small. You do not need to tackle everything at once. Pick one corner, one drawer, or one type of clutter to organize first. Success in a small area will motivate you to continue.
- Use Every Inch of Space. Your room has more storage potential than you think. Look up at your walls for shelving, down under your bed for rolling bins, and at the back of your doors for hanging organizers.
- Keep Things Visible But Tidy. Clutter happens when you cannot find what you own. Clear bins, file-folded clothes, and open displays for jewelry or hats let you see your items without creating a mess.
- Make Decluttering a Habit. The donation box rule is a simple way to continuously edit your belongings. When you make letting go a regular, easy process, clutter has less chance to build up.
- Give Everything a Home. The most fundamental rule of organization is that every item needs a designated spot. When you know where something belongs, cleanup becomes quick and simple.