Is your bedroom more chaotic storage unit than restful retreat? Many people struggle to find clever solutions to everyday clutter. The challenge of keeping a small space organized often feels overwhelming.

A tidy bedroom is essential for achieving peace and better sleep quality. In 2026, organization is not just about clearing surfaces; it is about using smart, integrated, and vertical systems. We must make every single inch of the room work harder.
We have gathered 38 of the most effective, future-forward organization ideas available today. These solutions range from simple DIY projects to high-tech storage concepts. Get ready to transform your bedroom from messy to tranquil, embracing a clean, functional lifestyle.
1. Hydraulic Lift Storage Bed

This image powerfully illustrates the ultimate strategy for maximizing bedroom square footage. The entire mattress platform lifts away easily on a hydraulic mechanism, showing a vast, concealed compartment underneath. This clever design instantly transforms otherwise wasted area into extremely valuable storage.
You can easily stow bulky items here, such as out of season clothing, extra linens, and even suitcases. The contents remain dust-free and out of sight, promoting a clean, restful visual aesthetic in your room. Utilizing the space beneath the bed frame is one of the most effective organizational tactics for a tidy home in 2026.
DIY Project: Custom Clear-Top Storage Sacks
Since a hydraulic lift bed is a major purchase, we can focus on maximizing the space inside that storage cavity. These custom sacks help you see exactly what you stored without moving everything around.
Materials Required
- Durable, tightly woven canvas or nonwoven storage fabric.
- Heavy-duty clear vinyl sheet (approximately 1/3 the size of the top panel).
- Long, separating zipper (at least 30 inches long).
- Matching thread.
- Measuring tape and straight pins.
- Basic sewing machine.
Step by Step DIY Instructions
- Measure and Cut Fabric: Decide on the size you need. A common size is 30″ x 20″ x 6″. You will need two pieces for the long sides (30″ x 6″), two pieces for the short sides (20″ x 6″), one piece for the bottom (30″ x 20″), and two pieces for the top panels. Cut one top piece (around 30″ x 15″) from the main fabric and a smaller window piece (around 30″ x 5″) from the clear vinyl. Add a half-inch seam allowance to all fabric pieces.
- Create the Clear Window: Take your two top panel pieces (fabric and vinyl). Sew the shorter edges of the vinyl piece to the main fabric piece, forming one long top panel. You are creating a clear viewing stripe. Now, attach the zipper along the two long, raw edges of this combined top panel.
- Assemble the Sides: Pin the long side pieces and the short side pieces together to form a rectangle, which creates the vertical walls of your storage container. Make sure you match up all the seams neatly. Sew these four sides together securely using your sewing machine.
- Attach the Bottom: Pin the rectangular bottom piece to the bottom edge of the newly created fabric “wall” from Step 3. Sew around all four sides, ensuring a strong seam so the bag can hold weight. Turn the bag right side out.
- Install the Top: Pin the zipper edge of the combined top piece (with the window) to the top perimeter of your fabric “wall.” The zipper’s pull tab should face outward. Carefully sew this final seam around the entire edge. Zip up your new sack and place it into the under-bed storage area, filling it with your seasonal goods.
2. Floating Bedside Shelving Unit

This clever solution shows how to reclaim floor space by using vertical wall storage. The wall-mounted system features two open wooden box shelves, providing ample room for essentials like books, charging stations, and a houseplant. With a clutter-free floor, the room feels significantly larger and more serene.
Not only does this setup provide smart storage, but it also includes task lighting mounted directly to the wall panel, keeping the nightstand surface completely clear. This integrated design is a hallmark of modern, streamlined bedrooms, offering both aesthetics and powerful functionality for a truly organized sleep space.
DIY Project: Wall-Mounted Charging Shelf
You can build a small, simple floating shelf specifically designed to hold a phone, a charger, and perhaps one book, giving you the clean, minimal look shown here.
Materials Required
- One piece of solid wood (pine or oak), approximately 12″ x 8″ x 1″ thick.
- Two small, decorative metal or wooden shelf brackets.
- Wood stain or paint (optional).
- Wood screws and wall anchors suitable for your wall type.
- Measuring tape and straight pins.
- Power drill.
Step by Step DIY Instructions
- Prepare the Wood: Sand all surfaces and edges of your 12″ x 8″ wood piece until it is smooth to the touch. If you desire a specific finish, now is the time to apply wood stain or paint, allowing it to dry completely according to the product instructions.
- Mark Bracket Placement: Place your shelf upside down on a flat surface. Position your two brackets on the underside of the shelf, making sure they are equally spaced from the front edge and from each side (e.g., about 2 inches from each end). Mark the screw holes onto the wood with your pencil.
- Attach Brackets to Shelf: Predrill small pilot holes where you marked the spots on the shelf. Screw the brackets securely into the underside of the shelf using short wood screws.
- Mark Wall Position: Decide on the height you want the shelf to sit next to your bed. Use a level and a pencil to draw a straight, horizontal line on the wall at that chosen height. Hold the shelf (with brackets attached) up to this line and mark the screw placement for the wall anchors through the bracket holes.
- Secure to Wall: Remove the shelf. Drill holes for your wall anchors at the marked spots. Insert the anchors firmly. Finally, hold the shelf back up to the wall, align the brackets with the anchors, and drive the wall screws in until the shelf is held tightly against the wall.
3. Customizable Wall Pegboard System

This photo illustrates the incredible versatility of a pegboard organizer for managing small cosmetics, jewelry, and beauty tools. The large board turns an ordinary wall into a dynamic, highly customizable display. Everything from necklaces to perfume bottles has a specific, visible location.
Different accessories are used here, including small shelves, cups, and hooks, demonstrating how easily the arrangement can shift to meet changing needs. Since items are stored vertically, the system takes up minimal footprint while maximizing accessibility. This keeps your vanity top clear and makes your morning routine much more efficient.
DIY Project: Entry-Level Pegboard Vanity Organizer
You can build a small, powerful organizational zone near your mirror using this highly adaptive format.
Materials Required
- One pre-cut piece of pegboard (e.g., 24″ x 36″).
- Four thin wooden furring strips (about 1″ x 2″) for framing and spacing.
- Pegboard hooks, small wire baskets, and cylindrical peg cups.
- Wood glue and small nails for the frame (optional: paint for the frame).
- Long screws and wall anchors.
- Level and power drill.
Step by Step DIY Instructions
- Build the Spacer Frame: The pegboard must stand slightly away from the wall so the hooks can fully insert. Cut your four furring strips to frame the back edges of the pegboard. Glue the strips around the perimeter of the back side of the board and secure them with small nails, creating a box frame on the back. This provides the necessary gap.
- Mark Wall Mounting Points: Choose a spot on the wall above your vanity or dresser. Hold the framed pegboard up and use a pencil to mark the four corners, making sure the top edge is level. You will be drilling through the frame strips, so mark where screws will pass through the strips.
- Drill and Anchor: Set the pegboard aside. Drill holes at your marked wall points and insert the wall anchors appropriate for carrying the weight of the board and all your stored items.
- Mount the Pegboard: Hold the framed pegboard back up to the wall, aligning the frame’s holes with the anchors. Drive your long screws through the frame and into the wall anchors. Check to ensure the board is securely fixed and cannot wobble.
- Customize the Layout: Start installing your chosen accessories. Place hooks for necklaces, baskets for larger cosmetics, and cups for brushes. Experiment with the arrangement until you create the most functional and visually appealing display.
4. Designated Clothing Zones

This thoughtful arrangement addresses the common issue of “re-wearing” garments that are not quite dirty enough for the laundry yet. By creating three distinct zones—Wear Again, Airing Out, and Functional Items—you eliminate the habit of tossing clothes onto chairs or the floor.
A metal blanket ladder provides easy, ventilated storage for the Wear Again pile. Separate hooks are dedicated to Airing Out clothes, allowing them to breathe before putting them away. Finally, labeled cloth bins offer simple collection points for clothes ready for cleaning or repair. This system promotes mindful dressing and prevents daily items from creating visual distraction.
DIY Project: Stylish Labeled Storage Bin
You can craft a chic, dual-tone storage bin using simple, affordable materials to manage your laundry sorting in style.
Materials Required
- One large, sturdy canvas or woven fabric storage basket (at least 18 inches tall).
- Fabric paint in two contrasting colors (one light, one dark).
- Painter’s tape or masking tape.
- Stencils or vinyl letters for your desired label (e.g., “Mending” or “Wash”).
- Foam brush or small paint roller.
Step by Step DIY Instructions
- Prepare the Surface: Lay the bin flat or upside down on a protected surface. Determine where you want the color break. Using painter’s tape, wrap a crisp, even line around the basket where the two colors will meet (e.g., dividing the bottom third from the rest). Press the tape down firmly to seal the edge.
- Apply Bottom Color: Use your darker fabric paint to thoroughly coat the bottom section of the basket below the tape line. Apply a thin, even coat, allowing it to dry slightly, and then apply a second coat if needed for opacity.
- Apply Top Color: Once the darker paint is completely dry, remove the tape. Now, apply a fresh line of painter’s tape just above the dark paint, covering the edge you just painted. Apply your lighter fabric paint to the main top section of the basket. Let it dry completely.
- Create the Label: Position your stencil or vinyl letters on the middle of the basket in the lighter painted area. If using a stencil, secure it with a small piece of tape and carefully dab the darker fabric paint over the stencil with a foam brush. Remove the stencil immediately and allow the lettering to dry. If using vinyl, simply apply the sticker letters.
- Set and Use: Once all paint is dry, the bin is ready for service. The distinct look makes the bin feel like a designed piece of furniture, not simply a hamper.
5. Entryway Command Center

This image displays a highly functional wall-mounted organizer placed right next to the door. This essential component of organizational success ensures that frequently lost items, like keys and mail, are captured immediately upon entering the room. This stops clutter from migrating further into the living space.
The unit combines several features: a shallow ledge for placing small, bulkier objects, a slim slot for sorting incoming papers and documents, and a lower metal strip with hooks for hanging keys and sunglasses. The use of warm wood tones and brass accents elevates the piece, proving that convenience does not require sacrificing style. Every tidy space needs a dedicated “drop zone.”
DIY Project: Key-Catching Drop Zone Shelf
You can easily assemble a simplified version of this unit, combining a mail slot and a key hook in one cohesive spot.
Materials Required
- One piece of wood (e.g., 10″ x 6″ x 1″).
- One short piece of magnetic knife holder or a strip of magnetic metal (about 6 inches long).
- Two small L-brackets or mounting hardware.
- Wood stain or paint (optional).
- Wood glue and finishing nails.
- Measuring tape, level, and power drill.
Step by Step DIY Instructions
- Prepare the Main Shelf: Sand and finish the 10″ x 6″ wooden piece with stain or paint. This will be the main flat shelf.
- Attach the Key Strip: Decide where you want your key strip (magnetic holder or hook strip) to go. It often looks best mounted directly below the main shelf. Center the strip and screw it securely into the wall at your desired height using the appropriate hardware.
- Mount the Shelf: Position the main wood shelf (10″ x 6″) above the key strip. Use your L-brackets to attach the shelf to the wall. To hide the brackets, you can screw them into the wall first, then screw up into the bottom of the shelf. Make sure to use a level so the shelf is perfectly horizontal.
- Add a Backstop (Optional Mail Slot): To create a mail slot, you can add a short, thin strip of wood (like a lattice piece, 10″ long) standing vertically along the back edge of the shelf, creating a shallow lip to hold envelopes upright. Secure this piece to the shelf using wood glue and small finishing nails driven up from the bottom of the shelf.
- Final Check: Test the sturdiness of the shelf and the magnetic strip. Place this piece near your bedroom door or in your entry hallway for quick access to essentials.
6. Motorized Ceiling Storage Rack

This innovative setup demonstrates how to leverage unused ceiling space for bulky, seasonal storage. A heavy-duty, grid-style metal rack hangs from the ceiling, offering a strong, secure place to store items you do not need daily. This solution is especially useful in rooms lacking traditional closet space.
A motorized lift system allows the homeowner to effortlessly raise and lower the rack with the push of a button. You can easily keep large, awkward items like snowboards, sporting equipment, or formal garments in protective bags up and out of the way. This organizational strategy is future-forward, maximizing room volume while maintaining a clean floor.
DIY Project: Fixed Ceiling Hook System for Garment Bags
While a motorized lift is complex, you can achieve a similar effect for lightweight, covered clothes by using sturdy fixed ceiling hooks.
Materials Required
- Two heavy-duty, closed-loop ceiling hooks (make sure they are rated for the weight you plan to hang).
- Two ceiling mounting toggles or anchors (check compatibility with your ceiling material, such as drywall).
- One strong, straight metal rod or dowel (long enough to span the distance between the hooks).
- Power drill and level.
- Measuring tape and pencil.
Step by Step DIY Instructions
- Locate Support: You must hang these hooks from a ceiling joist or structural beam, not just plain drywall, for safety. Use a stud finder to locate the joist running perpendicular to your desired rod placement. If a joist is not available, you must use high-strength toggle bolts.
- Mark Hook Positions: Determine the length of your rod. Mark two points on the ceiling at that distance apart, making sure they are centered in the room and aligned with the joist or secured support point. Use your level to ensure the points are perfectly horizontal relative to each other.
- Install the Hooks: Drill pilot holes slightly smaller than your hook threads into the marked spots in the joist. If using anchors, install those according to the manufacturer’s directions. Screw the ceiling hooks into the predrilled holes until they are tight and facing downward.
- Hang the Rod: Carefully place your rod or dowel through the closed loops of the two installed ceiling hooks.
- Test and Use: Once the rod is securely resting on the hooks, give it a firm tug to verify stability. Now, you can hang your long-term storage garment bags from the rod, keeping your clothes wrinkle-free and off the ground.
7. Rotating Closet and Vanity

This freestanding three-sided rotating wardrobe is an incredible space saver, consolidating multiple pieces of furniture into one functional unit. It offers hanging space on the front, deep shelving on the side, and a full-length mirror integrated into the third panel. This revolving design is incredibly practical for small apartments or bedrooms that need extra storage without occupying too much floor space.
The shelves on the side are strategically placed for quick access to shoes and accessories. By combining a closet, a shoe rack, and a mirror in one revolving structure, you simplify your dressing routine. This organizational piece turns a cluttered corner into an efficient, accessible style center.
DIY Project: Rotating Accessory Turntable
A custom Lazy Susan-style tray is a smaller, budget-friendly project that mimics the rotating efficiency of the large wardrobe, helping organize cosmetics or accessories on a dresser.
Materials Required
- Two round wooden discs (around 12 to 14 inches in diameter).
- One Lazy Susan hardware bearing kit (available at most hardware stores).
- Wood glue.
- Small wood screws.
- Drill or screwdriver.
Step by Step DIY Instructions
- Prepare the Bearings: The Lazy Susan hardware usually comes in two square halves. Center one half on the bottom of one wooden disc and mark the screw holes. Predrill shallow pilot holes, then screw the bearing half securely into the wood.
- Attach the Second Disc: Turn the assembled disc upside down. Center the second wooden disc onto the free half of the bearing hardware. Mark the screw holes onto the second disc.
- Secure the Base: Predrill pilot holes on the second disc and attach the second disc to the remaining half of the bearing hardware with screws. Make sure the screws are flush with the wood surface.
- Finishing Touches: If desired, sand the edges and paint or stain the finished turntable.
- Placement: Place the completed turntable on your dresser or shelf and fill it with your perfumes, lotions, or accessories. The easy rotation gives you quick access to everything.
8. Illuminated Clear Acrylic Shelves

These sleek, staggered clear acrylic shelves provide a floating, museum-like quality to the wall space. Since they are translucent, they add vertical storage without creating visual heaviness, making the room feel open and bright. The shelves are lit from behind, giving a subtle accent that highlights the items on display.
This is a fantastic method for organizing collections, records, or books in a way that turns them into decorative elements. Staggering the shelves creates a dynamic display, utilizing the whole wall area instead of just a single line. This clever design solution maximizes storage while acting as artistic wall decor.
DIY Project: Simple Acrylic Floating Shelves
You can easily mount transparent shelves yourself to achieve this modern, minimalist look for your books or media.
Materials Required
- Three pre-cut acrylic or clear plastic shelves (1/4 inch thickness recommended).
- Mounting hardware specifically for acrylic shelves (often clear clips or hidden metal standoffs).
- Level, pencil, and measuring tape.
- Power drill with appropriate drill bits for your wall type.
Step by Step DIY Instructions
- Plan the Layout: Determine the height and staggering pattern for your three shelves. Use the level and pencil to lightly mark the spots on the wall where the mounting brackets or standoffs for the first shelf will go.
- Mount the First Shelf Hardware: Drill holes and insert wall anchors at the marked spots for the first shelf’s hardware. Install the mounting hardware according to its specific instructions (often screws into the wall anchors).
- Attach the First Shelf: Place the acrylic shelf onto the installed hardware, securing it firmly.
- Repeat for Remaining Shelves: Measure the distance you want between the first and second shelf. Mark the hardware points for the second shelf, making sure it is level and correctly offset from the first. Install the hardware and attach the shelf. Repeat this process for the third shelf.
- Finalize: Gently wipe down the shelves to remove fingerprints. Arrange your books or albums, being careful not to overload the shelves, as acrylic has a lower weight capacity than wood.
9. Multipurpose Bedside Console

This image showcases an extremely useful bedside storage console that breaks the mold of traditional nightstands. The cabinet features a stone-like countertop for everyday items and a lower refrigerated section accessible through a glass door. This dual function provides convenience for both electronics and chilled beverages or skincare products.
The surface is tidy, holding only a lamp, an alarm clock, and a charging pad, demonstrating minimal surface clutter. By housing a refrigerator, the unit eliminates trips to the kitchen, making it a true all-in-one station for winding down and waking up. This is a brilliant example of how smart, multi-functional furniture can organize a room and enhance comfort.
DIY Project: Hidden Storage Nightstand
Since installing a refrigerator in a nightstand is complicated, you can create the visual aesthetic by adapting an existing cabinet to hide unsightly items and cords.
Materials Required
- One basic wooden cube cabinet with a door (or build one from plywood).
- One heavy ceramic or stone tile for the top (cut to fit).
- Adhesive for stone/tile (e.g., silicone caulk or construction adhesive).
- Power strip and cord management clips.
- Drill and screws.
Step by Step DIY Instructions
- Prepare the Cabinet: If your cabinet does not have a back, drill a small hole (around 1 inch in diameter) near the bottom of the cabinet’s side or back panel. This hole will be for running device charging cords into the console.
- Install Cord Management: Secure a small power strip inside the cabinet using screws or industrial-strength double-sided tape. Plug in all your charging cables, feeding the cable ends up through the hole you drilled in the cabinet.
- Attach the Countertop: Clean the top of the cabinet and the underside of the stone or ceramic tile. Apply a strong adhesive to the top edges of the cabinet. Carefully center and press the tile onto the cabinet top. Wipe away any excess adhesive immediately. Let the adhesive cure completely according to its instructions.
- Tidy the Cables: Place your charging devices on the new countertop. Run the main power strip cord out the back of the unit. Use cord clips to neatly secure the cord along the baseboard or behind the unit to hide it completely. Use the console’s interior to store books, journals, or other items you want to keep out of sight.
10. Cube Shelving Room Divider

This beautiful, open wooden cube shelf serves a crucial dual role: providing ample storage while physically separating two different zones within the bedroom. The unit contains a mix of decorative elements, like potted plants and books, alongside organizational elements, such as fabric storage bins. The combination promotes visual balance.
This is an essential strategy for those who need to integrate a workspace or seating area into their sleeping quarters. By placing the shelf perpendicular to the wall, you create a dedicated reading nook or office. The storage bins hide clutter completely, maintaining a calm, orderly appearance on both sides of the divider.
DIY Project: Custom Fabric Storage Bin
Fabric bins are essential for organizing cube shelves. Here is how to create your own custom bins that fit your shelf dimensions exactly.
Materials Required
- Two coordinating, heavy-duty fabrics (one for the exterior, one for the lining).
- Medium-weight fusible interfacing (to add stiffness).
- Measuring tape, thread, and straight pins.
- Sewing machine.
Step by Step DIY Instructions
- Measure and Calculate: Measure the interior height, width, and depth of your shelf cube. Add one inch to each dimension for seam allowance and for an easy fit. Cut two rectangular pieces (one exterior, one lining) for the bottom and four rectangular pieces for the sides.
- Stiffen the Fabric: Iron the fusible interfacing onto the wrong side of all your exterior fabric pieces. This step is crucial, as it makes the fabric stiff enough to stand up on its own.
- Assemble the Exterior: Pin the four exterior side pieces together at the corners and sew them into a box shape. Pin the exterior bottom piece to the bottom edge of the side box and sew all around, securing the bottom.
- Assemble the Lining: Repeat Step 3 for the four lining side pieces and the lining bottom piece, leaving a 3-inch gap unsewn on one side of the box. This gap will be used later for turning the bin right side out.
- Connect Exterior and Lining: Place the exterior bin inside the lining bin, with the right sides of the fabric facing each other. Pin the top raw edges together all around. Sew this top seam.
- Finish the Bin: Pull the exterior fabric out through the 3-inch gap you left in the lining. Gently push the lining inside the exterior so the box is formed. Hand stitch the 3-inch opening closed. Press the top edge with an iron to create a crisp, clean finish.
11. Minimalist Industrial Garment Rack

This sleek open clothing rack provides an eye-catching way to display a curated capsule wardrobe. Constructed from industrial pipes and fittings, the structure is both highly stable and visually appealing. A small shelf on top and a marble-look base on the bottom add sophistication, utilizing space for folded items and shoes.
This rack is especially useful for renters who cannot install built-in storage or for anyone who wants to showcase their favorite clothes. Keeping just a few coordinated outfits here reduces clutter in the main closet and makes morning dressing simple. The color-coordinated items add to the clean, organized aesthetic of the room.
DIY Project: Pipe and Shelf Garment Rack
You can construct a customizable, industrial-style rack using standard metal plumbing materials.
Materials Required
- Four pre-cut lengths of metal pipe for the vertical supports (e.g., 60 inches long).
- Two shorter lengths of metal pipe for the bottom bars (e.g., 20 inches long).
- One long metal pipe for the hanging rod (e.g., 48 inches long).
- Six 90-degree elbow connectors (flanged).
- Four screw-on floor flanges.
- One piece of wood (e.g., 48″ x 12″) for the top shelf.
- Spray paint (optional, for a uniform color).
Step by Step DIY Instructions
- Prepare the Base: Begin by laying out the floor flanges where the four corners of your base will be. Screw two 60-inch vertical pipes into the front two flanges and two into the back two.
- Assemble the Sides: Attach a 90-degree elbow connector to the top of each of the four vertical pipes. Now, connect the two front vertical pipes using one of the 20-inch bottom bar pipes. Repeat this step for the back two vertical pipes. You should now have a basic rectangular frame structure.
- Install the Hanging Rod: Attach the final two elbow connectors to the top of the two front vertical pipes and the two back vertical pipes, forming a U-shape. Connect the long 48-inch hanging rod pipe to these two elbows to complete the main hanging area.
- Add the Top Shelf: Center the wooden shelf piece on top of the structure, resting it securely on the top connecting pipes. You can use strong adhesive or small U-bolts to secure the shelf if needed.
- Finishing Touches: If you wish to paint the rack, you must first disassemble it, clean all the pipe parts thoroughly, spray paint them, and let them dry before reassembling.
12. Modular Glass-Front Closet System

This stunning built-in wardrobe system offers the luxury of a walk-in closet in a standard bedroom. The modular units combine open hanging sections, deep drawers, and frosted glass doors. This thoughtful mix allows certain items to be displayed while keeping other belongings privately hidden.
The framed structure and lighting give the entire setup a custom, high-end appearance. Utilizing both drawers and hanging space in a floor-to-ceiling configuration maximizes every bit of vertical room. Frosted glass doors are a wise choice; they allow light to filter in, giving a sense of openness, yet they conceal minor clutter.
DIY Project: Drawer Organization Boxes
Since installing a full modular system is a huge undertaking, focus on organizing the drawers within your existing closet using custom-sized organizational boxes.
Materials Required
- Several pieces of thin cardboard or sturdy foam board.
- Ruler or measuring tape and a craft knife.
- Hot glue gun and glue sticks.
- Decorative contact paper or wrapping paper (optional).
Step by Step DIY Instructions
- Measure the Drawer: Carefully measure the internal height, width, and depth of the drawer you want to organize. You will be making individual boxes that fit snugly inside.
- Cut the Pieces: Determine the size of the boxes you need (e.g., for socks, underwear, or belts). Cut the cardboard pieces for the bottom and four sides of each box, subtracting a small fraction (about 1/8 inch) from the height and width so they fit easily.
- Assemble the Boxes: Use the hot glue gun to apply a bead of glue along the edges of the bottom piece and firmly press the side pieces against it at 90-degree angles, creating a box structure. Reinforce all seams with extra glue.
- Decorate (Optional): If you wish to make the boxes more aesthetically pleasing, cover them with contact paper before assembly, or wrap them with paper after the glue dries.
- Fit and Fill: Place the finished boxes inside your drawer, arranging them like a puzzle so they fill the entire space. Sort your small clothing items into the designated containers, keeping everything separate and visible.
13. Three-Bin Closet Purge System

This solution highlights the importance of systematic decluttering right at the source of the mess: the closet floor. Three labeled bins—Resell, Donate, and Mend—sit beneath hanging garments, providing immediate destinations for items you no longer want. This eliminates the “maybe” pile.
The containers are clearly marked, and one features a QR code, indicating a modern, tech-enabled approach to selling or tracking donations. Creating a designated, accessible place for purging ensures that clothes do not linger on the floor or a chair, maintaining an ongoing state of tidiness.
DIY Project: Labeled Organizational Bins
Labels are vital for maintaining an organization system. You can easily create clean, professional-looking labels for your sorting bins.
Materials Required
- White card stock or thick paper.
- Word processing software and a printer.
- Clear packing tape or clear contact paper.
- Scissors or paper cutter.
- Double-sided tape or hook-and-loop fasteners for attaching.
Step by Step DIY Instructions
- Design the Labels: On your computer, design rectangular labels with simple, clear fonts. Use words like “DONATE,” “RESELL,” and “MEND.” Print these labels onto the card stock.
- Cut the Labels: Use scissors or a paper cutter to slice the printed labels into neat, uniform rectangles.
- Laminate for Durability: To protect the labels from wear and tear, apply a layer of clear packing tape or contact paper smoothly over the printed side. Trim the edges, leaving a slight border of clear material around the paper to seal it.
- Attach to Bins: Use hook-and-loop fasteners or strong double-sided tape on the back of the label. Affix the labels squarely onto the front of your storage bins. The hook-and-loop option allows you to swap labels if you repurpose the bins later.
14. Fabric Drawer Dresser Cart

This rolling fabric drawer storage cart is a wonderfully flexible piece of furniture, easily moved around as needed. It features a lightweight wooden frame that holds multiple fabric drawers. The soft drawers are collapsible and offer huge, flexible storage space.
This is a great option for organizing children’s items, arts supplies, or folded clothing. The drawers shown here are thoughtfully organized internally with dividers and labels for different categories like pictures and books. This method turns chaotic clutter into accessible, manageable zones.
DIY Project: Cardboard Drawer Dividers
You can replicate the internal organization shown in the image by building custom dividers for your soft fabric drawers using cardboard.
Materials Required
- Sturdy corrugated cardboard pieces (recycled moving boxes work well).
- Craft knife and metal ruler.
- Measuring tape and pencil.
- Wood glue or strong tape (e.g., duct tape).
Step by Step DIY Instructions
- Measure the Interior: Measure the interior length, width, and height of your fabric storage drawer.
- Design the Grid: Decide how many sections you need (e.g., four squares). Calculate the dimensions for the divider pieces. You will need one long piece and one shorter piece if you are creating a simple four-square grid. The height of the dividers should be about half an inch less than the drawer height.
- Cut and Notch: Cut the long and short cardboard pieces to the required dimensions. To join them, you must create notches. Cut a notch exactly halfway down the center of the long piece, and a corresponding notch halfway up the center of the short piece. Each notch should be the width of the cardboard thickness.
- Assemble the Dividers: Slide the long and short notched pieces together, interlocking them to form a sturdy cross shape. Secure the connection point with a small amount of wood glue or strong tape.
- Insert and Fill: Place the assembled cardboard grid inside the fabric drawer. Now, you have dedicated, separate spaces for each category of item, ensuring nothing shifts or gets mixed up.
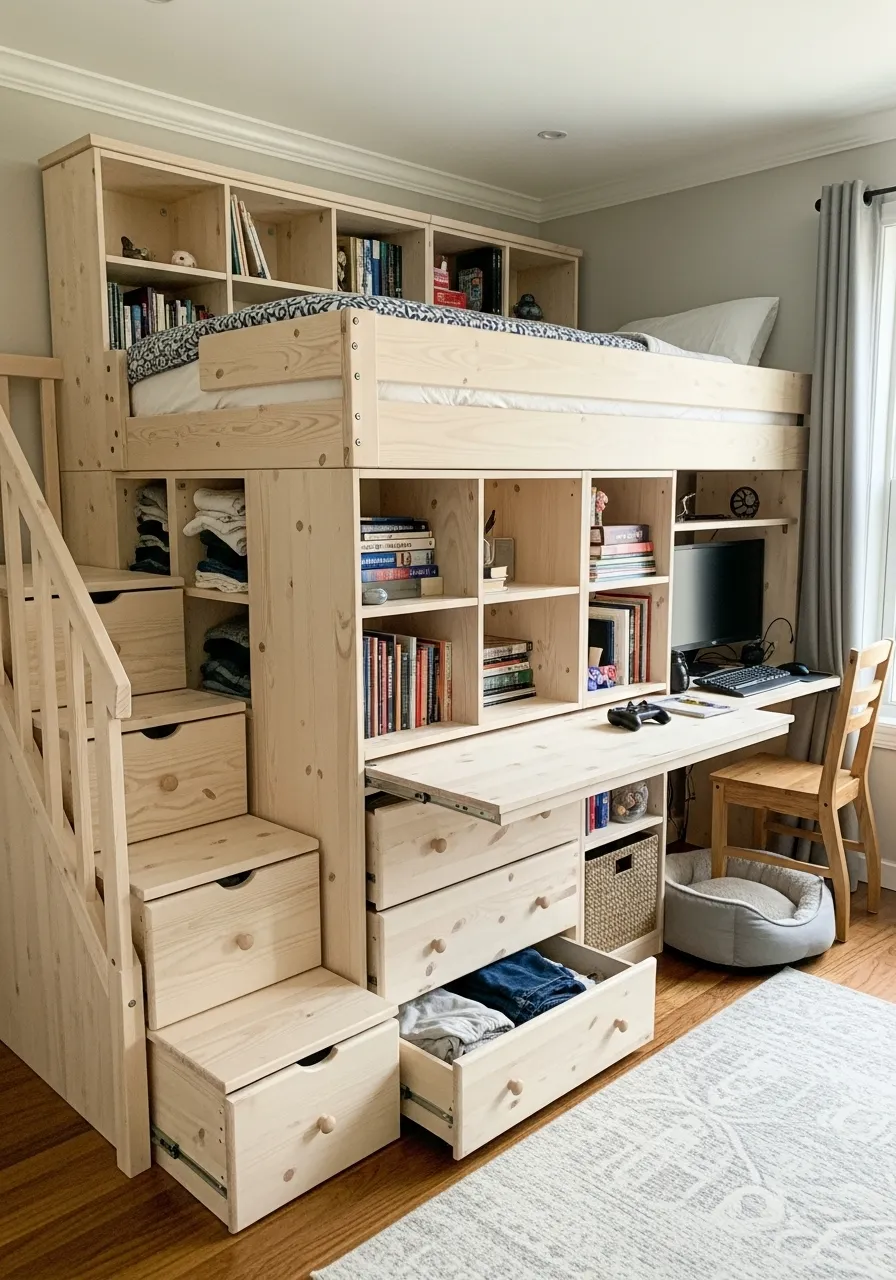
15. All-in-One Loft Bed System

This amazing elevated bed and storage unit is the ultimate space-saving solution, combining sleeping, storage, and working areas into one large piece. The bed is raised high above the floor, and the space beneath is utilized for drawers, shelves, and a desk. This design effectively triples the functionality of the room’s footprint.
Notice the clever integration of storage into the stairs, with each step serving as a pull-out drawer. The abundance of open shelving allows books and personal items to be organized neatly, promoting a sense of order in a small space. This solution is particularly valuable for maximizing every cubic inch of a tiny bedroom.
DIY Project: Storage Stairs Conversion
You can modify an existing low set of steps or a freestanding cabinet to incorporate hidden drawer storage, mimicking the functionality of this massive unit.
Materials Required
- One basic two- or three-step wooden unit (or a simple, enclosed low shelf).
- Drawer slides (one set for each step/drawer).
- Front panel boards (to match the existing structure).
- Drawer box materials (plywood or pre-cut wood).
- Drawer pulls or knobs.
- Screws, clamps, and power tools (saw, drill).
Step by Step DIY Instructions
- Measure and Build Boxes: Carefully measure the interior space beneath each step or shelf area. Construct simple rectangular drawer boxes from plywood that fit inside those spaces, leaving clearance for the slides.
- Install Drawer Slides: Following the manufacturer’s instructions, mount the inner slides onto the sides of your newly constructed drawer boxes. Mount the outer slides inside the wooden unit, ensuring they are perfectly level so the drawer moves smoothly.
- Test and Adjust: Insert each drawer box onto its slides and test its movement. Make any necessary adjustments so the drawer glides easily without catching.
- Attach the Front Panel: Cut the front panel boards to perfectly fit and cover the drawer opening. Screw the drawer pulls onto the center of these panels. Align the panel over the drawer box opening and secure it from the inside of the drawer box using screws, so the screws are hidden.
- Enjoy the Hidden Storage: You now have accessible, heavy-duty storage hidden within an ordinary piece of furniture.
16. Dedicated Valet Stand

The traditional valet stand is an often overlooked yet highly effective tool for keeping clothing tidy and ready for the next day. This wooden model features a curved hanger for jackets, a central bar for trousers, and a small tray for accessories like watches and wallets. It eliminates the “puddle of clothes” that often accumulates at the end of the day.
This piece encourages mindful planning of outfits, helping you save time in the morning. By having a designated, upright place for items that will be worn again, your main closet stays organized, and your clothes remain wrinkle-free. A separate, wall-mounted hook is even provided for an extra garment.
DIY Project: Simple Accessory Tray for a Valet
If you do not have a valet, you can create a simple, dedicated accessory tray to organize your wallet, keys, and watch on your dresser.
Materials Required
- One shallow wooden box or frame (e.g., 10″ x 8″ with 1-inch sides).
- Small square of corkboard or felt fabric.
- Wood stain or paint (optional).
- Wood glue.
Step by Step DIY Instructions
- Prepare the Box: Sand the wooden box until all surfaces are smooth. Apply wood stain or paint, allowing it to dry completely.
- Cut the Liner: Use the box interior dimensions to cut the corkboard or felt fabric piece to size. This liner will protect delicate items like watches and jewelry from scratches.
- Install the Liner: Apply a thin layer of wood glue to the bottom interior surface of the box. Carefully press the cork or felt liner down into the box, smoothing out any bubbles or wrinkles. Let the glue set firmly.
- Designate a Spot: Place the finished tray on your dresser or nightstand. Make it a rule that your watch, keys, and wallet always go into this tray when you enter the room, guaranteeing they are never misplaced.
17. Multi-Pocket Over-the-Door Organizer

This highly efficient over-the-door storage rack is a genius way to maximize a space often completely ignored. This organizer hangs securely over the door, utilizing vertical room for a wide array of accessories. The design combines clear plastic pockets for shoes with wire baskets for belts and scarves.
Labeling each basket, as seen here, is crucial for long-term organization, ensuring every item has a clear home. Using the door space means essential items are easily visible and accessible without taking up an inch of floor or wall area. This is a must-have for any small bedroom or cramped closet.
DIY Project: Over-the-Door Accessory Hooks
You can easily install a series of decorative hooks on the back of your closet door for hanging bags, robes, and scarves.
Materials Required
- Three to four decorative over-the-door hooks or adhesive wall hooks (if you prefer not to hang over the door).
- Measuring tape and pencil.
- Level.
- Rubbing alcohol (if using adhesive hooks).
Step by Step DIY Instructions
- Clean the Surface: If you are using adhesive hooks, clean the back of the door thoroughly with rubbing alcohol and a cloth. Let the surface dry completely. This step ensures the adhesive sticks strongly.
- Mark Hook Positions: Using your measuring tape, mark the positions for your hooks. Space them evenly down the length of the door, starting approximately 10 inches from the top. Use the level to ensure each marked point is vertically aligned.
- Install the Hooks: If using over-the-door hooks, simply place them over the top edge of the door. If using adhesive hooks, peel off the backing and press the hooks firmly onto the marked spots on the door, holding each one for at least 30 seconds.
- Wait for Cure: Allow the adhesive hooks to cure for several hours (or according to instructions) before hanging heavy items like bags. This simple addition makes a huge difference in managing grab-and-go accessories.
18. Vertical Fitness Equipment Cart

This slender, rolling storage cart is specifically designed for home fitness equipment. It keeps workout mats, resistance bands, and weights neatly contained and accessible within the bedroom space. By keeping the equipment organized and upright, it minimizes visual clutter when the exercise area is not in use.
The cart has specialized slots for rolled mats and tiered shelving for weights and dumbbells. It also includes hooks for hanging ropes and bands. The presence of wheels means the cart can be easily moved to clear floor space for a workout session, then tucked away out of sight afterward. This is essential for a dual-purpose room.
DIY Project: Rolling Mat and Dumbbell Basket
You can repurpose an ordinary laundry basket to hold rolled yoga mats and small hand weights.
Materials Required
- One tall, sturdy wire or woven laundry basket (with high sides).
- Several small pieces of soft felt or fabric scraps.
- Strong adhesive or hot glue.
- Small hand weights and yoga mats.
Step by Step DIY Instructions
- Line the Base: If you are using a wire basket, cut a round piece of felt or fabric to line the bottom. Secure the liner with strong adhesive or hot glue. This protects your floor and the mats from the wire edge.
- Create Compartment for Weights: For safety, the heavy weights need a secure spot. Place a small, heavy piece of wood or a thick square of foam at the very bottom of the basket. This acts as a base and stops weights from rolling.
- Protect the Metal: Use small felt pieces and glue to pad the inside rim of the basket where the weights or dumbbell handles might rest. This prevents scratching the metal or the basket itself.
- Organize and Roll: Roll your yoga mats tightly and stand them upright in the basket. Place the hand weights safely at the base. You can now easily roll the basket into a closet or behind a chair when your workout is finished.
19. Headboard with Built-in Shelf Niche

This inventive design demonstrates how to utilize the space behind the bed, effectively turning the wall into a functional storage area. The custom wooden headboard extends upward to create a wide, recessed shelf niche. This serves as a combined nightstand and bookshelf.
This solution completely eliminates the need for freestanding bedside tables, giving back valuable floor space. The niche provides room for reading materials, glasses, and personal lighting. Keeping items right at arm’s reach while promoting a clean, low-profile look is a smart organization strategy.
DIY Project: Floating Headboard Shelf
You can build a simple floating shelf above your bed to capture this vertical storage without needing a recessed wall.
Materials Required
- One long wooden shelf board (longer than the width of your bed).
- Two sturdy wall mounting brackets (hidden floating shelf brackets work best).
- Level, pencil, and measuring tape.
- Power drill and wall anchors.
- Wood stain or paint.
Step by Step DIY Instructions
- Finish the Shelf: Sand and apply your desired wood stain or paint to the shelf board. Allow it to dry fully.
- Mark the Wall: Decide on the placement for your shelf above the head of the bed, ensuring it is high enough not to interfere with pillows. Use a level and pencil to mark the locations for the two mounting brackets, making sure they are evenly spaced and perfectly aligned.
- Install the Brackets: Drill holes and insert the wall anchors. Secure the mounting brackets to the wall. For floating shelf brackets, make sure the mounting rods are horizontal.
- Attach the Shelf: Slide the shelf board onto the mounting rods or screw it onto the visible brackets. Check the stability and the level one final time.
- Accessorize: Place your small bedside reading lamps, books, and a glass of water on the shelf, leaving the floor entirely clear.
20. Decorative Vintage Trunk Stacking

This image shows how to repurpose antique trunks and suitcases as attractive, multi-functional storage. By stacking several trunks of different sizes and finishes, you create a rustic, large chest of drawers. The stacked tops provide an extra surface for displaying blankets, photos, and small decorative elements.
This method gives bulky items a new life while providing immense hidden storage for extra bedding, seasonal clothes, or memorabilia. The result is a unique piece of furniture that adds character to the room and efficiently organizes belongings without looking utilitarian. The arrangement serves as a beautiful accent piece at the foot of the bed.
DIY Project: Suitcase Top Revitalization
You can take an older, dusty suitcase and give it a fresh look suitable for bedside or foot-of-bed stacking.
Materials Required
- One vintage or hard-shell suitcase.
- Cleaning spray and cloth.
- Decorative peel-and-stick vinyl or wallpaper remnant.
- Scissors or craft knife.
- Ruler and strong spray adhesive.
Step by Step DIY Instructions
- Clean the Surface: Thoroughly clean the exterior of the suitcase, paying special attention to the top where objects will rest. Remove all dust and grime, allowing it to dry completely.
- Measure and Cut Liner: Measure the dimensions of the top surface of the suitcase. Use the ruler and scissors to cut the peel-and-stick material slightly larger than the measured area.
- Apply the Liner: Peel back the backing from the liner piece. Carefully align one edge of the liner with one edge of the suitcase top. Smooth the material down slowly, working out any air bubbles as you go. Use a squeegee or a credit card edge to ensure a smooth, wrinkle-free finish.
- Trim the Excess: Once the liner is fully adhered, use a craft knife or sharp scissors to trim away the excess material, creating a clean, neat edge.
- Stack and Display: Fill the newly refreshed suitcase with items like scarves or blankets. Stack it on top of other storage boxes or trunks to create your functional display.
21. Multi-Tiered Under-Bed Storage

This ingenious setup demonstrates maximum utilization of the space beneath a raised bed. The system combines different types of containers for maximum storage efficiency. You see labeled clear plastic boxes stacked on metal frames for items like sweaters and linens, offering easy viewing of contents.
Next to the plastic containers are deep, customized wooden drawers on casters, providing hidden storage for shoes and bulkier objects. Labeling every container, whether wood or plastic, is a critical step in maintaining order. This tiered system keeps items off the floor and protects them from dust, making it a powerful strategy for small rooms.
DIY Project: Wooden Rolling Under-Bed Drawer
You can easily build custom wooden drawers that roll out from beneath your existing bed frame.
Materials Required
- Plywood sheets (1/2 inch or 3/4 inch thickness) for the box sides and bottom.
- One piece of decorative wood for the front face.
- Four small swivel casters (wheels).
- Drawer pull/handle.
- Wood glue and finishing nails or screws.
- Measuring tape, saw, and drill.
Step by Step DIY Instructions
- Measure the Clearance: Measure the exact height, width, and depth of the open space underneath your bed frame. Subtract at least one inch from the height to ensure the drawer rolls freely over the carpet or rug.
- Cut and Assemble the Box: Cut the plywood into five pieces: a bottom, two long sides, and two short ends. Apply wood glue to the edges and screw the five pieces together, forming a sturdy rectangular box. Wipe away excess glue immediately.
- Attach the Wheels: Flip the box over. Screw one swivel caster securely into each of the four corners on the bottom exterior of the drawer box. Ensure the screws do not poke through the inside.
- Finish the Front: Attach your decorative wood front piece to the front of the assembled plywood box using wood glue and small finishing nails driven from the inside of the box. Install your chosen handle or pull in the center of the front face.
- Roll and Fill: Once the drawer is dry and assembled, roll it under the bed. You now have deep, accessible storage for anything from shoes to winter coats.
22. Wall-Mounted Jewelry Display

This solution turns tangled necklaces and bracelets into decorative wall art. The display features two distinct elements: a long, brass rod mounted high on the wall uses S-hooks to hold necklaces completely untangled. Below this, a natural, rustic branch holds a beautiful collection of stacked bangles and bracelets.
By hanging jewelry vertically, you eliminate the clutter that quickly overtakes a dresser top. This system makes it effortless to see your entire collection, which encourages you to wear pieces you might have forgotten about. This method is both functional and aesthetically pleasing, adding character to the room.
DIY Project: Rustic Branch Bracelet Holder
You can find a sturdy, fallen branch to create a unique and functional spot for your bracelets.
Materials Required
- One clean, dry branch (around 18 to 24 inches long, about 1-2 inches thick).
- Two small screw eyes (threaded loops).
- Rope or decorative twine.
- Two small wall hooks or nails.
- Measuring tape and pencil.
Step by Step DIY Instructions
- Prepare the Branch: Clean the branch thoroughly, removing any loose bark or debris. If needed, you can seal the wood with a clear varnish, allowing it to dry.
- Install the Screw Eyes: Screw one small metal eye into the wood near each end of the branch. Make sure they are aligned so the branch will hang straight.
- Attach the Hanging Cord: Cut a piece of rope or twine. Thread the rope through both screw eyes and tie a secure knot to form a loop for hanging. Adjust the loop length to your preference.
- Mount the Hooks: Choose a clear spot on your wall. Use a level and measuring tape to mark where your two wall hooks or nails will go. Install the hooks securely.
- Hang and Organize: Hang the rope loop onto the two wall hooks. Slide your bracelets and bangles onto the branch, allowing them to stack neatly for easy access.
23. Smart, Motorized Window Shades

While not a typical storage solution, motorized, smart shades contribute significantly to an organized and restful environment by managing light and privacy. The image shows two different textures—a natural woven shade and a modern cellular blackout shade—both controlled by a central smart hub.
Automating light control helps establish a consistent sleep schedule, which is fundamental to a well-managed space. Blackout shades are crucial for creating the dark, tranquil environment needed for restorative rest. This small technological upgrade supports a holistic approach to bedroom organization.
DIY Project: Simple Window Cord Tidy
Clutter often starts with stray cables and cords. You can easily manage tangled window blind cords to improve visual neatness.
Materials Required
- Several clear adhesive wall clips (the type used for hanging Christmas lights).
- Rubbing alcohol and a clean cloth.
- Measuring tape.
Step by Step DIY Instructions
- Clean the Window Frame: Clean the side of the window frame or wall where the cords hang using rubbing alcohol. Let it dry completely.
- Plan the Path: Determine the path you want the cord to follow, usually vertically down the side of the window frame. The goal is to keep the cord taut and out of the way.
- Attach the Clips: Starting near the top, peel the backing off an adhesive clip and press it firmly onto the frame. Place the next clip about six inches below it. Repeat this process until you reach the bottom of the cord length.
- Tuck the Cord: Gently tuck the window cord into the clips, pulling it just tight enough to eliminate any slack or knots. This simple trick contains the cord, instantly making the area look cleaner and safer.
24. Hanging Sweater and Accessory Shelves

The use of hanging fabric shelves inside a closet rod is a classic yet crucial organizational strategy. These modular units instantly transform vertical hanging space, which is often inefficient, into multiple, accessible shelves. This is an excellent alternative for storing folded sweaters, t-shirts, and jeans, protecting them from stretching out on hangers.
The shelves, often made of durable canvas, are easily removable and come in various sizes and pocket configurations. Transparent drawers or boxes are placed within the shelves, providing hidden spots for small items like socks, ties, or accessories. Maximizing every inch from rod to floor is the key here.
DIY Project: Cardboard Closet Shelf Inserts
You can easily reinforce soft hanging shelves and add internal dividers using thin cardboard pieces.
Materials Required
- Thin, sturdy cardboard (or thick card stock).
- Measuring tape and craft knife.
- Contact paper (optional, for a clean look).
- Hot glue gun.
Step by Step DIY Instructions
- Measure the Compartment: Measure the exact internal width and depth of one shelf compartment in your hanging organizer.
- Cut the Insert: Cut a piece of cardboard to match those dimensions exactly. This insert will sit on the bottom of the fabric shelf, providing a firm, flat surface that stops items from sagging.
- Create Dividers: If you want to divide the space (e.g., separating socks from underwear), measure and cut a strip of cardboard slightly shorter than the compartment depth. Notch the sides of the strip and secure it inside the box using hot glue.
- Install and Stack: Place the firm insert and any dividers into the fabric shelf. Now you can stack folded items neatly, ensuring the shelf remains flat and stable.
25. Bedside Skincare Tray

This image showcases the power of containment for small essentials. A shallow, elegant marble tray with brass handles organizes various nighttime necessities on the nightstand. The tray holds aromatherapy items, a diffuser, and small containers for jewelry.
Placing these items on a tray defines a clear boundary for clutter, forcing you to maintain a tidy surface. The marble finish elevates the look, turning mundane items into a styled grouping. This simple addition ensures that the few items kept bedside are grouped neatly, promoting a sense of calm before sleeping.
DIY Project: Decorative Handle Tray
You can easily upgrade a plain wooden or plastic tray using decorative handles and contact paper.
Materials Required
- One flat, shallow tray (wood, plastic, or sturdy cardboard).
- Two decorative furniture handles or drawer pulls.
- Screws or strong epoxy glue (depending on the handle type).
- Decorative adhesive paper (e.g., marble or wood grain).
- Power drill (if using screws) and ruler.
Step by Step DIY Instructions
- Prepare the Tray: If using a wooden tray, sand the surface lightly. If using a flat base like cardboard, skip this step.
- Apply Decorative Paper: Cut the adhesive paper to fit the bottom of the tray. Smooth the paper down carefully, avoiding air bubbles, to achieve your desired finish.
- Mark Handle Placement: Center the handles along the short sides of the tray. Use a ruler to ensure they are placed symmetrically. Mark the spots where the handles will attach.
- Attach the Handles: If your handles require screws, drill pilot holes through the sides of the tray and secure the handles. If using pulls that require epoxy, apply the glue and press the handles firmly into place, allowing the glue to cure completely before use.
- Style the Surface: Place your finished tray on the nightstand and load it with your routine items, enjoying the elevated, clean look.
26. Vertical Handbag Shelving

This brilliant closet organization system dedicates specific vertical space to handbags. Clear acrylic dividers are placed between the shelf rows, creating individual cubbies for each bag. This stops the bags from collapsing onto one another and keeps them standing upright.
On the right, heavy-duty S-hooks hang bags from the main closet rod, utilizing the empty air beneath shorter garments. This prevents creasing, preserves the bags’ shape, and makes selection simple. Utilizing shelf dividers and hanging hooks are critical, yet often overlooked, ways to keep accessories organized.
DIY Project: Acrylic Shelf Dividers
You can replicate the function of specialized acrylic dividers using simple clear plastic sheets or thin pieces of wood.
Materials Required
- Several clear plastic sheet protectors or rigid plastic binders.
- Heavy-duty double-sided mounting tape.
- Ruler and scissors or a craft knife.
Step by Step DIY Instructions
- Measure the Height: Measure the distance between the closet shelves.
- Cut the Plastic: Cut the plastic sheets to the shelf height and a suitable depth (e.g., 10 inches deep). You may need two sheets for each section you want to divide.
- Prepare the Mounting: Place a strip of strong double-sided mounting tape along the bottom edge of the plastic sheet.
- Install the Divider: Choose where you want to partition your bags. Press the tape firmly onto the shelf, holding the plastic sheet upright. If the plastic is thin, you might need to use two parallel sheets slightly apart to create a stable boundary.
- Organize the Bags: Stand your handbags upright between the dividers. This ensures they maintain their shape and do not slouch over.
27. Narrow Rolling Cart Fillers

This image solves the issue of awkward gaps between furniture and walls using ultra-slim rolling carts. These vertical units are designed to slide into narrow spaces, transforming wasted inches into valuable, accessible storage. The example shows two carts, one for personal items and one for books and essentials.
Because the carts are on wheels, they are easily pulled out for access and then discreetly tucked away when not in use. This method is incredibly useful for maximizing space next to a dresser or bed, storing everything from lotions and books to spare water bottles.
DIY Project: Simple Caster Addition for Existing Shelves
You can easily add wheels to a slim, stationary piece of furniture to create your own pull-out cart.
Materials Required
- Four small, high-quality swivel casters (wheels with mounting plates).
- Small wood screws.
- Power drill.
- Wood shims (optional, if the base is uneven).
Step by Step DIY Instructions
- Empty and Flip: Completely empty the shelving unit or cabinet you plan to modify. Gently flip it onto its side or top so the bottom is exposed.
- Mark Caster Positions: Mark the spot near each corner on the bottom of the unit where the caster plates will attach. Make sure the casters do not interfere with the unit’s frame.
- Attach the Casters: Predrill pilot holes at the marked spots. Use wood screws to securely attach the mounting plate of each swivel caster to the bottom of the unit. Ensure all screws are deeply set.
- Test the Roll: Carefully set the unit upright. Test its stability and roll it in and out of the designated narrow space. This new mobility greatly enhances the storage unit’s function.
28. Multi-Tiered Basket Nightstand

This creative solution replaces a bulky nightstand with a stacked tower of woven and wire baskets. This combination of open storage promotes a light, airy feeling in the room while providing multiple tiers for organization. The top surface holds a lamp and phone, while the lower baskets contain books, tissues, and a blanket.
The three-tiered structure provides immediate access to essentials without deep drawers. The use of hanging wired baskets adds a decorative touch, keeping plants and other smaller items contained. This is a relaxed, bohemian approach to bedside organization that maximizes vertical reach.
DIY Project: Hanging Plant Baskets
You can replicate the hanging basket display for plants or light fruit by mounting them from the ceiling or a wall bracket.
Materials Required
- Two or three small wire baskets.
- Heavy-duty chain or strong braided rope.
- S-hooks or carabiner clips.
- One sturdy, decorative ceiling or wall bracket (rated for heavy loads).
- Power drill and ceiling anchors (if mounting from the ceiling).
Step by Step DIY Instructions
- Mount the Bracket: Securely install your wall or ceiling bracket using the correct anchors. This must be a sturdy mounting point for safety.
- Prepare the Chains: Cut your chain or rope into three descending lengths. The longest chain should be for the bottom basket, and the shortest for the top basket. Attach an S-hook to one end of each chain.
- Attach the Baskets: Drill three small, evenly spaced holes near the top rim of each wire basket. Attach the free end of the three chains to the holes on the top basket using small clips or wire. Repeat this for the other baskets, connecting them in a vertical cascade.
- Hang the Assembly: Hook the top S-hook onto the wall or ceiling bracket. Fill the baskets with light items like fake plants or decorative fruit.
29. Hidden Charging Station Drawer

This clever hack solves the notorious problem of cable and device clutter on nightstands. A power strip is installed inside a drawer, transforming the space into a dedicated charging station. Devices are plugged in and hidden away when charging, leaving the top surface completely clear.
The drawer liner is segmented, separating phones, smart watches, and cables. This level of internal organization prevents cables from tangling and ensures every device has a designated spot. This is a must-have upgrade for the modern, tech-heavy bedroom.
DIY Project: Drawer Charging Station
You can retrofit an existing drawer with a power strip to create a discreet device charging center.
Materials Required
- One narrow, multi-plug power strip with surge protection.
- Strong adhesive or small screws/mounting tabs.
- Foam core board or drawer liner.
- Power drill with a large spade bit (for drilling a hole).
- Router (optional, for making a smooth cable channel).
Step by Step DIY Instructions
- Drill the Cable Hole: Choose a discreet location, such as the back corner of the nightstand. Use a large spade bit to drill a hole (about 1.5 inches in diameter) through the back of the nightstand box, behind where the drawer sits. This hole allows the main power strip cord to pass through.
- Secure the Power Strip: Place the power strip inside the drawer. Secure it firmly to the back or side of the drawer box using strong adhesive, mounting tabs, or small screws. The plugs should face upward or slightly inward.
- Plug and Feed: Plug the power strip’s cord through the hole in the back of the nightstand and plug it into the wall.
- Create Custom Dividers: Line the rest of the drawer with foam core board or a soft liner. Create small compartments around the power strip to hold devices, watches, and coiled cables.
- Charge Discreetly: Plug in your devices and slide the drawer mostly shut. Your surfaces remain clean while your electronics charge safely out of sight.
30. Framed Keepsake Shadow Boxes

This strategy uses decorative shadow boxes to organize and display small, meaningful items that might otherwise create clutter. Instead of sitting on a shelf, collections like travel mementos, old tickets, and academic badges are pinned neatly inside framed boxes. This turns them into a purposeful gallery wall.
The shadow boxes provide protection from dust and damage while grouping similar items together for visual order. Items like medals can be hung from ribbons pinned inside the frames, ensuring everything is contained. This is a beautiful way to organize sentimental possessions.
DIY Project: Simple Fabric-Backed Shadow Box
You can modify basic photo frames to turn them into deep shadow boxes for displaying small mementos.
Materials Required
- One deep-set photo frame (at least 1.5 inches deep).
- Piece of batting or cotton material for padding.
- Fabric (linen or felt) for the backing.
- Scissors, staple gun, or strong craft glue.
- Push pins or small hooks.
Step by Step DIY Instructions
- Disassemble the Frame: Remove the backing board and glass from the frame. Set the glass aside—you will not be using it.
- Create the Soft Backing: Cut the batting or cotton material slightly smaller than the backing board. Lay the fabric smoothly over the padding and tightly wrap it around the edges of the original backing board. Secure the fabric on the back with a staple gun or strong glue, pulling it taut so there are no wrinkles.
- Pin the Mementos: Arrange your medals, tickets, and photos on the new fabric-covered backing board. Use small push pins or sewing pins to gently secure the items in place.
- Reassemble and Mount: Place the decorated board back into the frame. Fasten the backing clips to hold it securely. Hang the finished shadow box on your wall to display your treasures neatly.
31. Bamboo Sorting Laundry Station

This beautiful three-bin laundry sorter replaces messy hampers with an organized system, separating clothing before it reaches the wash. The bamboo frame is aesthetically pleasing, and the removable canvas bags are clearly labeled for Lights, Delicates, and Dry-Cleaning.
The top shelf provides extra space for detergents, a clock, and folded items, giving the whole unit the look of a piece of furniture rather than a utility item. Sorting clothes as you take them off saves a huge amount of time on laundry day. This is a smart upgrade for any bedroom or laundry room transition zone.
DIY Project: Labeled Canvas Bags
You can easily adapt an existing laundry hamper or basket by adding clear, permanent labels for sorting.
Materials Required
- Two or three simple canvas laundry bags or plain hampers.
- Fabric paint or permanent fabric markers in a dark color.
- Cardboard for stenciling.
- Masking tape.
- Measuring tape.
Step by Step DIY Instructions
- Prepare the Surface: Lay the canvas bag or hamper flat on the floor. Slide a large, flat piece of cardboard inside the bag, behind the area you plan to label. This prevents the paint or marker from bleeding through to the other side.
- Create the Stencil: Cut out block letters for your labels (e.g., “LIGHTS,” “DARKS,” “TOWELS”) from a piece of cardboard, creating a simple stencil. Alternatively, you can print large block letters and cut them out.
- Position and Secure: Center the stencil on the front of the canvas bag. Use masking tape to temporarily secure the stencil edges to the bag, making sure the alignment is straight.
- Apply the Label: Using fabric paint and a foam brush, carefully dab the paint into the stencil cutout, or use the fabric marker to trace and fill the letters. Apply the paint lightly to avoid seepage under the stencil.
- Cure and Use: Carefully peel the stencil and masking tape away immediately. Let the fabric paint or marker dry completely according to the instructions, usually 24 hours. The bag is now ready for service.
32. Floor-to-Ceiling Built-In Shelving

This dramatic, custom wall unit frames the bed, utilizing every inch of vertical space from side to side and floor to ceiling. The shelving provides a mix of open storage for books, framed photos, and decorative baskets, along with lower cabinets for hidden storage.
The unified dark color gives the room a sophisticated, cocoon-like feeling. Integrating wall sconces directly into the shelving structure keeps the nightstand surface free of lamps. This is the ultimate example of maximizing storage capacity while adding architectural depth to the room.
DIY Project: Simple Cube Risers
While building custom cabinets is complex, you can achieve a similar integrated look by adding wooden risers to the tops of existing dressers or bookshelves.
Materials Required
- Four small blocks of wood (2x2s cut into 4-inch sections).
- Wood glue.
- Wood stain or paint to match your existing furniture.
- Sandpaper.
Step by Step DIY Instructions
- Prepare the Wood Blocks: Sand the four wood blocks until they are smooth. Stain or paint them to match the color of the furniture piece they will be placed on (e.g., a dresser or low bookshelf). Allow them to dry completely.
- Mark Placement: Measure the four corners of the top of your existing furniture piece. Place a mark one inch in from the edge at each corner. These marks show where the risers will sit.
- Attach the Risers: Apply a generous amount of wood glue to the top and bottom of each wood block. Carefully place the first block at one of the marked corner spots on the furniture top. Repeat this for all four blocks.
- Place the Shelf: Cut a simple wood or plywood shelf to sit on top of the four blocks. Place this new shelf on the blocks and press down firmly. The new shelf creates a small, defined layer of open storage above your dresser.
33. Oversized Rope Storage Basket

This image illustrates a simple yet effective organization strategy: using large, decorative rope baskets for soft, bulky storage. The basket’s woven, two-tone design makes it a stylish accessory, not just a utilitarian container.
The basket sits directly on the floor and is used here to hold extra blankets and decorative throw pillows. This is especially helpful for quick tidying—simply toss the extra throws into the basket instead of folding them immediately. By keeping the floor clutter-free, this solution adds texture and warmth to the room.
DIY Project: Two-Tone Rope Basket Finish
You can customize a plain rope basket with fabric paint to give it a stylish, two-tone look like the one in the photo.
Materials Required
- One plain, woven rope storage basket (white or natural color).
- Fabric paint in a neutral color (e.g., beige or charcoal).
- Painter’s tape or masking tape.
- Foam brush or small paint roller.
Step by Step DIY Instructions
- Mark the Line: Place the basket on a level surface. Determine the height where you want the lower colored section to begin (e.g., the bottom third of the basket). Wrap a line of painter’s tape tightly around the circumference of the basket at this point. Press the tape down firmly so no paint bleeds underneath.
- Apply the Paint: Dip your foam brush or roller into the fabric paint. Apply a thin, even coat of paint to the area below the painter’s tape line. For an even color, let the first coat dry and then apply a second.
- Remove the Tape: While the paint is still slightly damp (but not wet enough to smudge), carefully and slowly peel off the painter’s tape. If you wait until the paint is fully dry, it might tear and ruin the clean edge.
- Cure and Fill: Let the painted basket cure for 24 hours. Once dry, place it next to your bed or dresser and use it for throws, magazines, or extra pillows.
34. Fold-Away Integrated Desk

This high-tech wall unit perfectly solves the problem of integrating a workspace into a sleeping area. The desk is mounted onto a cabinet that also contains bookshelves and storage. When not in use, the desk surface folds up flat against the wall, hiding the office equipment and transforming the unit into a seamless piece of bedroom furniture.
This is an essential solution for multi-functional living in 2026. The built-in lighting and power ports keep cables contained, promoting a clutter-free work surface when the desk is open. This strategy ensures the bedroom can return to being a peaceful sanctuary at the end of the workday.
DIY Project: Simple Drop-Down Desk
You can build a simpler, non-cabinet version of this desk using basic hardware and a sturdy desktop.
Materials Required
- One piece of solid wood or plywood for the desktop (e.g., 36″ x 20″).
- Two heavy-duty folding shelf brackets or piano hinges.
- Wall ledger board (a thin strip of wood the length of the desk).
- Screws, wall anchors, and power drill.
- Wood stain or paint.
Step by Step DIY Instructions
- Prepare the Desk: Sand and finish the desktop with paint or stain.
- Mount the Ledger Board: Find a solid wall location. Using a level, mark a straight line for the desired height of the desk. Screw the ledger board directly into wall studs, or use heavy-duty anchors for masonry or drywall. This board acts as a permanent mounting point for the back of the desk.
- Attach the Brackets: Secure the two folding shelf brackets to the wall, positioned directly under the desk line, making sure they are spaced appropriately to support the desktop’s weight.
- Install the Desktop: Place the back edge of the desktop onto the ledger board. Secure the desktop to the ledger board using small wood screws from the top. Now, attach the desktop to the folding arms of the brackets.
- Test the Fold: Ensure the brackets lock securely when the desk is down and fold neatly when you lift the desk to the upright position. This gives you a spacious work surface that disappears when work is done.
35. Built-In Recessed Niches

This design uses recessed wall niches to create clean, integrated storage right next to the bed. Instead of furniture protruding into the room, these niches are built directly into the wall, offering shallow shelves for books, decorative items, and bedside essentials.
The warm wood finish and integrated lighting within the niches make them beautiful focal points. One smaller niche includes an outlet, creating a hidden charging spot. This architectural solution provides storage that is completely flush with the wall, maximizing floor space and promoting a sleek, tidy look.
DIY Project: Faux Recessed Shelf
You can create the look of a recessed niche using floating shelves and trim around the edges to give the illusion of depth.
Materials Required
- One floating shelf (a simple wooden box shelf works well).
- Wood trim molding (to match the shelf color).
- Wood glue and finishing nails.
- Paint for the wall trim (if applicable).
- Level and mounting hardware.
Step by Step DIY Instructions
- Mount the Shelf: Follow the instructions to securely mount the floating shelf to the wall at your desired height next to the bed. Use a level to ensure it is perfectly straight.
- Cut the Trim: Measure and cut four pieces of wood trim molding to frame the opening of the shelf (top, bottom, and two sides). Miter the corners (cut at a 45-degree angle) so they fit together seamlessly.
- Attach the Trim: Apply wood glue to the back of the first trim piece and press it against the wall, flush with the edge of the shelf opening. Secure the trim with small finishing nails. Repeat this process for the remaining three sides, creating a framed effect.
- Paint the Illusion: Caulk any gaps between the new trim and the wall. Paint the exposed trim and the wall area immediately surrounding the shelf the same color as the surrounding wall. This blending technique creates the visual depth of a true recessed niche.
36. Dual-Function Storage Ladders

These two vertical storage ladders demonstrate how to utilize wall height for organizing items that are often draped or piled. The wider, gray ladder provides ventilated hanging space for blankets and throws, keeping them folded and off of chairs. The narrower, wooden ladder is more specialized.
The wooden ladder uses wire baskets hung from the rungs for magazines and books, and the upper rungs are used for hanging scarves and accessories. By going vertical, both units take up minimal floor space while making blankets and reading materials easy to grab.
DIY Project: Magazine Basket Ladder
You can quickly convert a decorative or utility ladder into a magazine and accessory organizer using S-hooks and wire baskets.
Materials Required
- One wooden or metal decorative ladder (at least 5 feet tall).
- Three small wire or metal baskets (sized to fit between the ladder rungs).
- Six sturdy S-hooks.
- Pliers (optional, for tightening hooks).
Step by Step DIY Instructions
- Position the Ladder: Place the ladder securely against a wall. If it is unstable, use small furniture pads to create traction on the floor.
- Attach the Baskets: Hook two S-hooks onto the upper edge of the first wire basket. Hook the top of those S-hooks over a lower rung of the ladder. Repeat this process for the remaining two baskets, hanging them evenly spaced beneath the first.
- Secure the Hanging Items: If the baskets swing too much, use a small piece of twine or wire to tie the bottom of the basket to the ladder rung below it.
- Organize the Items: Fill the baskets with magazines, notebooks, or yarn. Hang folded scarves and throws over the empty rungs at the top, completing the organized display.
37. Multi-Compartment Drawer Organizer

This image is a masterclass in internal drawer organization. The drawer is completely sectioned off using various modular organizers, including bamboo boxes and clear plastic dividers. Every inch of space is dedicated to a specific category, such as rolled socks, ties, batteries, and small accessories.
The honeycomb grid in the center is a brilliant way to store smaller items like socks or belts, preventing them from unraveling. When everything has a designated slot, the drawer stays tidy long after the initial organization. This level of detail is key to maintaining a clutter-free wardrobe.
DIY Project: Honeycomb Drawer Dividers
You can easily build a honeycomb-style organizer using thin cardboard or plastic.
Materials Required
- Thin, flexible cardboard or plastic sheets (e.g., poster board).
- Ruler and craft knife.
- Hot glue gun and glue sticks.
- Pencil.
Step by Step DIY Instructions
- Measure the Drawer: Measure the height and depth of your drawer. The height of your honeycomb strips should be about half an inch less than the drawer height.
- Cut the Strips: Cut multiple long strips of cardboard or plastic to the calculated height. The length should be long enough to span the drawer depth.
- Mark the Notches: On each strip, use a ruler to mark lines every two inches. Cut a notch about halfway down into the strip at each mark. Each notch should be the width of your cardboard thickness.
- Assemble the Honeycomb: Begin interlocking the strips by sliding the notches together, creating an intersecting grid pattern. Use a small dab of hot glue at each intersection point to secure the structure.
- Place in Drawer: Gently slide the completed honeycomb grid into the drawer. Roll your socks, scarves, or belts and tuck them neatly into the individual hexagonal slots.
38. Digital Closet Planning

The final solution looks to the future: AR planning tools for designing closet space. This image shows a user utilizing a phone app to virtually map out and customize storage units within an empty closet. This allows homeowners to visualize exactly where shelves, drawers, and hanging rods will go before making any purchases.
Using augmented reality technology removes the guesswork from maximizing closet efficiency. You can test different configurations to make sure every item has a practical, dedicated home. Planning and visualizing the space digitally is the most effective way to ensure long-term organization success.
DIY Project: Simple Closet Layout Sketch
Before investing in any storage systems, you can use a simple paper sketch to plan the best layout for your needs.
Materials Required
- Graph paper.
- Measuring tape and ruler.
- Pencil and eraser.
Step by Step DIY Instructions
- Measure the Space: Measure the length, width, and height of your entire closet space. Write these dimensions down.
- Draw the Outline: On your graph paper, draw the outline of your closet, letting one square equal a specific dimension (e.g., one square equals six inches).
- Sketch Existing Items: Sketch in any existing, unmovable items like shelving or permanent rods.
- Plan New Elements: Draw in new potential storage solutions. Draw boxes for drawers, lines for hanging rods, and rectangles for shelves. Use different colored pencils to indicate what type of items will go in each area (e.g., blue for hanging shirts, red for folded sweaters).
- Refine the Plan: Once you have a visual plan, you can make adjustments. Erase and redraw elements until you have the most logical and space-efficient layout before you start shopping or building.
We have explored 38 cutting-edge methods designed to revolutionize your bedroom space. Moving into 2026, effective organization relies on multi-functional furniture and smart utilization of vertical areas. You now possess a toolkit full of actionable steps, from maximizing under-bed clearance to creating a dedicated charging station.
Achieving a tidy home requires commitment, but the payoff is a calming sanctuary where you can truly rest. Start small with a simple labeled bin or a wall-mounted shelf. Implement these genius solutions one by one, watching your space transform from cluttered to completely organized. A peaceful sleep environment is waiting for you.
Key Takeaways
- Go Vertical: Always look up. Utilize wall-mounted shelves, ladders, and hanging racks to reclaim floor space.
- Embrace Dual Function: Invest in furniture that serves two purposes, like storage benches or lofted beds with integrated desks.
- Contain the Chaos: Use clearly labeled bins, trays, and drawer dividers to give every small item a specific home.
- Conceal the Cords: Implement hidden charging stations and cord management solutions to eliminate visual clutter instantly.
- Plan Digitally: Use sketch tools or AR planning apps to map out your closet and storage space before you start building.