Does your bedroom feel more chaotic than calm? You are not alone.
A messy room can make your whole life feel cluttered. It is the first space you see in the morning. It is the last you see at night. This space should be your sanctuary.

The problem often is not just about having too much stuff. It is about not having good systems. Clutter happens when items have no clear, logical home.
This guide will help you fix that. We will explore simple, smart solutions. We will find places for everything, from your shoes to your phone charger.
Here are 38 genius solutions to help you get a tidy space in 2026.
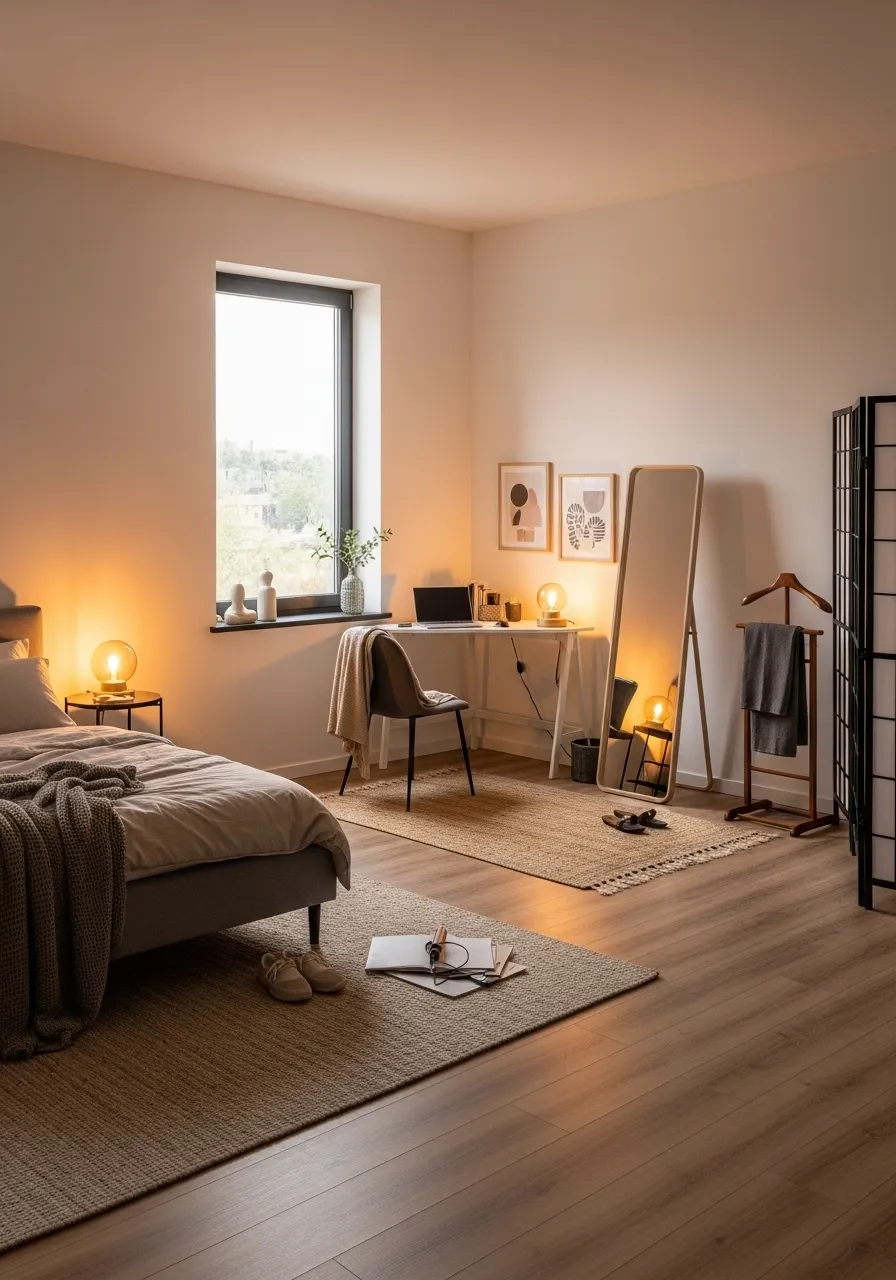
1. Lift Storage Off the Floor
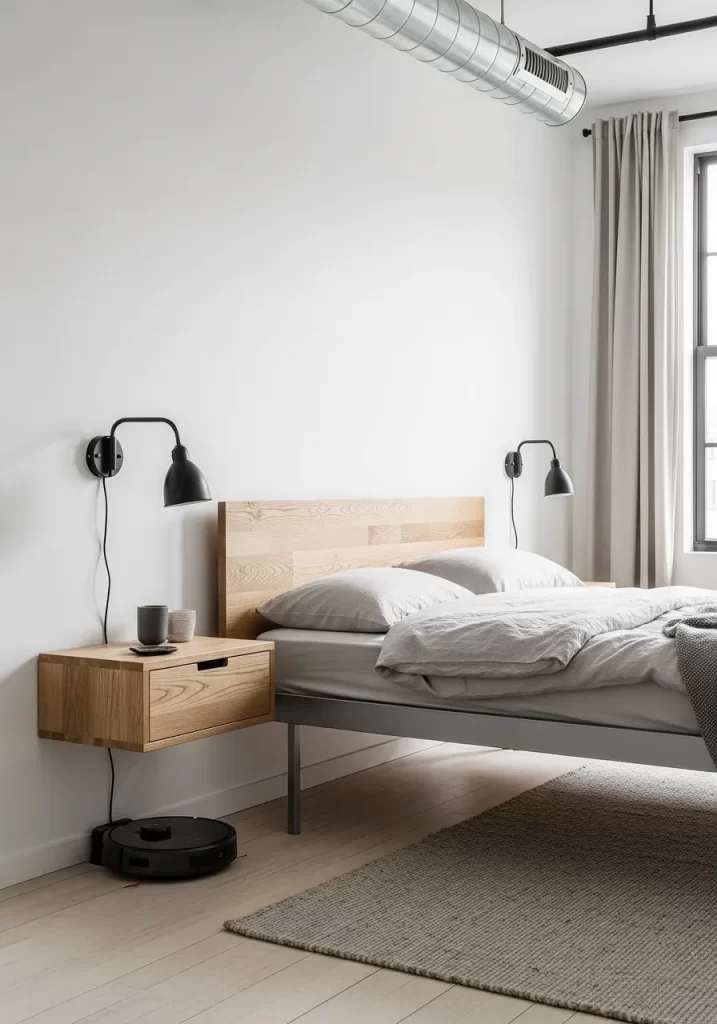
Clutter loves flat surfaces. It also loves floors. A traditional, bulky nightstand can make a small room feel cramped. It creates a heavy, boxed-in look. This simple design lifts the storage up.
A floating nightstand opens up the area below. This space makes the entire room feel larger and more open. It also gives you a specific spot for things like a robot vacuum or a small basket. Pairing it with wall-mounted lights frees the tabletop from lamp bases and cords.
DIY: Installing a Floating Nightstand
Tools You’ll Need:
- Stud finder
- Power drill
- Level (a long one is helpful)
- Measuring tape
- Pencil
- Heavy-duty wall anchors (if you can’t find studs)
- Screws (often come with the nightstand)
Instructions:
- Choose Your Spot: First, decide on the height. A good rule is to have the top of the nightstand level with the top of your mattress. Sit in bed to see what feels natural.
- Find Support: Use your stud finder to find the wooden studs inside your wall. These provide the strongest support. Mark the center of the studs with your pencil.
- Mark Your Holes: Hold the nightstand (or its mounting bracket) against the wall at your chosen height. Place your level on top to make sure it’s perfectly straight. Mark the wall through the screw holes on the nightstand or bracket.
- Drill Pilot Holes: If your marks line up with studs, drill a small “pilot” hole (a hole slightly smaller than your screw) at each mark.
- Use Anchors (If No Studs): If you are just drilling into drywall, you must use anchors. Drill a hole sized for your wall anchors. Gently tap the anchors into the holes with a hammer until they are flush with the wall.
- Attach the Nightstand: Hold the nightstand up to the wall, aligning its holes with your pilot holes or anchors. Drive the screws in until the nightstand is snug against the wall. Check the level one last time before you tighten them completely.
2. Create a Landing Zone for Worn Clothes

The “clothes chair” is a common problem. It’s the spot where clothes that are not dirty, but not clean, go to pile up. This setup gives those items a proper home.
A modern valet stand can hold the outfit you plan to wear tomorrow. A simple bamboo ladder offers rungs for pants or scarves. Wall hooks are a great spot for robes, sweaters, or light jackets. This system stops the pile before it starts. It keeps your clothes off the floor and your chair clear.
DIY: Installing Simple Wall Hooks
Tools You’ll Need:
- Wall hook set
- Power drill
- Level
- Stud finder
- Measuring tape
- Pencil
- Wall anchors (if you can’t drill into studs)
Instructions:
- Plan Your Layout: Decide where you want the hooks. A good height is usually just above eye level. Plan the spacing. 6 to 8 inches apart is a good starting point.
- Find Support: Use the stud finder to locate the wooden studs in your wall. This is the strongest place to anchor your hooks. Mark the center of any studs.
- Mark Your Holes: Hold the first hook up to the wall. Use your pencil to mark the screw holes. If you are installing multiple hooks, use your level and measuring tape to make sure all your marks are in a perfectly straight line.
- Use Anchors (If No Studs): If your marks are on hollow drywall, you need anchors. Drill a hole for the anchor and gently tap it in with a hammer until it’s flush with the wall.
- Attach the Hooks: Hold the hook over your pilot holes or anchors. Use the drill or a screwdriver to drive the screws in until the hook is tight against the wall.
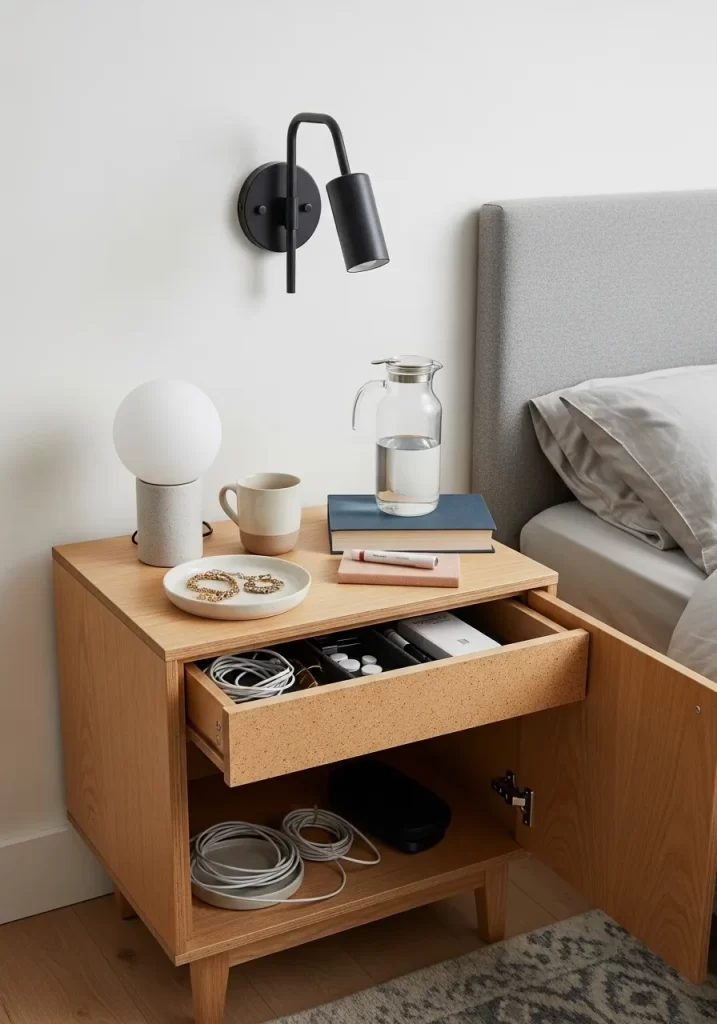
3. Conceal Wires with a Cabinet
Open-shelf nightstands look nice in photos. In real life, they just show off your mess. Cords, books, and tissue boxes create visual chaos right next to your bed.
This nightstand uses closed storage to hide those items. A small top drawer holds your immediate essentials, like remotes or chapstick. The cabinet door below conceals everything else. It’s a simple way to make your sleep space feel calm. You just shut the door.
DIY: Add an Internal Shelf to Your Nightstand
Tools You’ll Need:
- Measuring tape
- 1×2 pine board (for “cleats”)
- A piece of plywood or common board (for the shelf)
- Hand saw
- Level
- Small finishing nails and a hammer (or a brad nailer)
Instructions:
- Measure Inside: First, measure the internal width and depth of the cabinet.
- Decide on Height: Choose how high you want your new shelf to be. Use a pencil and the level to draw a straight line on the inside walls.
- Cut Supports (Cleats): Cut four pieces of the 1×2 board. Two should match the depth of the cabinet. One should match the full width (for the back).
- Install Cleats: Attach these 1×2 “cleats” to the inside of the cabinet, just below your pencil line. Nail them into the cabinet walls. These will support the shelf.
- Cut Your Shelf: Measure the top of your new cleats. Cut your plywood or pine board to this exact size.
- Place Shelf: Slide the new shelf into the cabinet. It should rest securely on the cleats, giving you a new storage level.
4. Build a Hidden Charging Drawer
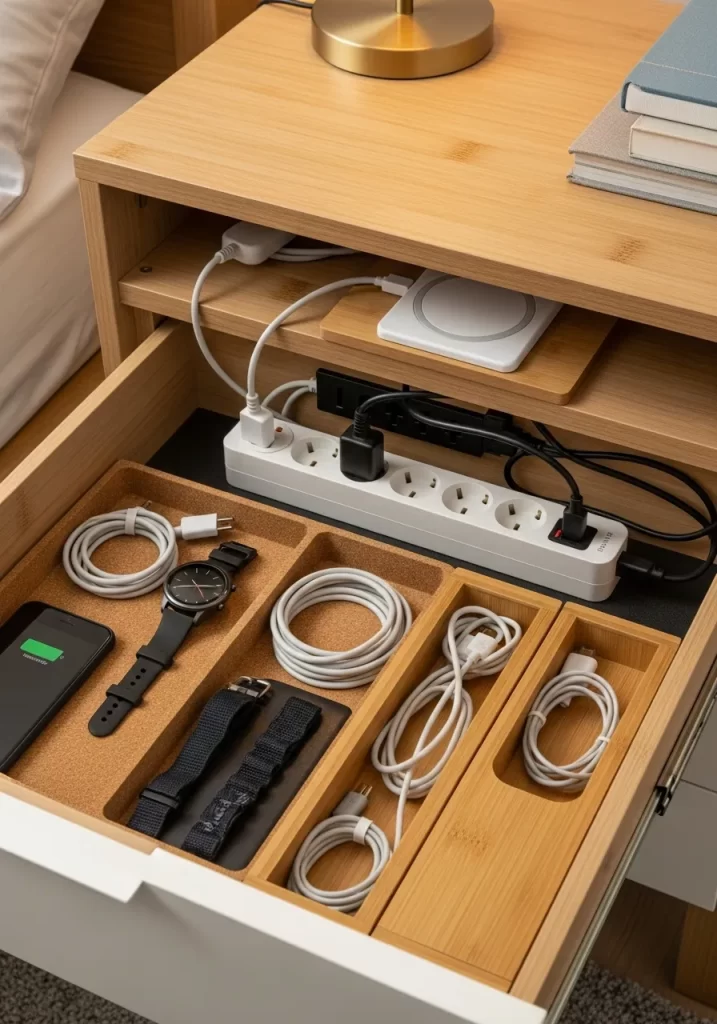
Cables are a big source of bedroom clutter. Your nightstand becomes a tangled nest of wires for your phone, watch, and lamp. This clutters the first surface you see in the morning.
This solution moves the entire mess inside a drawer. A power strip is mounted at the back. Small drawer organizers neatly hold coiled cables and accessories. Your devices can charge overnight, completely out of sight. It keeps your tabletop clear.
DIY: Create a Charging Drawer
Tools You’ll Need:
- A surge-protector power strip
- Power drill with a large bit (a 1-inch “spade” bit or “hole saw” bit)
- Heavy-duty double-sided tape or command strips
- Drawer organizers (bamboo or cork)
- Cable ties
Instructions:
- Plan the Exit: You need a hole for the power strip’s cord. Find a clear spot on the back of the nightstand, not the drawer itself.
- Drill the Hole: Use your large drill bit to drill a hole. Make sure it’s big enough for the plug of the power strip to pass through.
- Feed the Cord: Push the plug end of the power strip’s cord from inside the nightstand out through the new hole.
- Mount the Strip: Pull the cord so the power strip is inside the nightstand, near the drawer opening. Use heavy-duty tape to stick the power strip to the back of the drawer.
- Organize: Place your drawer organizers. Coil your cables, secure them with cable ties, and place them in the compartments.
- Plug In: Plug the power strip into your wall outlet.
5. The Fold-Away Home Office

When your bedroom is also your office, it can be hard to relax. A large, permanent desk makes the room feel like a workspace, not a sanctuary.
A wall-mounted “Murphy desk” is a smart fix. During the day, it’s a stable workspace with shelves for your laptop and notebooks. When you are finished, you fold it up. The desk disappears into a slim cabinet on the wall. This creates a clear boundary between your work and your personal time.
DIY: Installing a Wall-Mounted Desk
Tools You’ll Need:
- The wall-mounted desk kit (includes hardware)
- Stud finder
- Power drill
- Level
- Measuring tape
- Pencil
Instructions:
- Find Studs (Crucial): This unit will be heavy. It must be anchored to the wooden studs in your wall. Use your stud finder to locate and mark the center of at least two studs.
- Choose Height: Decide on your desk height. A standard desk is 29-30 inches from the floor to the writing surface. Mark this height on the wall.
- Position the Unit: You will need help for this step. Have someone hold the desk unit against the wall. Align it with your height mark and the stud marks.
- Level and Mark: Place your level on top of the unit. Adjust it until it’s perfectly straight. Mark the mounting holes on the wall.
- Drill and Secure: Set the desk down. Drill pilot holes into the studs on your marks. Hold the unit back up and drive the main screws or lag bolts (from the kit) through the desk and into the studs.
- Test: Before placing items on it, carefully lower and lift the desktop to ensure it is secure and functions smoothly.
6. Unlock Your Under-Bed Space
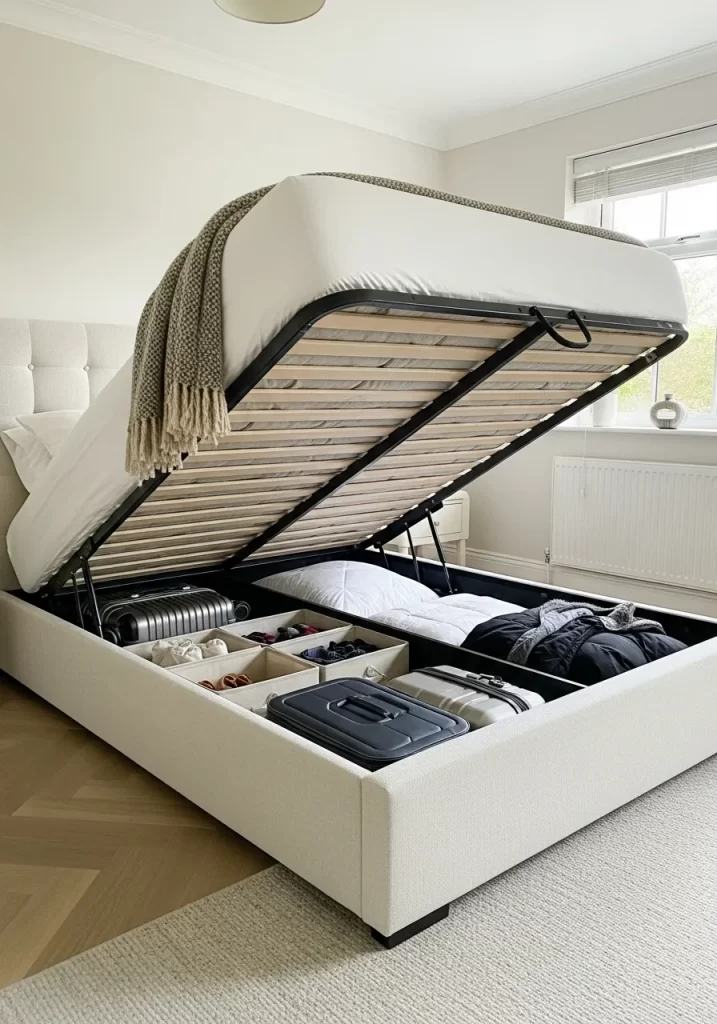
The space under a bed is often wasted. It becomes a hard-to-reach void that just collects dust and lost socks.
A hydraulic lift bed frame turns your entire mattress into a hidden storage lid. This gives you a massive, easy-to-access storage area. It is a great place for bulky items you don’t need every day. Store your extra bedding, seasonal clothes, and empty luggage here. It keeps them clean and out of your main closet.
DIY: Create Under-Bed Storage Zones
(A lift bed is a complex purchase, but you can organize the space under any standard bed frame this way.)
Tools You’ll Need:
- Measuring tape
- 1×4 pine boards (or 1×6 for taller beds)
- Hand saw
- Sandpaper
- L-brackets and screws (optional, for a sturdier build)
Instructions:
- Measure Your Space: Measure the length, width, and clear height under your bed.
- Design Your Grid: Plan a simple grid. A common design is one long board running from the head to the foot, and two or three shorter boards crossing it.
- Cut Your Boards: Cut your long board(s) to fit the length. Cut your shorter “divider” boards to fit the width.
- Sand: Quickly sand any cut edges to prevent splinters and snags.
- Assemble: You can often just slide the boards into place. The long board holds the shorter boards.
- For a Sturdier Fix: You can join the boards where they cross. Either use small L-brackets or cut small notches (halfway through each board) so they slot together. This creates custom cubbies for shoes and flat-storage boxes.
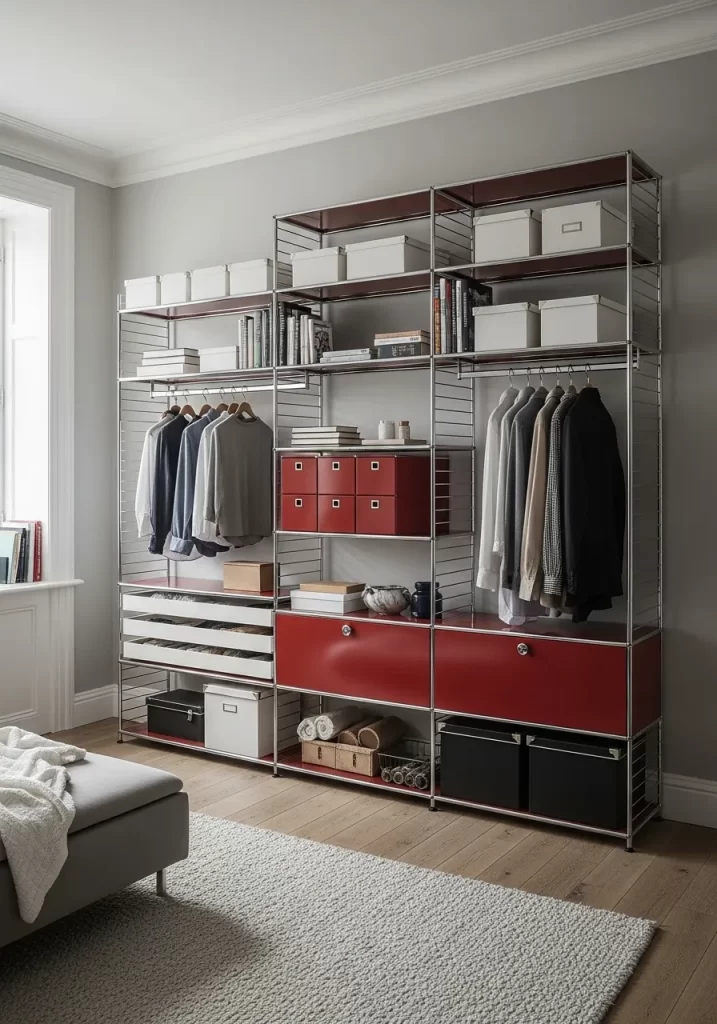
7. Design a Custom Closet System
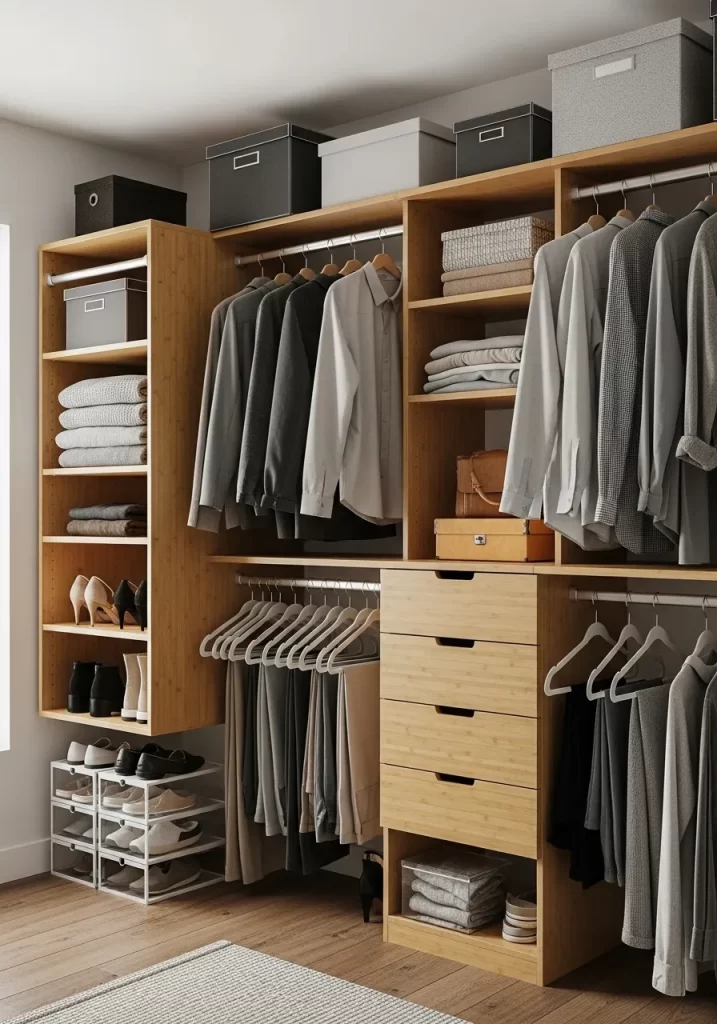
Most closets have a single rod and a high shelf. This design is simple, but it wastes a lot of space. Clothes get crammed together and the floor becomes a pile of shoes.
A modular closet system creates specific zones for everything. It adds double-hung rods, which instantly doubles your hanging space for shirts and pants. Open shelves hold folded sweaters. Drawers conceal socks and accessories. This system uses every inch of the closet, from floor to ceiling.
DIY: Installing a Modular Closet System
Tools You’ll Need:
- A modular closet kit (like the one pictured)
- Stud finder
- Power drill
- Level (a long one is best)
- Measuring tape
- Pencil
Instructions:
- Empty and Find Studs: First, empty your closet. Use the stud finder to mark the location of all studs on the back wall.
- Install the Top Rail: Most systems hang from one long, horizontal rail. Hold this rail against the wall at the height specified in your kit’s instructions.
- Level and Secure: Place your level on the rail. Adjust it until it’s perfectly straight. Secure the rail to the wall, driving the heavy-duty screws directly into the studs you marked. This is the most important step.
- Hang Verticals: Hook the long, vertical standards onto the top rail. Let them hang down.
- Add Components: Click the shelf brackets and rod holders into the vertical standards.
- Place Shelves and Rods: Set your shelves onto the brackets. Pop the closet rods into their holders. This flexible system lets you adjust your layout as your needs change.
8. Get Your Shoes Off the Floor
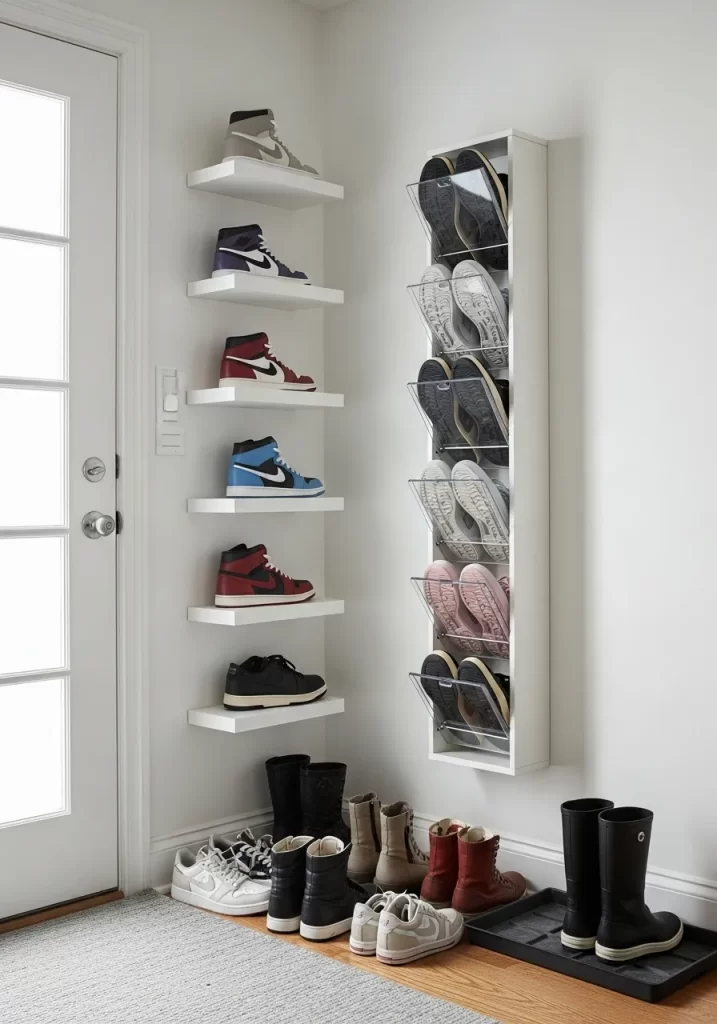
A pile of shoes by the door or in the closet makes any room feel messy. This solution clears the floor by using overlooked wall space.
Floating corner ledges turn an awkward, empty corner into a clean display. They are a good spot for your favorite sneakers or heels. For everyday shoes, a slim, wall-mounted cabinet hides them completely. The doors tilt open, keeping the profile of the unit very thin.
DIY: Floating Ledge Shelves
Tools You’ll Need:
- Floating shelf kit (with hidden brackets)
- Power drill
- Level
- Stud finder
- Pencil
- Measuring tape
- Wall anchors
Instructions:
- Plan Your Layout: Decide where you want your shelves. You can stagger them in the corner as shown in the picture.
- Mark the Bracket: Start with one shelf. Hold its metal mounting bracket against the wall. Use your level to get it straight.
- Find Support: Try to position the bracket over a wall stud. If you can’t, mark your holes for heavy-duty drywall anchors.
- Install Anchors: Drill the holes and tap in the anchors.
- Attach Bracket: Screw the mounting bracket securely to the wall.
- Slide on the Shelf: Slide the “floating” shelf sleeve over the metal bracket. Most shelves secure with a few tiny set-screws on the underside.
- Repeat: Repeat the process for the other shelves.
9. Go Vertical with Book Storage
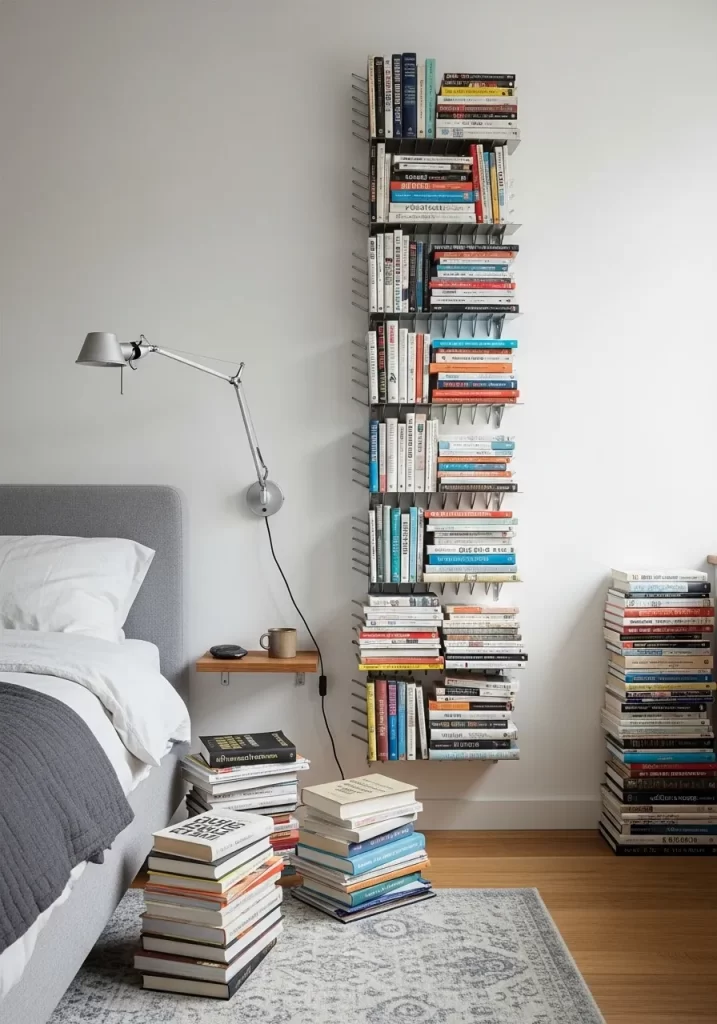
Books are wonderful, but they stack up fast. Piles on the floor or a crammed nightstand add to the visual noise.
This “spine” bookshelf is a smart solution. It has a very small footprint but holds a lot of books. By stacking the books horizontally, it uses vertical wall space that is normally empty. It keeps your reading list visible. The shelf itself almost disappears, turning your collection into a tall, organized tower.
DIY: Installing a Spine Bookshelf
Tools You’ll Need:
- Spine bookshelf kit
- Power drill
- Level
- Stud finder
- Pencil
- Measuring tape
Instructions:
- Find a Stud: This is essential. A tall shelf full of books must be anchored to a wall stud for safety. Find a stud and mark its center.
- Assemble (If Needed): Assemble the shelf’s “spine” on the floor if it comes in pieces.
- Position and Level: Stand the shelf up against the wall, centered on your stud line. Use your level against the side of the spine to make sure it is perfectly vertical.
- Mark Holes: Mark the wall through the mounting holes in the shelf’s spine.
- Drill Pilot Holes: Set the shelf aside. Drill small pilot holes into the stud at your marks.
- Secure the Shelf: Hold the shelf back in place. Drive the screws through the shelf and firmly into the stud. Start at the top and work your way down, checking the level as you go.
10. Create a Dedicated Donate Bin
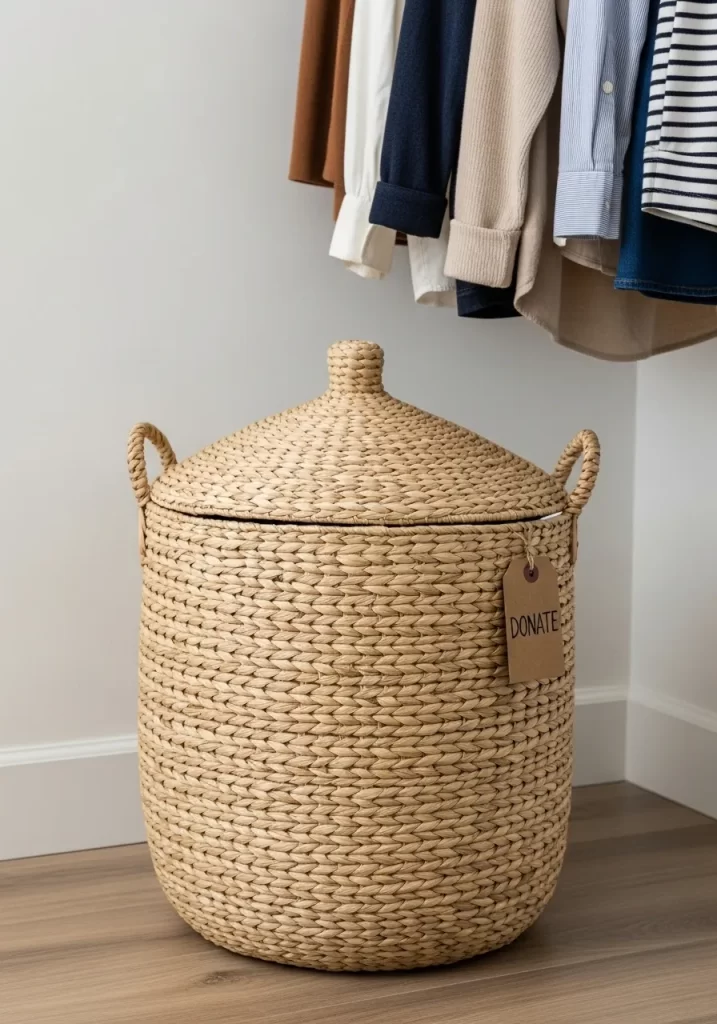
Part of staying organized is letting go of things you no longer use. Clothes we might wear “someday” are a main source of closet clutter.
Place a dedicated “Donate” basket right in your closet. When you try something on and decide you don’t love it, put it in the basket. It’s a simple, one-way system. You don’t hang it back up. Once the basket is full, you take it to a donation center.
DIY: Make Your “Donate” Bin
Tools You’ll Need:
- A wicker or canvas basket (a lid is a nice option)
- A wooden tag or a piece of thick cardstock
- A dark permanent marker or paint pen
- A piece of string or twine
Instructions:
- Choose Your Basket: Find a basket that fits in a corner of your closet.
- Make the Tag: Take your wooden or cardstock tag. Write the word “DONATE” on it clearly with your marker.
- Attach the Tag: Use the string or twine to tie the tag firmly to one of the basket’s handles.
- Place It: Put the basket in a visible, easy-to-access spot. The goal is to make it easier to put an item in this bin than to hang it back in the closet.
11. Combine Open and Closed Wardrobe Storage

Many people struggle with a mix of items. Some clothes look neat when hung or folded. Others, like extra pillows or a mess of accessories, create visual clutter.
This wardrobe design offers the best of both worlds. The left side uses closed cabinets, hiding bulkier items like spare bedding. The open section allows for hanging frequently worn clothes, making them easy to see and access. A simple curtain can be drawn across the open section. This creates a clean, calm look when you want to hide everything.
DIY: Adding a Curtain to an Open Wardrobe
Tools You’ll Need:
- Curtain rod (tension rod for easiest install, or screw-in for permanence)
- Measuring tape
- Curtain fabric or pre-made curtain panel
- Sewing machine or iron-on hem tape (if making your own)
- Drill and screws (for permanent rod)
- Level (for permanent rod)
Instructions:
- Measure Your Opening: Measure the width of the open wardrobe section. Then measure the height from the top of the opening to the floor or shelf where you want the curtain to end.
- Choose Your Rod:
- Tension Rod: If your opening is rigid and strong, a tension rod is simplest. It expands to fit the space.
- Screw-in Rod: For a wider or more permanent solution, choose a rod that mounts with brackets.
- Prepare Your Curtain:
- Pre-made Panel: If using a pre-made curtain, ensure its width is 1.5 to 2 times the width of your opening for a nice fullness. Hem the length if needed, so it just grazes the floor or bottom shelf.
- Fabric: If making your own, cut fabric to your desired finished width (x2 for fullness) and add 2 inches for hems. Do the same for length.
- Install the Rod:
- Tension Rod: Twist the rod until it’s snug between the two side walls of your wardrobe opening.
- Screw-in Rod: Mark the bracket positions on the inside walls, use a level to ensure they are straight, drill pilot holes, and screw the brackets into place. Then place the curtain on the rod and insert the rod into the brackets.
- Hang the Curtain: Thread your curtain onto the rod. If using a tension rod, secure it in place after the curtain is on.
12. Use Dividers to Separate Zones

A single, large room can feel chaotic if all its functions blend together. When your bedroom is also where you work or relax, defining spaces helps.
This room uses a folding screen to create a clear division. It subtly separates the sleep area from the small desk and dressing zone. This helps your mind shift gears. When the screen is open, light flows freely. When closed, it suggests a more private, calm retreat for rest.
DIY: Positioning a Room Divider
Tools You’ll Need:
- A folding screen or room divider
- Measuring tape
Instructions:
- Identify Zones: Look at your room. Where do you sleep? Where do you get dressed? Where do you read or work? Think about which functions you want to keep separate.
- Measure the Space: Measure the area where you intend to place the divider. Ensure there is enough room for the divider to stand freely.
- Test Placement: Experiment by moving the divider around. Try it at the foot of your bed to create an entrance hallway. Put it between your bed and a desk to section off the work area.
- Consider Light and Flow: See how the divider affects light and movement. A divider with slats or translucent panels will let some light through.
- Secure (If Needed): Most folding screens are freestanding. If you have children or pets, consider using furniture straps to secure the divider to a wall. This prevents it from falling over.
13. Contain Everyday Pocket Clutter
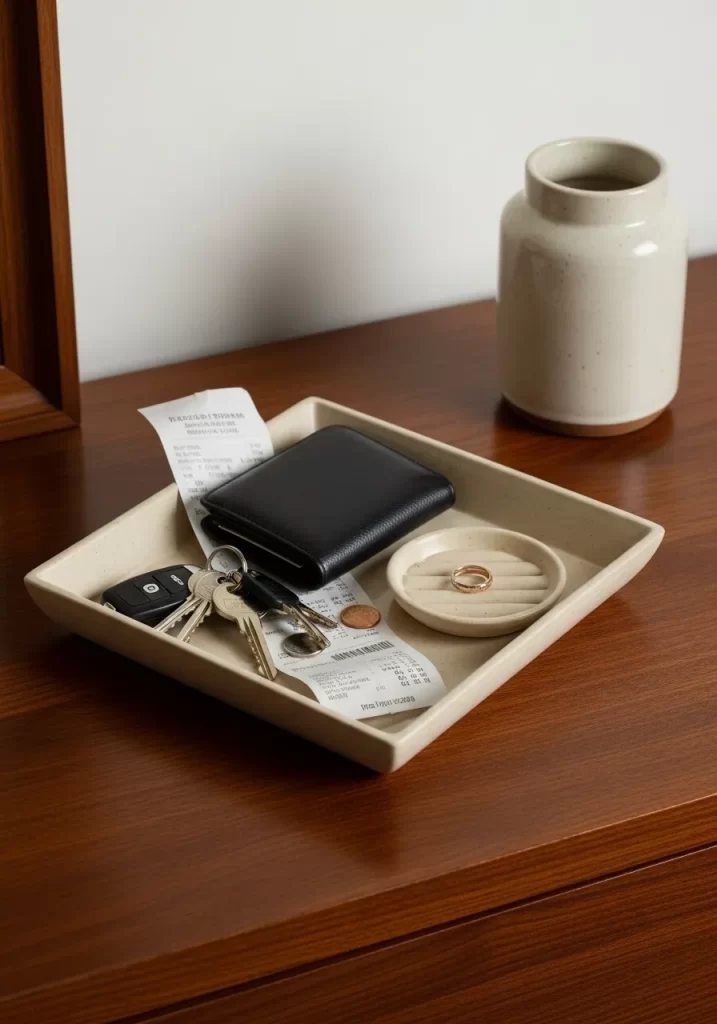
Small items often get scattered on dressers and nightstands. Keys, wallets, loose change, and receipts create tiny piles everywhere. This adds up to a generally unorganized feeling.
A simple catch-all tray offers a home for these daily essentials. This shallow dish keeps everything contained in one spot. Adding a smaller dish for rings or earrings gives those tiny valuables a dedicated resting place. It simplifies your routine. You know exactly where to put these items. You know where to find them.
DIY: Customize a Catch-All Tray
Tools You’ll Need:
- A ceramic, wooden, or metal tray
- Small dish or bowl (for jewelry)
- Cork liner or felt squares (optional, to protect surfaces)
- Permanent marker (optional, for labels)
Instructions:
- Choose Your Tray: Select a tray that fits the top of your dresser or nightstand. Consider the style of your room.
- Add a Jewelry Dish: Place a smaller dish inside the main tray. This keeps tiny items, like rings or stud earrings, from getting lost among keys and change.
- Add Liner (Optional): Cut a piece of cork or felt to fit the bottom of the tray. This protects the tray from scratches and muffles the sound of keys.
- Create Zones (Optional): Use the permanent marker to draw subtle lines on the liner. This creates sections for “keys,” “wallet,” or “change.”
- Designate a Home: Commit to using this tray for all your pocket items. Make it part of your routine when you enter the bedroom.
14. Embrace Picture Ledge Shelves
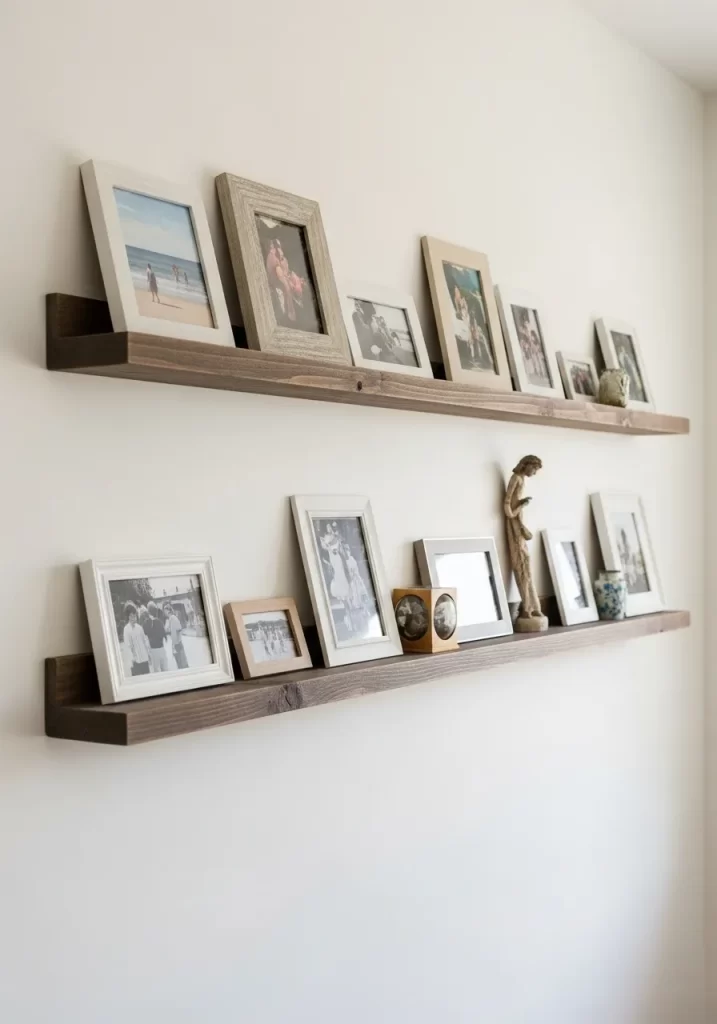
Empty walls are a missed opportunity for both decor and organization. Traditional shelves can feel heavy or require a lot of planning for arrangement.
Picture ledge shelves are slim and simple. They offer a stable lip to hold framed photos. You can layer different sizes and swap them out easily without re-drilling holes. These ledges can also hold small art, small plants, or thin books. They add visual interest and keep surfaces clear without adding bulk.
DIY: Installing Picture Ledge Shelves
Tools You’ll Need:
- Picture ledge shelves (pre-made kits are easiest)
- Power drill
- Level (a long one is helpful)
- Measuring tape
- Pencil
- Stud finder (for stability)
- Wall anchors (if not drilling into studs)
Instructions:
- Plan Your Arrangement: Decide how many shelves you want and how far apart they will be. A common spacing is 12-18 inches between ledges.
- Mark the First Shelf: Hold the first shelf (or its mounting bracket) against the wall at your desired height. Use your level to ensure it’s perfectly straight. Mark the screw holes with your pencil.
- Find Studs (If Possible): Use your stud finder to see if any marks align with wall studs. Drilling into studs offers the best support.
- Drill Pilot Holes: If you hit studs, drill small pilot holes. If not, drill holes for your wall anchors and install them.
- Attach the Shelf: Hold the shelf or bracket back against the wall, aligning holes. Drive the screws in until the shelf is secure.
- Repeat for Other Shelves: Use your measuring tape to ensure consistent spacing for the next shelves. Use your level for each one.
- Decorate: Arrange your frames, small art, or objects. The lip on the ledge prevents them from sliding off.
15. Choose Woven Storage Pieces
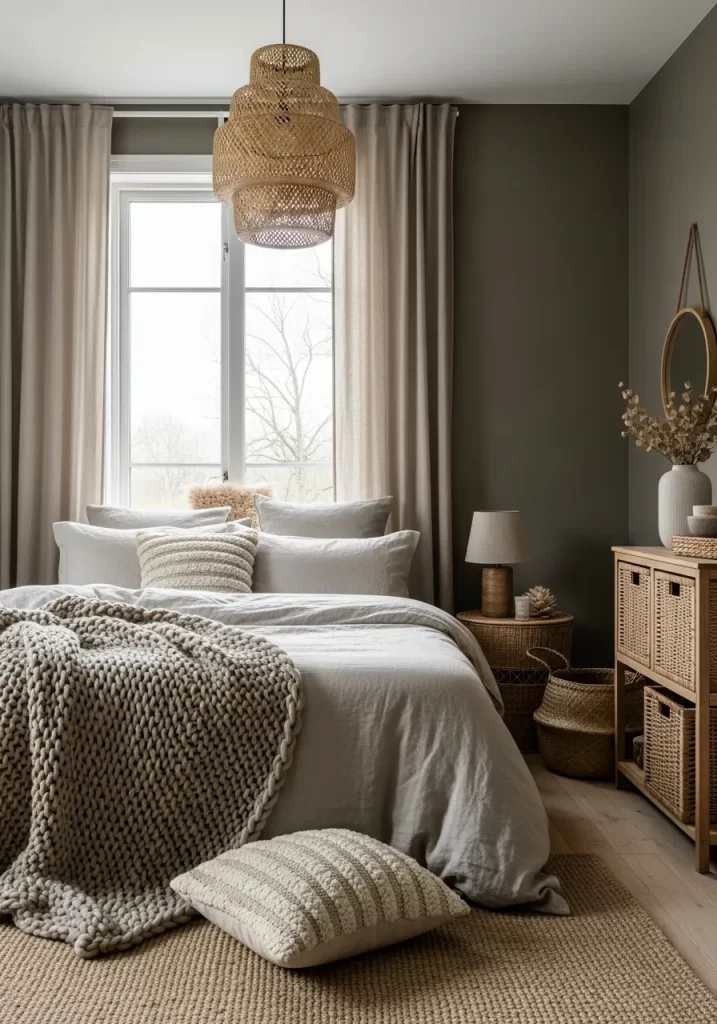
Many storage solutions are made of plastic or metal. While functional, they can make a bedroom feel cold or utilitarian. They add to visual clutter.
Woven baskets and natural fiber furniture bring warmth and texture. A large woven lamp becomes a focal point. Baskets next to the bed can hold extra blankets. A rattan dresser with woven drawers hides items. These elements feel organic. They soften the look of the room while providing much-needed hidden storage.
DIY: Selecting and Arranging Woven Baskets
Tools You’ll Need:
- Various sizes of woven baskets (seagrass, rattan, wicker)
- Measuring tape
Instructions:
- Assess Your Needs: Think about what you need to store. Do you have extra blankets, magazines, or remote controls? This will help you choose basket sizes.
- Measure Your Space: Measure the available floor space next to your bed, dresser, or in a corner. Ensure the baskets will fit without obstructing pathways.
- Mix Sizes: Group baskets of different sizes for visual interest. A large one can hold throws, a medium one magazines, and a small lidded one for remotes.
- Consider Lids: Lidded baskets are excellent for hiding items you do not want to see. This helps reduce visual clutter.
- Place Strategically:
- Beside the Bed: A basket here can hold nighttime reading or a spare blanket.
- Next to a Dresser: Good for laundry or items waiting to be put away.
- Empty Corners: Add a large decorative basket for a plant or seasonal items.
16. Bring Life with Vertical Gardens
Clutter is not just about physical items. A room can feel dull and uninspiring, contributing to a sense of disorganization. Plants add life but can take up floor space or valuable surface area.
Vertical planters and hanging baskets lift greenery off the ground. A wall-mounted system offers pockets for multiple plants. Hanging macrame holders use the empty space near windows. Ladder shelves in a corner organize various pots without needing a lot of floor space. Plants clean the air. They also add color and a calming presence.
DIY: Wall-Mounted Planter System
Tools You’ll Need:
- Wall-mounted planter system kit
- Power drill
- Level
- Measuring tape
- Pencil
- Stud finder (for stability)
- Small plants and potting soil
Instructions:
- Choose Your Wall: Pick a wall with good light for your plants. A spot near a window is usually best.
- Mark Your Mounts: Hold the planter system’s main frame or brackets against the wall. Use your level to make sure it’s straight. Mark the screw holes with your pencil.
- Find Support: Use your stud finder. It’s best to drill into wall studs for this. If you cannot, use appropriate wall anchors.
- Drill and Secure: Drill pilot holes. Attach the main frame or brackets securely to the wall.
- Add Planter Pots: Once the frame is up, place your small planter pots into their designated slots.
- Plant Your Greens: Gently place your plants into the pots, adding potting soil as needed.
- Water Carefully: Water your plants, making sure not to overfill the pots to avoid drips.
17. Use Transparent Room Dividers
Traditional walls or heavy curtains can make a small bedroom feel even smaller and darker. They block light and break up the visual flow.
Fluted glass or reeded glass dividers offer separation without isolation. The textured glass allows light to pass through. It also blurs what is behind it. This creates a sense of privacy for a dressing area or a sleeping nook. The room still feels bright and open. It helps to define zones without creating a closed-off feeling.
DIY: (Conceptual – Professional Installation Recommended)
(Installing a permanent glass wall is a major home renovation that requires professional help for safety and precision. However, you can achieve a similar effect with temporary options.)
Conceptual Approach for a Professional Install:
- Consult a Professional: Speak with a glass or interior design contractor. Discuss your vision for separating the space.
- Measure and Design: They will take precise measurements and help you choose the right type of fluted glass and frame material (e.g., steel, aluminum).
- Frame Installation: The contractor will install a sturdy frame to the ceiling, floor, and adjacent walls. This frame will hold the glass panels.
- Glass Panel Insertion: The custom-cut fluted glass panels are then carefully fitted and secured within the frame.
- Seal and Finish: The edges are sealed for stability and sound dampening. The frame is then given its final finish.
DIY Alternative: Large Freestanding Room Screen
- Find a Screen: Look for a large, freestanding room divider or screen. Some modern ones feature translucent panels or even acrylic fluted sections that mimic the look of glass.
- Position: Place it to define your zones. The benefit is it is portable.
18. Roll and Contain Drawer Items

Overstuffed drawers are a major frustration. Socks are mismatched. Small garments are lost. It becomes impossible to find anything without rummaging.
Drawer organizers transform chaos into calm. Rolling items like T-shirts, socks, and underwear makes them compact. They fit neatly into fabric bins or bamboo dividers. Small, honeycomb-shaped organizers are great for individual pairs of socks or ties. This method allows you to see everything at a glance. It maximizes the usable space inside the drawer.
DIY: Organizing Drawers with Rolling and Bins
Tools You’ll Need:
- Various drawer organizers (bamboo dividers, fabric bins, honeycomb inserts)
- Measuring tape
Instructions:
- Empty and Clean: Take everything out of the drawer. Wipe it clean. This is a good time to declutter and get rid of anything you no longer need.
- Measure the Drawer: Measure the internal length, width, and depth of your drawer. This helps you select organizers that fit well.
- Sort Your Items: Group similar items together: all socks, all underwear, all T-shirts.
- The Rolling Method:
- Socks: Fold socks in half, then roll them tightly from the toe to the cuff.
- Underwear/T-shirts: Fold into a rectangle, then roll tightly.
- Place Organizers: Arrange your chosen organizers within the drawer. Try different configurations to see what works best.
- Fill the Organizers: Place your rolled items into the bins or dividers. Use honeycomb inserts for individual items like socks or belts. Flat dividers work well for neatly folded shirts or accessories.
- Maintain: Get into the habit of rolling and placing items back into their designated spots.
19. Utilize Multi-Purpose Ottoman Storage

Every square foot in a bedroom counts. Single-purpose furniture often takes up valuable space without adding enough utility.
A storage ottoman is a smart multi-tasker. It serves as a comfy footrest or an extra seat. The hinged lid lifts to reveal a hidden compartment. This is the perfect spot for blankets, extra pillows, or even books. Some ottomans have a reversible lid that turns into a tray. This makes it an instant bedside table for a drink or snack.
DIY: Choosing and Styling a Storage Ottoman
Tools You’ll Need:
- Measuring tape
- A storage ottoman
Instructions:
- Assess Your Needs: What do you need to store? Extra throws? Magazines? Consider the size of these items.
- Measure Your Space: Measure the available area at the foot of your bed or next to a chair. Ensure the ottoman will fit without making the room feel crowded.
- Choose Your Style: Ottomans come in many shapes, sizes, and fabrics. Pick one that complements your existing bedroom decor.
- Consider Tray Tops: Some ottomans have lids that flip over to become a tray. This adds another useful surface.
- Position It:
- Foot of the Bed: A common and useful spot for blankets or extra pillows.
- Next to a Chair: Provides a comfortable footrest and a place for reading materials.
- As a Side Table: If it has a flat top, it can replace a small end table.
- Organize Inside: Even inside the ottoman, keep things tidy. Use small fabric bins or dividers to prevent items from becoming a jumbled mess.
20. Reduce Sensory Clutter
Clutter is not just about physical items. Stale air or lingering odors can create “sensory clutter.” This makes a room feel stuffy and unpleasant.
An air purifier helps clean the air, removing dust and allergens. An aroma diffuser adds a gentle, calming scent like lavender or eucalyptus. This combination makes the space feel fresh and clean. It creates a serene atmosphere that helps you relax.
DIY: Create a Calming Diffuser Blend
Tools You’ll Need:
- An essential oil diffuser
- Clean water
- Essential oils (e.g., lavender, chamomile, and sandalwood)
Instructions:
- Fill the Diffuser: Open your diffuser and fill it to the marked line with clean, cool water.
- Add Calming Oils: Add 3-4 drops of lavender essential oil. This is known for its relaxing properties.
- Add Grounding Oils: Add 1-2 drops of chamomile or sandalwood oil. These scents can help reduce stress.
- Turn On: Place the diffuser on a stable surface. Turn it on about 30 minutes before you plan to go to sleep.
21. Automate Your Clothing Care

Laundry is a chore that never seems to end. Piles of clean clothes waiting to be folded are a major source of clutter. Wrinkled shirts add to the mess.
New technology can help. A smart garment care system, like the one pictured, can steam and refresh clothes. This removes wrinkles and odors without an iron. Other devices can automatically fold clean laundry. This automation saves time. It makes it easier to keep your closet tidy.
DIY: Make a Simple Laundry Folding Board
Tools You’ll Need:
- A large, sturdy cardboard box
- Box cutter or strong utility knife
- Measuring tape
- Pencil
- Duct tape
Instructions:
- Cut Your Panels: From the flat cardboard, cut six identical rectangular panels. A good size is about 10 inches wide by 12 inches tall.
- Lay Out Panels: Arrange four of the panels on the floor in a 2×2 grid. Leave a tiny gap (about 1/8 inch) between them.
- Tape the Joints: Use duct tape to create “hinges.” Tape along all the inside joints where the panels meet.
- Add Side Panels: Place the last two panels on the left and right sides of the top row. Tape these as well.
- Fold: Flip the whole board over. To use it, lay a shirt face-down. Fold in the left panel, then the right. Then, fold the bottom two panels up.
22. Carve Out a Dedicated Fitness Corner
Exercise equipment is often bulky. Yoga mats, weights, and foam rollers can easily take over a room and look messy.
This setup gives your workout gear a proper home. A simple wall-mounted rack neatly holds yoga mats. A woven basket corrals smaller items. Dumbbells rest on the floor, tucked away. This creates a dedicated zone. It stops your fitness gear from migrating around the room.
DIY: Make a Wall-Mounted Yoga Mat Holder
Tools You’ll Need:
- One 1×4 pine board (about 2 feet long)
- Two large wooden dowels (1-inch diameter, each about 10 inches long)
- Power drill
- A 1-inch drill bit (a “spade” or “Forstner” bit is best)
- Measuring tape
- Pencil
- Level
- Wall screws and a stud finder
Instructions:
- Mark Your Board: Lay the 1×4 board flat. Measure in about 4 inches from each end. Mark the center of the board’s width at these two points.
- Drill Dowel Holes: Use your 1-inch drill bit to drill two holes all the way through the board at your marks.
- Insert Dowels: You can add wood glue for extra strength. Insert the two wooden dowels into the holes. Make sure they are straight.
- Find a Stud: Use your stud finder to locate a stud on the wall where you want to hang the rack.
- Mount the Rack: Hold the rack against the wall over the stud. Use your level to make sure it’s straight. Drive screws through the backboard (the 1×4) and into the stud.
- Store Your Mat: Roll up your yoga mat and rest it on the two dowels.
23. Build In Your Nightstands
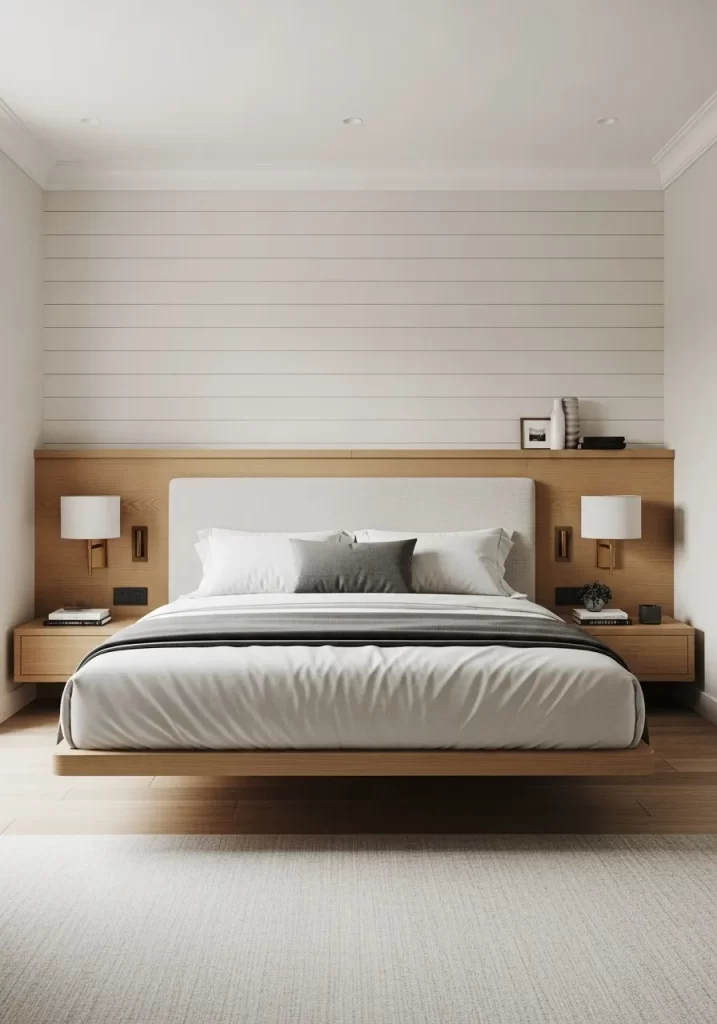
Traditional headboards and separate nightstands can feel disjointed. They often leave awkward gaps where dust collects.
This design combines them into one seamless unit. The headboard extends across the wall, creating a clean backdrop. The “floating” nightstands are integrated into this structure. This looks clean and intentional. It also provides a long ledge above the headboard for small items.
DIY: Create a Faux Built-in Ledge
Tools You’ll Need:
- One long 1×6 or 1×8 pine board
- Wood stain or paint
- Level (a long 4-foot one is best)
- Power drill
- Heavy-duty L-brackets (at least 3-4)
- Screws and wall anchors
- Stud finder
Instructions:
- Measure and Cut: Measure the width of your bed. Add the width of your nightstands, or just have the ledge run the full width of the bed. Have the board cut to this length.
- Finish the Board: Sand and stain (or paint) the board. Let it dry completely.
- Find Studs: Decide on the height for your ledge. Use your stud finder to locate all the wall studs along this line. Mark them.
- Attach Brackets: Secure your L-brackets to the wall. You must screw them directly into the studs. Use your level to ensure all brackets are perfectly aligned.
- Mount the Ledge: Place your finished board on top of the brackets. Secure the board by driving short screws up from the bottom of the L-bracket into the wood.
24. Store Seasonal Items High and Low

Most closets have wasted space. The high top shelf and the floor are common clutter zones.
This closet uses uniform bins to fix that. Clear bins on the floor hold folded clothes or shoes. Matching fabric bins on the top shelf hide out-of-season items. Using identical bins creates a clean, organized look. It stops the shelves from looking like a random pile.
DIY: Label Your Storage Bins
Tools You’ll Need:
- Your storage bins
- Cardstock tags or sticker labels
- A dark marker or a label maker
- Hole punch (if using tags)
- String or twine (if using tags)
Instructions:
- Sort Your Items: Group all your out-of-season items. For example, create piles for “Winter Sweaters,” “Summer Shorts,” or “Ski Gear.”
- Fill Bins: Pack one category of items into each bin. Do not overstuff them.
- Create Labels: Use your marker or label maker to create a clear, simple label for each bin. Be specific.
- Attach Labels:
- Stickers: Stick the label on the front of the bin.
- Tags: Write on the tag, punch a hole, and use twine to tie it to the bin’s handle.
- Arrange Bins: Place the labeled bins on your shelves. Now you can see what is in each one at a glance.
25. Invest in a Quality Dresser
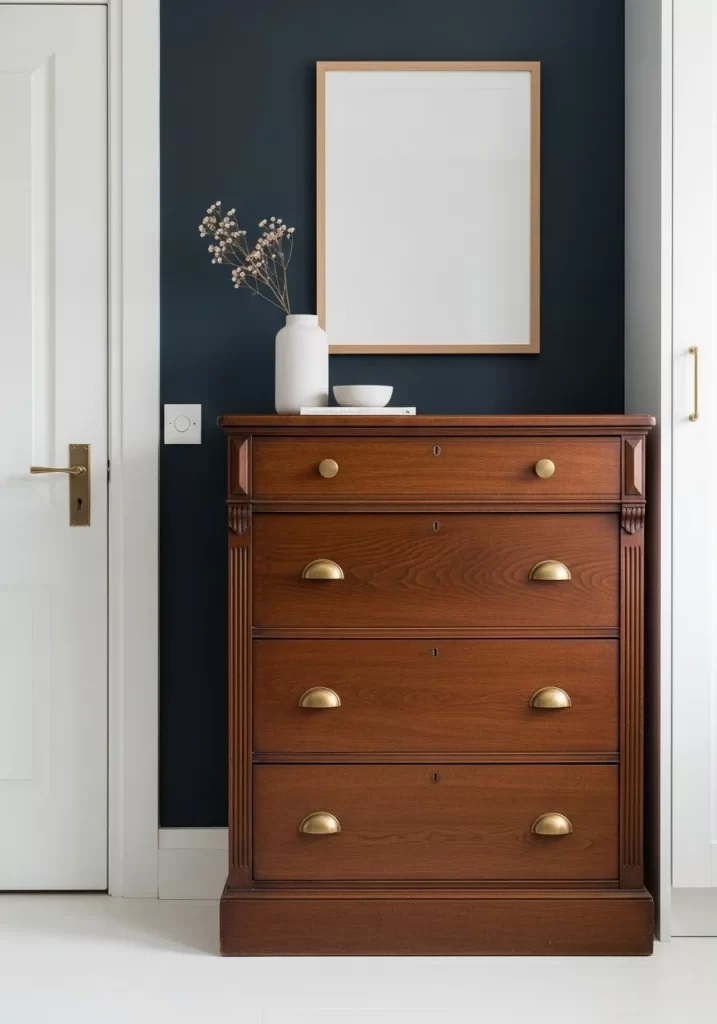
A cheap, flimsy dresser can actually cause disorganization. Its drawers stick. The frame wobbles. It just does not hold enough.
Investing in a solid piece of furniture is a real solution. This classic wooden dresser has good construction. That means the drawers glide smoothly. The deep drawers provide ample space. A beautiful piece of furniture also motivates you to keep the surface on top clear.
DIY: Restore an Old Dresser
Tools You’l Need:
- Sandpaper (medium and fine grit)
- Wood cleaner and clean rags
- Wood stain or paint
- New drawer knobs or pulls
- A screwdriver
Instructions:
- Clean and Prep: Remove all the drawers. Wipe down the entire dresser and drawers with wood cleaner.
- Sand: Lightly sand all surfaces with medium-grit sandpaper. This removes the old finish. Wipe away all the dust. Go over it again with fine-grit sandpaper for a smooth finish.
- Stain or Paint: Apply your new stain or paint. Follow the product’s directions. Let it dry completely.
- Update Hardware: Use your screwdriver to remove the old drawer pulls. Install new knobs or handles. This simple change can completely update the look.
- Wax Drawers (Optional): If the wooden drawers stick, rub a bar of soap or a bit of wax on the runners. This helps them glide smoothly.
26. Organize Your Jewelry Drawer

Jewelry is small and tangles easily. Throwing it in a drawer or box creates a jumbled mess.
This solution uses shallow, stackable trays. The soft, velvet-like lining stops items from sliding. Separate compartments keep necklaces, rings, and bracelets from mixing. You can see your entire collection at a glance. It makes getting ready simple. It also protects your items from scratches.
DIY: Make Your Own Drawer Dividers
Tools You’ll Need:
- 1/4-inch thick balsa wood or “hobby wood” strips
- Measuring tape
- A craft knife or small saw
- A hot glue gun or strong wood glue
Instructions:
- Measure Your Drawer: Measure the inside length and width of your drawer.
- Cut Main Dividers: Cut two or three long strips of wood to match the length of your drawer.
- Place Long Dividers: Place these strips inside the drawer, spacing them out to create long lanes.
- Cut Short Dividers: Measure the distance between your long strips. Cut many small “cross” pieces to this length.
- Assemble the Grid: Place the short pieces between the long ones. This creates a grid of small squares.
- Glue: Once you are happy with the layout, use a small dot of glue at each joint to hold the grid together.
- Line (Optional): You can cut pieces of felt to fit the bottom of each new compartment for a softer lining.
27. Use a Rolling Utility Cart
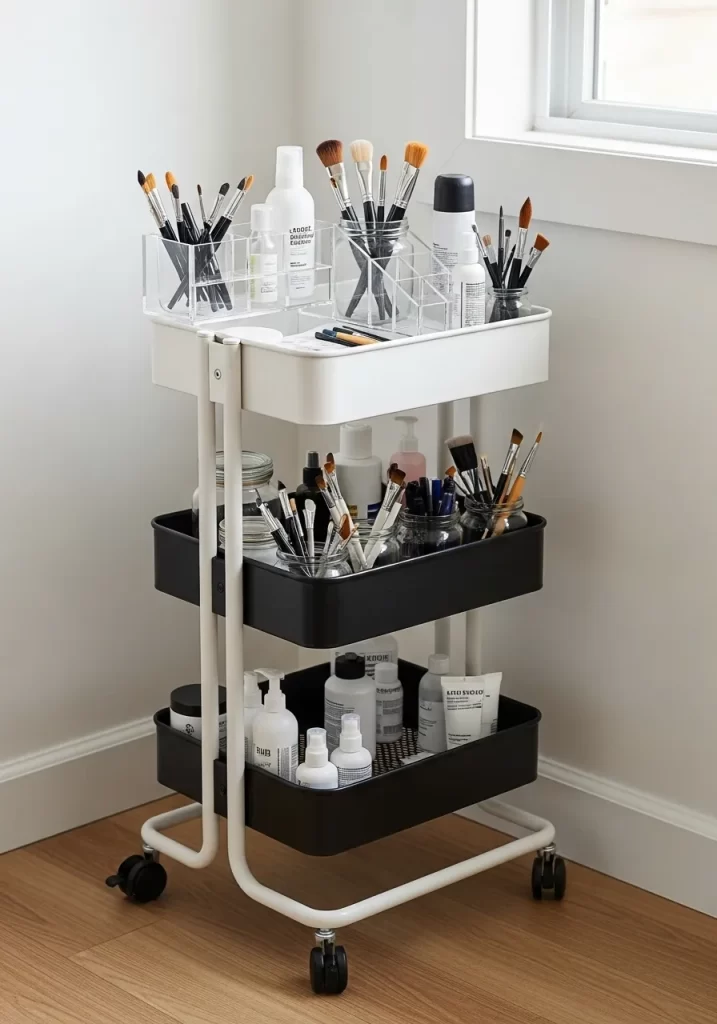
Sometimes clutter comes from hobbies or daily routines. Makeup, art supplies, or skincare items can spread out.
A rolling utility cart is a mobile solution. It has multiple tiers to organize all your items. You can roll it to where you need it, like a window with good light. When you are done, you roll it back into a corner or closet. It keeps everything together.
DIY: Organize Your Rolling Cart
Tools You’Table of Contents:
- Your rolling cart
- Various cups, old jars, and small bins
- Acrylic organizers
- Labels or a marker
Instructions:
- Designate Tiers: Give each level of the cart a job.
- Top Tier: For items you use every day (like makeup brushes or daily skincare).
- Middle Tier: For items you use sometimes (like face masks or nail polish).
- Bottom Tier: For bulk storage (like extra bottles or cleaning supplies).
- Contain Small Items: Use old jars or acrylic cups to hold tall, thin items like makeup brushes, pencils, and mascaras.
- Use Trays: Place small bins or trays within the cart’s shelves. This groups smaller items and stops them from rolling around.
- Label: Label the bins so you know exactly where everything goes.
28. Store Luggage Intelligently

Luggage is large, awkward, and used infrequently. It takes up a huge amount of valuable closet floor space.
This method is simple. First, nest smaller suitcases inside larger ones. Then, stack them neatly on the floor. A dust cover over the top piece keeps them clean. This reduces the footprint of your entire luggage collection. It gets them out of the way.
DIY: Maximize Your Luggage Storage
Tools You’ll Need:
- Your set of luggage
- A dust cover (or an old, clean bedsheet)
- Vacuum-seal bags (optional)
Instructions:
- Nest Your Luggage: Open your largest suitcase. Put your medium suitcase inside it. Put your carry-on inside the medium one. This “nesting” trick combines multiple bags into one.
- Store Items Inside: Use the empty space inside the nested luggage. It is a great spot to store out-of-season items like winter coats. Use vacuum-seal bags to make them smaller.
- Stack: Place the nested set in your closet. If you have other bags, stack them neatly from largest to smallest.
- Cover: Place a dust cover or an old bedsheet over the stack. This prevents them from getting dusty while in storage.
29. Layer Your Bedroom Lighting
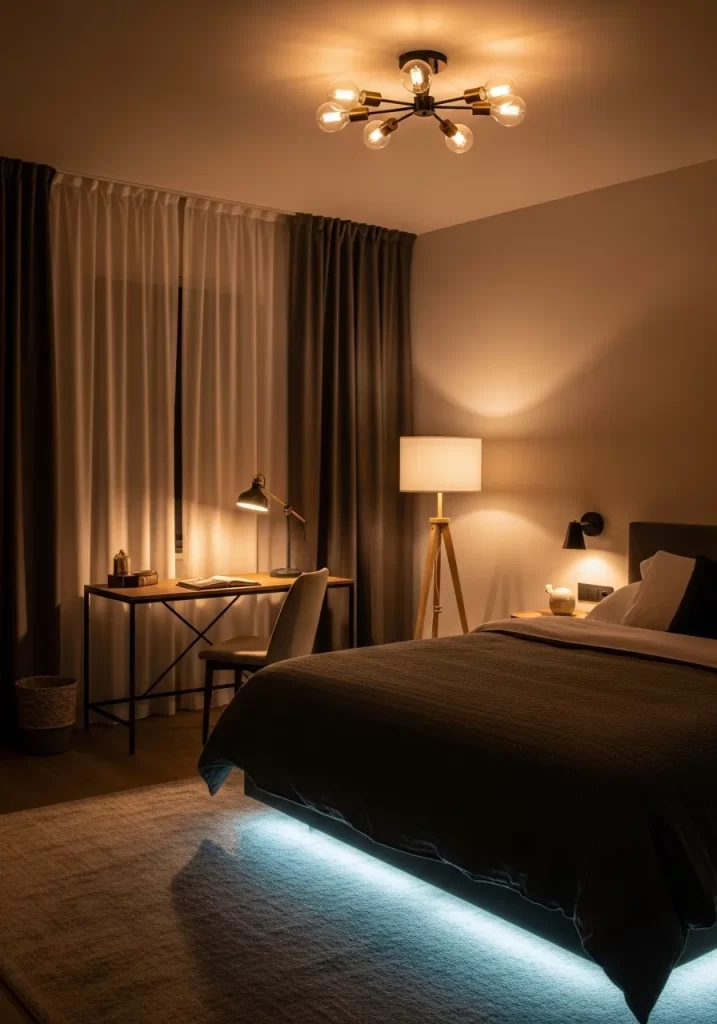
A single, harsh overhead light can make a room feel flat. It casts shadows in corners and does not create a relaxing mood.
Layered lighting is the solution. A ceiling fixture provides general light. A floor lamp brightens a reading corner. A small desk lamp focuses on a task. Wall lights or under-bed strips add a soft glow. This makes the room feel warmer, more finished, and more inviting.
DIY: Install Under-Bed LED Strip Lighting
Tools You’ll Need:
- An LED light strip kit (one with adhesive backing)
- Measuring tape
- Scissors
- A cleaning cloth and rubbing alcohol
Instructions:
- Measure Your Bed Frame: Measure the underside of your bed frame (the two sides and the foot).
- Clean the Surface: Wipe down the area where you will stick the lights. Use a cloth with a little rubbing alcohol. This removes dust and helps the adhesive stick.
- Cut the Strip (If Needed): Roll out your LED strip. Most kits have marked “cut” lines where it is safe to cut with scissors.
- Apply the Strip: Peel off the adhesive backing. Press the light strip firmly onto the underside of the bed frame.
- Connect and Plug In: Connect any corners with the connectors from your kit. Run the power cord to the nearest wall outlet.
- Control: Use the remote to turn on the lights. It adds a soft glow and makes it easy to see at night.
30. Use a Minimalist Wall Shelf

Some bedrooms have no space for a nightstand. This corner by the door is a common example.
A small, simple wall shelf is a great substitute. This one is just wide enough for essentials: a tablet, a clock, and a charging hub. The wall-mounted lamp saves even more space. This setup keeps your must-haves within reach. It does not take up a single inch of floor space.
DIY: Install a Simple Bracket Shelf
Tools You’ll Need:
- A small wooden board (e.g., 1×8 pine, cut 12-18 inches long)
- Two decorative or simple metal L-brackets
- Power drill
- Level
- Measuring tape
- Pencil
- Wall anchors and screws
Instructions:
- Finish Your Shelf: Sand and paint or stain your wooden board. Let it dry.
- Choose Height: Decide on the height for your shelf. A good height is level with the top of your mattress.
- Mark Bracket Holes: Hold one bracket against the wall at your chosen height. Use your level to make sure it is vertically straight. Mark the screw holes.
- Install First Bracket: Drill holes and tap in your wall anchors. Screw the first bracket to the wall.
- Mark for Second Bracket: Place your shelf board on the first bracket. Put your level on the board. Hold the second bracket under the board. Adjust it until the board is perfectly level. Mark the holes for the second bracket.
- Install Second Bracket: Attach the second bracket to the wall.
- Secure Shelf: Place your board on top of both brackets. Drive short screws up through the bracket holes into the bottom of the shelf.
31. Set Up a Paper Processing Station
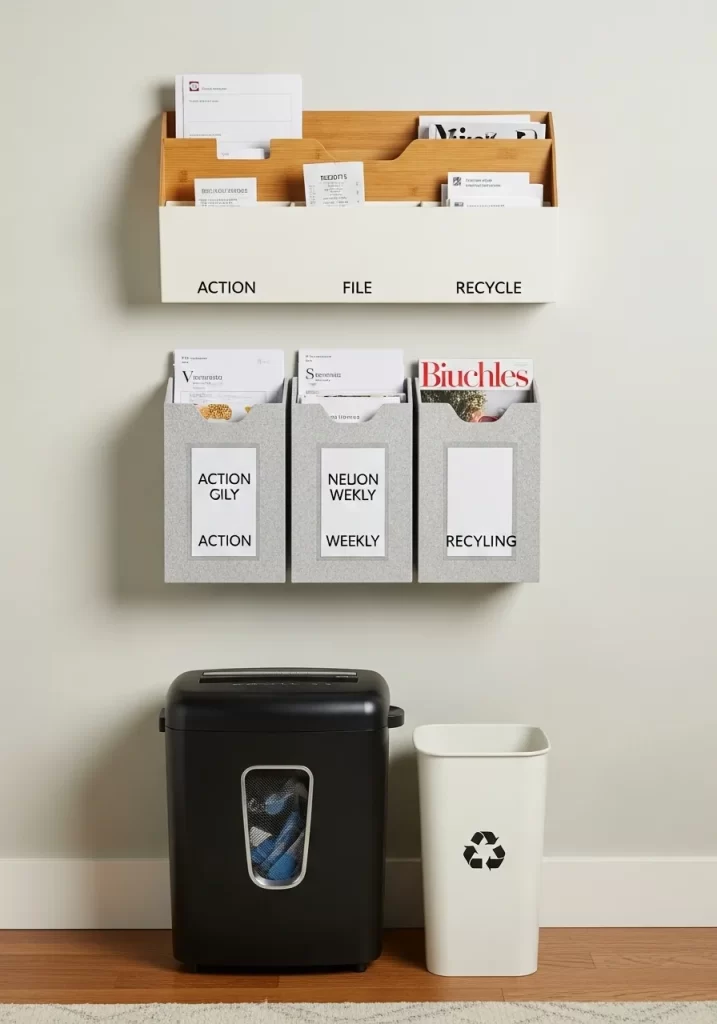
Paper clutter quickly gets out of control. Bills, junk mail, and important documents pile up on every flat surface. This can lead to missed payments or lost information.
This wall-mounted system tackles paper head-on. It has clearly labeled slots for “Action,” “File,” and “Recycle.” Below, a shredder handles sensitive documents. A recycling bin takes care of junk mail. This simple setup creates a routine for managing paper. It keeps your desk and other surfaces clear.
DIY: Create a Wall-Mounted Mail Sorter
Tools You’ll Need:
- A wall-mounted file organizer or magazine rack
- Labels or a label maker
- Power drill
- Level
- Measuring tape
- Pencil
- Wall anchors and screws
Instructions:
- Choose Your Location: Pick a spot in your bedroom that is convenient for processing mail, but not directly in your sleep zone.
- Plan Your Categories: Decide on your categories. “Action,” “File,” and “Recycle” are good starting points. You could also add “To Read” or “Shred.”
- Mount the Sorter: Hold the organizer against the wall at a comfortable height. Use your level to make sure it is straight. Mark the screw holes.
- Drill and Secure: Drill pilot holes. If you are not hitting studs, use wall anchors. Secure the organizer to the wall.
- Label: Apply your labels clearly to each slot.
- Add Accessories: Place a small recycling bin and a paper shredder on the floor beneath the organizer.
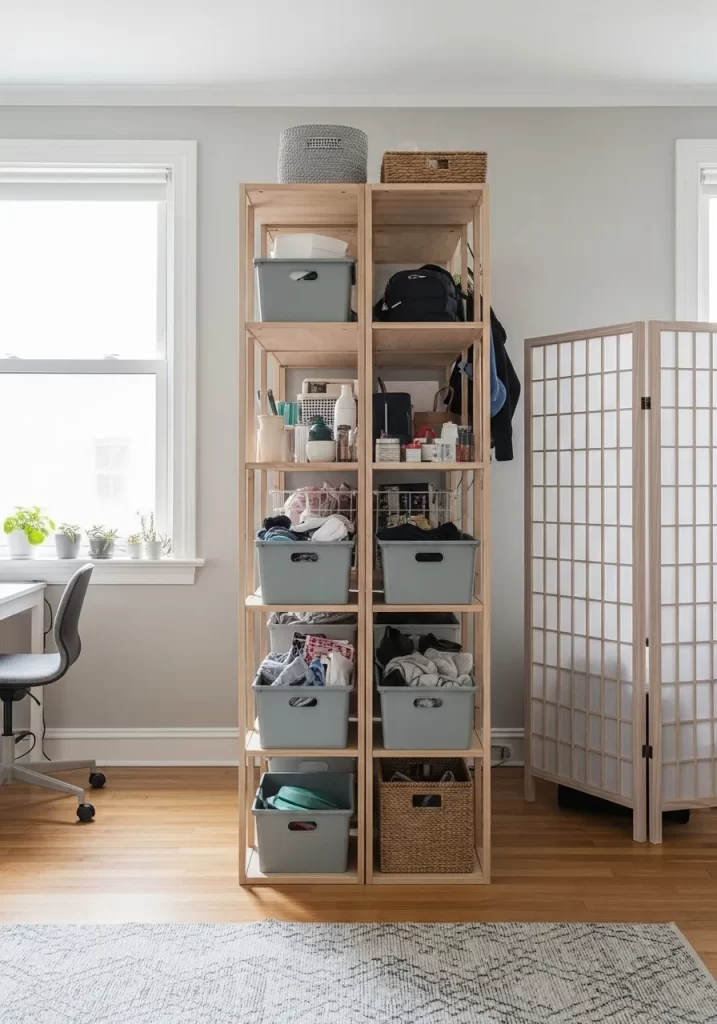
32. Maximize Vertical Space with Modular Shelving
A common problem is running out of storage. When all your items are crammed into drawers or on the floor, it looks messy.
A modular shelving unit is a smart choice. It uses the entire height of your wall. Wire shelves keep it feeling light and airy. You can customize the layout with hanging rods, drawers, and open shelves. This lets you store everything from folded clothes to books. It expands your storage without adding bulk.
DIY: Assemble a Freestanding Modular Shelving Unit
Tools You’ll Need:
- Modular shelving kit (comes with instructions)
- Rubber mallet (optional, for tapping pieces into place)
- Level
Instructions:
- Read Instructions: Always start by reading the specific assembly instructions for your chosen modular unit.
- Lay Out Components: Lay all the pieces on the floor. Group similar parts together.
- Build the Frames: Assemble the vertical side frames first. These often click or screw together.
- Attach Back Panels/Braces: Connect the side frames with horizontal back braces or panels. This makes the unit stable.
- Add Shelves and Drawers: Slide or click the shelves into place at your desired heights. Install any drawers or hanging rods according to the kit’s directions.
- Level and Secure: Once assembled, stand the unit upright. Use your level to ensure it is straight. If it is tall, use wall anchor straps (often included) to secure it to the wall. This prevents tipping.
33. Incorporate Mirrored Wardrobe Doors
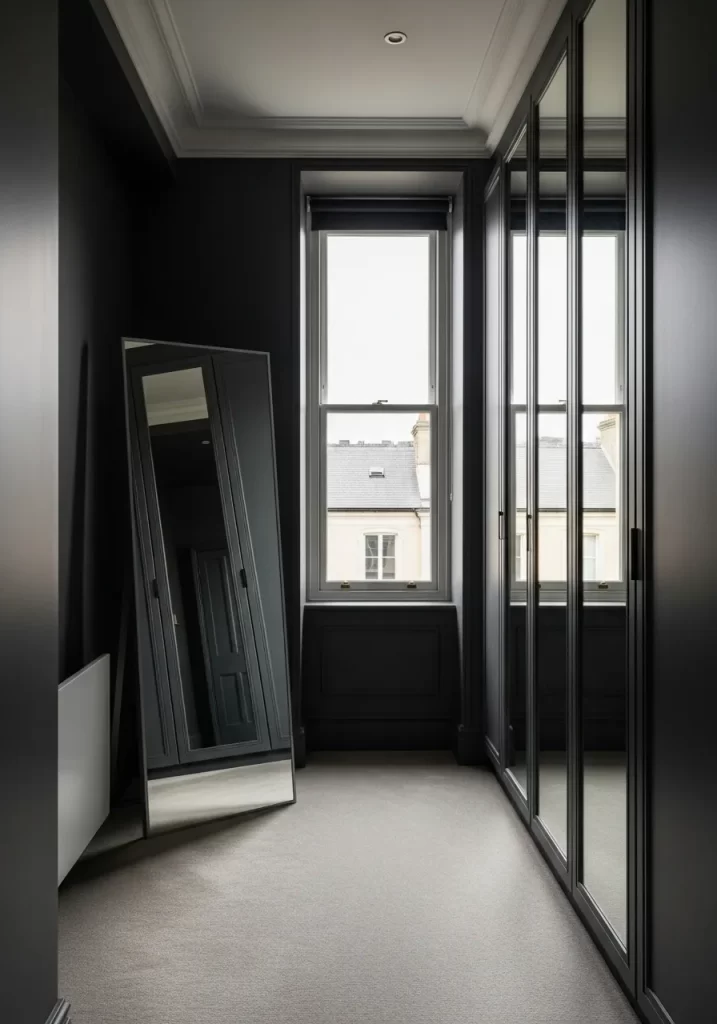
Small bedrooms can feel cramped and dark. Heavy, opaque wardrobe doors can make a space feel even smaller.
Mirrored wardrobe doors are a clever solution. They reflect light, making the room appear brighter. They also create the illusion of more space. It is like having an extra window. This also gives you a full-length mirror without needing to find a separate spot for one. It is functional and stylish.
DIY: Add a Full-Length Mirror to a Door
(Replacing existing wardrobe doors with mirrored ones is complex. Consider adding a full-length mirror to the inside of a closet door or a bedroom door for a similar effect.)
Tools You’ll Need:
- Full-length mirror (check for lightweight options with adhesive backing)
- Heavy-duty mirror adhesive (if not self-adhesive)
- Measuring tape
- Pencil
- Level
- Clean cloth and rubbing alcohol
Instructions:
- Choose Your Door: Decide which door (closet or bedroom) you want to use.
- Clean the Surface: Wipe the door thoroughly with a clean cloth and rubbing alcohol. Let it dry. This ensures good adhesion.
- Measure and Mark: Hold the mirror up to the door to decide on its placement. Center it vertically and horizontally. Use your pencil and level to lightly mark the top and side edges.
- Apply Adhesive:
- Self-Adhesive: Carefully peel off the backing.
- Tube Adhesive: Apply lines of mirror adhesive to the back of the mirror. Follow the product instructions for spacing.
- Attach Mirror: With help, carefully align the mirror with your marks. Press it firmly onto the door. Hold it in place for a minute or two.
- Cure Time: Allow the adhesive to cure fully before moving the door much. This can take 24-48 hours.
34. Use Uniform, Labeled Storage Bins
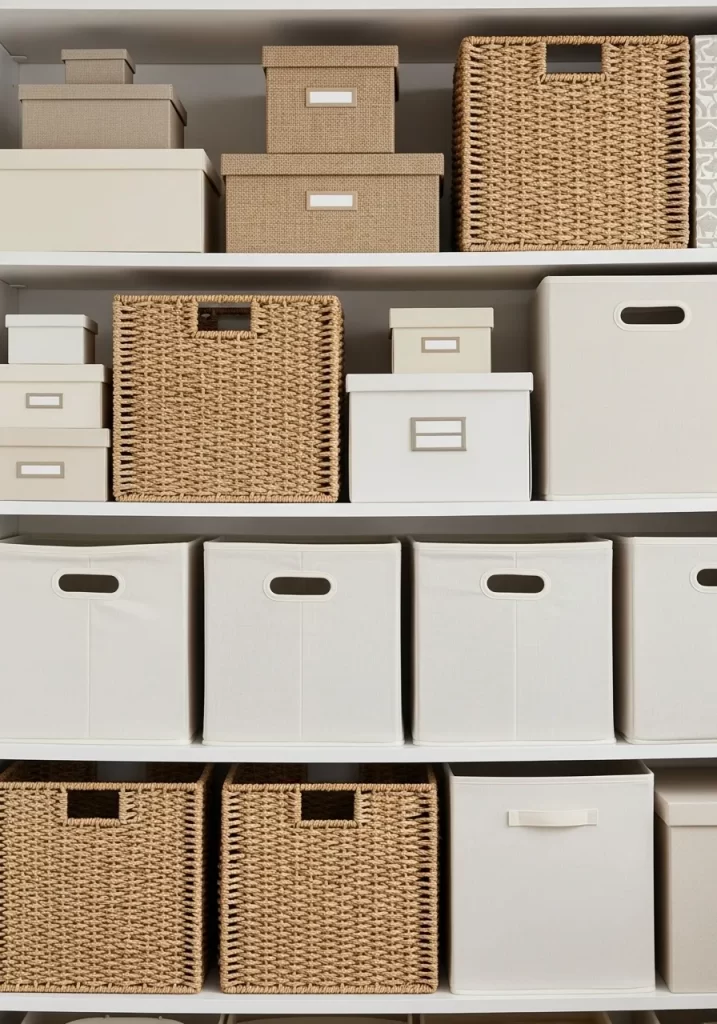
A common source of clutter is having a mix of random containers. Clear bins showing everything, or mismatched baskets, create visual noise.
This strategy uses uniform, opaque storage bins. Some are woven, some are fabric, and some are plain boxes. The key is their matching style. Each bin has a label holder. This hides the contents from view, yet makes it easy to find what you need. This creates a clean, cohesive look.
DIY: Create Uniform Labels for Bins
Tools You’ll Need:
- Label holders (adhesive or clip-on)
- Cardstock or thick paper
- A dark marker or label maker
- Scissors
Instructions:
- Group Similar Items: Before labeling, ensure items inside your bins are properly sorted. One bin for “Extra Sheets,” another for “Winter Scarves,” etc.
- Write Clear Labels: Using your marker or label maker, create clear, concise labels for each bin.
- Cut Inserts: If using cardstock, cut the paper to fit snugly inside your label holders.
- Attach Holders:
- Adhesive: Peel the backing and stick the label holder to the front of the bin.
- Clip-on: Simply clip the holder onto the edge of the bin.
- Insert Labels: Slide your written or printed labels into the holders. This makes it simple to change labels later if the contents of a bin change.
35. Make the Most of Over-the-Door Storage

Closets and drawers are not the only places to store things. The back of a door offers vertical space.
An over-the-door organizer provides a lot of extra storage. This system uses adjustable shelves and hooks. It can hold shoes, cleaning supplies, and folded towels. It keeps these items out of sight and off the floor. It is a fantastic way to add storage without needing any extra floor space.
DIY: Install an Over-the-Door Organizer
Tools You’ll Need:
- Over-the-door organizer kit
- Screwdriver (if assembly required)
- Measuring tape
Instructions:
- Assemble the Frame: Follow the kit instructions to assemble the main frame of the organizer.
- Attach Hooks: Secure the over-the-door hooks to the top of the frame. These hooks will rest over the door.
- Hang the Organizer: Carefully hang the entire assembled frame over the top of your bedroom or closet door.
- Add Shelves/Bins: Place the individual shelves, baskets, or shoe racks onto the frame. Most systems have adjustable slots.
- Distribute Weight Evenly: Try to spread out the weight of your items. Avoid putting all heavy items on one side or one shelf.
- Secure (Optional): Some kits come with small adhesive pads or screws to secure the bottom of the organizer to the door. This stops it from swinging when the door opens and closes.
36. Use Open Shelving Units
Sometimes, you need visible storage that is easy to access. Heavy wardrobes can feel too bulky.
Open shelving units are a lightweight option. They provide ample space for folded clothes, baskets, and decorative items. By choosing bins or baskets that fit the shelves, you can keep things looking tidy. These units are also easy to move. They offer flexible storage for evolving needs.
DIY: Build a Simple Open Shelving Unit
(Building from scratch can be tricky. Here’s how to assemble a common flat-pack shelving unit.)
Tools You’ll Need:
- Flat-pack shelving unit kit
- Screwdriver or power drill
- Allen wrench (usually included)
- Rubber mallet (optional)
Instructions:
- Unpack and Sort: Lay out all the pieces and hardware. Match them to the parts list in the instructions.
- Assemble Side Frames: Start by building the vertical side frames. These are often long panels with pre-drilled holes.
- Attach Crossbars/Shelves: Connect the side frames using the horizontal crossbars or shelves. Make sure all connections are tight. Use the Allen wrench for cam locks or screws.
- Add Back Panel (If Any): Some units have a thin back panel that nails on. This adds stability.
- Stand Upright: With help, carefully stand the unit upright.
- Level and Secure: Use a level to check it. If the unit is tall, attach it to the wall using the anti-tip hardware provided. This is a safety measure.
- Organize: Add your bins and baskets.
37. Optimize Closet Wall Space
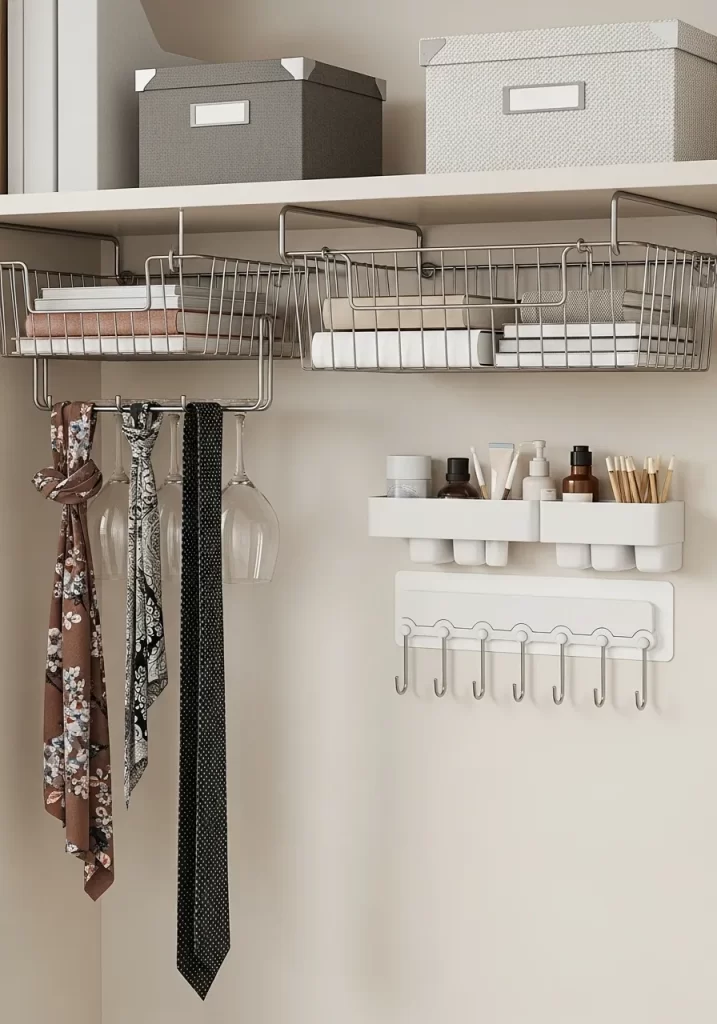
Even a deep closet has unused vertical space. The upper parts of walls, or under existing shelves, are often overlooked.
This system takes advantage of those spots. Under-shelf baskets slide on, creating instant new storage for flat items. Wall-mounted organizers hold small bottles and brushes. A row of hooks is great for ties and scarves. This makes every inch of your closet work harder.
DIY: Install Under-Shelf Baskets and Hooks
Tools You’ll Need:
- Under-shelf slide-on baskets
- Wall-mounted hook rack or individual hooks
- Power drill
- Measuring tape
- Pencil
- Wall anchors and screws
Instructions:
- Install Under-Shelf Baskets:
- Choose Shelf: Select an existing shelf in your closet.
- Slide On: Simply slide the basket’s arms onto the underside of the shelf. Make sure it is secure.
- Load: Place lightweight items like notebooks or small towels in the basket.
- Install Wall Hooks:
- Choose Spot: Find an empty section of wall in your closet.
- Mark and Level: Hold the hook rack up. Use your level and pencil to mark the screw holes.
- Drill and Secure: Drill pilot holes. If you are not hitting a stud, use wall anchors. Screw the hook rack firmly to the wall.
- Hang Items: Use the hooks for ties, scarves, belts, or even small bags.
- Wall Organizer (Optional): For small bottles, a stick-on shower caddy can work well inside a closet. Just make sure the surface is clean before applying.
38. Use Vacuum Bags for Bulky Items
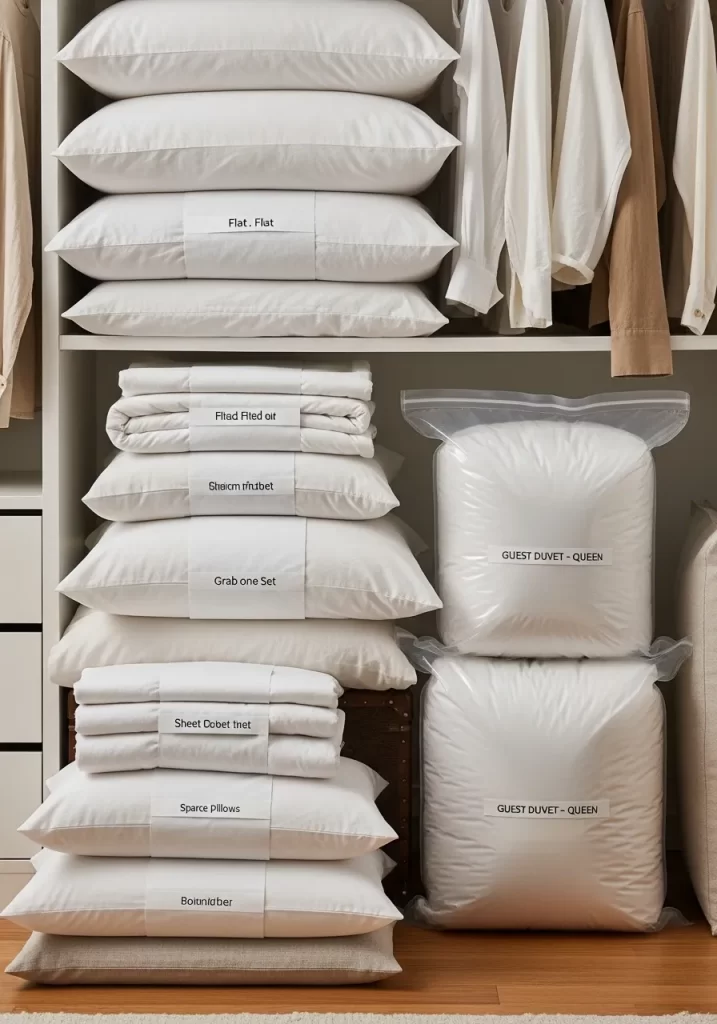
Pillows, duvets, and seasonal bedding take up enormous amounts of space. They are hard to store neatly.
Vacuum storage bags are a game-changer. You place bulky items inside, seal the bag, and use a vacuum cleaner to suck out the air. This shrinks the items down to a fraction of their size. They become flat and stackable. This frees up huge amounts of closet or under-bed space.
DIY: Master Vacuum Sealing
Tools You’ll Need:
- Vacuum storage bags (various sizes)
- A vacuum cleaner with a hose attachment
Instructions:
- Choose the Right Bag: Select a bag size that matches your item. Do not try to force a large duvet into a small bag.
- Fold Item Neatly: Fold your duvet, pillows, or blankets as neatly as possible. This helps them compress more evenly.
- Place in Bag: Put the folded item inside the vacuum bag. Do not overfill the bag. Leave enough room to seal it.
- Seal the Zipper: Firmly press along the double zipper closure. Make sure it is completely sealed. Run your fingers along it a few times.
- Attach Vacuum: Open the air valve on the bag. Attach your vacuum cleaner hose to the valve.
- Remove Air: Turn on your vacuum cleaner. Watch as the bag flattens. Once all the air is out, turn off the vacuum and quickly close the valve.
- Store: Your now-compact items are ready to be stacked in a closet or under the bed.
Creating a truly restful bedroom is a process. It does not happen overnight.
The goal is to build new habits that last. A tidy space is possible when every item has a home. You can reclaim your room from the clutter.
These 38 ideas show that smart storage can be simple. You do not need a massive room. You just need a better plan.
Start with one solution. Try organizing a single drawer. Or hang one shelf. You can build a peaceful room, one small change at a time.
Key Takeaways
- Give every item a clear, dedicated home.
- Use hidden spaces, like under the bed or inside an ottoman.
- Maximize vertical space with wall shelves, hooks, and tall units.
- Hide visual clutter like cables, paper, and small items.
- Choose furniture that serves more than one purpose.