There you have it—a complete journey from a bare, boxed tree to a magnificent holiday masterpiece. Decorating a Christmas tree is more than just hanging ornaments; it’s an art of layering, texture, and personal expression. Each step builds upon the last, creating a rich and cohesive look.

By focusing on a strong foundation of fluffing and lighting, and then adding thoughtful layers of garlands, ribbons, and varied ornaments, you give your tree depth and personality. The small details, like adding a festive scent or using decorative picks to fill gaps, are what truly elevate the final result.
Ultimately, the most beautiful tree is one that brings you joy and reflects your family’s spirit. Don’t be afraid to try new things, make adjustments, and infuse your decorations with personal memories. Your stunning Christmas tree is now ready to be the warm, glowing heart of your home this holiday season.
1. The Foundation of a Full Tree: Start with Fluffing
Item Name: Foundational Branch Fluffing

The most important step for a beautiful artificial tree happens before a single ornament is placed. Proper fluffing, or shaping the branches, is the key to a full and lush-looking tree. This process involves separating and fanning out each individual tip on every branch to fill in gaps and hide the center pole.
Many people rush this step, but taking the time to shape each branch makes the tree look more realistic and provides a better canvas for your decorations. A well-fluffed tree looks bigger, healthier, and more expensive. It is the professional secret to achieving that magazine-worthy holiday centerpiece.
DIY Instructions: How to Fluff a Tree!
Let’s make your tree look big and full, like a real one from the forest.
- Work in Sections. Most artificial trees come in a few big pieces. Start with the bottom section and put it in the stand. Don’t add the other sections yet.
- Start at the Back. On one single branch, find the little tips that are closest to the center pole. Start by bending these ones out in different directions—some up, some down, some to the side.
- Work Your Way Out. Move from the inside of the branch out to the very tip, fanning out all the little stems. Think of a peacock’s tail; you want the needles to spread out wide.
- Do Every Branch. Finish one whole branch, then move to the next one, and the next one, until the entire bottom section is done.
- Add the Next Piece. Now, add the middle section of the tree and repeat the whole process. Do the same for the very top piece. It takes time, but it’s worth it!
2. The First Layer of Sparkle: Add the Lights
Item Name: Foundational Twinkle Lights

Once your tree is properly fluffed, the next step is to add the lights. This is the foundation of your tree’s magical glow. It is important to add the lights before any garlands or ornaments, as this allows you to weave them deep into the branches for a more integrated look.
Start from the bottom and work your way up, wrapping the light strings around each major branch from the trunk to the tip and back again. This method ensures the tree is lit from the inside out, creating a beautiful depth and a professional, even sparkle. Don’t skimp on lights; more is always better for a brilliant display.
DIY Instructions: How to Put on Tree Lights!
Let’s get your tree twinkling and shining bright.
- Test Your Lights First! Before you do anything, plug in all your light strings to make sure every single bulb is working. It’s much easier to fix a problem now than when they are already on the tree.
- Start at the Bottom. Take the end of your first light string (the one without the plug) and find a low branch near the center pole of the tree.
- Wrap from the Inside Out. Wrap the lights around the base of that branch, near the trunk. Then, continue wrapping the lights along the branch all the way to the tip.
- Wrap Back to the Inside. Once you get to the tip, wrap the lights back down the same branch towards the trunk.
- Move to the Next Branch. Now, move to the next branch over and do the same thing: wrap from the trunk to the tip, and back to the trunk. Keep doing this until you run out of lights, then plug in your next string and continue.
3. Create Depth and Glow: Mix Your Lights
Item Name: Mixed Style Light Set

To give your tree a richer, more complex glow, don’t limit yourself to just one type of light. A great designer trick is to mix different kinds of lights together. For example, start with a base of standard, small twinkle lights, and then add a string of larger bulb lights.
This combination of light sizes creates a beautiful layering effect. The small lights provide an all-over sparkle that makes the tree twinkle, while the larger bulbs add bold, warm pops of light that stand out. This technique adds depth and a custom-designed feel to your tree’s illumination.
DIY Instructions: How to Mix Your Lights!
This is a fun way to make your tree’s glow look extra special.
- Put Your Main Lights On. First, wrap your tree with your regular, small twinkle lights using the method we just learned. Make sure they are spread out evenly. This is your base coat of sparkle.
- Get Your “Feature” Lights. Now, grab your string of bigger, different-shaped lights.
- Drape, Don’t Wrap Deeply. You don’t need to wrap these bigger lights as deeply as the first set. Gently drape them over the branches, closer to the outside.
- Place Them Like Ornaments. As you drape the string, make sure each of the big bulbs has a nice spot to sit where it can be seen, almost like you’re hanging special ornaments.
- Spread Them Out. Make sure you drape the big bulb string evenly all around the tree so you have these pops of warm light everywhere.
4. Create a Fuller Look: Cluster Your Ornaments
Item Name: Ornament Cluster Bundles

To make your tree look extra full and professionally styled, try clustering your ornaments together. Instead of hanging single balls, group three ornaments of different sizes—one large, one medium, and one small—together in a tight bunch.
This technique fills more visual space and creates a more luxurious, abundant look. You can tie the ornaments together with a piece of floral wire or a single hook to make them easy to hang. Distribute these clusters evenly around the tree to fill gaps and create beautiful, dense points of color and texture.
DIY Instructions: How to Make an Ornament Cluster!
Let’s make some fancy ornament bunches to hang on the tree.
- Pick Your Ornaments. Choose three ball ornaments that look nice together. It works best if you pick a large one, a medium one, and a small one.
- Get Some Wire. Cut a piece of thin floral wire about 6 inches long. You can find this at a craft store.
- Thread the Ornaments. Take your first ornament and slide the wire through the little metal loop at the top. Do the same for the second and third ornaments, so all three are on the same piece of wire, like a keychain.
- Bunch Them Up. Slide the ornaments to the middle of the wire and bunch them together so they look like a bundle of grapes.
- Twist to Secure. Twist the two ends of the wire together tightly to lock the ornaments into their cluster. You can then use the ends of the wire to attach the whole cluster to a branch on your tree.
5. Add a Layer of Texture: Drape the Garland
Item Name: Loosely Draped Tinsel Garland

Garland is a great way to add another layer of color and texture to your tree. Whether you use tinsel, beads, or ribbon, the key is to drape it in a natural-looking way. Avoid wrapping it tightly around the tree, which can make it look stiff and constricted.
Instead, start at the top and let the garland hang in gentle, smiling swoops from branch to branch. This creates a more relaxed and graceful feel. Let the garland rest on the outer tips of the branches, allowing it to weave slightly in and out. This adds a beautiful sense of movement and flow.
DIY Instructions: How to Drape a Garland!
Let’s hang your garland so it looks graceful and natural.
- Start at the Top. Take the end of your garland and tuck it into a branch near the top and back of the tree to hide the end and secure it.
- Create a “Swoop.” As you move sideways around the tree, let the garland droop down in a gentle curve. It should look like a smiley face.
- Catch it on a Branch. After a foot or two, catch the garland by resting it on the tip of a branch. Don’t pull it tight!
- Continue the Pattern. Keep making these gentle swoops all the way around the tree.
- Work Your Way Down. As you circle the tree, slowly work your way downwards. The swoops on the bottom of the tree should be a little bigger than the ones at the top. When you reach the end, just tuck the final end into a branch at the back.
6. A Different Direction: Use Vertical Ribbons
Item Name: Cascading Vertical Ribbons

For a dramatic and elegant look, try hanging your ribbons vertically instead of wrapping them around the tree. This technique creates long, flowing lines that draw the eye up and down, making the tree appear taller and more grand.
To do this, cut long strips of ribbon. Start at the top of the tree, tucking one end deep into the branches, and let the rest of the ribbon cascade straight down. You can let the ends pool at the floor or trim them near the bottom branches. This method is a modern and sophisticated way to incorporate ribbon into your design.
DIY Instructions: How to Hang Ribbons Straight Down!
This is a really cool and modern way to use ribbon on your tree.
- Cut Your Ribbon. Instead of using the whole roll at once, you will cut your ribbon into long pieces. Each piece should be about as long as your tree is tall. Cut several of these strips.
- Go to the Top. Take the end of one of your ribbon strips. Go to the very top of your tree and tuck that end deep into a branch to anchor it.
- Let it Flow. Let the rest of the ribbon just fall straight down the side of the tree.
- Give it a Tuck. To make it look more natural, give the ribbon a gentle tuck into a branch about halfway down the tree. This gives it a soft wave.
- Add More Ribbons. Take your other ribbon strips and do the same thing, spacing them out evenly all the way around the tree.
7. Don’t Forget the Foundation: Dress the Base
Item Name: Padded Tree Skirt

The base of the tree is just as important as the topper. A beautiful tree skirt not only hides the unattractive metal stand but also completes the overall look. It acts as the foundation for the entire display and creates a soft, decorative space for presents.
For an extra plush and professional look, you can add some soft batting or even crumpled-up paper bags underneath the skirt. This gives it a bit of volume and a smooth, billowy shape, preventing it from looking flat and wrinkled. It’s a simple trick that makes the base of your tree look finished and full.
DIY Instructions: How to Make Your Tree Skirt Look Fluffy!
Let’s make the bottom of your tree look soft and pretty.
- Put Your Skirt in Place. First, wrap your tree skirt around the tree stand and secure it.
- Get Your “Stuffing.” You can use polyester batting (the fluffy stuff inside pillows), a bag of cotton balls, or even just some crumpled-up tissue paper.
- Lift the Edge. Gently lift up the outer edge of your tree skirt.
- Add the Fluff. Start placing handfuls of your stuffing underneath the skirt, pushing it towards the outer edge.
- Plump it Up. Continue adding the stuffing all the way around the tree until your skirt has a soft, puffy, and rounded shape. Now it looks like a soft blanket of snow under your tree!
8. Fill the Gaps: Use Decorative Picks
Item Name: Glimmering Berry Picks

Even on the most well-fluffed tree, there can sometimes be small, unavoidable gaps between the branches. Decorative picks are the perfect solution. These are small bunches of glittery leaves, berries, or flowers on a wire stem that you can use to fill in any sparse areas.
You don’t need to hang them; simply stick the wire stem deep into the tree wherever you see a hole. They instantly add a layer of texture, sparkle, and fullness. Picks are a versatile tool that can be used to reinforce your color scheme and add a final touch of polish to your tree.
DIY Instructions: How to Use Tree Picks!
These are like little magic wands for filling empty spots on your tree.
- Find the Gaps. Step back from your tree and look for any “holes” where you can see the center pole or a lot of empty space between branches.
- Take Your Pick. Choose one of your decorative picks. It might look like a spray of berries or some sparkly leaves on a long stick.
- No Hook Needed! You don’t hang these.
- Just Stick It In. Aim the pointy end of the pick’s stem into the center of the gap you found.
- Push it In. Gently push the stem deep into the tree’s branches until the decorative part at the end is filling the hole. The branches of the tree will hold it in place. Use these to fill all the empty spots you can find.
9. Engage All the Senses: Add a Nice Scent
Item Name: Scented Ornaments & Diffusers

An artificial tree can look beautiful, but it lacks the wonderful, nostalgic scent of a real pine or fir tree. You can easily fix this by adding scent to your decor. Hang a few scented ornaments, like these “Scentsicles,” which are infused with Christmas tree fragrance.
Another option is to use natural elements. Hang bundles of cinnamon sticks tied with twine, or tuck a few small pinecones into the branches. You can even place a subtle holiday-scented diffuser near the base of the tree. This final touch engages the sense of smell, making the holiday experience even more immersive.
DIY Instructions: How to Make a Cinnamon Stick Bundle!
Let’s make your tree smell like Christmas baking.
- Get Your Cinnamon. You will need a few long cinnamon sticks from the grocery store.
- Make a Bundle. Take three or four cinnamon sticks and hold them together in a neat little bunch.
- Cut Some Twine. Cut a piece of string or twine about 10 inches long.
- Tie a Knot. Wrap the twine around the middle of your cinnamon stick bundle a few times, and then tie a tight double knot.
- Make a Hanging Loop. Use the ends of the twine to tie another knot, creating a loop you can use to hang your bundle from a tree branch. You can make several of these and hang them around your tree for a lovely, subtle scent.
10. Play with Light: Use Reflective Ornaments
Item Name: Reflective Metallic Ornaments

To maximize the sparkle of your tree, make sure to include plenty of reflective ornaments. Mirrored, metallic, and glittery balls are essential for creating a dazzling display. They catch the light from your twinkle lights and reflect it back, multiplying the shimmer and making the entire tree appear brighter.
Place these shiny ornaments deep within the branches as well as on the tips. The ones inside will catch the light and create a beautiful sense of inner glow and depth. This strategic use of reflection is what gives a tree that magical, sparkling quality that feels so festive.
DIY Instructions: How to Place Your Shiny Ornaments!
Let’s use your shiniest ornaments to make the whole tree sparkle more.
- Find Your Shiniest Ornaments. Go through your collection and pick out all the ornaments that are super shiny, like mirrors, or covered in glitter.
- The “Push and Place” Method. Don’t hang all of them on the very tips of the branches. Take about half of your shiny ornaments and hang them deeper inside the tree.
- Get Close to a Light. Try to hang these inner ornaments right next to one of the little light bulbs on your string lights.
- Add the Rest to the Outside. Now, take the other half of your shiny ornaments and hang them normally on the outer parts of the branches.
- See the Sparkle! Turn on your lights. You’ll see that the shiny ornaments deep inside the tree are catching the light and creating a beautiful glow from within, making the whole tree look brighter.
11. Create Bold Stripes: Color Block Your Ornaments
Item Name: Color Block Ornament Bands

For a modern and organized look, try arranging your ornaments in distinct color bands. This technique involves grouping ornaments of the same color together in wide, horizontal stripes down the tree. It creates a powerful visual impact that is both playful and very stylish.
This method moves away from a random scattering of colors and instead makes a deliberate design statement. Your tree will look thoughtful and well-planned. The clean lines of the color blocks draw attention and give your tree a unique, contemporary feel that stands out from more traditional decorating styles.
DIY Instructions: How to Make Color Stripes!
This is a fun way to organize your ornaments on the tree.
- Choose Your Colors. Pick out three or four different colors of ball ornaments that you want to use. Make sure you have a good number of each color.
- Divide Your Tree into Sections. Look at your tree and imagine it’s a layer cake. You’re going to decorate each layer with a different color. The top section will be for your first color, the middle for your second, and so on.
- Start with the Top Color. Take all the ornaments of your first color. Hang them only in the top third of the tree. Spread them all around that section.
- Add the Next Color Band. Now, take your second color of ornaments. Hang these only in the middle section of the tree, right below the first color.
- Continue Down the Tree. Keep going with your other colors, creating a new color stripe for each section until you reach the bottom.
- Step Back and Admire. From a distance, you will see cool, wide stripes of color on your tree!
12. The Grand Finale: Crown Your Tree
Item Name: Crowning Glory Tree Topper

The tree topper is the final, crowning piece of your Christmas tree. Whether you choose a classic star, a beautiful angel, or a modern spire, the topper serves as the focal point for the entire display. It completes the tree’s shape and draws the eye to the very peak.
A good topper should match the style and scale of your tree. It is the last ornament to be placed, often with ceremony, marking the completion of the decorating. This final touch provides a sense of balance and grandeur, turning your beautifully decorated tree into a finished masterpiece.
DIY Instructions: How to Put on a Tree Topper!
Let’s get that beautiful topper on the tree safely.
- Make Sure It’s a Good Fit. Before you do anything, check that your topper isn’t too heavy for the top branch of your tree. The very top branch is often a bit flimsy.
- Strengthen the Top Branch. If the top branch is weak, you can make it stronger! Take a sturdy wooden dowel or even a chopstick and place it alongside the main top branch. Use green floral tape or a zip tie to bind them together. This will make it much stronger.
- Use a Sturdy Step Stool. Don’t try to stretch to reach the top. Get a safe and sturdy step stool or ladder so you can see and reach the top of the tree easily.
- Attach the Topper. Most toppers have a cone or a spiral at the bottom. Gently slide this base down over the strengthened top branch.
- Secure it in Place. Wiggle it a little to make sure it’s on securely. If it still feels wobbly, you can use another piece of floral wire or a zip tie to attach the base of the topper to the branch for extra support.
13. Add Delicate Detail: Use Beaded Garland
Item Name: Elegant Beaded Garland

For a touch of timeless elegance, consider draping your tree with beaded garland. Unlike shiny tinsel, beaded garlands made of wood or faux pearls offer a more subtle and sophisticated texture. They catch the light in a softer way, adding a delicate detail that enhances the overall design.
This type of garland adds a handmade, classic feel to the tree. It can be used to create gentle swooping lines that guide the eye around the decorations. Whether you choose the rustic charm of wooden beads or the classic beauty of pearls, this element introduces a different kind of pattern and refinement.
DIY Instructions: How to Make a Simple Bead Garland!
You can make your own beautiful garland very easily.
- Get Your Supplies. You’ll need some wooden beads (you can find these at a craft store), and a long piece of string or twine. Make sure the hole in the beads is big enough for your string to go through.
- Measure Your String. Decide how long you want your garland to be and cut a piece of string. It’s a good idea to add a little extra length.
- Tie a “Stopper” Bead. Take one bead and tie it to the very end of the string. Tie a double knot. This bead will stop all the other beads from sliding off while you work.
- Start Stringing! Now, just start sliding the rest of your beads onto the string, one after another. You can use beads that are all the same size and color, or you can make a pattern with different ones.
- Finish it Off. Once your garland is the length you want, tie another bead at the other end to lock all the beads in place. Now it’s ready to hang on your tree!
14. Light It Up Smartly: Manage Your Power
Item Name: Smart Power Management

Managing the cords for your Christmas tree lights can be a hassle. A simple power strip and an extension cord can make things much easier and safer. This setup allows you to plug in all your light strings in one convenient place at the base of the tree.
For ultimate convenience, plug the power strip into a foot-pedal switch or a smart plug. A foot switch lets you turn the tree on and off with a simple tap of your foot. A smart plug lets you control the lights from your phone or set a schedule. This small trick saves you from crawling behind the tree every day.
DIY Instructions: How to Set Up Easy Tree Lights!
Let’s make turning your tree on and off super simple.
- Get Your Gear. You will need a green extension cord (so it hides in the tree) and a power strip that has multiple outlets. For an extra cool trick, get a foot-pedal switch from a hardware store.
- Plan Your Plugs. As you put lights on your tree, leave the plugs for each string hanging near the bottom center of the tree.
- Connect the Power Strip. Hide the power strip on the floor behind the tree. Plug all of your light strings into the power strip.
- Add the Foot Switch. Now, plug the power strip’s cord into the foot-pedal switch. Then, plug the foot-pedal’s cord into your main extension cord.
- Plug it in the Wall. Finally, plug the extension cord into the wall outlet. Place the foot pedal on the floor in a spot that’s easy to reach with your foot. Now you can turn all your tree lights on and off with one tap!
15. Add Character: Use Uniquely Shaped Ornaments
Item Name: Heirloom-Style Ornaments

While round ball ornaments are essential for creating a full base, adding ornaments of different shapes and sizes is what gives a tree its true personality. Look for unique, heirloom-style pieces like teardrops, finials, and faceted designs.
These special ornaments create visual interest and break up the monotony of simple spheres. They serve as the “jewelry” of the tree. Distribute these feature ornaments around the tree after you have placed your basic balls, hanging them in more prominent positions where they can be easily seen and admired.
DIY Instructions: How to Place Your Special Ornaments!
Let’s make sure your favorite ornaments get the attention they deserve.
- Hang Your Basic Balls First. Before you hang your special ornaments, make sure all your regular round ball ornaments are already on the tree. This creates the background.
- Pick a Special Ornament. Choose one of your favorite, uniquely shaped ornaments.
- Find a Good Spot. Look for a spot on the tree that has a little bit of open space around it. You want to hang these on the tips of sturdy branches so they don’t get hidden.
- Hang It at the Front. Unlike filler ornaments that you might push deeper into the tree, you want to hang these special ones near the front of the branches where everyone can see them clearly.
- Spread Them Out. Continue hanging your other special ornaments, making sure to spread them out evenly all over the tree. Don’t put them all in one spot.
16. Make a Bold Statement: Use Feature Lights
Item Name: Statement Starburst Lights

Take your tree’s glow to the next level by incorporating a string of statement lights. These are larger, more decorative lights, like these starbursts, that act as both a light source and an ornament. They create bright, eye-catching focal points all over the tree.
You don’t need many of these to make a big impact. After your base layer of twinkle lights is in place, add a string or two of these feature lights. Place them near the outer edges of the branches. They add a magical, explosive burst of light that brings a wonderful sense of energy and excitement to your tree.
DIY Instructions: How to Add Your Big, Cool Lights!
These lights are like special ornaments that also light up.
- Your Regular Lights Go First. Make sure your tree is already wrapped with your normal, small string lights. This is your base sparkle.
- Get Your Statement Lights. Unbox your string of big, starburst-style lights. Gently fluff out the “bursts” if they are bendable so they look like little fireworks.
- Drape, Don’t Wrap. You don’t need to wrap these lights deep in the tree. Instead, you’ll drape them over the outside of the branches.
- Find Good Homes for Them. Place each individual starburst light in a visible spot on the tree, just like you would with a special ornament. Spread them out evenly.
- Hide the Wire. As you drape the string, try to tuck the wire back into the tree between the big lights so it’s not as noticeable.
- Light It Up! Turn on both sets of lights and see how the big starbursts create amazing focal points all over your tree.
17. Create a Winter Wonderland: Add a Dusting of Snow
Item Name: Winter Wonderland Flocking

To give your green tree the magical look of a snowy winter forest, consider adding a light dusting of fake snow or flocking. This simple touch can completely transform the appearance of your tree, making it look like it was just brought in from a gentle snowfall.
You can buy spray-on snow or a powder that you sprinkle over the branches. The flocking sticks to the needles and gives the tree a soft, frosted texture. It beautifully highlights the shape of the branches and makes colorful ornaments pop against the white background, creating a charming and cozy winter scene.
DIY Instructions: How to Add Fake Snow to Your Tree!
Let’s make your tree look frosty and snowy.
- Protect Your Floor. Before you start, lay some old newspapers or a plastic sheet on the floor all around the base of your tree. This can get a little messy.
- Get Your Snow. You can use a can of spray-on snow or a box of sprinkle-on flocking powder. If you use the powder, you’ll also need a spray bottle filled with water.
- For Spray Snow: Shake the can well. Stand about a foot away from the tree and spray the tips of the branches. Use short, quick sprays. Don’t spray too much in one spot. You just want a light dusting.
- For Powdered Snow: Use one hand to gently mist a branch with water from your spray bottle. With your other hand, take a pinch of the snow powder and sprinkle it over the wet branch. The water helps it stick.
- Work from Top to Bottom. Start at the top of the tree and work your way down. Let the “snow” fall naturally onto the branches below. Let it dry completely before you add any more decorations.
18. Make It Personal: Decorate with Memories
Item Name: Personalized Photo Memories

A Christmas tree can be more than just a decoration; it can tell the story of your family. Creating ornaments with personal photos is a wonderful way to fill your tree with love and cherished memories. Each picture represents a special moment or a beloved person.
You can print small photos to place inside clear glass ornaments or mount them on rustic wood slices. As you hang them each year, you’ll be reminded of happy times. These ornaments become treasured keepsakes that make your tree uniquely yours and a true reflection of your family’s journey.
DIY Instructions: How to Make Your Own Photo Ornaments!
Let’s put your favorite pictures on the tree.
For Clear Ball Ornaments:
- Print a small photo. Roll it up gently with the picture facing out.
- Carefully take the metal cap off a clear glass or plastic ball ornament.
- Slide the rolled-up photo through the opening. Once inside, it will unroll. Use a toothpick or tweezers to help position it.
- Put the cap back on, and it’s ready to hang!
For Wood Slice Ornaments:
- Get some small, flat wood slices and your favorite photos.
- Trace the shape of the wood slice over the part of the photo you want to use, then cut the photo out.
- Use a paintbrush to apply a thin layer of Mod Podge or school glue to the wood slice.
- Carefully place your cut-out photo onto the glue. Smooth out any bubbles. Let it dry completely.
- Screw a small eye-hook into the top and tie a ribbon through it for hanging.
19. Elevate the Details: Use Custom Ornament Hangers
Item Name: Custom Ornament Hangers

The way you hang your ornaments can be a decoration in itself. Instead of using the simple metal hooks that come in the box, try using different materials for your hangers. Pieces of velvet ribbon, rustic twine, or shiny silver cord can add an extra layer of texture and color to your tree.
This small detail shows a high level of thought and care in your decorating. You can match the hanger style to the ornament or to your overall theme. For example, twine works well for rustic ornaments, while satin ribbon adds a touch of elegance. It’s a simple swap that makes your ornaments look more integrated and custom-styled.
DIY Instructions: How to Make a Ribbon Hanger!
Let’s swap out those plain metal hooks for something prettier.
- Choose Your Material. Pick out some thin ribbon, pretty string, or rustic twine that you like.
- Cut a Piece. Cut a piece of your ribbon or string that is about 6 to 8 inches long.
- Find the Ornament Loop. Take one of your ornaments and find the little metal loop at the top where you would normally put a hook.
- Thread it Through. Push one end of your ribbon through that little loop.
- Tie a Knot. Bring the two ends of the ribbon together and tie a simple knot close to the ends. This will create a loop for hanging.
- Hang it Up! Now you can hang your ornament on a branch using your new, beautiful ribbon loop. Do this for all of your ornaments for a really cohesive look.
20. Step Back and Edit: Curate the Final Look
Item Name: The Cohesive Final Design

After all your lights, garlands, ribbons, and ornaments are on the tree, the final step is to step back and look at the big picture. A beautifully decorated tree is all about balance. The different elements should work together to create a single, harmonious design.
Take a walk around your tree and view it from different angles, and even from another room. Look for any empty spots that might need one more ornament, or cluttered areas where you might need to remove one. Adjust a ribbon, straighten an ornament, and ensure everything looks balanced. This final curation is what brings all your hard work together into a stunning holiday centerpiece.
DIY Instructions: The Final Tree Check-Up!
Let’s do one last check to make sure your tree looks its absolute best.
- Walk Away. No, really! Go to the other side of the room, or even stand in the doorway of another room, and look at your tree. Seeing it from far away helps you see the whole shape.
- Squint Your Eyes. This is a funny trick artists use. Squint your eyes a little bit when you look at the tree. This blurs the details and helps you see if the lights and colors look balanced. Are there any spots that are too bright or too dark?
- Check for Holes. Look for any obvious empty gaps. If you see one, find a spare ornament or a decorative pick and use it to fill the space.
- Fix Crooked Ornaments. Walk up close to the tree and check if any ornaments are hanging crooked or backward. Gently turn them so they are facing forward.
- Enjoy Your Work! That’s it! Your tree is done. You’ve followed all the steps and created something beautiful for the holidays.
21. Don’t Neglect the Core: Decorate the Trunk
Item Name: Inner Trunk Wrapping

On many artificial trees, the metal center pole can be visible through the branches, taking away from the natural look. A clever trick is to decorate the trunk itself. This adds an unexpected layer of detail and helps to hide the artificial core.
You can wrap the pole with a thin, sparkly garland or even its own string of lights before you start fluffing the branches. This makes the tree look full from the inside out and provides a beautiful, subtle glow from the very center of your tree. It is a small step that makes a big visual difference.
DIY Instructions: How to Decorate Your Tree’s Pole!
This is a super simple trick for artificial trees.
- Do This First! It is very important to do this step before you start fluffing and shaping your tree branches. It’s easiest when the branches are still folded up.
- Get Your Garland. Choose a thin, simple garland. A skinny tinsel garland works great.
- Start at the Bottom. Take the end of your garland and wrap it around the base of the center pole to secure it.
- Wrap Your Way Up. Begin wrapping the garland around the pole, moving upwards in a spiral pattern, like a candy cane stripe. Keep the wraps close together to cover the pole.
- Secure the Top. When you get to the top of the tree section, tuck the end of the garland into itself or wrap it securely around the pole to finish. Now you can fluff your branches, and the pole will be beautifully hidden!
22. Create a Unique Crown: Combine Your Toppers
Item Name: Layered Angel & Star Topper

Can’t decide between a traditional star and a classic angel for your tree topper? You can create a unique and personalized look by using both. Layering two different toppers adds height, substance, and a custom feel to the peak of your tree.
This method allows you to combine different styles for a look that is all your own. You can place a star slightly in front of or above an angel, or find a topper that already incorporates multiple classic designs. It makes the very top of your tree a special point of interest and a true reflection of your style.
DIY Instructions: How to Layer Two Tree Toppers!
Let’s create a one-of-a-kind look for the top of your tree.
- Choose Your Toppers. Pick two toppers that look nice together. A good combination is a flatter one (like a star) and one with more shape (like an angel).
- Strengthen the Top Branch. As we’ve mentioned before, make sure the top branch of your tree is strong. You can secure a wooden dowel to it with floral tape to give it extra support.
- Place the Back Topper. First, put on the topper that you want to be in the back. For example, the angel. Slide it onto the strengthened top branch so it sits securely.
- Add the Front Topper. Now, take your second topper, like a star. Using green floral wire, attach it to the branch in front of the first topper.
- Secure and Adjust. Wrap the wire securely so the front topper is stable. Adjust them both until they look like one beautiful, combined piece.
23. Go Natural: Bring the Outdoors In
Item Name: Woodland & Botanical Accents

For a rustic and organic theme, step away from glitter and shine and look to nature for your decorations. Elements like pinecones, dried flowers, pheasant feathers, and sprigs of baby’s breath can create a stunning and unique woodland-inspired tree.
These natural textures add a soft, earthy beauty that is both calming and sophisticated. You can simply tuck these items directly into the branches, letting them rest among the needles. This approach celebrates the beauty of the outdoors and gives your tree a cozy, cabin-like feel.
DIY Instructions: How to Add Natural Decorations!
Let’s decorate your tree with things you can find outside.
- Gather Your Treasures. You can use pinecones from your yard, dried flowers from a craft store, or even pretty feathers.
- Prepare Your Pinecones. If you use pinecones from outside, it’s a good idea to clean them. You can bake them in the oven on low heat (about 200°F) for 30 minutes to get rid of any little critters.
- No Hooks Needed! The great thing about these decorations is that you don’t need hooks. Find a nice, sturdy spot on a tree branch.
- Tuck Them In. Gently wedge the pinecone or the stem of a dried flower directly into the tree’s branches. The needles of the tree will hold it in place.
- Spread Them Out. Place your natural items all around the tree to give it a beautiful, woodsy look from every angle.
24. A Touch of Nostalgia: String a Classic Garland
Item Name: Handcrafted Popcorn Garland

Sometimes the most charming decorations are the ones you make yourself. A classic popcorn and cranberry garland is a fun, nostalgic craft that adds a touch of handmade warmth to any tree. It is a timeless tradition that brings a rustic and colorful element to your decor.
The bright red of the cranberries and the bumpy white texture of the popcorn create a beautiful contrast against the green branches. This simple, homespun decoration feels cozy and personal. It’s a wonderful activity to do with family and a great way to create lasting holiday memories.
DIY Instructions: How to Make a Popcorn Garland!
This is a really fun project, and you can eat the leftover popcorn!
- Get Your Supplies. You’ll need a bag of plain popcorn (make sure it’s fully popped and cooled), a bag of fresh cranberries, a needle, and some strong thread or fishing line.
- Thread Your Needle. Cut a long piece of thread and pull it through the eye of the needle. Tie a big knot at the other end of the thread so your popcorn doesn’t slide off.
- Start Stringing. Carefully push the needle through the center of a piece of popcorn and slide it down the thread to the knot.
- Add a Cranberry. Next, push the needle through the center of a cranberry and slide it down next to the popcorn.
- Create a Pattern. Continue adding popcorn and cranberries, creating a pattern. You could do three pieces of popcorn, then one cranberry, or any pattern you like!
- Finish and Hang. Once your garland is long enough, take the needle off and tie another big knot. Now you can gently drape your beautiful handmade garland on your tree.
25. Engage the Senses: Focus on Texture
Item Name: Mixed-Texture Ornament Assortment

A tree becomes much more interesting when it features a variety of textures. Don’t just focus on color and shape; think about how the ornaments feel. Mix in soft, fuzzy ornaments with smooth wooden ones, and contrast them with shiny glass and patterned fabric balls.
This mix of textures creates depth and a rich sensory experience. The soft ornaments absorb light, creating cozy spots, while the wooden pieces add a rustic, natural element. This thoughtful layering makes the tree more dynamic and inviting, encouraging people to look closer at the unique details.
DIY Instructions: How to Make a Fluffy Snowball Ornament!
Let’s make some soft, snowy-looking ornaments.
- You Will Need: A smooth styrofoam ball (any size), some white school glue, a small paintbrush, and a bag of fluffy white yarn or cotton balls that you can pull apart.
- Paint with Glue. Use your paintbrush to cover a section of the styrofoam ball with a thin layer of glue.
- Add the Fluff. Take a small piece of your fluffy yarn or cotton and press it onto the glue-covered section.
- Cover the Whole Ball. Continue painting a section with glue and adding the fluff until the entire styrofoam ball is covered and looks like a soft snowball.
- Let it Dry. Set it aside to dry completely.
- Add a Hanger. Once it’s dry, you can make a hanger by forming a loop with a ribbon and pinning it to the top with a small pin.
26. Create Harmony: Stick to a Cohesive Theme
Item Name: Unified Metallic Color Palette

For a look that is incredibly elegant and put-together, choose a strict color palette and stick to it. Decorating with only one or two complementary colors, like the golds, silvers, and champagnes seen here, creates a sophisticated and harmonious design.
This approach requires discipline, but the result is stunning. By using ornaments of different shapes, sizes, and textures all within the same color family, you create a tree that is rich with detail yet feels calm and unified. The look is timeless and makes a very chic statement.
DIY Instructions: How to Decorate with a Color Theme!
Let’s create a tree that looks like it was decorated by a professional.
- Pick Your Colors. Choose just one, two, or three colors that look good together. For example: gold and white, or different shades of blue.
- Gather Your Ornaments. Go through all your ornaments and pull out only the ones that match your chosen colors. Put all the other ones away for another year.
- Look for Different Textures. To make your theme interesting, make sure you have ornaments in your colors with different finishes. For example, if your color is gold, use shiny gold, glittery gold, and matte gold ornaments.
- Decorate in Layers. Hang your largest ornaments first, spreading them out evenly. Then fill in the spaces with your medium and small ornaments.
- Add Matching Ribbon. Finish the look with a ribbon or garland that also matches your color theme. This will tie everything together beautifully.
27. Add Life and Dimension: Use Clip-On Ornaments
Item Name: Woodland Creature Clip-Ons

Ornaments don’t always have to hang down from a branch. Clip-on decorations, like these charming birds and butterflies, add a wonderful sense of life and dimension to your tree. They appear to be perched right on the branches, creating a more natural and whimsical scene.
These types of ornaments are great for filling in awkward spots and adding interest to the outer edges of your tree. Because they sit on top of the needles, they stand out more than hanging ornaments. They are a fantastic way to introduce a woodland or garden theme to your holiday decor.
DIY Instructions: How to Use Clip-On Ornaments!
These are one of the easiest decorations to add to your tree.
- Find Your Clip-Ons. Gather all of your ornaments that have a small clip on the bottom instead of a hook.
- Open the Clip. Squeeze the clip to open it, just like a clothespin or a hair clip.
- Find a Branch Tip. Look for the end of a branch that has a little bit of space. You want your clip-on ornament to have room to be seen.
- Clip it On! Attach the clip directly onto the branch. You can position it so the bird or butterfly looks like it just landed there.
- Spread Them Out. Place your clip-on ornaments all over the tree. Try putting some higher up and some on lower branches to create a sense of movement.
28. A Frosty Finish: Create an Icy Look
Item Name: Shimmering Icicle Ornaments

Capture the magic of a frosty winter morning by decorating your tree with shimmering tinsel and glass icicles. This combination creates a beautiful, icy effect that sparkles and shines as it catches the light. It is a classic look that evokes the feeling of a winter wonderland.
The long, thin icicles mimic the natural formations of ice, adding an elegant vertical element to the tree. When paired with fluffy tinsel garland, the textures combine to create a scene that is both frosty and festive. The light reflecting off these surfaces gives the whole tree a magical shimmer.
DIY Instructions: How to Hang Icicles for a Natural Look!
Let’s make your tree look like it’s covered in frosty icicles.
- Drape Your Tinsel First. If you’re using tinsel garland, drape it in gentle swoops around the tree before you hang the icicles.
- Grab an Icicle Ornament. Take one of your long, thin icicle ornaments.
- Hang Them on the Edge. Instead of hanging them deep inside the tree, hang your icicles on the very tips of the branches.
- Let Them Dangle. This is where they would naturally form, so it will look more realistic. Let them hang freely so they can spin and catch the light.
- Hang in Groups. For an even more natural look, hang two or three icicles of slightly different lengths close to each other on the same branch, just like real ice would form.
29. Frame Your Ornaments: Use Ribbon “Shelves”
Item Name: Horizontal Ribbon Wrapping

Here is a unique way to use ribbon that creates a very structured and organized look. By wrapping a wide ribbon horizontally around the tree, you can create distinct bands that act like “shelves” or frames for your ornaments.
This technique neatly contains your ornaments in sections and adds a strong graphic element to your tree’s design. It works especially well for showcasing a collection of special ornaments, as the ribbon provides a clean backdrop for each one. The result is a tree that looks tidy, cohesive, and full.
DIY Instructions: How to Make Ribbon Bands!
This technique looks impressive, but it’s quite simple to do.
- Choose Wide Ribbon. This works best with a wide ribbon, about 2-3 inches. Wired ribbon is even better because it holds its shape.
- Start at the Top. Tuck the end of your ribbon deep into the branches near the top of the tree to anchor it.
- Wrap Horizontally. Begin wrapping the ribbon around the outside of the tree in a horizontal line. Don’t pull it too tight; let it rest gently on the tips of the branches.
- Create a Spiral. Continue wrapping the ribbon in a downward spiral, keeping the space between each band even. Aim for about 8-12 inches between each layer of ribbon.
- Secure the End. When you reach the bottom, cut the ribbon and tuck the end deep into the back of the tree to hide it. Now you have beautiful bands ready to be filled with ornaments!
30. A Cascade of Color: The Ombre Effect
Item Name: Ombre Color Gradient

For a truly dramatic and artistic statement, decorate your tree in an ombre pattern. This involves arranging your ornaments in a gradual color progression from one shade to another. You can go from light to dark, or even transition between two different colors.
This technique turns your Christmas tree into a stunning piece of art. The smooth gradient of color is visually striking and very modern. It requires careful planning and sorting of your ornaments, but the breathtaking result is a unique and memorable tree that will be the talk of the holiday season.
DIY Instructions: How to Create an Ombre Tree!
Let’s make a beautiful color-fade effect on your tree.
- Choose Your Colors. Decide what colors you want to use for your gradient. For example, you could go from dark blue at the bottom to light blue, and then to white at the top.
- Sort All Your Ornaments. This is the most important step! Lay out all your ornaments on the floor and sort them into piles by color and shade. Make a pile for dark blue, medium blue, light blue, and white.
- Start at the Bottom. Take all the ornaments from your darkest color pile (dark blue). Hang these ornaments only on the bottom section of your tree.
- Move to the Next Shade. Now, take the ornaments from your next color pile (medium blue). Hang these in the section right above the dark blue.
- Continue Up the Tree. Keep adding your bands of color, going from darkest to lightest as you move up the tree, until you hang your lightest color (white) at the very top.
31. Extend the Theme: Coordinate Your Gifts
Item Name: Coordinated Gift Wrapping

The beauty of your Christmas tree doesn’t have to stop at the branches. To create a truly cohesive and polished look, extend your decorating theme to the presents underneath. Wrapping your gifts in paper and ribbons that match the colors of your tree ties the whole scene together.
This thoughtful detail makes the entire area look like a single, well-designed display. If your tree is decorated in blues and golds, use blue and gold paper for your gifts. This simple step elevates the overall presentation, turning the pile of presents into a beautiful and intentional part of your holiday decor.
DIY Instructions: How to Match Your Presents to Your Tree!
Let’s make the area under your tree look extra special.
- Look at Your Tree’s Colors. What are the main one or two colors on your Christmas tree? Let’s say it’s blue and silver.
- Choose Your Wrapping Paper. When you go to the store, look for wrapping paper that is mainly blue or silver. You can even get one roll of each, and maybe a patterned one that has both colors.
- Pick Matching Ribbons. Find ribbons and bows that also match these colors.
- Wrap Your Gifts. As you wrap your presents, mix and match the papers and ribbons. You could wrap a gift in blue paper and tie it with a silver ribbon.
- Arrange Them Nicely. When you place the gifts under the tree, spread the different patterns and colors out. The whole area will look like it was planned by a designer!
32. A Study in Elegance: Try a Monochromatic Theme
Item Name: Single-Color Ornament Scheme

For a look that is incredibly chic and sophisticated, try decorating your tree using only one color. A monochromatic theme, like this all-white-and-silver tree, creates a powerful and unified statement. It’s a simple concept that delivers a high-end result.
The key to making this work is to use a wide variety of shapes, sizes, and textures all within that single color. Mix shiny silver balls with matte white snowflakes and glittery icicles. This variation keeps the tree from looking flat and adds a ton of visual interest, proving that you don’t need a rainbow of colors to create a stunning tree.
DIY Instructions: How to Decorate with Just One Color!
This is a really cool way to make your tree look super stylish.
- Choose Your Hero Color. Pick one main color you want to use. White, silver, gold, red, or blue are great choices.
- Gather Every Ornament in That Color. Go through your whole collection and pull out every single ornament that is your chosen color.
- Find Different Textures. To make it look interesting, you need variety. Make sure you have ornaments that are shiny, glittery, matte (not shiny), and maybe even some with patterns, all in your one color.
- Vary the Shapes and Sizes. It’s also important to use big ornaments, small ornaments, round ones, and long ones.
- Decorate Your Tree. Hang all of your single-color ornaments on the tree, spreading out the different shapes and textures so it looks balanced and beautiful.
33. Location, Location, Location: Plan Your Placement
Item Name: Strategic Tree Placement

Before you even begin decorating, think carefully about where your tree will stand. The best spot is often near a window where it can be enjoyed from both inside and outside, but it is crucial to make sure it is also near a power outlet.
Placing your tree close to an outlet prevents you from having to run long, unsightly extension cords across the floor, which can be a tripping hazard. A well-placed tree looks like it belongs in the space and makes the logistics of lighting it up simple and safe. This little bit of planning saves a lot of hassle later.
DIY Instructions: How to Pick the Best Spot for Your Tree!
Let’s find the smartest place in your room for your tree.
- Become a Detective. Before you set up your tree stand, walk around your living room and look for all the empty wall outlets.
- Find a Corner or a Nice Wall. The best spots for a tree are usually in a corner or against a flat wall where it won’t block a doorway or a path where people walk.
- Choose a Spot Near an Outlet. From the corners you found, pick the one that has a power outlet very close by. This is your winner!
- Measure Your Space. Make sure the spot is wide enough for your tree. You don’t want the branches to be all squished against the wall or the sofa.
- Set Up Your Tree. Now you can build your tree in that spot, knowing it will be easy and safe to plug in the lights.
34. A Quick Frosting: Use Spray-On Snow
Item Name: Aerosol Snow Flocking

If you love the look of a snow-covered tree but don’t want the mess of powdered flocking, a can of snow spray is a fantastic alternative. It provides a quick and easy way to give the tips of your branches a beautiful, frosted appearance.
The spray allows for more controlled application, so you can decide just how much “snow” you want. You can give the tree a light, delicate dusting or a heavier, more blizzard-like coating. It instantly adds texture and a wintery feel, making your green tree look like it’s been kissed by a frost.
DIY Instructions: How to Use Snow Spray!
This is a fast and fun way to make your tree look snowy.
- Protect Your Area. Lay down old newspapers or a plastic sheet on the floor around your tree. It’s also a good idea to open a window for some fresh air.
- Shake the Can! Shake the can of snow spray really, really well. You should hear the little ball rattling inside. Shake it for at least a minute.
- Do a Test Spray. Before you spray the tree, do a quick test spray onto a piece of newspaper to make sure it’s coming out in a nice, fine mist.
- Spray the Branch Tips. Hold the can about 12-18 inches away from a branch. Press the button and spray in short, sweeping motions. Aim for the top surfaces of the branches, where snow would naturally fall.
- Less is More. Start with a light coat. You can always add more if you want a heavier snow look. Let it dry completely before hanging any ornaments.
35. Double the Texture: Layer Your Garlands
Item Name: Layered Ribbon and Bead Garland

Why settle for just one type of garland when you can layer two for a richer, more textured look? Combining different styles of garland, like a wide, glittery ribbon and a simple wooden bead string, adds incredible depth and visual interest to your tree.
Drape the two garlands at the same time, letting one rest just above or below the other. The contrast between the soft, wide ribbon and the hard, round beads creates a beautiful dynamic. This simple technique makes your tree look more professionally styled and thoughtfully layered.
DIY Instructions: How to Hang Two Garlands at Once!
Let’s create a cool layered look with your garlands.
- Choose Your Pair. Pick two different types of garland that look nice together. A wide ribbon with a skinny bead garland is a great combo.
- Hold Them Together. Take the end of your ribbon and the end of your bead garland and hold them together in one hand.
- Start at the Top. Go to the top of your tree and securely tuck both ends deep into the branches together.
- Drape Them Together. As you walk around the tree, let both garlands swoop down in gentle curves. Try to keep them close to each other, with the bead garland hanging just below the ribbon.
- Adjust as You Go. You may need to adjust them a bit to make sure they are both visible and not twisted.
- Tuck the Ends. When you get to the bottom, tuck both ends into a low branch to hide them.
36. Add a Touch of Glamour: Paint the Tips
Item Name: Gilded Branch Tips

For a truly custom and glamorous look, consider painting the tips of your artificial tree’s branches. Applying a bit of metallic gold, silver, or even white paint to the ends of the needles can completely transform your tree. It adds a subtle shimmer and a touch of unexpected color.
This technique gives your tree a high-end, designer feel. It looks beautiful on its own or as a shimmering backdrop for your ornaments. It’s a bit of extra effort, but the result is a unique tree that looks like a work of art.
DIY Instructions: How to Paint Your Tree Branches!
This is a really cool project for an artificial tree.
- Do This Before Decorating. This must be done on a completely bare tree, before any lights or ornaments are added. Protect your floor with newspaper.
- Get Your Paint. You will need some non-toxic acrylic craft paint in a metallic color like gold, and a small, flat paintbrush.
- Put Paint on a Plate. Squeeze a little bit of paint onto a paper plate.
- Dip Your Brush. Dip just the very tip of your paintbrush into the paint. You don’t need a lot!
- “Dry Brush” the Needles. Take your brush and lightly flick it over the tips of the branches. You aren’t trying to coat them completely, just lightly graze the ends so they pick up a bit of the metallic color.
- Work Around the Tree. Continue this on all the branch tips. Let the paint dry completely before you start decorating.
37. Top It with a Bow: A Classic Finial
Item Name: Grand Ribbon Bow Topper

A large, beautifully tied bow can make a stunning and elegant tree topper. It is a classic alternative to a star or an angel and adds a wonderful touch of soft texture to the top of the tree. Using a wide, wired ribbon allows you to create big, full loops that won’t droop.
You can make the bow the main event or have long ribbon tails that cascade gracefully down the sides of the tree. This type of topper works well with a variety of themes, from rustic farmhouse to glamorous and formal. It provides a soft yet grand finish to your holiday centerpiece.
DIY Instructions: How to Make a Big Tree Topper Bow!
Let’s make a beautiful bow for the very top of your tree.
- Get a Long Piece of Ribbon. You’ll need a long piece of wide, wired ribbon. About 5-6 feet should be enough.
- Make Your First Loop. About a foot from one end of the ribbon, make a loop. Pinch the bottom of the loop tightly with your thumb and forefinger.
- Twist and Make Another Loop. Twist the ribbon where you are pinching it, and then make another loop of the same size on the other side. Keep pinching the center.
- Keep Making Loops. Keep twisting the ribbon in the center and making loops on alternating sides until you have three or four loops on each side.
- Secure the Center. While still pinching the middle tightly, take a piece of floral wire and wrap it around the center several times. Twist it tightly to secure all the loops.
- Attach to the Tree. Use the ends of the wire to attach your beautiful bow to the top branch of your tree. Now you can fluff out the loops and arrange the ribbon tails.
38. Beyond the Ball: Vary Your Ornament Shapes
Item Name: Assorted Finial & Shaped Ornaments

While round ornaments are the foundation of tree decorating, the real personality comes from using a variety of shapes. Incorporating long finials, teardrops, little trees, and other unique forms adds so much visual interest and sophistication.
Different shapes catch the light in different ways and help to break up the visual pattern of the tree. Hang your larger, more unusually shaped ornaments in prominent positions after your basic round balls are in place. This layering of shapes is what gives a tree depth and a curated, designer quality.
DIY Instructions: How to Arrange Different Shaped Ornaments!
Let’s make your tree look interesting by mixing up the ornament shapes.
- Hang Round Ornaments First. Put all of your standard, round ball ornaments on the tree. Push them a little deeper into the branches. They are your background.
- Pick a Special Shape. Now, choose an ornament that has a different shape, like a long, pointy one (a finial) or one shaped like a Christmas tree.
- Give It a Prime Spot. Hang this special ornament on the outer part of a branch where it has plenty of space to hang straight and be seen.
- Spread Them Out. Don’t hang all of your long ornaments in one spot and all your other special shapes in another. Mix them up! Hang a finial, then a few branches over, hang a little tree ornament.
- Check for Balance. Step back and look to make sure your special shapes are distributed evenly all over the tree.
39. A Unifying Element: Use Ribbon as a Neutral
Item Name: Neutral Metallic Ribbon

Ribbon can be a fantastic tool for unifying a tree with multiple accent colors. A wide, metallic ribbon in a neutral shade like gold, silver, or champagne can act as a consistent base that flows through the entire design, tying everything together.
Weave the ribbon loosely throughout the tree first, and then place your colorful ornaments in the spaces between. The neutral ribbon will provide a beautiful, shimmering backdrop that connects the pops of green and blue, making the overall design feel cohesive and intentional rather than random.
DIY Instructions: How to Use Ribbon to Tie Colors Together!
Let’s use ribbon to make all your different colored ornaments look like they belong together.
- Choose a Neutral Ribbon. Pick a ribbon in a simple, metallic color like gold or silver. This will be your “glue.”
- Weave the Ribbon First. Before you hang any of your colorful ornaments, drape your gold ribbon through the tree. You can wrap it in a spiral or just swoop it from branch to branch.
- Now Add Your Ornaments. Take your ornaments in different colors (like the blue, green, and silver ones in the picture).
- Tuck Them In. Hang your ornaments in the open spaces on the branches, in and around the ribbon.
- See the Magic! Step back and notice how the gold ribbon flows through the whole tree and makes the different colors look like a planned and beautiful collection.
40. The Final Tweak: Troubleshoot and Fix
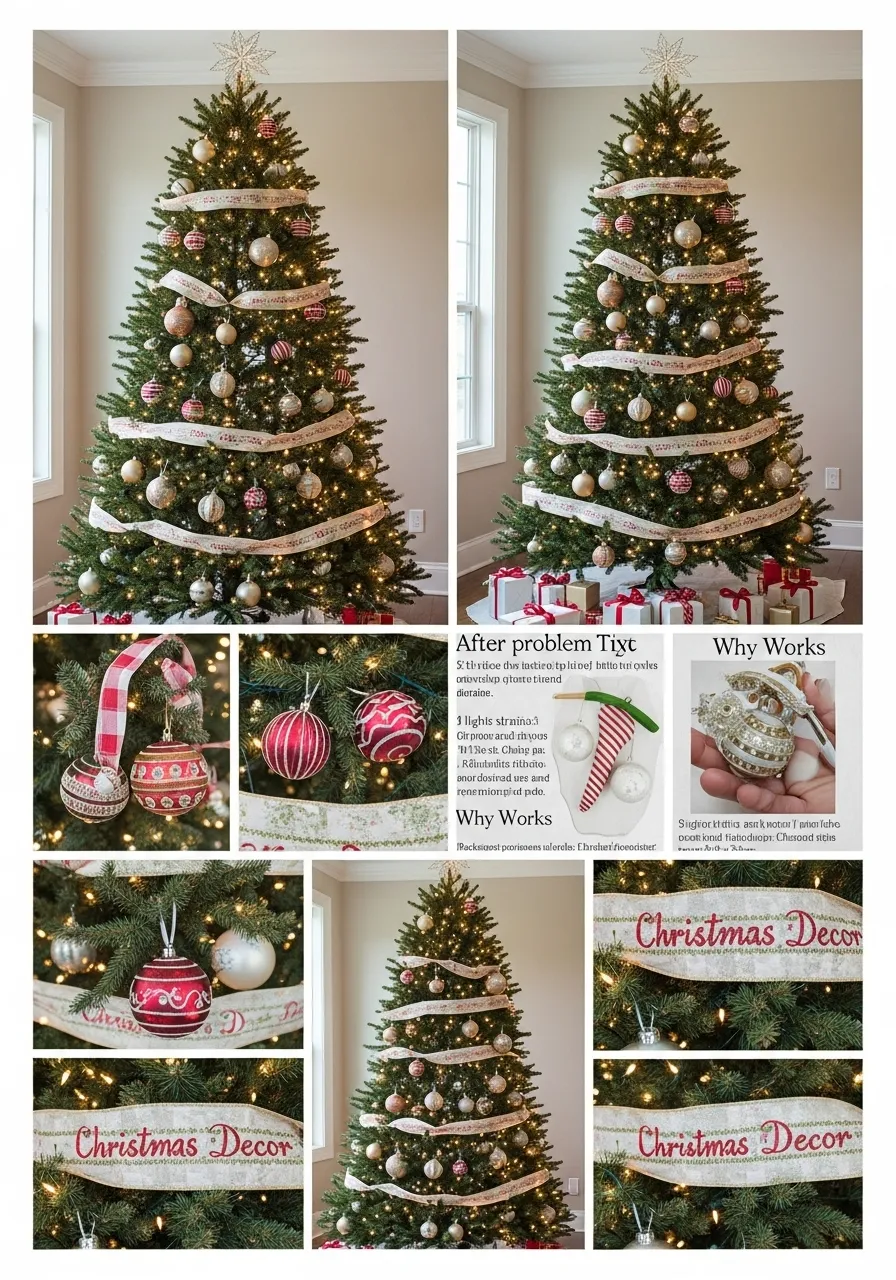
Item Name: Before & After Polish

Sometimes you finish decorating, step back, and something just feels “off.” Maybe the ribbon looks too tight, or the lights are uneven. Don’t be afraid to make small adjustments. This collage shows how small tweaks can make a huge difference.
The tree on the left has limp ribbon and the branches aren’t fully shaped. On the right, the branches are fluffed out, and the ribbon is draped in beautiful, full swoops. Taking a few extra minutes to fluff a bare spot, loosen a tight garland, or redistribute a cluster of ornaments is the final step to a truly stunning tree.
DIY Instructions: How to Fix Common Tree Problems!
Let’s look for little things we can fix to make your tree look even better.
- Problem: Skinny-Looking Tree. The Fix: Your branches aren’t fluffed enough! Go back and spend more time separating every little tip on every branch. It takes time but makes the biggest difference.
- Problem: Strangulated Ribbon. The Fix: You wrapped your ribbon too tightly! Unwrap it. This time, just let it rest gently on the tips of the branches, creating a soft, wavy curve instead of a tight line.
- Problem: Dark Holes. The Fix: You have a spot with no lights. If it’s a burned-out bulb, replace it. If it’s just a gap, you can carefully move a section of your light string to cover that area.
- Problem: Ornament Overload. The Fix: You have too many ornaments in one spot. It’s okay to take a few off! Move them to a spot that looks a little more empty to balance things out.
There you have it—a complete journey from a bare, boxed tree to a magnificent holiday masterpiece. Decorating a Christmas tree is more than just hanging ornaments; it’s an art of layering, texture, and personal expression. Each step builds upon the last, creating a rich and cohesive look.
By focusing on a strong foundation of fluffing and lighting, and then adding thoughtful layers of garlands, ribbons, and varied ornaments, you give your tree depth and personality. The small details, like adding a festive scent or using decorative picks to fill gaps, are what truly elevate the final result.
Ultimately, the most beautiful tree is one that brings you joy and reflects your family’s spirit. Don’t be afraid to try new things, make adjustments, and infuse your decorations with personal memories. Your stunning Christmas tree is now ready to be the warm, glowing heart of your home this holiday season.
Key Takeaways
Here are the most important points to remember for a beautiful Christmas tree:
- A Strong Foundation is Everything: Never skip the fluffing. A well-fluffed tree is the single most important step for a full, lush look. Weave your lights deep into the branches before adding anything else.
- Layering Creates Depth: Build your tree’s look in layers. Mix different types of lights, layer garlands with ribbons, and combine various ornament textures to create a rich, dynamic appearance.
- Fill the Gaps: Use decorative picks, clustered ornaments, and a well-fluffed base to eliminate any sparse areas. This ensures your tree looks full and luxurious from every angle.
- Details Matter: Elevate your tree with small, thoughtful touches. Add a holiday scent, use custom ribbon hangers, and coordinate your gift wrap with your tree’s theme for a polished, professional look.
- Personalize Your Design: Make the tree uniquely yours. Incorporate photo ornaments, stick to a color theme that you love, or add whimsical elements like clip-on birds.
- Don’t Forget the Top and Bottom: A beautiful topper and a well-dressed base with a tree skirt are essential for a finished look. They frame your tree and complete the picture.