Is your daily routine feeling dull? That basic, builder grade bathroom might be to blame. Most people spend significant time in this room, yet it often gets the least amount of decorating love. A tired bathroom can instantly lower the mood of your entire home.

The good news is that a major renovation is not required for a style refresh. You can easily inject vibrant color and unique personality using simple weekend projects. We gathered 35 fast, budget friendly ideas that use paint, hardware, and clever accessories.
Get ready to transform that drab space into a stunning retreat today.
1. Gradient Blue Towel Stacks

You can transform a plain bathroom without picking up a paintbrush. Using towels in varying shades creates an instant visual impact on your shelves. This approach works well because it adds texture and depth to otherwise empty spaces. Dark navy tones anchor the bottom stacks while lighter sky blues keep the top feeling airy.
Grouping these linens by color makes the space look intentional and organized. Guests will appreciate the spa like atmosphere you created with such little effort. Swapping out old, mismatched linens for a cohesive color palette is a quick fix for boring decor. The blue gradient offers a calming vibe that suits almost any white or neutral bathroom. It is functional decor at its best.
Materials Required
- 2 Bath sheets (Dark Navy)
- 2 Bath towels (Royal Blue)
- 2 Hand towels (Light Blue or Sky Blue)
- 2 Washcloths (Pale Blue or White)
Equipment Required
- Flat table or bed for folding
- Open bathroom shelving or a storage cabinet
DIY Step by Step Instructions
Step 1: Sort Your Shades
Gather all your towels and separate them by color intensity. Place them in groups ranging from the darkest shade to the lightest shade. This visualization helps you decide which order looks best for your specific shelf height.
Step 2: The Spa Fold Method
Lay a towel flat on your table. Fold one long side towards the middle. Fold the other long side over the first one, creating a long, narrow strip. Now, fold the strip in half so the short ends meet. Finally, fold it in half one more time. This creates a thick, fluffy edge that looks great facing outward.
Step 3: Create the Base
Start with the largest and darkest towels. Place these on the lowest shelf or at the bottom of your stack. The visual weight of the dark color creates a sturdy foundation for the display.
Step 4: Layer the Colors
Stack the medium blue towels directly on top of the dark ones if you have vertical space. Alternatively, place the medium shades on the shelf immediately above the dark ones. Ensure the folded edges are all facing the same direction for a clean look.
Step 5: Top with Light Tones
Finish the arrangement with your lightest hand towels and washcloths. Place these at the very top of the stack or on the highest shelf. This draws the eye upward and keeps the arrangement from feeling too heavy.
2. Geometric Gold Line Wall Art

Plain white walls often feel sterile and uninspired. Adding a geometric design introduces modern flair without the mess of wallpaper. This specific look uses sharp angles to create movement across the surface. The mix of black, grey, and gold lines adds a touch of luxury.
It makes the room feel custom designed rather than basic. You only need a steady hand and some patience to achieve this. Guests will assume you hired a professional artist. The gold accents catch the light beautifully. This project works well because it keeps the room bright while adding significant visual interest.
Materials Required
- Gold metallic paint pen (wide tip)
- Black paint pen or permanent marker
- Grey paint pen
- Clear topcoat (optional, for durability)
Equipment Required
- Long ruler or straight edge level
- Pencil
- Step ladder
- Eraser
DIY Step by Step Instructions
Step 1: Prep the Canvas
Clean your wall thoroughly with a damp cloth to remove dust. Wait for it to dry completely. A clean surface ensures the paint pens glide smoothly and adhere well.
Step 2: Draft Your Design
Use a pencil and your long ruler to lightly sketch your triangles and intersecting lines. Don’t worry about symmetry. Random intersections often look more artistic. Step back frequently to ensure the pattern is balanced across the wall.
Step 3: Trace the Lines
Select your first color, such as black. Place the ruler against your pencil line. Run the paint pen along the ruler’s edge to create a crisp, straight line. Allow this color to dry for 10 minutes before switching colors to avoid smudging.
Step 4: Add the Accents
Repeat the process with the grey and gold pens. Use the gold color sparingly to highlight specific intersections. Once the ink is fully dry, gently erase any visible pencil marks.
3. Two Tone Board and Batten

Dark wainscoting grounds a small room effectively. The high contrast between the deep green bottom and the white top makes the ceiling feel taller. This architectural detail adds significant value and character to your home. It looks expensive but uses very affordable materials.
The vertical wood strips add texture that flat paint simply cannot achieve. This style blends traditional charm with a modern color palette. It protects the lower walls from scuffs and splashes. You can transform a builder grade box into a refined space in just one weekend.
Materials Required
- 1×3 inch Pine boards or MDF strips
- Top cap molding (dado rail)
- Construction adhesive (Liquid Nails)
- Spackle or wood filler
- Caulk
- Dark Green Paint (e.g., Hunter Green)
- White Paint
Equipment Required
- Measuring tape
- Level
- Saw (Miter saw or hand saw)
- Hammer and finish nails (or brad nail gun)
- Paintbrush and roller
DIY Step by Step Instructions
Step 1: Plan the Spacing
Measure your wall length. Decide how far apart you want your vertical battens (usually 12 to 16 inches). Mark the positions on the wall with a pencil to ensure even spacing.
Step 2: Install the Horizontal Rails
Install the top horizontal board at your desired height (usually about 1/3 or 2/3 up the wall). Use a level to ensure it is perfectly straight. Secure it with construction adhesive and nails.
Step 3: Attach Vertical Battens
Measure the distance from the floorboard to the bottom of your top rail. Cut your vertical strips to this length. Apply glue to the back of a strip, place it on your wall mark, check with a level, and nail it into place. Repeat for all vertical strips.
Step 4: Fill and Finish
Fill all nail holes with wood filler. Apply caulk along the edges where the wood meets the wall for a seamless look. Once dry, sand the filler smooth. Paint the entire lower section, including the wood and the wall between it, in your dark green color.
4. The Teal “Fifth Wall” Statement

Most people ignore the ceiling when decorating. Painting it a bold teal changes the entire atmosphere of the bathroom. It draws the eye upward immediately. This trick works exceptionally well in small powder rooms where wall space is limited.
The color wraps the room in a cozy embrace. Keeping the walls neutral ensures the space does not feel closed in. It is a brave choice that pays off by making the room feel taller. A colorful ceiling is an unexpected surprise for anyone entering the room.
Materials Required
- Teal interior latex paint (Semi gloss finish recommended for moisture)
- Painter’s tape (wide width)
Equipment Required
- Extension pole for paint roller
- Paint roller with a smooth nap cover
- Angled sash brush
- Step ladder
- Drop cloths
DIY Step by Step Instructions
Step 1: Protect the Room
Cover your floor and vanity with drop cloths. Apply painter’s tape firmly along the very top edge of the walls where they meet the ceiling. Press the tape down firmly to prevent paint bleed.
Step 2: Cut In the Edges
Climb your ladder with the angled brush. Carefully paint a 3 inch strip of teal around the perimeter of the ceiling. This “cutting in” allows you to roll the rest without bumping into the walls.
Step 3: Roll the Color
Attach your roller to the extension pole. Dip it in the paint tray. Roll the paint onto the ceiling in “W” patterns to distribute it evenly. Work across the wet edge to avoid lap marks.
Step 4: Second Coat
Allow the first coat to dry for at least two hours. Apply a second coat for full coverage and rich color depth. Remove the painter’s tape slowly while the paint is still slightly tacky to get a crisp line.
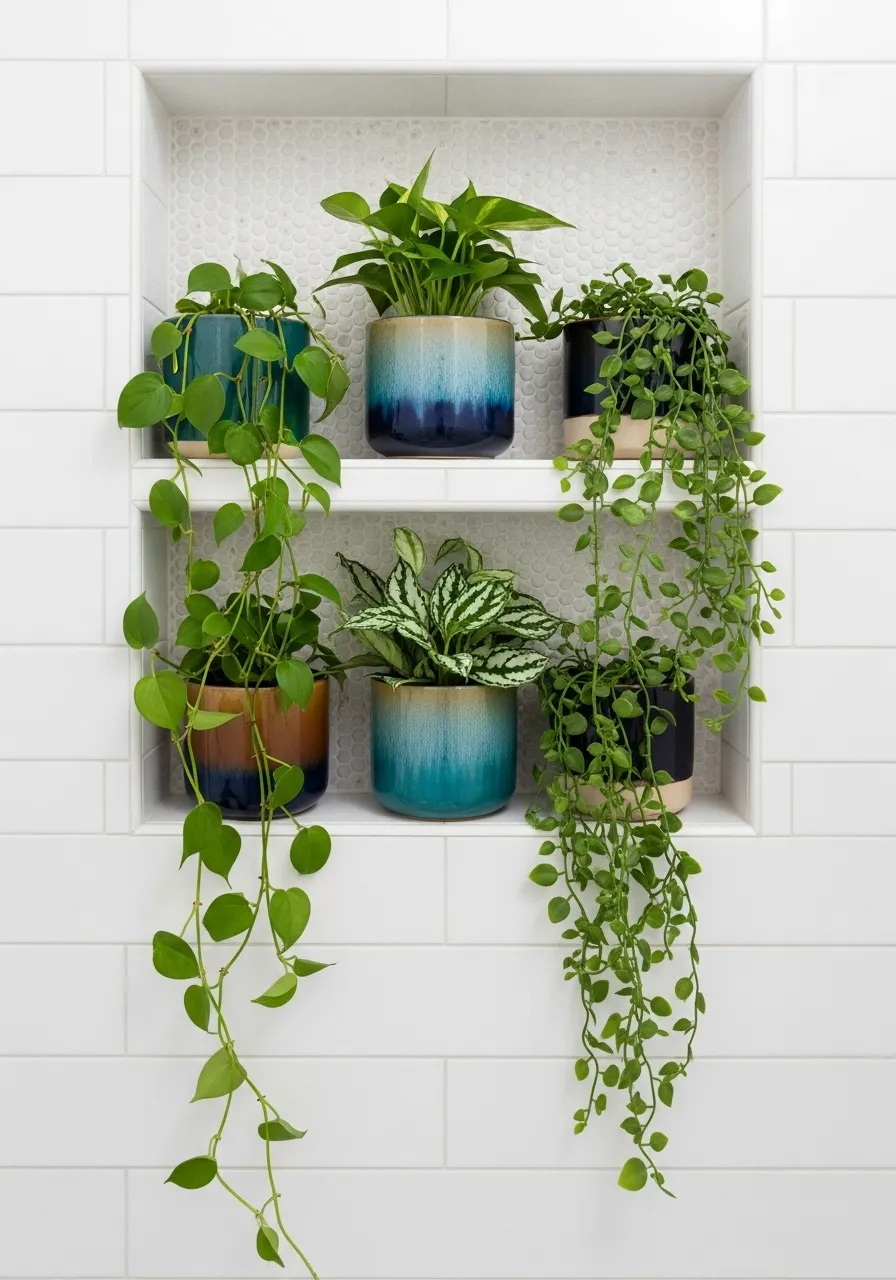
5. Shower Niche Greenery

Bathrooms naturally have high humidity. Many plants thrive in this exact environment. Placing greenery in a white tiled shower niche softens the hard lines of the ceramic. The trailing vines create a living waterfall effect.
It turns a daily shower into a refreshing nature walk. This setup brings organic life to a usually sterile spot. You must choose ceramic or plastic pots that handle water exposure well. It is a functional way to decorate without using counter space.
Materials Required
- 3 Small Potted Plants (Pothos or Philodendrons work best)
- 3 Medium Potted Plants (Ferns or Peperomia)
- Ceramic or glazed pots (with drainage holes)
- Potting soil
Equipment Required
- Small gardening trowel
- Watering can
DIY Step by Step Instructions
Step 1: Select Moisture Loving Plants
Visit your local nursery. Ask for plants that love high humidity and indirect light. Pothos, Heartleaf Philodendron, and Boston Ferns are excellent choices for a bathroom environment.
Step 2: Potting
Transfer your plants into decorative ceramic pots. Ensure the pots are glazed so they don’t absorb shower water and grow mold. If the pots have holes, make sure they have saucers, or simply use the decorative pot as a cover for the plastic nursery pot.
Step 3: Arrange by Height
Place the trailing plants, like Pothos, on the lower shelf of the niche so vines can hang down freely. Place upright plants, like Peperomia, on the top shelf to fill the vertical space.
Step 4: Maintenance Routine
Check the soil moisture weekly. Even though the air is humid, the roots still need watering. rotate the pots occasionally so all sides get equal light exposure.
6. Hot Pink Mirror Makeover

Builder grade mirrors often lack personality. A coat of hot pink paint fixes that instantly. The bold color acts as a massive focal point. It adds fun and energy to a plain vanity area.
This project saves money since you reuse the existing frame rather than buying new. You can finish this transformation in a single afternoon. It proves that bold style does not require a full renovation. This pop of color works best when the rest of the wall remains neutral.
Materials Required
- Hot Pink Spray Paint (Satin or Gloss)
- Spray Primer (suitable for plastic or wood)
- Painter’s tape
- Newspaper or masking paper
Equipment Required
- Screwdriver (to remove mirror if possible)
- Fine grit sandpaper (220 grit)
- Damp cloth
DIY Step by Step Instructions
Step 1: Remove or Protect
If the mirror hangs on a hook, take it down. If it is glued to the wall, you must mask off the wall and the glass. Cover the entire glass surface with newspaper and tape the edges precisely so no paint gets on the reflection.
Step 2: Prepare the Surface
Lightly sand the frame to remove any glossy finish. This helps the new paint stick. Wipe away the sanding dust with a damp cloth.
Step 3: Prime
Apply a thin coat of primer to the frame. Let it dry according to the can’s instructions. Primer prevents the pink color from peeling later.
Step 4: Apply Color
Shake your pink spray paint can vigorously. Hold the can 10 inches away from the frame. Spray in light, sweeping motions. Apply two to three thin coats rather than one thick coat to avoid drips. Let it cure for 24 hours before removing the tape.
7. Color Blocked Entryway

Why settle for a standard white door? A coral door paired with teal trim creates high energy contrast. This combination surprises anyone who enters the bathroom. It defines the space clearly and separates it from the hallway.
Color blocking is a trendy way to show personality. The contrast separates the bathroom from the hallway. The bright teal frame frames the warm coral door like a piece of art. It is paint power at its best.
Materials Required
- Coral Interior Paint (Semi gloss)
- Teal Interior Paint (Semi gloss)
- Sandpaper (180 grit)
- Painter’s tape
Equipment Required
- Screwdriver
- Paintbrush (2 inch angled sash)
- Small foam roller
- Drop cloth
DIY Step by Step Instructions
Step 1: Remove Hardware
Use your screwdriver to remove the doorknob and latch plate. This is much faster than trying to tape around them and results in a cleaner finish.
Step 2: Prep and Sand
Lightly sand both the door and the door frame. You don’t need to remove the old paint, just scuff it up so the new paint grips. Wipe off the dust.
Step 3: Paint the Trim
Apply painter’s tape to the wall surrounding the door frame. Paint the frame with your teal color using the angled brush. Allow it to dry completely.
Step 4: Paint the Door
Apply the coral paint to the door. Use a brush for the recessed panels and a foam roller for the flat surfaces. This ensures a smooth finish without brush marks. Apply a second coat if the old color shows through. Reinstall the knob once dry.
8. Hunter Green Vanity Refresh

Old wooden cabinets can look heavy and dated. Painting them a deep green creates a sophisticated mood. Gold hardware pops brilliantly against the dark background. This update mimics the look of high end custom furniture.
You avoid the cost of replacing the entire vanity unit. The matte finish hides imperfections in older wood grain. It anchors the sink area beautifully. This deep color pairs wonderfully with white countertops.
Materials Required
- Hunter Green Cabinet Paint (Enamel or Alkyd formula)
- Cabinet Primer
- Liquid Deglosser
- Gold Cabinet Knobs
Equipment Required
- Screwdriver or Drill
- Sanding block
- Mini paint roller (foam or mohair)
- Angled paintbrush
DIY Step by Step Instructions
Step 1: Disassemble
Remove all cabinet doors and drawers. Take off the old hinges and knobs. Place the doors on a flat surface like a garage floor or workbench.
Step 2: Clean and Degloss
Scrub the surfaces with a degreaser to remove bathroom grime. If you want to skip heavy sanding, wipe the wood down with a liquid deglosser. This dulls the old finish chemically.
Step 3: Prime
Apply a high quality bonding primer to the cabinet box, doors, and drawer fronts. This step is crucial for durability. Let the primer dry overnight.
Step 4: Paint and Reassemble
Paint the cabinets with the hunter green paint. Use the brush for corners and the roller for flat areas to get a smooth finish. Apply two coats. Once cured (usually 24 48 hours), attach your new gold hardware and rehang the doors.
9. Retro Patterned Floor Runner

Tile floors can feel cold and hard underfoot. A long runner rug adds warmth instantly. The retro pattern here introduces orange and brown tones. These colors warm up the sterile white tiles.
A runner also guides the eye through the room, making it feel longer. It covers chipped or outdated flooring easily. This is the fastest way to change the room’s color palette without any permanent labor. It also provides safety by reducing slips on wet floors.
Materials Required
- Patterned Runner Rug (Washable material recommended)
- Rug Pad (Non slip)
- Carpet Tape (Double sided)
Equipment Required
- Scissors
- Measuring tape
- Vacuum cleaner
DIY Step by Step Instructions
Step 1: Measure the Pathway
Measure the floor space between your vanity and the wall or tub. You want at least 2 to 3 inches of visible floor on all sides of the rug so it doesn’t look cramped.
Step 2: Prepare the Floor
Vacuum and mop the floor thoroughly. Any dust or hair left on the floor will prevent the non slip pad from gripping correctly. Let the floor dry completely.
Step 3: Cut the Pad
Roll out your non slip rug pad. Cut it with scissors so it is about one inch smaller than your rug on all sides. This ensures the pad remains hidden.
Step 4: Secure the Rug
Place the pad on the floor. Lay the runner rug on top. If the corners curl up, apply a small strip of double sided carpet tape to the corners of the rug to hold them flat against the floor.
10. Fine Art Shower Curtain

A standard white curtain disappears. A curtain featuring a classic oil painting acts as a mural. The rich colors dominate the view. It turns a bathtub into an art gallery. This accessory sets a dramatic tone.
You can change the entire theme by swapping one item. It is renter friendly and highly impactful. The large scale of the face creates a bold statement that guests won’t forget.
Materials Required
- Art Print Fabric Shower Curtain
- Plastic Shower Liner (Clear or White)
- Metal Shower Curtain Hooks
Equipment Required
- Steamer or Iron
- Step stool
DIY Step by Step Instructions
Step 1: Remove Wrinkles
Fabric curtains often have creases from packaging. Iron the curtain on a low setting or use a handheld steamer to smooth it out. This makes the “art” look high quality.
Step 2: Prepare the Rod
Ensure your tension rod is secure. If it feels loose, twist it to expand it until it fits tightly against the walls.
Step 3: Layer the Curtains
Take a hook and thread it through the grommet of the plastic liner first, then through the fabric curtain. The liner should always face the inside of the tub, and the fabric should face the room.
Step 4: Hang and Arrange
Hang all hooks on the rod. Spread the curtain out fully to appreciate the image. Adjust the height of the rod if necessary so the curtain hem hangs just above the floor, preventing it from collecting dust.
11. Smart Mood Lighting

Lighting completely changes how you perceive a room’s color. Installing a smart color changing bulb is the fastest way to alter the atmosphere. You can turn your white walls pink, blue, or teal with a single tap on your phone. This versatility allows the bathroom to adapt to your mood instantly.
It eliminates the commitment of painting the walls a specific color. You can have a bright, energizing light for morning routines and a soft, calming glow for evening baths. This technology is affordable and requires zero electrical knowledge. It brings a modern, high tech feel to even the oldest bathroom.
Materials Required
- Smart LED Bulb (E26 base or size fitting your fixture)
- Smartphone or Tablet
Equipment Required
- Step ladder (if the fixture is high)
- Stable Wi Fi connection
DIY Step by Step Instructions
Step 1: Safety First
Turn off the light switch. Ensure the old bulb is cool to the touch before you try to remove it.
Step 2: Swap the Bulbs
Unscrew the existing light bulb. Screw the new smart bulb into the socket gently. Do not overtighten it. Turn the light switch back on. The bulb will likely blink to indicate it is ready for pairing.
Step 3: App Setup
Download the specific app mentioned on the bulb’s packaging. Create an account if needed. Follow the on screen prompts to connect the bulb to your Wi Fi network.
Step 4: Create Scenes
Use the app to save your favorite colors. Set a “Morning” scene with bright white light and a “Spa” scene with soft pink or blue hues.
12. Patterned Sink Skirt

Pedestal sinks look classic but offer zero storage. They also leave ugly plumbing pipes exposed. Wrapping a colorful fabric skirt around the sink basin hides the clutter and the pipes. This adds a significant amount of pattern and softness to the room.
This solution is brilliant for renters who cannot build a cabinet. You gain a hidden spot to stash cleaning supplies or extra toilet paper. The fabric brings warmth to a room usually filled with cold porcelain and tile. It is a charming, vintage inspired touch.
Materials Required
- Patterned Fabric (Cotton or Linen blend)
- Heavy duty adhesive Velcro tape
- Hemming tape (iron on)
Equipment Required
- Measuring tape
- Scissors
- Iron
- Ironing board
DIY Step by Step Instructions
Step 1: Measure the Basin
Measure the circumference of your sink basin where you want the skirt to attach. Add 4 inches to this number for fullness. Measure the height from that point down to the floor.
Step 2: Prepare the Fabric
Cut your fabric to size. Use the iron on hemming tape to create neat edges on all four sides. This prevents fraying without needing a sewing machine.
Step 3: Attach Velcro to Sink
Clean the rim of the sink thoroughly with rubbing alcohol to remove soap scum. Stick the “hook” side of the Velcro tape around the rim of the sink.
Step 4: Attach and Gather
Stick the “loop” side of the Velcro to the top edge of your fabric. Press the fabric onto the sink, creating small pleats or gathers as you go to give it a wavy, curtain like appearance.
13. Colored Glass Dispensers

Plastic soap bottles create visual clutter with their loud logos. Transferring your liquids into matching amber and blue glass bottles instantly elevates the sink area. The rich colors of the glass act like jewels on your countertop. This small change makes the entire vanity look organized and expensive.
It is an eco friendly choice that allows you to buy soap in bulk. The uniformity brings a sense of calm to the space. You can easily distinguish between hand soap and lotion by using different colored glass. It is a five minute project with long term visual rewards.
Materials Required
- 1 Amber Glass Pump Bottle (16 oz)
- 1 Blue Glass Pump Bottle (16 oz)
- Waterproof Labels (optional)
- Bulk Liquid Soap and Lotion
Equipment Required
- Small funnel
- Dish soap (for cleaning new bottles)
- Warm water
DIY Step by Step Instructions
Step 1: Clean New Bottles
Wash the interior of your new glass bottles with warm soapy water. Pump water through the dispenser mechanism to clear out any factory dust. Let them dry completely.
Step 2: Fill Carefully
Place the small funnel into the neck of the amber bottle. Pour your liquid hand soap in slowly to avoid bubbles overflowing. Leave about an inch of space at the top.
Step 3: Fill the Second Bottle
Repeat the process with the blue bottle, filling it with hand lotion or a different soap. Using two colors helps guests know which one is which without reading a label.
Step 4: Prime the Pump
Screw the pump tops back on. Press the pump down several times until the liquid begins to dispense smoothly. Wipe down the outside of the bottles to remove fingerprints.
14. Mediterranean Tile Decals

Replacing a backsplash is messy and costly. Tile decals offer the look of hand painted ceramic without the grout work. These colorful stickers cover up boring or dated tiles instantly. The intricate patterns add a worldly, traveled vibe to your bathroom.
They are resistant to humidity and easy to wipe clean. This is the ultimate renter hack because they peel off without damaging the surface underneath. You can mix and match patterns for a eclectic look or keep them uniform. It brings focus to the sink area.
Materials Required
- Vinyl Tile Stickers (sized to match your current tiles, e.g., 4×4 or 6×6)
- Degreasing cleaner (TSP or alcohol based)
Equipment Required
- Utility knife or Box cutter
- Plastic smoothing tool (squeegee or old credit card)
- Clean cloth
DIY Step by Step Instructions
Step 1: Deep Clean
Scrub your existing tiles to remove all grease, soap scum, and dust. This is the most critical step. If the surface is oily, the stickers will peel off. Let the tiles dry completely.
Step 2: Align the Sticker
Peel the backing off the top edge of the first sticker. Align it with the top corners of your existing tile. Do not touch the adhesive side too much.
Step 3: Apply and Smooth
Slowly peel away the rest of the backing while pressing the sticker down. Use your plastic tool to push from the center outward. This forces out any air bubbles.
Step 4: Trim Edges
If you have half tiles at the edge of the wall, apply the sticker and use your utility knife to trim the excess vinyl carefully along the grout line.
15. Mint Green Floating Shelves

Wall storage often looks utilitarian and bulky. Painting floating shelves a soft mint green turns them into a decorative feature. This pastel shade creates a fresh, clean contrast against white or grey walls. It provides a dedicated stage for your prettiest decor items.
The color connects with nature and feels very soothing. By using open shelving, you keep the room feeling open rather than boxy. It is a functional way to add color without painting the walls. This project is great for utilizing awkward vertical space above a toilet.
Materials Required
- 3 Floating Shelves (Unfinished wood)
- Mint Green Paint (Satin finish)
- Wood Primer
- Wall Anchors and Screws
Equipment Required
- Drill
- Level
- Paintbrush
- Sandpaper (220 grit)
DIY Step by Step Instructions
Step 1: Prepare the Wood
Lightly sand the shelves to remove rough spots. Wipe away the dust. Apply a coat of primer to ensure the mint color pops truly. Let it dry.
Step 2: Paint
Apply your mint green paint. Brush with the grain of the wood for a smooth finish. Apply two coats, allowing ample drying time in between.
Step 3: Mark the Wall
Decide where you want the shelves. Use a level to draw a faint straight line for each shelf bracket. Mark the screw holes with a pencil.
Step 4: Install
Drill holes into your marks. Insert the wall anchors. Screw the brackets into the wall securely. Slide the painted shelves onto the brackets.
16. Bold Botanical Wallpaper

Small powder rooms are the best place to take risks. A busy black and white botanical wallpaper makes the small space feel like a jewel box. The pattern camouflages uneven walls and distracts from basic fixtures. It creates an immersive experience for anyone who enters.
Peel and stick wallpaper makes this accessible for everyone. The monochromatic scheme is bold but not overwhelming because it lacks bright neon colors. It pairs beautifully with wood accents and black hardware.
Materials Required
- Peel and Stick Wallpaper (Calculate square footage plus 15% extra)
- Smoothing tool
Equipment Required
- Step ladder
- Utility knife with fresh blades
- Measuring tape
- Metal straight edge
DIY Step by Step Instructions
Step 1: Plan the Layout
Measure the width of your wall and the width of the wallpaper roll. Determine where your first strip should go so you don’t end up with a tiny sliver of paper in the corner.
Step 2: Apply First Strip
Peel back about 12 inches of the backing. Stick the paper to the top of the wall, allowing an inch of excess to overlap the ceiling. Use your smoothing tool to press it down, working from the center out.
Step 3: Match the Pattern
Line up the second strip so the botanical pattern connects seamlessly with the first strip. This is vital for a professional look. You may need to waste some paper at the top to get the alignment right.
Step 4: Trim Excess
Once all walls are covered, use your utility knife and straight edge to cut off the excess paper at the ceiling and baseboards for a crisp line.
17. Statement Typography Mats

Bathroom floors can be cold and uninviting. Adding bright pink mats with bold typography injects humor and warmth. The vibrant color breaks up the monotony of neutral floor tiles. It is a playful addition that shows you don’t take your decor too seriously.
These mats are functional, absorbing water and preventing slips. The text adds a graphic element that draws the eye downward. You can customize plain mats to say whatever you want. It is a fun way to greet yourself in the mirror every morning.
Materials Required
- 2 Plain Cotton or Microfiber Bath Mats (Pink)
- Fabric Paint (Red or Dark Pink)
- Stencil Plastic sheets or Freezer paper
- Masking tape
Equipment Required
- Hobby knife (X Acto)
- Stencil brush or sponge
- Iron (to set paint)
DIY Step by Step Instructions
Step 1: Create Stencils
Print out your desired words in a bold, block font. Trace the letters onto your stencil plastic or freezer paper. Cut out the letters carefully with a hobby knife.
Step 2: Position and Secure
Place the stencil on the bath mat. If using freezer paper, iron it shiny side down so it sticks temporarily. If using plastic, tape it down firmly so it doesn’t shift.
Step 3: Apply Paint
Dip your sponge in the fabric paint and dab off the excess on a paper towel. Press the sponge vertically onto the stencil. Do not rub side to side, or paint will bleed under the letters.
Step 4: Set the Design
Peel off the stencil while the paint is wet. Allow it to dry for 24 hours. Run a hot iron over the design (use a cloth between iron and mat) to heat set the paint so it survives the washing machine.
18. Custom Roman Shade

Privacy is essential in a bathroom, but blinds can look office like. A fabric Roman shade adds softness and luxury. The patterned fabric with a solid blue border acts like a framed picture on your window. It blocks the view while letting in filtered light.
This treatment elevates the window from a structural necessity to a design feature. The fabric absorbs sound, making the bathroom echo less. You can achieve this look without a sewing machine by using fabric glue.
Materials Required
- Patterned Decorator Fabric
- Solid Blue Fabric (for border)
- Fabric Glue or Fusible Bonding Tape
- 3 Tension rods (small diameter)
Equipment Required
- Scissors
- Measuring tape
- Iron
DIY Step by Step Instructions
Step 1: Measure and Cut
Measure the inside width of your window frame. Cut your main fabric to this width plus 1 inch. Cut the length to fit the window height plus 4 inches.
Step 2: Add the Border
Cut strips of the blue fabric. Use fabric glue or bonding tape to attach these strips to the edges of your main fabric. Iron the seams flat to ensure the glue bonds securely.
Step 3: Create Rod Pockets
Fold the top edge over by 2 inches and glue it to create a pocket for the top tension rod. Do the same for the bottom edge.
Step 4: Install Faux Shade
Insert tension rods into the top and bottom pockets. Place the top rod in the window frame. To create the “folds,” place a third tension rod behind the fabric at the desired height and drape the fabric over it to simulate a raised shade.
19. High Contrast Window Trim

White trim is standard, but black trim is striking. Painting your window sash and casing black creates a picture frame effect. It draws the eye directly to the natural light source. This high contrast look is a staple of modern farmhouse and industrial styles.
It makes the outdoors feel like art. The black paint hides dust and fingerprints better than white. It is a very low cost update that requires only a small amount of paint. The result is architectural and sharp.
Materials Required
- Black Interior Trim Paint (Semi gloss or Satin)
- Painter’s tape (for glass)
- Sanding sponge (fine grit)
Equipment Required
- Angled Sash Brush (1.5 to 2 inch)
- Damp cloth
- Utility knife
DIY Step by Step Instructions
Step 1: Clean and Mask
Clean the window frame thoroughly. Apply painter’s tape to the glass panes precisely where they meet the wood. Press the tape edges down firmly with your fingernail.
Step 2: Light Sanding
Scuff sand the existing trim to help the new paint stick. You don’t need to strip it, just dull the glossy surface. Wipe away the dust.
Step 3: Paint Carefully
Dip your angled brush into the black paint. Paint the inner sashes first, then the outer frame. Use long, smooth strokes. Watch for drips in the corners.
Step 4: Reveal
Let the paint dry until it is tacky but not fully hard (about 1 hour). Score the edge of the tape with a utility knife to break the paint seal, then pull the tape off slowly at a 45 degree angle.
20. Geometric Grid Gallery

A large empty wall can make a bathroom feel unfinished. Creating a gallery wall with a strict grid layout brings order and color. The matching frames create a cohesive look that calms the mind. The colorful geometric art adds a modern, artistic touch.
This arrangement works because it treats multiple small pictures as one large focal point. It is easier to transport and hang than one massive canvas. You can swap out the prints later if you want to change the color scheme.
Materials Required
- 8 Matching Picture Frames (Light wood or White)
- 8 Geometric Art Prints (Colorful)
- Command Strips or Picture Nails
Equipment Required
- Level (long spirit level)
- Measuring tape
- Painter’s tape
- Pencil
DIY Step by Step Instructions
Step 1: Frame the Art
Clean the glass on your frames. Insert your geometric prints and secure the backings.
Step 2: Map the Grid
Determine the total size of your arrangement. You want about 2 to 3 inches of space between each frame. Use painter’s tape to mark the outer rectangle on the wall to visualize the scale.
Step 3: Mark Hangers
Measure the distance from the top of the frame to the hanging hardware on the back. Transfer these measurements to the wall. Use your level to ensure every row is perfectly straight.
Step 4: Hang and Level
Install your nails or Command strips at the marked points. Hang the frames. Place the level on top of each frame one last time to ensure they are perfectly horizontal.
21. Pop Art Trash Can

A trash bin is usually something you try to hide. Painting a standard metal bin bright red turns it into a standout feature. The teal lid adds a playful contrast that feels retro and energetic. This proves that even the most functional items can be beautiful.
You can find these metal bins cheaply at hardware stores. Customizing it makes your bathroom feel unique. It allows you to test bold color combinations without painting a wall. This small project brings a sense of fun to a boring corner.
Materials Required
- Metal Trash Can with Lid
- Red Spray Paint (Gloss finish)
- Teal Spray Paint (Gloss finish)
- Spray Primer (Metal bonding)
Equipment Required
- Drop cloth or old newspapers
- Masking tape (Painter’s tape)
- Sanding sponge (fine grit)
DIY Step by Step Instructions
Step 1: Prepare the Surface
Wash the trash can and lid with soap and water. Dry them completely. Lightly sand the metal surface to help the paint stick better. Wipe away the dust.
Step 2: Prime
Place the can and lid separately on your drop cloth. Spray a thin coat of primer over both pieces. Let this dry for about 30 minutes.
Step 3: Paint the Body
Spray the main body of the can with the red paint. Hold the can about 10 inches away and use sweeping motions. Apply two or three thin coats to prevent drips.
Step 4: Paint the Lid
Spray the lid with the teal paint using the same technique. Let both parts cure for at least 24 hours before putting them back together to ensure the paint does not chip.
22. Dried Floral Sculpture

Fresh flowers die quickly in bathrooms without windows. Dried botanicals in dyed purple and pink shades last essentially forever. The spiky textures add height and drama to the back of a toilet tank. This arrangement brings an artistic element to the room.
It requires zero watering or maintenance. The deep colors look stunning against white tile. It creates a soft and organic feel in a hard and cold space. This is a sculpture made of nature.
Materials Required
- Dried Bunny Tails (Pink and Orange)
- Dried Eucalyptus (Dyed Purple)
- Dried Palm Spear (Purple)
- Clear Glass Vase
Equipment Required
- Floral shears or sturdy scissors
- Floral tape (optional)
DIY Step by Step Instructions
Step 1: Sort Your Stems
Lay all your dried flowers out on a table. Group them by type and height. This helps you visualize the final shape.
Step 2: Build the Base
Start with the tallest stems, like the purple eucalyptus. Place them in the vase first to establish the height and width of the arrangement.
Step 3: Add Focal Points
Insert the dried palm spear near the center but slightly lower than the back stems. This large leaf acts as the anchor for the design.
Step 4: Fill the Gaps
Add the colorful bunny tails in bunches. distribute the pink and orange pops of color evenly. Trim the stems as needed so they sit at different heights for a full look.
23. Paint Dipped Stool

A wooden stool is useful for holding books or candles near the tub. Dipping the feet in mint green paint gives it a modern update. This specific look is very trendy and easy to achieve. It keeps the warmth of the natural wood while adding a splash of color.
The paint also protects the wood legs from wet floors. It adds a playful touch to a rustic item. This project is quick and hard to mess up. The result looks like a custom piece of furniture.
Materials Required
- Wooden Stool (Unfinished or sanded)
- Mint Green Paint (Acrylic or Latex)
- Painter’s Tape (High quality)
- Clear Polycrylic Sealer
Equipment Required
- Paintbrush
- Measuring tape
- Pencil
- Sandpaper
DIY Step by Step Instructions
Step 1: Measure the Dip
Decide how high you want the “socks” on your stool legs to be. Measure 4 to 6 inches up from the floor on each leg. Mark it with a pencil.
Step 2: Tape the Line
Wrap painter’s tape around each leg precisely at your mark. Press the edges of the tape down firmly to prevent paint from bleeding under it. This creates a crisp line.
Step 3: Paint
Paint the bottom section of the legs with your mint green color. Paint the bottom of the feet as well to seal them from water. Apply two coats for solid coverage.
Step 4: Seal and Peel
Peel off the tape while the second coat is still slightly wet. Once the paint is fully dry, brush a clear sealer over the painted section to protect it from scuffs.
24. Cherry Red Curtain Rings

You do not need to buy a new shower curtain to change the look. Spraying the rings a bright red creates a surprising detail. Most rings are silver or plastic, so this color stands out immediately. It draws the eye up and frames the curtain beautifully.
This is the definition of a micro update with macro impact. It costs almost nothing but looks custom. The red circles create a rhythmic pattern across the rod. It adds a designer touch to a basic bathroom necessity.
Materials Required
- Pack of Plastic or Metal Shower Rings
- Red Spray Paint (Glossy)
- Spray Primer
Equipment Required
- String or thin wire
- Cardboard box or outdoor space
- Two chairs (to hold the string)
DIY Step by Step Instructions
Step 1: Create a Painting Station
Tie a string between two chairs or across a cardboard box opening. Thread your shower rings onto the string so they hang freely without touching each other.
Step 2: Prime
Spray a light coat of primer on the rings. Spin them gently on the string to ensure you coat all sides.
Step 3: Apply Color
Spray the rings with the red paint. Use short bursts to avoid globs of paint forming at the bottom of the rings. Walk around the string to hit them from every angle.
Step 4: Cure
Let the rings hang on the string until they are completely dry and hard. This usually takes 24 hours. Thread them onto your curtain and rod carefully.
25. Neon Acrylic Organization

Cluttered counters make a bathroom feel small. Coralling products into a neon yellow acrylic tray solves the mess stylishly. The translucent material catches the light and glows. It looks futuristic and clean.
This specific color adds a high voltage pop to a white vanity. It defines a specific zone for your daily essentials. Organizing becomes decor when you use bright and bold storage solutions. It creates a modern boutique hotel vibe.
Materials Required
- Acrylic Sheet (Neon Yellow, 1/8 inch thick)
- Acrylic Cement (Solvent welder) or Super Glue for Plastics
- Masking Tape
Equipment Required
- Acrylic Scoring Knife (or you can order pre cut pieces)
- Ruler
- Syringe applicator (for cement)
DIY Step by Step Instructions
Step 1: Cut the Pieces
(Skip this if you bought pre cut pieces). You need one base rectangle (e.g., 8×10 inches) and four side strips (e.g., two 8×2 inches and two 10×2 inches). Score the acrylic deeply with the knife and snap it over a table edge.
Step 2: Dry Fit
Assemble the pieces without glue to ensure they fit. Use masking tape to hold the side walls onto the base to check the corners.
Step 3: Glue the Edges
With the pieces taped in place, apply a thin line of acrylic cement along the inside seams where the walls meet the base. The liquid will flow into the joint and fuse the plastic.
Step 4: Finish
Let the bond set for 24 hours. Remove the tape. You now have a custom neon tray.
26. Two Tone Towel Ladder

Towel bars can damage walls and are hard to move. A bamboo ladder leans casually and holds multiple towels. Painting one side blue and the other red makes it a piece of modern art. It uses vertical space efficiently in tight quarters.
The colors can match your towels or contrast with them. This storage solution keeps damp towels dry and off the floor. It adds height and structure to a blank wall. It is a renter friendly storage hack.
Materials Required
- Bamboo Decorative Ladder
- Teal Paint (Sample pot size)
- Red Paint (Sample pot size)
- Painter’s Tape
Equipment Required
- Two small paintbrushes
- Drop cloth
DIY Step by Step Instructions
Step 1: Divide the Ladder
Look at the ladder vertically. You want to paint the left rail and the left half of the rungs one color, and the right side another. Run a strip of painter’s tape down the exact center of every rung.
Step 2: Paint Side A
Paint the left vertical rail and the left half of the rungs teal. Be careful near the tape line on the rungs.
Step 3: Paint Side B
Paint the right vertical rail and the right half of the rungs red. Apply two coats to both colors for vibrancy.
Step 4: Remove Tape
Peel off the tape from the center of the rungs. You should have a sharp line where the red meets the teal. Touch up any mistakes with a small art brush.
27. Boho Tinted Lighting

Standard vanity lighting is often boring. A fixture with multicolored glass shades casts a magical glow. The pink, teal, and amber glass warms up the light quality. It feels like jewelry for your ceiling.
This bohemian style adds personality and charm. You can achieve this by replacing the shades or tinting clear ones yourself. It becomes the immediate focal point of the room. The mixed colors mean it matches everything.
Materials Required
- Glass Shade Chandelier (3 light)
- Transparent Glass Paint (Pink, Teal, Amber)
- Rubbing Alcohol
Equipment Required
- Soft bristle paintbrush
- Oven (if using heat set paint)
- Paper towels
DIY Step by Step Instructions
Step 1: Clean the Glass
Remove the glass shades from the fixture. Clean them thoroughly with rubbing alcohol to remove any oils. Do not touch the surface with your fingers after this.
Step 2: Apply Glass Paint
Paint the exterior of the first shade teal. Use smooth, vertical strokes to keep the texture even. Paint the second shade pink and the third amber. The paint must be transparent, not opaque.
Step 3: Cure the Paint
Follow the instructions on your specific paint bottle. Some require air drying for days, while others need to be baked in a home oven at a low temperature to become permanent.
Step 4: Reassemble
Once cured, reattach the shades to the light fixture. Turn on the light to see the beautiful colored glow.
28. Wallpaper Surprise Cabinet

Medicine cabinets are usually stark and white inside. Lining the back with a colorful floral wallpaper creates a secret joy every time you open it. It turns a mundane daily task into a delightful moment.
This is a great use for leftover wallpaper scraps. It hides stains or scratches on old shelves. The pattern adds depth and interest to an unexpected place. It is a personal detail just for you.
Materials Required
- Floral Wallpaper (Peel and stick is easiest)
- Cleaning spray
Equipment Required
- Measuring tape
- Scissors or Utility knife
- Plastic smoothing tool
DIY Step by Step Instructions
Step 1: Measure the Interior
Measure the back panel of your medicine cabinet. If the shelves are not removable, measure the height between each shelf individually.
Step 2: Cut the Paper
Cut your wallpaper to the exact dimensions you measured. It is better to cut slightly larger and trim it later than to cut it too small.
Step 3: Clean and Stick
Clean the back wall of the cabinet to remove dust. Peel the backing off the top of your wallpaper piece. Stick it to the top of the cabinet back.
Step 4: Smooth It Out
Slowly pull the backing down while pressing the paper against the wall with your smoothing tool. Push bubbles out towards the edges. Repeat for each section or drawer bottom.
29. Mixed Metal Vanity

People often think all metals must match. Mixing a matte black faucet with satin gold cabinet pulls looks designer and chic. The black feels modern and industrial, while the gold adds luxury.
This combination breaks the rules in the best way. It creates layers of interest rather than a flat look. Swapping hardware is the easiest renovation task you can do. The contrast is sharp and sophisticated.
Materials Required
- Matte Black Faucet Set
- Gold Cabinet Pulls (Center to center measurement must match old holes)
Equipment Required
- Adjustable wrench
- Screwdriver
- Plumber’s tape (Teflon tape)
- Bucket (to catch water)
DIY Step by Step Instructions
Step 1: Water Off
Turn off the water supply valves under the sink. Turn on the old faucet to drain any remaining water.
Step 2: Replace Hardware
Use a screwdriver to remove the old cabinet handles. Screw in the new gold pulls. This is an instant visual upgrade.
Step 3: Remove Old Faucet
Use your wrench to disconnect the water lines and the nut holding the old faucet. Pull the old faucet out. Clean the sink surface.
Step 4: Install New Faucet
Place the new black faucet into the holes. Tighten the mounting nuts from underneath. Reconnect the water lines, using plumber’s tape on the threads to prevent leaks. Turn the water back on and check for drips.
30. Apothecary Soap Jar

Unwrapped bar soaps are beautiful but often hidden in boxes. Stacking colorful, round soaps in a large glass apothecary jar creates an instant centerpiece. It looks like a jar of candy but smells fresh and clean.
The pastel colors mix together to create a soft palette. This is functional storage that doubles as decor. It keeps your backup soap supply dust free and accessible. The glass reflects light and adds sparkle to the shelf.
Materials Required
- Large Glass Apothecary Jar with Lid
- 10 to 15 Round Bar Soaps (Various pastel colors)
Equipment Required
- Microfiber cloth
DIY Step by Step Instructions
Step 1: Select Your Soaps
Choose soaps in colors that complement your bathroom. Pastels like mint, lavender, and peach look lovely together. Remove all plastic packaging.
Step 2: Polish the Jar
Ensure your glass jar is perfectly clean inside and out. Use a microfiber cloth to remove any smudges or water spots.
Step 3: Random Arrangement
Place the soaps into the jar one by one. Do not stack them perfectly straight. Let them tumble naturally so you see the different colors and embossed designs.
Step 4: Display
Place the lid on top. Set the jar on a shelf or the back of the toilet. The soaps will scent the air lightly even when inside the jar.
31. Wood Tone Toilet Seat

White toilets are standard. Swapping the seat for a warm wooden one instantly adds a touch of natural elegance. The contrast between the white porcelain and the wood feels luxurious. It brings an unexpected organic element to a very functional item.
This change is quick and does not require a plumber. The wood can range from light bamboo to rich mahogany, fitting many decor styles. It makes the bathroom feel more like a spa retreat. It is a small upgrade that makes a big impact on comfort and style.
Materials Required
- New Wooden Toilet Seat with Hardware
- Mild Cleaner (for old bolts)
Equipment Required
- Adjustable Wrench or Pliers
- Screwdriver (if bolts have screwdriver slots)
DIY Step by Step Instructions
Step 1: Remove the Old Seat
Look at the back of your toilet bowl where the seat is attached. You will see two bolts. Either unscrew them by hand or use your wrench or pliers to loosen the nuts from underneath. Remove the old seat.
Step 2: Clean the Bowl
Thoroughly clean the area where the old seat sat. This is a chance to get rid of any grime that built up there.
Step 3: Install New Hardware
Place the new wooden seat on the bowl. Insert the new bolts through the holes. Reach underneath and thread the nuts onto the bolts.
Step 4: Tighten Securely
Tighten the nuts evenly with your wrench or pliers. Do not overtighten, as this could crack the porcelain. Ensure the seat is centered and stable.
32. Stained Glass Window Film

Privacy in a bathroom is crucial, but heavy curtains block light. Stained glass window film offers privacy and a beautiful light show. The geometric pattern breaks sunlight into colorful rainbows. It brings artistry to a plain window.
This film gives the effect of real stained glass without the cost or permanence. It is easy to apply and remove, making it renter friendly. You get privacy without sacrificing natural light. It adds unique character to an otherwise basic pane of glass.
Materials Required
- Decorative Window Film (Stained glass pattern)
- Squeegee or old credit card
- Dish Soap
- Water
- Spray Bottle
Equipment Required
- Measuring tape
- Utility knife or sharp scissors
- Clean microfiber cloth
DIY Step by Step Instructions
Step 1: Clean the Window
Clean the window glass thoroughly with a glass cleaner. Remove any dust, dirt, or grease. Wipe it dry with a microfiber cloth.
Step 2: Measure and Cut
Measure the exact dimensions of your window pane. Cut the window film slightly larger (about 1 inch extra on each side) than your measurements.
Step 3: Prepare the Surface
Fill your spray bottle with water and add a few drops of dish soap. Liberally spray the entire window glass with this soapy water solution.
Step 4: Apply and Trim
Peel the backing off the film. Apply the adhesive side to the wet window. Slide it into position. Use your squeegee to push out water and air bubbles from the center outward. Trim excess film with a utility knife along the window frame for a precise fit.
33. Mixed Metal Vent Cover

Vent covers are usually plain white or silver and often overlooked. Upgrading to a copper finish transforms it into a piece of decorative hardware. The warm metallic tone adds an antique feel. Using a pattern instead of simple slats elevates the design.
It brings a custom detail to an otherwise utilitarian element. Copper complements many bathroom color schemes, from white to dark greens. This small change adds a surprising amount of elegance. It shows attention to every detail in your decor.
Materials Required
- Decorative Copper Vent Cover (Ensure it matches your existing vent size)
- Screws (matching copper finish)
Equipment Required
- Screwdriver
- Measuring tape
DIY Step by Step Instructions
Step 1: Measure Existing Vent
Measure the length and width of your existing vent opening. This is crucial for ordering the correct size of your new decorative cover.
Step 2: Remove Old Cover
Use your screwdriver to remove the screws holding the old vent cover in place. Carefully pull it away from the wall or ceiling.
Step 3: Clean the Opening
Vacuum any dust or debris from inside the vent duct. Wipe down the area around the opening on the wall.
Step 4: Install New Cover
Position the new copper vent cover over the opening. Line up the screw holes. Insert the new copper screws and tighten them evenly with your screwdriver. Do not overtighten.
34. Color Burst Pillar Candles

The back of the toilet often collects dust or looks forgotten. A mirrored tray filled with colorful pillar candles creates a vibrant display. The varying heights and bold colors immediately draw the eye. It transforms an empty space into a moment of intentional decor.
The colors include purple, red, blue, and yellow, creating a cheerful mosaic. These candles are decorative even when unlit. Lighting them for a bath sets a relaxing, spa like mood. It adds a soft glow and a touch of luxury.
Materials Required
- Mirrored Vanity Tray
- 7 Pillar Candles (Various heights and colors: Red, Blue, Purple, Yellow, White)
Equipment Required
- Lighter or Matches
- Dusting cloth
DIY Step by Step Instructions
Step 1: Clean the Tray
Ensure your mirrored tray is spotless. Fingerprints or dust will detract from the display.
Step 2: Arrange by Height
Place the tallest candle (e.g., the dark purple one) at the back center of the tray. Arrange the other candles around it, varying their heights and colors. You want a pleasing, uneven cluster.
Step 3: Place with Purpose
Set the tray on the back of your toilet tank. Ensure it is stable and not wobbly.
Step 4: Enjoy the Ambiance
Light the candles for a soothing bath experience. Always remember to extinguish them before leaving the room.
35. Olive Green Curtains

Windows in bathrooms need privacy, but blinds can feel cold. Rich olive green velvet curtains add luxurious texture and warmth. The deep color instantly makes the room feel sophisticated and cozy. Hanging them wide on either side of the window makes the window appear larger.
Sheer white panels underneath provide daytime privacy without blocking all light. This layered approach allows for versatile light control. The heavy fabric also helps absorb sound, creating a calmer atmosphere. It is a touch of drama that transforms a mundane window.
Materials Required
- 2 Olive Green Velvet Curtain Panels
- 2 Sheer White Curtain Panels
- Double Curtain Rod with Brackets
- Curtain Tie Backs
Equipment Required
- Drill
- Level
- Measuring tape
- Pencil
DIY Step by Step Instructions
Step 1: Measure and Choose Rod
Measure the width of your window. Choose a double curtain rod that extends at least 6 to 12 inches beyond each side of the window frame.
Step 2: Install Brackets
Mark the bracket placement on the wall, ensuring they are several inches above the window frame. Use your level to ensure they are even. Drill pilot holes and install the brackets.
Step 3: Hang Sheers
Thread the sheer white panels onto the inner rod of your double rod. Hang the inner rod onto the brackets.
Step 4: Hang Velvet Panels
Thread the olive green velvet panels onto the outer rod. Hang the outer rod onto the brackets. Use the tie backs to neatly hold the velvet panels open, framing the sheers.
You have now explored 35 simple yet stunning ways to add character to your bathroom. These projects prove that creativity does not need a massive budget or endless time. Whether you choose a dramatic color shift on the ceiling or just swap out old hardware for gold, every small change builds momentum.
Do not let that room stay boring for another day. Pick one easy idea, gather your supplies, and start enjoying a beautifully personalized space. A colorful bathroom is truly within reach.
Key Takeaways
- Color is strongest on unexpected surfaces like the ceiling, door frames, and inside cabinets.
- Storage items, such as trays, jars, and ladders, should be functional decor pieces.
- New hardware and small painted accessories provide the biggest visual change for the smallest effort.
- Look for renter friendly solutions like easy to remove decals, vinyl film, and tension rod curtains.