When autumn chills the air, the night seems a little closer. The shadows get longer. It is the season for spooky stories and haunted decorations. Bats are a classic symbol of this enchanting time.

They can be creepy creatures of the night or elegant gothic icons. They can even be cute and charming. These winged wonders are incredibly versatile, ready to fit any Halloween theme you can imagine.
This guide will show you 38 ways to bring bat decor into your home. You will find ideas for every surface, from your front door to your dining room table. Many of these projects are simple to make yourself, using basic materials. Get ready to transform your space.
1. Fireplace Bat Eruption

Create a dramatic focal point by having a swarm of bats erupt from your fireplace. This design uses dozens of paper or vinyl bats to create a sense of motion, as if a colony has just burst forth into the room. The bats flow up the wall, drawing the eye and making the space feel dynamic and alive with spooky energy.
This decoration is a great way to make a big impact in your main living area. It transforms a cozy fireplace into a portal for creatures of the night.
DIY Instructions: How to Create a Bat Eruption
What You’ll Need:
- Black cardstock or craft foam sheets
- Bat stencils in 3-4 different sizes
- A pencil
- Scissors
- Removable wall putty or double-sided tape
Step-by-Step Guide:
Step 1: Make Your Bats Trace your bat stencils onto the black paper. Make lots of them in all the different sizes. The more bats you have, the better it will look.
Step 2: Cut Them Out Carefully cut out all the bat shapes. This is a great activity to do while watching a spooky movie.
Step 3: Give Them Life Gently fold the wings of each bat upwards along the body. This little fold makes them look 3D and like they are really flying.
Step 4: Start the Swarm Take your wall putty or tape and stick a small piece to the back of each bat’s body. Start by placing a dense cluster of bats right at the opening of your fireplace.
Step 5: Let Them Fly Continue sticking the bats to the wall, creating a path that flows up and out from the fireplace. As you get further away, space the bats out more to make it look like they are spreading out through the room.
2. Gothic Damask Bat Wallpaper

For a more elegant and permanent spooky touch, consider a gothic-inspired wallpaper. This design weaves bats into a classic damask pattern, creating a look that is both sophisticated and subtly sinister. It’s a bold choice that turns an entire wall into a piece of art.
This wallpaper sets a moody and dramatic tone for a room. It is a fantastic backdrop for a Halloween party but is also stylish enough to be kept up all year round for those who love a darker aesthetic.
DIY Instructions: How to Create a Faux Wallpaper Look
What You’ll Need:
- A large bat stencil with a fancy design
- A smaller, simple bat stencil
- Black and deep red craft paint
- A stencil brush or a small sponge
- Painter’s tape
Step-by-Step Guide:
Step 1: Plan Your Pattern Decide where you want your pattern to be. You can do a whole wall or just a section like in the picture.
Step 2: Stencil the Main Pattern Use painter’s tape to hold your large, fancy stencil on the wall. Dip your stencil brush in a little bit of red paint and dab it over the stencil. Don’t use too much paint, or it will bleed. Carefully remove the stencil.
Step 3: Create the Pattern Move the stencil to the next spot, lining it up with the first one, and repeat. Continue this until your main pattern is complete.
Step 4: Add the Filler Bats Once the red paint is dry, use your smaller, simple bat stencil and the black paint to add filler bats in the empty spaces between your main pattern.
Step 5: Let it Dry Let the whole wall dry completely. It will look just like fancy, spooky wallpaper.
3. Haunted Ancestors Portrait Gallery

Give your family portraits a creepy Halloween twist. This idea involves decorating old-fashioned portraits with bat-themed accessories. Small paper bats are placed on and around the frames, while the subjects of the portraits are given their own bat-shaped collars.
This is a fun and creative way to add a subtle and spooky story to your decor. It makes it seem as though the figures in the paintings are part of the haunted festivities, blurring the line between decoration and the supernatural.
DIY Instructions: How to Haunt Your Own Portraits
What You’ll Need:
- A few old portraits (you can find cheap ones at a thrift store or print some from the internet)
- Black paper
- Small bat stencils
- Scissors
- Cotton balls
- Removable double-sided tape
Step-by-Step Guide:
Step 1: Create Your Bat Accessories Trace and cut out several small bat shapes from the black paper.
Step 2: Dress Up the People For each portrait, choose one bat to be a “bowtie” or “brooch.” Use a tiny piece of tape to stick it onto the person’s collar in the picture.
Step 3: Add Some Fog Gently pull a cotton ball apart to make it look thin and wispy, like fog or mist. Use another tiny piece of tape to stick this “fog” at the bottom of the portrait, near the bat bowtie.
Step 4: Decorate the Frames Use more tape to stick the other bats onto the picture frames themselves, as if they are flying around the portraits.
Step 5: Arrange Your Gallery Hang your newly haunted portraits on the wall. You can even add some old books and candles below them to complete the look.
4. Bat Infestation Corner

Create the ultimate creepy-crawly effect with a full-blown bat infestation in the corner of your room. This decoration uses a massive number of felt bats clustered together, making it look like a real colony has taken over your home. The swarm spills out onto the wall and ceiling.
This is a high-impact design that is sure to give your guests a little shock. Combined with spider webs, it creates a scene of spooky neglect, as if the room has been abandoned to the creatures of the night.
DIY Instructions: How to Make a Bat Colony Corner
What You’ll Need:
- A lot of black felt
- A bat stencil
- Fabric scissors
- Thumbtacks or removable wall hooks
Step-by-Step Guide:
Step 1: Cut Out a Bat Army Trace your bat stencil onto the black felt over and over again. Cut out as many bats as you can. Using felt instead of paper makes them look a little more realistic and less like cutouts.
Step 2: Find Your Corner Choose a corner of a room that you want to be the center of your infestation.
Step 3: Start in the Corner Start by pinning the bats up right in the corner. Overlap them and pack them in very tightly. You want it to look like a dense nest.
Step 4: Spread Out Begin pinning more bats on the walls and ceiling, spreading out from the main cluster in the corner. The further away from the corner you get, the more space you should leave between the bats.
Step 5: Add Some Webs To complete the look, stretch some fake spider webs over your bat colony and around the corner of the room.
5. Menacing Carved Wall Bats

These aren’t your average paper cutouts. These intricately carved wooden bats bring a more artistic and menacing feel to your wall decor. The detailed patterns and sharp, angry faces make them look like demonic creatures rather than simple animals.
This decoration is for someone who takes their spooky style seriously. The 3D nature and detailed carving make these bats a true focal point, especially when lit from below to create dramatic shadows. They feel more like permanent art pieces than temporary decorations.
DIY Instructions: How to Make a Faux Carved Bat
What You’ll Need:
- A sheet of black craft foam (the thick kind)
- A pointy tool, like a dull pencil or a ballpoint pen that has run out of ink
- A bat stencil
- Scissors
- A silver or gray metallic marker
Step-by-Step Guide:
Step 1: Cut Out Your Bat Trace your bat stencil onto the black foam and cut out the shape.
Step 2: “Carve” the Details Place the foam bat on a hard surface. Use your dull pencil or pen to press lines and patterns into the foam. You are not poking holes, just pressing hard enough to leave a dent. Create fancy patterns on the wings.
Step 3: Add a Face Press in two angry eyes, a nose, and a mouth with sharp fangs.
Step 4: Highlight Your Work To make your “carvings” stand out, take the metallic marker and lightly color over the lines you pressed into the foam. This will make them look like carved highlights.
Step 5: Hang Your Masterpiece Use some removable putty to hang your bat on the wall.
6. Bat Swarm Mirror Takeover

Create a spooky and surreal scene by having a swarm of bats fly across a mirror. The reflection creates an illusion of double the bats, making the swarm look even larger and more chaotic. It feels as if the bats are emerging from the mirror world itself.
This is a very clever way to decorate. It combines a classic Halloween motif with an elegant piece of home decor, creating a look that is both beautiful and unsettling. The golden frame of the mirror adds a touch of gothic class.
DIY Instructions: How to Decorate a Mirror with Bats
What You’ll Need:
- Black paper
- Bat stencils in many different sizes, from very big to very tiny
- Scissors
- Removable adhesive putty or clear double-sided tape
Step-by-Step Guide:
Step 1: Make a Bat Cloud Trace and cut out a very large number of bats in all your different sizes. You will need a lot to make it look full.
Step 2: Give Them Wings Gently fold the wings up on each bat to make them look 3D.
Step 3: Plan Your Flight Path Decide how you want the swarm to move. A swooping curve across the mirror often looks best.
Step 4: Start Sticking Using small pieces of putty or tape, start sticking the bats to the wall next to the mirror. Then, continue the swarm right across the glass of the mirror. Finally, have the swarm continue onto the wall on the other side.
Step 5: Create a Dense Swarm In the middle of your swarm, cluster the bats very close together. Use all your different sizes, especially the tiny ones, to fill in any gaps. This will make the swarm look thick and real.
7. Stained Glass Bat Window Cling

Turn your windows into a beautiful work of spooky art with a stained glass-style window cling. This decoration captures the magical feeling of a moonlit Halloween night. The silhouettes of bare trees and flying bats against a colorful, glowing moon create a stunning visual.
This is a great way to decorate for people who love the beauty of Halloween more than the horror. During the day, sunlight shines through the colors, and at night, the lights from inside your house make it glow for everyone outside to see.
DIY Instructions: How to Make a Faux Stained Glass Window
What You’ll Need:
- A piece of clear contact paper or a clear sheet protector
- Black construction paper
- Colored tissue paper in yellow, blue, and orange
- A bat stencil, and a tree branch stencil (or you can draw them)
- Glue stick
- Scissors
Step-by-Step Guide:
Step 1: Create Your Frame Cut your clear contact paper to the size of your window pane. Lay it on a table with the sticky side up.
Step 2: Make Your Silhouettes Trace and cut out your bat and tree branch shapes from the black construction paper. Also, cut out a large circle for the moon.
Step 3: Create the Background Rip up your colored tissue paper into small pieces. Stick these pieces all over the sticky side of the contact paper, overlapping them to create the “stained glass” background.
Step 4: Add the Scenery Once the background is covered, use a glue stick to put glue on the front of your black paper silhouettes. Carefully place them on top of the tissue paper layer.
Step 5: Display Your Art Carefully lift your finished creation and press the sticky side against a clean window. The whole thing will stick to the glass and look like a beautiful stained glass painting.
8. 3D Bats on the Windows

Give your windows a creepy, three-dimensional makeover with these realistic-looking bats. These decorations are designed to cling to the glass, making it look as though a swarm of bats is trying to get into your house. The varied positions and sizes make the scene look very natural.
This is a great way to decorate the outside of your house. It creates a spooky scene for neighbors and trick-or-treaters to enjoy. Adding some fake spider webs in the corners of the windows completes the haunted look.
DIY Instructions: How to Make Window Bats
What You’ll Need:
- Black craft foam
- A bat stencil
- Scissors
- Red glitter glue or small red gem stickers
- Window-safe removable adhesive (like clear museum gel or putty)
Step-by-Step Guide:
Step 1: Cut Out Your Bats Trace your bat stencil onto the black craft foam and cut out several bats. Craft foam is great for this because it’s weatherproof and holds its shape.
Step 2: Give Them Shape Gently bend and fold the foam bats. You can bend one wing up and one wing down, or fold them in half as if they are resting. This makes them look more realistic than flat cutouts.
Step 3: Add Glowing Eyes Use the red glitter glue to make two small dots for eyes on each bat. Or, you can stick on two tiny red gems. Let them dry completely.
Step 4: Stick Them to the Window Put a small ball of the clear museum gel on the back of each bat’s body. Press them firmly onto the outside of your windows. Arrange them so they look like they are crawling all over the glass.
9. Black Lace Bat Curtains

Add a touch of gothic romance to your windows with these beautiful black lace curtains. The delicate lace is woven with a pattern of tree branches and bats, creating a look that is both elegant and eerie. They filter the light beautifully, casting spooky shadows into the room.
This is a wonderful decoration for those who love a more sophisticated and less obvious Halloween style. The curtains are a statement piece that can transform the feel of an entire room, making it feel like a parlor in a haunted mansion.
DIY Instructions: How to Make No-Sew Lace Curtains
What You’ll Need:
- A few yards of black lace fabric (enough to cover your window)
- A bat stencil
- Black felt
- Fabric glue
- Scissors
- A tension rod or a regular curtain rod
Step-by-Step Guide:
Step 1: Measure and Cut Your Fabric Measure your window and cut your lace fabric so that it is the right length and width. You will need two panels.
Step 2: Make a Pocket for the Rod At the top of each lace panel, fold over about two inches of fabric and use a line of fabric glue to stick it down, creating a pocket. Make sure the pocket is wide enough for your curtain rod to slide through. Let the glue dry.
Step 3: Cut Out Your Felt Bats Trace your bat stencil onto the black felt and cut out several bat shapes.
Step 4: Decorate Your Curtains Lay your lace curtain panels flat. Arrange the felt bats on the lace in a pattern you like. Use small dots of fabric glue to attach the bats to the lace. Let them dry completely.
Step 5: Hang Your Curtains Slide your curtain rod through the pockets you made and hang your new, spooky curtains in the window.
10. Glow-in-the-Dark Window Bats

Surprise your guests with a decoration that comes to life after dark. These glow-in-the-dark bat stickers look like simple decorations during the day, but at night they shine with an eerie green light. Arranged in a spiral or a giant bat shape, they create a truly magical effect.
This is a fun and low-effort way to decorate a window or a wall in a kid’s room. The glowing effect is always a big hit, and it adds an extra layer of spooky fun once the sun goes down.
DIY Instructions: How to Make Your Own Glowing Bats
What You’ll Need:
- A sheet of glow-in-the-dark vinyl or paper (from a craft store)
- A bat stencil
- A pencil
- Scissors
Step-by-Step Guide:
Step 1: Trace Your Bats On the back of the glow-in-the-dark paper, trace your bat stencil many times.
Step 2: Cut Them Out Carefully cut out all the glowing bat shapes.
Step 3: Charge Them Up Before you stick them up, you need to “charge” the paper. Just lay the bats out under a bright lamp for about 15 minutes.
Step 4: Create Your Design Turn off the lights to see them glow. Now, stick them to your window or wall. Most glow-in-the-dark paper is like a sticker, so you can just peel off the back. Arrange them in a cool shape, like a big bat made out of little bats, or a swirling vortex.
11. Hanging Bat Canopy

Create an immersive dining experience with this hanging bat installation. A large colony of bats is suspended from the ceiling, forming a dense canopy over the table. This makes it feel like you are dining in a cavern surrounded by the creatures of the night.
The varying heights and colors of the bats give the display depth and a sense of motion. It’s a bold decoration that transforms an entire room into a spooky environment, sure to be a conversation starter at any dinner party.
DIY Instructions: How to Create a Bat Canopy
What You’ll Need:
- A wire mesh grid (from a hardware store) or a large embroidery hoop
- Many plastic or rubber bats
- Clear fishing line
- Scissors
- Hooks to hang the grid from the ceiling
Step-by-Step Guide:
Step 1: Prepare Your Hanger Have a grown-up install hooks in the ceiling above your table. Attach strings or wires to your mesh grid so you can hang it from the hooks.
Step 2: Cut Your Strings Cut many pieces of fishing line in different lengths. Some can be short (6 inches) and some long (2 feet). This variety is what makes it look cool.
Step 3: Tie On the Bats Tie one end of a piece of fishing line to a bat. Tie the other end to the wire grid.
Step 4: Build Your Colony Continue tying bats to the grid. Place them close together in the middle and a little farther apart on the edges. Use your different lengths of string.
Step 5: Hang Your Canopy Carefully lift the grid and hang it from the hooks on the ceiling.
12. Spiraling Bat Tornado

This dynamic installation creates the illusion of a bat tornado swirling through your room. The bats form a spiral that descends from a light fixture, as if they are being summoned by the light. It is a large, dramatic piece of decor that feels like it’s in motion.
This design turns your ceiling into the centerpiece of your Halloween decorations. The spiral shape naturally draws the eye down, making the room feel taller and more dramatic.
DIY Instructions: How to Make a Bat Tornado
What You’ll Need:
- A large embroidery hoop
- Black paper or cardstock
- Bat stencils in different sizes
- Scissors
- A pencil
- Clear fishing line
- Tape
Step-by-Step Guide:
Step 1: Make a Bat Cloud Trace and cut out a large number of paper bats in various sizes. Gently fold their wings up to make them look 3D.
Step 2: Cut the Strings Cut many pieces of fishing line. You will need a few very long pieces for the bottom of the tornado, and many shorter pieces for the top.
Step 3: Attach the Bats Tape one end of a fishing line to the back of a bat.
Step 4: Create the Spiral Tie the other end of the fishing line to the embroidery hoop. Start with the longest strings and your biggest bats. As you add more bats, use shorter and shorter strings. This will create the funnel shape of the tornado.
Step 5: Hang Your Vortex Use more fishing line to hang your finished embroidery hoop from the ceiling or around a light fixture.
13. Rustic Bat Branch Mobile

For a more natural and crafty Halloween look, try this hanging branch mobile. It uses a real tree branch as the base, decorated with fuzzy, handmade bats. This brings an element of the spooky outdoors inside.
This decoration has a charming, rustic feel. The combination of the dark branch, soft bats, and maybe a few purple lights creates a scene that is both eerie and beautiful. It’s a nice change from more graphic or scary decor.
DIY Instructions: How to Make a Bat Branch
What You’ll Need:
- A cool-looking tree branch from your yard
- Black and gray felt
- A bat stencil
- Scissors
- Fabric glue
- Twine or string
- A small bag of cotton stuffing (poly-fil)
Step-by-Step Guide:
Step 1: Make Your Puffy Bats For each bat, trace and cut out two bat shapes from the felt. Place one on top of the other. Use fabric glue around the edges, but leave a small hole open.
Step 2: Stuff the Bats Gently push a small amount of cotton stuffing into the bat through the hole. Then, glue the hole shut. Let them all dry.
Step 3: Get Ready to Hang Cut pieces of twine in different lengths. Use a dot of glue to attach one end of the twine to the back of a stuffed bat.
Step 4: Assemble Your Mobile Tie the other end of each twine string to the branch. Space your bats out along the branch.
Step 5: Hang it Up Tie a long piece of twine to each end of the branch and hang it from a hook in the ceiling.
14. Holographic Bat Mobile

Add a bit of magic to your Halloween decor with this iridescent bat mobile. Instead of being dark and spooky, these bats shimmer with all the colors of the rainbow. The mobile gently twists and turns, catching the light and creating a dazzling display.
This is a fun and modern take on bat decorations. It’s less about being scary and more about creating a cool, eye-catching piece of art that moves.
DIY Instructions: How to Make a Holographic Mobile
What You’ll Need:
- An embroidery hoop or a metal ring
- Holographic or iridescent poster board
- A bat stencil
- A pencil
- Scissors
- A needle and clear thread
- Clear fishing line
Step-by-Step Guide:
Step 1: Cut Out Your Shiny Bats Trace your bat stencil onto the back of the holographic paper and cut out several bats.
Step 2: String Them Together Cut a few long pieces of clear thread. Use a needle to poke a hole in the top and bottom of most of your bats. Thread the needle and push it through the top of one bat, then the bottom, then the top of the next bat, leaving space between them. You are making a chain of bats.
Step 3: Attach to the Hoop Tie your finished bat chains to the embroidery hoop. Hang them at different heights.
Step 4: Get it Ready to Hang Cut three or four long, equal pieces of fishing line. Tie them evenly spaced around the hoop. Then, tie the other ends together in a knot at the top. Use this to hang your mobile from the ceiling.
15. Creepy Bat Cave Entrance

Transform any hallway or entryway into the mouth of a terrifying bat cave. This decoration uses layers of tattered, torn black fabric to create a dark tunnel. A large, menacing bat figure hangs at the entrance, guarding the passage.
This is an immersive decoration that creates a whole experience for your guests. Adding a fog machine and some spooky colored lights from within the tunnel makes it even more effective.
DIY Instructions: How to Build a Bat Cave
What You’ll Need:
- Several yards of cheap black fabric or black cheesecloth
- Scissors
- Thumbtacks or a staple gun
- A large plastic bat decoration
- String
Step-by-Step Guide:
Step 1: Shred the Fabric Lay your fabric out and use scissors to make long cuts in it. Rip and tear the fabric to make it look old and tattered. The messier it looks, the better.
Step 2: Create the Tunnel Start at one end of your hallway. Use thumbtacks or a staple gun to attach the top edge of the fabric to the ceiling. Let it drape down the walls. Layer more pieces of fabric to make it dark.
Step 3: Add the Guardian Tie a piece of string to your large bat decoration. Tack the other end of the string to the ceiling at the very entrance of your tunnel so the bat hangs in the middle.
Step 4: Add More Bats You can stick smaller bat cutouts to the inside of the fabric tunnel for an extra creepy touch.
16. Bat Swarm Door Archway

Welcome visitors with a spectacular arch of bats around your front door. This garland creates a powerful first impression, framing your entrance with a spooky swarm. The mix of solid black and glittery bats adds texture and catches the light beautifully.
This is a great way to make your front porch look festive and inviting for trick-or-treaters. It’s a large decoration that makes a big statement without being too difficult to create.
DIY Instructions: How to Make a Bat Arch
What You’ll Need:
- A long piece of flexible wire or a pre-made wire garland form
- Black and silver glitter craft foam or cardstock
- Bat stencils
- Scissors
- A hot glue gun (with a grown-up’s help)
- Hooks or clips to attach it to the doorframe
Step-by-Step Guide:
Step 1: Cut Out a Swarm Trace and cut out a very large number of bats from the black and silver glitter paper.
Step 2: Start Gluing Have a grown-up help you use the hot glue gun. Start at one end of the wire. Put a dot of glue on the wire and press the body of a bat onto it.
Step 3: Build the Garland Keep gluing bats onto the wire. Overlap them and have them point in different directions to make the swarm look thick and full. Mix up the black and silver bats.
Step 4: Shape and Hang Once the glue is dry, gently bend the wire into an arch shape. Use removable hooks or clips to secure your bat arch around your doorframe.
17. Haunted Bat Roost Tree

Turn a tree in your yard into a centerpiece of horror with this bat roost idea. The branches are filled with bats, some hanging upside down as if sleeping, and others with wings spread for flight. At night, colored lights make the scene truly come alive.
This decoration makes great use of your natural landscape. It creates a large-scale spooky scene that can be seen from the street, setting the mood for your entire property.
DIY Instructions: How to Make a Bat Tree
What You’ll Need:
- A tree in your yard
- Many plastic bats (get some that are made to hang upside down)
- Thin wire or string
- Outdoor spotlights (green and purple look great)
Step-by-Step Guide:
Step 1: Choose Your Tree Pick a tree that doesn’t have too many leaves on it, so you can see the bats clearly. A spooky, bare tree is great.
Step 2: Prepare the Bats for Hanging Cut pieces of wire or string. Loop them through a hole on the bat or tie them around the bat’s feet.
Step 3: Infest the Tree Hang the bats all over the branches of the tree. Hang most of them upside down. Place a few right-side up on the trunk or branches as if they are crawling.
Step 4: Light it Up Place your colored spotlights on the ground at the base of the tree. Aim them up into the branches.
Step 5: Add a Graveyard (Optional) For an extra spooky touch, you can place a few fake tombstones around the base of the tree.
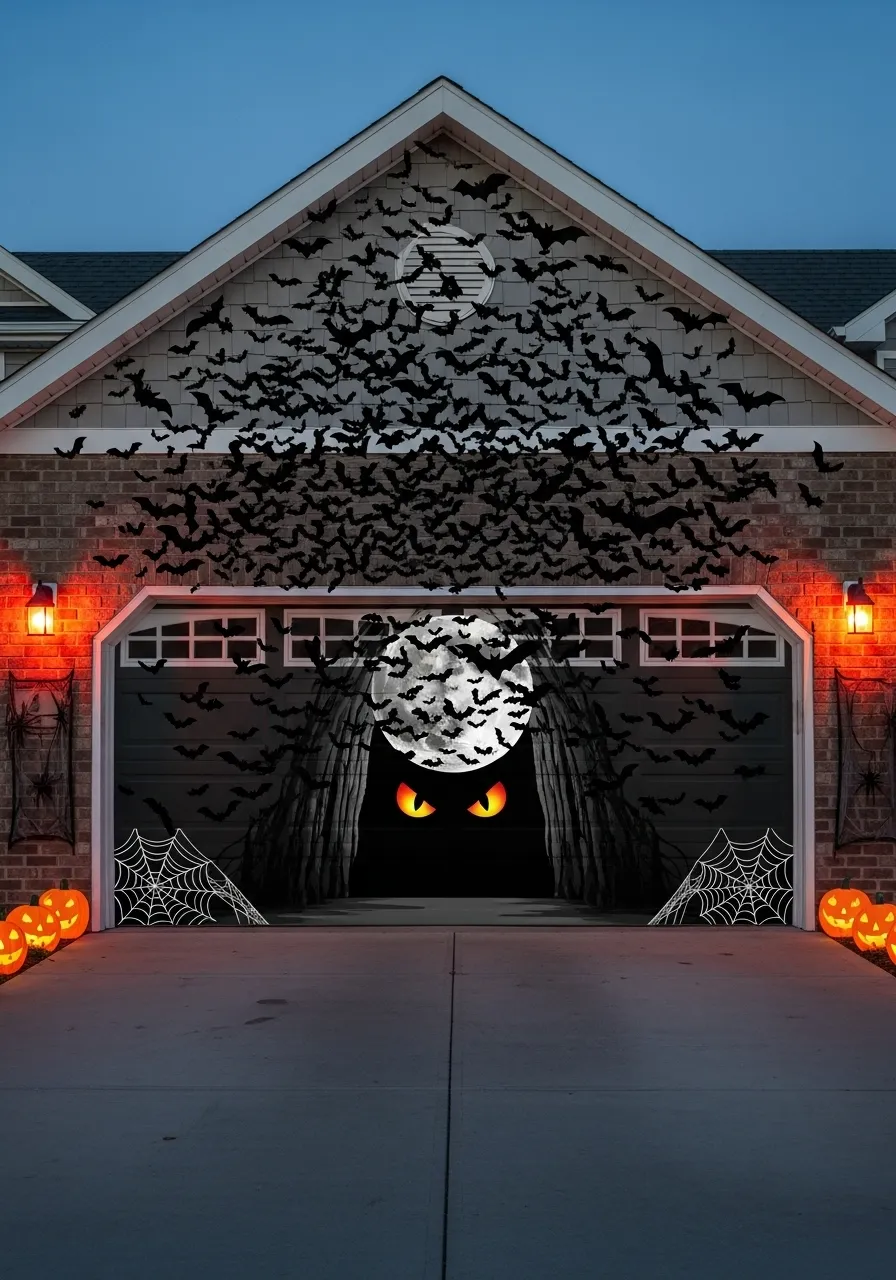
18. Garage Door Bat Cave

This huge decoration transforms your garage door into the entrance to a monster’s lair. A printed banner makes the door look like a dark cave opening with glowing eyes peering out. A massive swarm of 3D bats appears to be flying out of the cave.
This idea is all about creating a big illusion. It’s a fantastic way to decorate a large, flat surface and will definitely make your house the talk of the neighborhood.
DIY Instructions: How to Make a Garage Bat Cave
What You’ll Need:
- A cave-themed banner for your garage door (you can buy these online) OR a large black sheet and yellow/red poster board
- Lots of black construction paper
- Bat stencils, a pencil, and scissors
- Strong, outdoor double-sided tape
Step-by-Step Guide:
Step 1: Create the Cave Attach the banner to your garage door. If you are making your own, hang a black sheet and tape two big, scary eye shapes cut from the poster board onto it.
Step 2: Create a Bat Hurricane Trace and cut out as many bats as you can from the black paper. You will need a lot! Fold their wings to make them 3D.
Step 3: Start the Swarm Using the double-sided tape, start sticking the bats onto the house. Begin by clustering them densely around the top of the “cave” opening on the garage.
Step 4: Expand the Swarm Continue sticking the bats up the wall above the garage. Spread them out more as you get further away from the garage door, making it look like they are flying away into the night.
19. Bat Silhouette Porch Railing

This is a simple and clean way to add a spooky touch to your front porch. Black panels are attached to the railing, creating a bold background for bat silhouettes. It’s an organized and graphic look that is very effective.
This decoration is great for adding a festive touch without being too messy or over-the-top. The strong contrast between the black bats and a white railing makes it stand out, especially from a distance.
DIY Instructions: How to Make a Bat Railing
What You’ll Need:
- Black foam board or corrugated plastic sheets
- A craft knife (get a grown-up’s help)
- A ruler
- Black zip ties
- Bat stencils and black cardstock (optional, for extra bats)
Step-by-Step Guide:
Step 1: Measure Your Railing Measure the space between the posts on your porch railing. You need the height and the width.
Step 2: Cut the Panels (Adults Only!) Ask a grown-up to use the craft knife and ruler to cut the black foam board into panels that will fit in the spaces you measured.
Step 3: Attach the Panels Use black zip ties to attach the panels to the railing posts. Pull them tight so the panels are secure.
Step 4: Add More Bats For extra decoration, cut some bat shapes out of cardstock. Use double-sided tape to stick them onto the black panels or the railing posts themselves.
20. Whispering Bat Wind Chimes

Add some spooky sounds to your porch with these bat-themed wind chimes. Made from metal and driftwood, they create a gentle, eerie clinking noise whenever the wind blows. It’s a decoration that engages more than just the sense of sight.
The rustic look of the driftwood combined with the bat shapes makes for a unique piece of outdoor decor. It’s a subtle but creepy addition to your Halloween atmosphere.
DIY Instructions: How to Make Bat Wind Chimes
What You’ll Need:
- A piece of driftwood
- A few small eyelet screws
- Thin metal craft sheets or old soda cans, washed and dried
- A permanent marker
- Tin snips (get a grown-up to help)
- A nail and hammer
- Fishing line
Step-by-Step Guide:
Step 1: Prepare the Hanger Have a grown-up help you gently screw a few small eyelet screws into the bottom of your piece of driftwood.
Step 2: Draw Your Bats Using a permanent marker, draw bat shapes on your metal sheets.
Step 3: Cut the Bats (Adults Only!) Ask a grown-up to carefully cut out the bat shapes using the tin snips. The edges can be sharp, so be careful.
Step 4: Make a Hole Place a bat on a piece of scrap wood. Use the hammer and nail to carefully punch a hole near the top of the bat.
Step 5: Assemble the Chimes Cut pieces of fishing line in different lengths. Tie one end through the hole in a bat, and tie the other end to one of the eyelet screws on the driftwood. Hang all your bats.
Step 6: Hang it Up Tie a long piece of fishing line to both ends of the driftwood and use it to hang your new wind chime on your porch.
21. Eerie Bat Garden Stakes

Light the way for trick-or-treaters with these spooky bat silhouettes. Placed among solar-powered garden lights, these bat stakes create a creepy graveyard scene on your lawn. The bats stand out as dark shapes against the glow, looking as if they are about to take flight into the night.
This outdoor decoration is great for setting a haunted mood along a pathway or in a garden bed. The combination of light and shadow makes for a simple but highly effective display that brings your yard to life after dark.
DIY Instructions: How to Make Your Own Bat Stakes
What You’ll Need:
- Black corrugated plastic sheet (like a yard sign) or thick craft foam
- A craft knife (get a grown-up’s help)
- Thin metal rods or wooden dowels (from a hardware store)
- A hot glue gun or strong waterproof glue
- A bat stencil and a silver marker
Step-by-Step Guide:
Step 1: Trace Your Bats Use your silver marker to trace a few different bat shapes onto the black plastic sheet. Make them fairly large so they can be seen from the street.
Step 2: Cut Them Out (Adults Only!) Ask a grown-up to carefully cut out the bat shapes using the craft knife.
Step 3: Attach the Stakes Have a grown-up help you use the hot glue gun. Put a generous line of glue on the back of a bat’s body and press the top of a metal rod into it. Hold it until the glue sets.
Step 4: Plant Your Bats Once the glue is completely cool and hard, take your bat stakes outside. Push the rods firmly into the grass along your walkway or in your garden.
Step 5: Add the Lights Place some solar-powered garden lights near your bat stakes to make them glow at night.
22. Folded Paper Bat Garland

For a more delicate and crafty look, this hanging bat garland is a wonderful choice. Made from folded paper, the bats seem to float in the air, connected in long, graceful strands. Using plain black and patterned paper adds a stylish, decorative touch.
This decoration looks great draped around a doorway, window, or along a mantelpiece. It moves gently with the air currents in the room, giving the illusion of a whole column of bats in silent flight.
DIY Instructions: How to Make an Origami Bat Garland
What You’ll Need:
- Black and patterned scrapbook paper, cut into squares (6×6 inches is a good size)
- A needle and black thread
- Scissors
Step-by-Step Guide:
Step 1: Fold a Bat Take a square of paper. Fold it in half to make a triangle, then unfold. Fold it in half the other way to make another triangle, and unfold. Now, push the sides in to collapse the paper into a smaller, double-layered triangle. This is your base.
Step 2: Shape the Wings Fold the top layer’s corners up to the top point of the triangle. Flip it over and do the same on the other side. Now you have a kite shape.
Step 3: Make the Head and Wings Fold the top point down a little bit to make the bat’s head. Now, fold the entire thing in half and make two angled folds for the wings. It sounds tricky, but you can find lots of easy videos online for “origami bat”!
Step 4: Make a Colony Fold lots of bats using your different papers.
Step 5: String Them Together Thread your needle. Carefully push the needle through the body of one bat and pull some thread through. Then, do the same for the next bat, leaving a few inches of space between them. Keep going until your garland is the length you want.
23. Gothic Bat Wing Bookends

Add a touch of vampire library chic to your bookshelf with these ornate bat bookends. These heavy, detailed pieces are both functional and incredibly stylish. They look like they were taken directly from a gothic castle.
This is a great way to add a permanent piece of spooky decor to your home that works all year round. They are perfect for holding your collection of horror novels and create a fantastic, moody atmosphere on any shelf.
DIY Instructions: How to Make Your Own Spooky Bookends
What You’ll Need:
- Two simple, L-shaped metal or wooden bookends
- Air-dry modeling clay
- Clay sculpting tools or a plastic knife
- Black and bronze metallic craft paint
- A paintbrush
- Strong glue
Step-by-Step Guide:
Step 1: Build Your Bat Take a chunk of air-dry clay and start sculpting a bat shape onto the vertical part of one bookend. Focus on making big, dramatic wings. Don’t worry about making it look exactly right, just have fun. Do the same for the second bookend.
Step 2: Let it Dry Let your clay dry completely. This might take a day or two. It will feel hard and light when it’s ready.
Step 3: Paint it Black Paint the entire bookend, including your clay bat, completely black. Let it dry.
Step 4: Add Metallic Highlights Dip the very tip of your finger or a dry paintbrush into the bronze paint. Gently brush it over the raised parts of your clay bat. This will make the details pop and look like old metal.
Step 5: Let them Rest Let the paint dry, and your custom bookends are ready to guard your books.
24. Cute Felt Bat Ornaments

Who says bats have to be scary? These adorable felt bat ornaments are a sweet and charming take on Halloween decor. With their friendly smiles and soft pastel colors, they are a fun addition to a Halloween tree or can be hung anywhere you need a touch of cuteness.
This is a great decoration for households with young children or for anyone who prefers a less frightening approach to the holiday. They are soft, colorful, and completely friendly.
DIY Instructions: How to Make Cute Bat Buddies
What You’ll Need:
- Felt in different colors (like gray, purple, and mint green) plus black for the wings
- A paper bat pattern with a body and wings
- Scissors
- Embroidery thread in black and pink
- A needle
- A small bag of cotton stuffing
- Fabric glue
- A small ribbon for hanging
Step-by-Step Guide:
Step 1: Cut Your Pieces For each bat, cut out two body shapes from a colored felt, and two wing shapes from the black felt.
Step 2: Sew the Body Place the two body pieces together. Use black thread to sew two little eyes and a smile on one piece. Use pink thread to make two little circles for cheeks.
Step 3: Start Sewing Use thread to sew around the edge of the body, but leave a small hole at the bottom.
Step 4: Make it Puffy Gently push a small amount of cotton stuffing into the body through the hole until it’s puffy. Then, sew the hole closed.
Step 5: Add the Wings and Hanger Use a little fabric glue to attach the wings to the back of the bat’s body. Fold a small piece of ribbon into a loop and glue the ends to the back of the bat’s head so you can hang it up.
25. Bat Swarm Light Projector

Instantly cover an entire room in a swirling swarm of bats with a Halloween light projector. This device casts moving images of colorful bats onto your walls and ceiling, creating an instant party atmosphere with almost no effort.
This is a fantastic option for filling a large space with dynamic decoration. The constant motion and bright colors are eye-catching and fun, turning any room into a spooky dance floor.
DIY Instructions: How to Make a Simple Bat Projector
What You’ll Need:
- A strong flashlight with a round lens
- A piece of black construction paper
- Scissors
- A pencil
- Tape
Step-by-Step Guide:
Step 1: Trace the Light Place the front of the flashlight down on the black paper and trace a circle around it.
Step 2: Cut Out the Circle Cut out the circle you traced. This should fit perfectly over the lens of your flashlight.
Step 3: Create Your Stencil Inside the black circle, carefully draw and cut out a small bat shape. The light will only shine through the hole you cut.
Step 4: Attach Your Stencil Tape the black paper circle over the front of the flashlight. Make sure the bat shape is in the middle.
Step 5: Project Your Bat Turn off the room lights, turn on your flashlight, and point it at a blank wall. You’ve made a bat signal!
26. Scientific Bat Specimen Display

This decoration creates the look of a vintage naturalist’s collection. Featuring realistic bats mounted in shadow boxes with scientific-looking labels, it’s a sophisticated and subtly macabre display. It adds a touch of gothic academia to your decor.
This is a great idea for a study, a bookshelf, or a mantelpiece. It tells a story and feels more like a real, curious artifact than a simple Halloween decoration.
DIY Instructions: How to Make a Faux Taxidermy Bat
What You’ll Need:
- A shadow box frame
- A piece of scrapbook paper that looks like old linen or burlap
- A realistic-looking plastic or rubber bat
- Straight pins
- A printer
- Hot glue gun (with a grown-up’s help)
Step-by-Step Guide:
Step 1: Prepare Your Box Open the shadow box and place your piece of linen-looking paper inside as the background.
Step 2: Mount Your Specimen Use a grown-up’s help with the hot glue gun. Put a few dots of glue on the back of the plastic bat’s body and press it into the middle of the shadow box.
Step 3: Make it Look Scientific Gently press a few straight pins into the background around the bat’s wings and body, as if you are holding it in place for study.
Step 4: Create a Label On your computer, type up a fake scientific name for your bat (like Vespertilio Halloweenus), a fake location, and a date. Print it out on a small piece of paper.
Step 5: Add the Label Glue the label inside the box beneath the bat. Close up your shadow box and it’s ready to display.
27. Bat-Shaped Charcuterie Board

Take your Halloween party snacks to the next level with a bat-shaped serving board. This functional piece of decor brings the spooky theme right to the food table. Filled with cheeses, meats, and fruits, it becomes a festive and edible centerpiece.
This is a fantastic way to make your party food part of the decoration. The natural wood grain contrasts nicely with the dark foods often served for Halloween, making everything look extra delicious.
DIY Instructions: How to Make a Bat Snack Board
What You’ll Need:
- A regular flat wooden cutting board or serving platter
- A large piece of paper
- A pencil
- Scissors
- A variety of spooky-colored foods (blackberries, black olives, dark crackers, figs, etc.)
Step-by-Step Guide:
Step 1: Create a Bat Template On your piece of paper, draw a large, simple bat shape. The wings should be wide to hold lots of food. Cut out your paper bat.
Step 2: Lay Down Your Guide Place the paper bat template in the middle of your wooden serving board.
Step 3: Build Your Bat with Food Start arranging your food on the board, using the paper template as your guide. Use dark foods like blackberries or olives to create the outline of the bat.
Step 4: Fill it In Fill the inside of your bat outline with the other snacks, like cheese, crackers, and nuts. Keep the foods tightly packed so they hold the bat shape.
Step 5: Remove the Guide Once your food bat is complete, carefully slide the paper template out from underneath. Your edible bat is ready to be served!
28. Bat Signal Spotlight

Summon the spirit of Halloween (or a certain superhero) with this dramatic bat signal spotlight. This single, powerful image projected onto a wall or ceiling creates an instant focal point. It’s a simple, clean, and universally recognized symbol of the night.
This decoration is all about high impact with minimal fuss. It works best in a dark room where the crisp shadow can stand out, creating a mysterious and cool atmosphere.
DIY Instructions: How to Create a Bat Signal
What You’ll Need:
- A desk lamp with a single bulb that you can aim, or a strong flashlight
- A small piece of cardboard or black paper
- Scissors
- Tape
Step-by-Step Guide:
Step 1: Make Your Stencil Cut a circle from the cardboard that is slightly larger than the light source on your lamp or flashlight.
Step 2: Cut Out the Bat In the center of the cardboard circle, carefully draw and cut out a bat symbol. This is the shape the light will shine through.
Step 3: Attach the Stencil Use tape to secure your cardboard stencil over the light. Make sure no light can escape from the sides, only through the bat cutout.
Step 4: Power Up the Signal Turn off the other lights in the room. Turn on your lamp or flashlight and aim it at a blank wall. Adjust the distance to make the bat signal bigger or smaller and more focused.
29. Stone Bat Garden Guardians

Add an ancient and eerie feel to your garden with stone bat statues. These figures look like little gargoyles, wrapping their wings around themselves as if they are sleeping or protecting something. Placed on stairs or along a path, they look like they’ve been part of the landscape for centuries.
This is a great option for durable, long-lasting outdoor decor. They add a touch of gothic mystery to your landscaping that feels timeless and deeply spooky.
DIY Instructions: How to Make Faux Stone Bats
What You’ll Need:
- A smooth, roundish rock (about the size of a melon)
- Air-dry modeling clay
- Gray, black, and white craft paint
- A paintbrush
- Outdoor sealant spray (with a grown-up’s help)
Step-by-Step Guide:
Step 1: Find Your Stone Find a nice, smooth rock that can sit flat. Clean off any dirt and let it dry.
Step 2: Sculpt the Bat Use the air-dry clay to sculpt bat wings that wrap around the rock. Add a little face and two pointy ears on top. You don’t have to be a great artist—just the suggestion of a bat is enough. Let the clay dry completely.
Step 3: Paint the “Stone” Paint the entire rock and the clay parts with gray paint.
Step 4: Make it Look Old While the gray paint is still a little wet, add some streaks of black and white paint and blend them in. This will make it look like old, weathered stone. Let it dry.
Step 5: Seal it Up (Adults Only!) To protect it from the rain, ask a grown-up to spray your bat rock with a clear outdoor sealant. Do this in a well-ventilated area. Once it’s dry, you can place your stone guardian in the garden.
30. Spooky Bat Terrarium Centerpiece

Create an elegant and modern piece of spooky decor with this bat terrarium. A clear glass vase is filled with rocks, branches, and bat silhouettes to create a self-contained haunted scene. It’s a clean and simple centerpiece that adds a touch of darkness to any table.
This decoration is great because it’s not messy and can be customized with different colors of rocks or flowers. It’s a sophisticated way to display your love for bats without having them take over the whole room.
DIY Instructions: How to Make a Bat Vase
What You’ll Need:
- A clear glass vase
- Small rocks, pebbles, or black aquarium gravel
- A few small, spooky-looking twigs or branches
- Black craft foam
- A bat stencil
- Scissors
Step-by-Step Guide:
Step 1: Cut Your Bats Trace your bat stencil a few times onto the black craft foam and cut out the shapes. Craft foam is great because it’s waterproof and a little bit 3D.
Step 2: Build Your Base Pour your rocks or gravel into the bottom of the vase.
Step 3: Arrange the Scenery Stick your spooky branches down into the rocks so they stand up.
Step 4: Add the Bats Place your foam bats inside the vase. You can wedge them between rocks, lean them against the glass, or tuck them into the branches so it looks like they are flying around inside.
Step 5: Add a Finishing Touch (Optional) You can add a single dark flower, like a deep purple calla lily, to the vase for a touch of gothic elegance.
31. Giant Stitched Bat Wall Art

Make a huge statement with a piece of textile art that is both spooky and impressive. This giant, soft-sculpture bat looks like a specimen from a mad scientist’s lab, with stitched details that outline its skeleton. It’s a unique piece that dominates a wall with its impressive wingspan.
This decoration blends a crafty, handmade feel with a creepy subject. The mix of different black and gray fabrics adds texture and depth, making it a true centerpiece for any Halloween gathering.
DIY Instructions: How to Make a No-Sew Fabric Bat
What You’ll Need:
- A large piece of black felt for the body and wings
- Gray fabric (like from an old pair of jeans) for wing panels
- Cotton stuffing
- Fabric glue
- A white fabric marker or puffy paint
- Two large black buttons for eyes
- Scissors
Step-by-Step Guide:
Step 1: Cut Out Your Bat Draw and cut out a large bat shape from the black felt. Make it in three pieces: the body, and two separate wings.
Step 2: Add Detail to the Wings Cut panels from the gray fabric that are slightly smaller than your felt wings. Use fabric glue to attach these panels to the middle of the wings to create a layered look.
Step 3: Make the Body Puffy Cut a second, identical body piece from the black felt. Glue the two body pieces together along the edges, leaving a hole. Gently push stuffing inside to make it puffy, then glue the hole shut.
Step 4: Attach the Wings Glue the wings to the back of the stuffed body.
Step 5: Add the Skeleton and Face Use your white fabric marker or puffy paint to draw a ribcage and bones on the bat’s body and lines on the wings. Glue on the two button eyes. Let everything dry completely before hanging it.
32. Etched Bat Glassware

Host the most elegant gothic dinner party with a set of bat-etched glassware. This subtle detail adds a layer of sophistication to your table setting. The tiny bat silhouettes look as if they are flying across the glass, a classy nod to the creatures of the night.
Unlike temporary decorations, this is a permanent design that you can enjoy year after year. It’s a wonderful way to invest in a spooky aesthetic that is more refined than scary, suitable for any dark and moody occasion.
DIY Instructions: How to Etch Your Own Glasses
What You’ll Need:
- Plain glass cups or wine glasses
- Armour Etch glass etching cream (from a craft store)
- Small bat-shaped vinyl stickers
- Rubber gloves and safety glasses
- A small paintbrush
- Paper towels
Step-by-Step Guide:
Step 1: Get Your Glasses Ready Wash and thoroughly dry your glasses. Make sure there are no fingerprints where you plan to put the stickers.
Step 2: Place Your Stencils Carefully place the bat stickers onto the glass. Press down firmly on all the edges to make sure no etching cream can sneak underneath. This is very important.
Step 3: Put on Safety Gear Put on your rubber gloves and safety glasses. The etching cream is a chemical, so you need to protect your skin and eyes.
Step 4: Apply the Cream Using your paintbrush, apply a thick, even layer of the etching cream over the bat stickers. Don’t just paint it on; dab it so it’s a thick coat.
Step 5: Wait and Rinse Let the cream sit for about 5-10 minutes (read the instructions on your bottle). Then, under running water, rinse off all the cream. Peel off the stickers while rinsing. The glass underneath will now be frosted. Dry the glass, and it’s ready to use.
33. Gothic Bat Weathervane

Let all who approach your home know which way the wind is blowing with a magnificent bat weathervane. This piece of rooftop decor is the ultimate commitment to a gothic aesthetic. It serves as a spooky guardian, watching over your home from above.
A weathervane is a classic architectural element, and swapping the traditional rooster for a bat adds a huge amount of personality. It’s a statement piece that blends in with the house itself, making your spooky style a permanent fixture.
DIY Instructions: How to Make a Decorative Weathervane
What You’ll Need:
- A sheet of black corrugated plastic
- A wooden dowel (about 3 feet long)
- A craft knife (get a grown-up’s help)
- A drill and a long nail that is slightly wider than the dowel
- A small plastic bead
- Waterproof glue
Step-by-Step Guide:
Step 1: Create Your Bat and Arrow Draw a large bat shape on the plastic sheet. On another part of the sheet, draw the two ends of an arrow: the pointy tip and the feathered tail.
Step 2: Cut the Pieces (Adults Only!) Ask a grown-up to carefully cut out the bat and the two arrow ends.
Step 3: Assemble the Spinner Glue the bat onto the top of the wooden dowel. Glue the arrow’s tip to the front of the dowel, and the tail to the back. This part will be the spinner.
Step 4: Create the Stand You can stick another dowel into the ground or attach it to a shed roof. Ask a grown-up to drill a hole through the top of this stand.
Step 5: Make it Spin Have a grown-up drill a hole through the middle of your bat-and-arrow dowel. Slide the long nail through the hole in your stand, then through the bead (this helps it spin), and then through the hole in your spinner dowel. Don’t hammer it in tight, leave it loose so it can spin in the wind.
34. Colorful Crocheted Bat Friends

Add a dose of cozy and cute to your Halloween with a bowl full of crocheted bats. With their cheerful colors and friendly fanged smiles, these little creatures are more sweet than spooky. They make for a charming centerpiece or can be strung together for a garland.
This decoration is a great way to celebrate the season with a handmade touch. It’s perfect for a more whimsical and less scary Halloween theme, proving that not all creatures of the night have to be frightening.
DIY Instructions: How to Make a No-Sew Sock Bat
What You’ll Need:
- A small, fuzzy sock (black, gray, or a fun color)
- Rice or beanbag filling
- A rubber band or string
- Black and white felt
- Fabric glue
- Scissors
Step-by-Step Guide:
Step 1: Fill the Bat’s Body Pour rice into the sock until you have a nice, plump little body shape.
Step 2: Make the Head and Ears Tie the sock closed tightly with a rubber band. Leave a little bit of the sock cuff above the rubber band. Cut the cuff part down the middle and then shape the two pieces into pointy ears.
Step 3: Cut Out the Wings and Fangs From the black felt, cut out a pair of bat wings. From the white felt, cut out two tiny triangles for fangs.
Step 4: Glue it All Together Use fabric glue to attach the wings to the back of the sock body. Then, glue the two little fangs onto the front to give your bat a cute, toothy grin. You can also add small felt circles for eyes.
35. Ornate Bat Wing Wall Sconce

Light up your haunted halls with a wall sconce straight from a vampire’s castle. This highly detailed fixture features a bat whose wing elegantly holds a candle aloft. It’s a piece of functional art that adds an incredible amount of gothic atmosphere.
The aged bronze finish and intricate details make this feel like a genuine antique. It casts a warm, eerie glow that is perfect for creating a moody and mysterious environment in any room.
DIY Instructions: How to Make a Faux Bat Sconce
What You’ll Need:
- A small, decorative wooden plaque
- Air-dry modeling clay
- A battery-operated LED taper candle
- Black and bronze metallic craft paint
- A paintbrush
- Strong glue or a hot glue gun (with a grown-up’s help)
Step-by-Step Guide:
Step 1: Sculpt Your Bat Use the air-dry clay to sculpt a bat shape onto the front of the wooden plaque. Make one wing much larger and have it curve upwards to form a holder for your candle. Let the clay dry completely.
Step 2: Create the Candle Holder Make a small ring of clay that your LED candle can sit in snugly. Glue this ring to the top of the big, curved wing.
Step 3: Paint it Black Paint the entire plaque and the clay bat completely black. Let it dry fully.
Step 4: Add the Antique Finish Dip your finger or a dry brush in a tiny bit of bronze paint. Lightly rub it over the raised parts of your bat sculpture. This will highlight the details and make it look like old, cast metal.
Step 5: Add the Light Once the paint is dry, place your battery-operated candle in the holder. Hang your new, safe sconce on the wall.
36. Glimmering Bat Confetti

A little sparkle can go a long way. This bat-shaped confetti in shimmering purple, silver, and black is an easy way to add a festive touch to your party. Scatter it across a tablecloth or down the center of a runner to catch the light and add some glamour.
This is one of the simplest decorations to use, but it instantly makes a surface look more prepared for a party. You can also add a pinch to Halloween cards or party invitations for a fun surprise.
DIY Instructions: How to Make Your Own Bat Confetti
What You’ll Need:
- A bat-shaped craft punch (you can find these at any craft store)
- Scrapbook paper in black, silver glitter, and purple glitter
Step-by-Step Guide:
Step 1: Get Your Paper Choose a few different kinds of cool paper. The glittery kind works best because it really sparkles in the light.
Step 2: Start Punching This is the fun part! Just take your bat-shaped punch and start punching out bat shapes from the paper.
Step 3: Make a Big Pile Keep punching until you have a big pile of glittery bats.
Step 4: Decorate! Mix all your different colored bats together in a bowl and then sprinkle them wherever you want some Halloween magic.
37. Bat Shadow Puppet Display

Create a mysterious and dramatic scene with nothing more than light and shadow. This simple display uses bat cutouts on sticks to cast large, ominous shadows on a wall. It’s a minimalist decoration that has a huge atmospheric impact.
The beauty of this idea is its simplicity. By placing the bats at different distances from the light, you can make the shadows different sizes, creating the illusion of depth and a swarm in flight.
DIY Instructions: How to Make a Shadow Caster
What You’ll Need:
- Black cardstock
- Thin wooden skewers or sticks
- A block of floral foam or a small wooden block with holes drilled in it
- Scissors
- Tape or glue
- A lamp with a single, bright bulb (an LED bulb works well)
Step-by-Step Guide:
Step 1: Cut Out Your Shadow Bats Draw or trace and cut out several bat shapes from the black cardstock.
Step 2: Attach Them to Sticks Tape or glue the back of each bat to the top of a wooden skewer.
Step 3: Create Your Stand Stick the other end of the skewers into your block of foam or wood. Arrange them at different heights and angles.
Step 4: Set the Scene Place your bat stand on a table a few feet away from a blank wall.
Step 5: Turn on the Light Place your lamp behind the bat stand and turn it on. Turn off the other lights in the room. Move the lamp closer or further away to make the bat shadows on the wall sharper, bigger, or smaller until you like how it looks.
38. Flying Bat Silhouette Lampshade

Give a plain lampshade a quick and easy Halloween makeover. This idea uses simple bat cutouts to create the illusion that a swarm is flying up and around the warm glow of the lamp. It’s a temporary decoration that adds a spooky touch to your everyday decor.
This is a great last-minute decorating idea that requires very few materials. The silhouette effect is classic and creepy, and adding a bat hanging from the pull-chain is a fun, finishing touch.
DIY Instructions: How to Decorate a Lampshade with Bats
What You’ll Need:
- Black construction paper
- A pencil
- Scissors
- Removable adhesive putty or double-sided tape
- A needle and thread (optional)
Step-by-Step Guide:
Step 1: Create Your Bats Draw and cut out several bat shapes from the black paper. Make them in a few different sizes for variety.
Step 2: Arrange Their Flight Path Plan how you want the bats to look on your lampshade. A swirling pattern that goes up the shade looks very cool.
Step 3: Stick Them On Take a tiny piece of removable putty or tape and stick it to the back of a bat. Press the bat firmly onto the outside of the lampshade. Continue adding bats until your swarm is complete.
Step 4: Add the Dangler (Optional) To hang a bat from the lamp’s pull-chain, carefully poke a needle with thread through the top of a paper bat, tie a knot, and then tie the other end of the thread to the chain.
You have now explored 38 different ways to decorate with bats. We have seen them fly from fireplaces, crawl up windows, and hang from ceilings. Each idea shows how a simple shape can create a powerful, spooky mood.
Decorating for Halloween does not have to be complex. A few paper cutouts or a well-placed light can change a room entirely. Your home can become a gothic castle, a creepy cave, or a charming autumn cottage.
So pick a project that excites you. Gather your materials and start creating. It is time to fill your home with the spirit of the season and let your spooky style take flight.
Key Takeaways
- Bats Are Versatile: This collection shows that bat decorations can be anything you want them to be. They can be genuinely scary, elegantly gothic, modern and artistic, or even cute and colorful.
- DIY Makes a Big Impact: You do not need to buy expensive decorations. Most of these impressive displays can be created at home using simple, affordable materials like paper, felt, and clay.
- Decorate Every Space: Bats are not just for walls. Think about your windows, doors, ceilings, garden, and even your glassware and snacks to create a fully immersive theme.
- Lighting is Everything: Many of the most effective ideas rely on good lighting. Use shadows, backlighting, and spotlights to make your bat decorations look dynamic and truly eerie after dark.