Are you ready to transform your ordinary bathroom into a stunning sanctuary? You do not need a massive renovation budget to achieve that sophisticated, high-end feel. Many of the most impactful upgrades come from smart choices in color, texture, and accessories.

Focusing on small, strategic changes can elevate your space from drab to designer, making it a true retreat. These seemingly minor adjustments often provide the biggest stylistic punch without requiring extensive construction or spending fortunes.
We have compiled a collection of 36 accessible ideas, focusing on elements that provide the greatest visual impact. Get ready to rethink your space and learn how simple materials and detailed DIY projects can introduce lasting elegance. Begin your journey toward a more luxurious home today.
1. Floating Wood Vanity and Modern Round Mirror

This bathroom design shows how mixing textures achieves an upscale feel without a massive price tag. A striking circular mirror with a matte black frame immediately centers the room and creates depth. Notice how this mirror is paired with a sleek, minimalist black vanity light, emphasizing the modern aesthetic.
The star of this look is the floating wood vanity, which introduces a lovely, warm element to the otherwise bright space. Its rustic grain contrasts beautifully with the clean white countertop. Because the vanity is mounted off the floor, the room feels significantly larger and more open. This piece, along with the black hardware, provides strong, sophisticated lines that make the entire ensemble feel expensive and thoughtfully curated. This pairing is an accessible way to achieve that sought-after spa like sanctuary.
Material Required for DIY Accent (Mirror Frame)
- One round frameless or thinly framed mirror (if you wish to upgrade an existing one).
- Matte black spray paint (specifically formulated for metal or plastic, depending on your frame material).
- Painter’s tape.
- New hanging wire or heavy duty D-rings and wall anchors (check your wall type).
Equipment Required for DIY Accent
- Drop cloth or old newspapers.
- Screwdriver (if removing the existing frame for easier painting).
- Gloves and safety mask (for spray painting).
- Level and tape measure.
DIY Instruction Steps (How to Achieve a Black Framed Mirror Look)
Step 1: Prepare Your Workspace and Mirror
Lay your drop cloth or newspapers down in a well ventilated area, preferably outdoors or in a garage. If your mirror has a frame already, thoroughly clean it to remove any dust or grime. If your mirror is currently frameless, you will be painting a thin line around the edge or attaching a simple, thin wooden or metal ring which you will then paint.
Step 2: Mask the Glass
Carefully apply painter’s tape along the inside edge of the mirror frame, right where the glass meets the frame. Press the tape down firmly to ensure no paint can seep underneath onto the reflective surface. You want a crisp, clean line.
Step 3: Apply the Spray Paint
Wearing your mask and gloves, shake the matte black spray paint can well for at least one minute. Hold the can approximately 8 to 12 inches away from the frame. Apply a very thin, even coat using smooth, sweeping motions. It is always better to apply two or three light coats than one thick coat, which can run or drip.
Step 4: Allow Drying and Reapply
Let the first coat dry completely according to the time specified on the paint can (usually 20 to 30 minutes). Once dry, apply a second light coat. Repeat this process until you achieve a rich, consistent black finish.
Step 5: Remove Tape and Hang
Wait until the final coat has completely cured, which might take a few hours or even overnight. Carefully peel away the painter’s tape. Install your new hanging hardware if necessary, making sure it is rated for the mirror’s weight. Use your level and tape measure to mount the mirror above the vanity, ensuring it is perfectly straight and centered for a professional look.
2. Deep Teal Walls and Gold Fixtures

Transforming your bathroom does not always require new cabinetry; sometimes a bold color change makes all the difference. This striking look uses a deep jewel-toned teal paint, applied from the floor to the ceiling, creating an immediate sense of richness. The subway tile on the lower half of the wall reflects light with its glossy finish, adding dimension to the dark color.
To keep the space from feeling too heavy, bright white trim and a white vanity base provide crisp contrast. The real luxury comes from the hardware choices. Elegant brass or gold-toned fixtures—the mirror frame, the vanity drawer pulls, the towel ring, and the globe sconces—pop against the dark background. The combination of rich color and warm metallic accents gives this bathroom an expensive, boutique hotel ambiance that feels incredibly inviting and cozy.
Material Required for DIY Accent (Hardware Upgrade)
- Gold or brass spray paint (use a metallic finish specifically for hardware).
- Clear protective sealant/topcoat (rated for high-moisture areas).
- New vanity knobs and pulls (if you are replacing them entirely).
- Small detail brush (for touch ups).
Equipment Required for DIY Accent
- Screwdriver (to remove existing hardware).
- Drop cloth or old towels.
- Painter’s tape (to cover screw heads if painting).
- Container of soapy water and clean rags (for cleaning).
DIY Instruction Steps (How to Update Hardware with Gold Finish)
Step 1: Carefully Remove Existing Hardware
Using a screwdriver, gently remove all the knobs, drawer pulls, and towel rings you plan to upgrade from the walls and vanity. Keep the screws separate and organized so you know which piece they belong to.
Step 2: Clean and Prepare the Pieces
Wash all the hardware thoroughly using warm, soapy water to remove any grease, dirt, or cleaning product residue. Any residue will prevent the paint from sticking correctly. Dry them completely, as paint will not adhere well to damp surfaces.
Step 3: Arrange and Spray Paint
Lay the hardware out on a drop cloth in a well-ventilated area. If you are only painting the exterior of a piece, use painter’s tape to mask off any areas you do not want painted, such as the screw threads or the back. Apply the gold or brass spray paint in light, even coats, holding the can approximately 10 inches away. Allow the first coat to dry completely before applying the next. Aim for complete, even coverage across all pieces.
Step 4: Seal for Durability
Once the paint is fully dry and you are happy with the color saturation, apply a coat of the clear protective sealant. This step is essential in a bathroom environment to protect the metallic finish from moisture and frequent handling, preventing chips and tarnish.
Step 5: Reinstall the Hardware
After the sealant has fully cured according to the product instructions, carefully reattach all the pieces using the original screws. Ensure the hardware is straight and securely fastened before admiring your sophisticated, warm-toned update.
3. Industrial Black Shelving and Storage

This bathroom proves that high contrast, combined with thoughtful accessories, creates instant visual appeal. The white subway tiles and black grout provide a textured backdrop that feels modern and clean. To elevate the functionality and style, the designer introduced a slender, open metal shelving unit. This approach provides abundant storage without blocking the light or making the room feel enclosed.
Black accents are consistently used across all elements: the mirror frame, the sink faucet, the lighting fixtures, and the floor tile. Even small items like the soap dispenser and toothbrush holder coordinate with the matte black theme. Using metal shelving under the sink keeps the space airy while offering practical storage for towels and bins. This simple, strong color palette is affordable, chic, and always in style.
Material Required for DIY Accent (Open Metal Shelf Unit)
- Steel or black painted metal pipe/rod sections (pre-cut to desired height and width).
- Matching metal pipe connectors or elbow joints.
- Wood shelves (cut to fit the frame, can be painted black or stained).
- Wall mounting brackets and heavy duty D-rings and wall anchors.
Equipment Required for DIY Accent
- Tape measure and pencil.
- Drill and various drill bits.
- Level.
- Safety goggles.
- Allen wrench or appropriate tool for connecting pipe joints.
DIY Instruction Steps (How to Build an Affordable Open Industrial Shelf)
Step 1: Plan and Measure Your Space
Determine the precise height and width you want the finished shelving unit to be, especially if you plan to install it over the toilet or next to the vanity. Mark the location of the wall mounting brackets on the wall using your pencil and level, ensuring they are perfectly aligned.
Step 2: Assemble the Frame Sections
Lay out your metal pipe or rod sections on the floor. Start connecting the pieces using the elbow joints and connectors to form the main rectangular frame outline. If you are using pre-threaded pipes, hand-tighten the pieces together. Ensure the structure is square and stable at each connection point.
Step 3: Attach Wall Mounts and Secure the Frame
Attach the wall mounting brackets to the frame where you previously marked the wall. Predrill holes into the wall at your marked locations. Secure the entire frame to the wall using the heavy duty screws and appropriate wall anchors. The unit must be firmly attached to prevent it from tipping.
Step 4: Install the Shelves
Place the pre-cut wooden shelves onto the horizontal supports of the metal frame. Depending on your design, you may need to drill pilot holes through the bottom of the shelf and into the support rod, then secure them with small screws for added stability. Make sure each shelf is flush with the metal frame.
Step 5: Finish and Style
Once the structure is completely stable, wipe down all surfaces. Arrange your towels, baskets, and decorative items. Remember to utilize the shelf for both necessary items and stylish accessories like artwork or plants to complete the elevated industrial aesthetic.
4. Terracotta Hues and Natural Arch Mirror

A warm color palette can instantly transform a basic bathroom into a stylish, spa-like escape. This design uses square terracotta-colored tiles to bathe the room in a soothing, earthy tone, a delightful alternative to standard white or gray. The color feels contemporary yet incredibly cozy.
To amplify this warmth, natural textures are essential. A stunning arched mirror with a light wood frame immediately draws the eye, softening the room’s hard edges. The vanity features a gorgeous terracotta-colored vessel sink that matches the tile, showcasing a strong commitment to the theme. Simple black faucets and hardware provide subtle grounding contrast, allowing the rich color and natural materials to truly shine. Adding woven baskets and pampas grass completes this relaxing, bohemian-inspired look.
Material Required for DIY Accent (Arched Mirror Upgrade)
- Large, rectangular mirror (existing or new).
- Thin, flexible wood trim or molding (enough to frame the mirror).
- Wood glue and clamps.
- Light stain or paint (to achieve the natural wood look).
- Jigsaw or handsaw.
Equipment Required for DIY Accent
- Measuring tape and pencil.
- Safety goggles.
- Sandpaper or orbital sander.
- Wood filler (if needed).
DIY Instruction Steps (How to Create an Affordable Arched Wood Mirror Frame)
Step 1: Determine the Arch Shape and Size
Measure the dimensions of your existing rectangular mirror. Decide on the height and curve of the arch you want to create above the top edge. A simple way to draw the arch is to find the center point of the top edge and use a string and pencil to draw a perfect semi-circle on a large piece of paper or cardboard. This will be your template.
Step 2: Prepare the Frame Pieces
Measure and cut two straight pieces of wood trim for the vertical sides of the mirror. Using your template, carefully cut the flexible wood trim or molding into the desired arch shape using a jigsaw. Sand all the cut edges thoroughly until they are smooth and free of splinters.
Step 3: Stain or Paint the Wood
Apply your chosen light stain or paint to all the frame pieces to achieve that natural, warm wood appearance. Allow them to dry completely according to the product instructions.
Step 4: Attach the Frame to the Mirror
Apply a strong wood glue along the back edges of the three frame pieces (two sides and the arch). Carefully align the pieces onto the front of the mirror, pressing down firmly. Use clamps to hold the wood frame securely against the mirror glass or existing frame while the glue dries completely.
Step 5: Finishing Touches
Wait until the glue has cured, remove the clamps. Fill any small gaps between the wood pieces with wood filler, let it dry, and lightly sand the area smooth. Install or re-hang your now beautiful arched mirror, which instantly introduces soft lines and a custom, high-end feel.
5. Sleek Floating Double Vanity and Recessed Storage

Achieving a high-end minimalist look is simpler than you might think, focusing on clean lines and texture rather than complex colors. This modern bathroom uses large format gray wall tiles to provide a subtle, textural backdrop. A long, streamlined floating double vanity in crisp white offers substantial storage while maintaining a light, airy feel in the room.
Notice the clever use of built-in storage. Recessed niches next to the wall-mounted toilet eliminate clutter and keep necessities within easy reach but neatly tucked away. The extended mirror cabinet is both functional and stylish, reflecting light and making the space feel larger. Using matte black fixtures—from the faucets to the linear light bar—provides necessary contrast against the white and gray palette, making the overall design feel sophisticated and curated.
Material Required for DIY Accent (Recessed Niche)
- Pre-made shower niche box (available at home improvement stores, sized for standard wall framing).
- Waterproof caulk or sealant.
- Tile adhesive (thin-set mortar).
- Grout that matches your existing wall tile.
- Scrap wood (for temporary support during installation).
Equipment Required for DIY Accent
- Level and tape measure.
- Utility knife or drywall saw.
- Trowel (for applying adhesive).
- Grout float and sponges.
- Safety glasses.
DIY Instruction Steps (How to Install a Simple Recessed Storage Niche)
Step 1: Locate and Mark the Niche Position
Decide on the exact spot for your niche. Use a stud finder to ensure the location is free of wall studs or plumbing pipes. If you are not in a wet area like the shower, you will be cutting into drywall. Use a pencil and level to draw the outline of the niche box onto the wall.
Step 2: Carefully Cut the Opening
Wearing safety glasses, use a utility knife or drywall saw to carefully cut along the marked lines. Take your time to ensure a clean, square opening. Test fit the niche box to ensure it slides easily into the opening. If it is a tight fit, gently trim the edges until it sits flush with the wall surface.
Step 3: Secure the Niche Box
Apply a generous bead of waterproof caulk or construction adhesive around the flange (the flat edge) of the niche box. Insert the box into the opening, pressing the flange firmly against the wall. Use small pieces of scrap wood to brace the box temporarily until the adhesive begins to set.
Step 4: Tile Around the Niche
Once the niche is secure, you can begin tiling. If you have existing tile, cut the new tiles to fit perfectly around the opening of the niche. If you are tiling the niche’s interior, cut those pieces next. Apply thin-set mortar to the back of each tile and press it into place, using spacers to maintain even grout lines.
Step 5: Grout and Finish
After the tile adhesive is fully dry (usually 24 hours), mix and apply the grout to the lines surrounding and inside the niche. Use a grout float to press the material firmly into the gaps, then wipe away the excess with a damp sponge. Once the grout cures, your neat, built-in storage will give the wall a truly custom look.
6. Coastal Chic with Beadboard and Stripes

This bathroom achieves a calming, coastal retreat feel through smart color and texture choices. A soft mint green paint is used on the upper wall, complementing the gray and white tones throughout the space. Below the vanity, traditional beadboard paneling adds texture and an upscale, cottage-style charm that is surprisingly budget-friendly to install.
The long, continuous vanity top features two sinks, simplifying the morning routine. Open shelving beneath the countertop allows for easy access to neatly folded towels and decorative baskets, keeping the aesthetic light. A bold, striped shower curtain and matching hand towels introduce a playful pattern and pop of accent color. The large, unframed mirror visually expands the room, reflecting the airy, serene atmosphere.
Material Required for DIY Accent (Wainscoting or Beadboard Panel)
- Beadboard paneling sheets or long planks (cut to the desired height, usually one third of the wall height).
- Quarter round or simple trim pieces (for the top edge).
- Finishing nails or construction adhesive.
- Paint (matching the white of the vanity and existing trim).
- Wood filler or caulk.
Equipment Required for DIY Accent
- Tape measure and level.
- Stud finder.
- Miter saw or handsaw (for cutting trim pieces).
- Hammer or nail gun.
- Caulk gun.
DIY Instruction Steps (How to Install Simple Beadboard Wainscoting)
Step 1: Measure and Prep the Wall
Decide the height for your beadboard (wainscoting). Use a pencil and level to draw a straight line around the room at this height. Locate all the wall studs and mark them lightly. Remove any baseboards or existing trim in the work area.
Step 2: Cut the Panels and Trim
Measure and cut the beadboard panels to fit snugly against the floor and up to your drawn line. Cut out any openings needed for outlets or plumbing. Cut your top trim pieces to length, using 45-degree cuts at the corners for a professional joint.
Step 3: Attach the Beadboard
Apply construction adhesive to the back of the first panel, or use a hammer or nail gun to secure the panel to the wall, focusing on nailing into the wall studs for maximum stability. Continue attaching panels along the wall, ensuring they interlock or butt up neatly against each other.
Step 4: Install the Top Trim
Once all panels are up, apply a thin bead of wood glue to the back of the top trim piece. Attach the trim to the wall along the top edge of the beadboard using finishing nails. The trim piece covers the raw edge of the paneling and provides a neat cap.
Step 5: Caulk and Paint
Use caulk to fill any gaps between the new trim and the wall, as well as any nail holes. Once the caulk is dry, apply a coat of white paint to the beadboard and the new trim. This creates a durable, moisture-resistant finish that immediately adds architectural interest and upscale texture to the bathroom.
7. Vintage Glamour with Ornate Mirror

Injecting vintage charm is an accessible way to make a bathroom feel luxurious and custom. This design pairs classic white subway tile and a hexagonal floor tile with an elaborate, ornate mirror. The dramatic black frame on the mirror provides a stunning focal point, contrasting beautifully with the bright white background.
To enhance the old-world elegance, warm brass fixtures—the pedestal sink faucet, the towel ring, and the handle on the toilet tank—are featured throughout. Simple black wall sconces flank the mirror, echoing the dark frame and casting a soft, flattering glow. The final touch is a subtle patterned shower curtain, introducing texture and color without overwhelming the clean, established aesthetic. This blend of classic elements and high contrast creates a truly timeless space.
Material Required for DIY Accent (Ornate Mirror Frame)
- Large, used picture frame with interesting scrollwork or carving (check thrift stores or online marketplaces).
- Mirror glass cut to fit the frame’s opening (or use a flat mirror and place the frame over it).
- Matte black spray paint (suitable for wood or plastic).
- Wood filler (to repair any damaged areas).
- Hanging wire and mounting hardware.
Equipment Required for DIY Accent
- Sandpaper (various grits).
- Screwdriver (if the frame has existing backing).
- Drop cloth.
- Safety mask and gloves (for painting).
DIY Instruction Steps (How to Create an Ornate Vintage Mirror)
Step 1: Source and Prepare the Frame
Find a large frame with decorative carvings or scrollwork. If the frame is currently very glossy, lightly sand it to give the paint something to adhere to. Fill any small nicks or chips in the wood or composite material using wood filler, letting it dry completely before sanding smooth.
Step 2: Clean and Paint the Frame
Wipe the entire frame clean to remove all dust. Lay the frame on a drop cloth in a well-ventilated area. Apply the matte black spray paint in several light, even coats, rotating the frame frequently to ensure the paint reaches all the carved details. Allow adequate drying time between each coat.
Step 3: Insert the Mirror Glass
Once the paint is completely dry and cured, flip the frame over. Carefully place the mirror glass into the opening. Secure the glass in place using metal clips, tabs, or a thin bead of silicone adhesive around the edges to prevent movement.
Step 4: Install Hanging Hardware
Attach a sturdy hanging wire or D-rings to the back of the frame, ensuring the hardware is strong enough to support the full weight of the new mirror.
Step 5: Hang and Accessorize
Measure and mark your wall, confirming the mirror will be centered above your sink. Install the appropriate wall anchors and securely hang your new, dramatic vintage mirror. The strong, dark lines instantly upgrade the room with a sense of historic luxury.
8. Moroccan-Inspired Mirror and Terracotta Color

This bathroom utilizes bold, saturated color blocking to achieve a vibrant, exotic feel. The walls above the tile line are painted a rich, earthy terracotta, immediately setting a warm and inviting mood. This dramatic color is beautifully contrasted by a band of deep teal tiles running horizontally across the wall.
The striking feature here is the arched mirror, framed in the same vibrant teal as the accent tile. This cohesive use of color between the frame and the tile creates a unified, custom look often found in luxury retreats. White subway tiles and a wide, tiled countertop keep the overall design feeling clean. Adding a subtle metallic accent, like the brass lantern on the counter, completes the global-inspired, sophisticated ambiance.
Material Required for DIY Accent (Mirror Frame Color Upgrade)
- Arched or unusually shaped mirror (ensure the frame material is suitable for painting).
- Deep teal or turquoise paint (use a high gloss or semi-gloss finish for moisture resistance).
- Fine-grit sandpaper (to prep the existing frame).
- Painter’s tape.
- Primer (recommended for plastic or slick metal frames).
Equipment Required for DIY Accent
- Clean rags and degreaser (to clean the frame).
- Small detail paint brush (for edges).
- Drop cloth.
DIY Instruction Steps (How to Achieve a Custom-Colored Mirror Frame)
Step 1: Clean and Prepare the Frame
Lay the mirror on a drop cloth in a well ventilated area. Thoroughly clean the entire mirror frame using a degreaser to remove any oils or soap scum. Lightly scuff the frame surface with fine-grit sandpaper; this provides “tooth” for the new paint to grip onto.
Step 2: Mask the Glass
Carefully apply painter’s tape along the entire inner edge where the frame meets the mirror glass. Press the tape down firmly and ensure there are no bubbles or gaps to prevent paint bleed. Cover any exposed hardware or the back of the mirror that you do not want painted.
Step 3: Prime and Paint
If you are painting a slick material like plastic or metal, apply one thin coat of bonding primer first and let it dry. Next, apply your teal paint in a thin, even coat. Do not try to achieve full coverage with the first application.
Step 4: Layer the Color
Allow the first coat of colored paint to dry completely. Apply a second or even a third light coat as needed until the color is rich and solid. Patience is key here to avoid drips and achieve a smooth finish.
Step 5: Cure and Reveal
Let the paint fully cure for the time recommended on the can before moving the mirror. Carefully peel off the painter’s tape to reveal the sharp line between the vibrant frame and the reflective glass. This custom color will tie the whole room together, mimicking an expensive, custom designed piece.
9. Modern Industrial Shelving and Exposed Pipes

Achieving a rugged, stylish industrial aesthetic is straightforward using exposed hardware and rich textures. This design uses a base of large gray tiles, providing a neutral, contemporary feel. The drama is achieved by implementing shelving and lighting constructed from black metal pipes and fittings.
Open shelving, running vertically from the ceiling, maximizes storage while offering a display for toiletries and decorative items. The vanity area continues this theme with a countertop and simple vessel sink supported by exposed black pipe legs. Overhead, three black wire cage lights hang from a ceiling mount also made of pipe, creating a custom lighting solution. The wood tones in the shelves and vanity add necessary warmth, balancing the cool industrial metal and stone.
Material Required for DIY Accent (Industrial Pipe Shelving)
- Black iron or steel pipes (various lengths for vertical supports and horizontal shelf supports).
- Flanges (to attach pipes to the wall).
- Elbows, tees, and caps (to join the pipe sections).
- Pre-cut wood shelves (stained or sealed).
- Wall anchors and screws (heavy duty).
Equipment Required for DIY Accent
- Stud finder.
- Level and tape measure.
- Drill and various drill bits.
- Pipe wrench (optional, for tightening joints).
DIY Instruction Steps (How to Construct Pipe and Wood Industrial Shelving)
Step 1: Design and Pre-Assemble Segments
Measure the total height and width desired for your shelving unit. Screw the vertical pipes into the flanges that will attach to the wall. Assemble the horizontal support pieces (using tees and elbows) that will hold the wooden shelves. Lay all pieces out to ensure they fit correctly.
Step 2: Mark and Drill Wall Anchor Points
Hold the partially assembled frame against the wall, using the level to ensure it is straight. Use a pencil to mark where each wall flange needs to be secured. Use a stud finder; if you cannot hit studs, use the strongest wall anchors rated for the weight of your shelves plus all the items you plan to store. Drill the necessary pilot holes.
Step 3: Mount the Vertical Supports
Screw the flanges tightly onto the wall using the heavy duty screws. Attach the vertical pipe supports to these flanges, ensuring they are all straight and plumb.
Step 4: Install Horizontal Supports and Shelves
Attach the horizontal pipe sections to the vertical supports, tightening them securely using the appropriate fittings. Once the metal structure is complete, lay the pre-cut wooden shelves onto the supports. You can optionally secure the shelves to the pipes with small U-bolts or screws drilled up through the pipe into the wood for added stability.
Step 5: Style the Unit
Wipe down the entire structure to remove dust or oil residue. Arrange folded towels, bath products, and small plants on the shelves to soften the metal and wood structure, completing the modern industrial look.
10. Floating Vanity and Slatted Wood Feature

Creating a serene, spa-like experience is achieved by leaning heavily into natural elements and gentle lighting. This design uses light wood tones to establish warmth and organic texture. The unique feature is the vertical wood slatted wall paneling next to the bathtub, which adds architectural depth and acoustic softness.
The light wood floating vanity and matching tall storage cabinet enhance the contemporary Scandinavian feel. Functionality is addressed with a sleek, illuminated mirror, providing excellent task lighting and an understated luxury element. Simple black wall-mounted faucets and clean, modern greenery complete this look. A focus on natural materials and recessed lighting creates a calming sanctuary.
Material Required for DIY Accent (Wood Bath Mat/Floor Slats)
- Simple wood planks or decking boards (e.g., cedar or bamboo, cut to short, equal lengths).
- Waterproof wood stain or sealant.
- Thin rubber strips or waterproof adhesive (to connect the planks).
- Small screws or staple gun (optional, for connecting).
Equipment Required for DIY Accent
- Saw (if not pre-cut).
- Sandpaper.
- Paintbrush (for sealant).
DIY Instruction Steps (How to Create a Simple Slatted Wood Bath Mat)
Step 1: Prepare and Seal the Wood
Cut your wood planks to a uniform length and sand all the edges smooth. This ensures a comfortable and safe mat surface. Apply a generous amount of waterproof wood stain or sealant to all surfaces of the wood. This is crucial for protecting the mat from moisture and mold in the bathroom environment. Let the sealant dry completely.
Step 2: Measure and Space the Planks
Lay the sealed planks parallel on a flat surface, ensuring the best side is facing up. Use spacers (small pieces of wood or coins work well) to create an equal gap between each plank. This gap is necessary for water drainage.
Step 3: Connect the Planks with Rubber Strips
Cut your thin rubber strips (or use waterproof webbing) into two or three pieces slightly shorter than the mat’s width. These strips will run perpendicular to the planks on the bottom side. Apply a strong, waterproof adhesive to the strips and carefully press the rubber onto the base of the planks, ensuring the spacing remains consistent.
Step 4: Secure the Connection (Optional)
For extra durability, once the adhesive is partially set, you can use a staple gun or small screws to secure the rubber strips to the planks, creating a strong bond. Ensure the screws/staples do not pierce through to the top surface.
Step 5: Final Check
Once the mat is fully assembled and the adhesive is cured, flip it over. The rubber strips will keep the mat elevated for drying and prevent it from slipping on the bathroom floor. This simple addition adds a high-end, organic touch often found in luxury spas.
11. Mid-Century Modern Color Block and Walnut Wood

This bathroom flawlessly blends modern luxury with playful mid-century design through striking color and material choices. The floating walnut vanity immediately stands out, lending rich, dark warmth to the otherwise bright room. Its clean lines and simple brass handles are hallmarks of the sophisticated mid-century aesthetic.
The attention grabbing feature is the geometric color blocking on the wall—a large vertical strip of bright mustard yellow paint. This pop of color is unexpected and injects tremendous energy. The color is beautifully balanced by brass accents, including the wall sconces and the sleek faucet. Matching the vanity’s rich wood tone are floating shelves, perfect for displaying amber glassware and other small, curated accessories that enhance the period charm.
Material Required for DIY Accent (Wall Color Blocking)
- Paint in your chosen bold accent color (e.g., bright yellow, deep teal, or orange).
- Painter’s tape (high quality is recommended for sharp lines).
- Paint for the border color (usually the existing wall color).
- Level and tape measure.
Equipment Required for DIY Accent
- Small roller and paint tray.
- Angled paintbrush (for cutting in edges).
- Pencil.
DIY Instruction Steps (How to Create a Dramatic Vertical Color Block Accent)
Step 1: Plan and Mark the Block
Decide the exact width and location for your color block. It looks best when it is off-center or used to highlight a specific feature, like the mirror or a light fixture. Use a tape measure and a long level to lightly pencil the outline of your intended block onto the wall.
Step 2: Apply the Painter’s Tape
Carefully apply the high-quality painter’s tape just outside your penciled lines. Press the tape down firmly with your finger or a dull edge, ensuring the paint cannot seep underneath. If you are concerned about bleeding, paint a thin seal layer of the border color (the existing white wall color) over the inside edge of the tape and let it dry. This acts as a barrier.
Step 3: Apply the Accent Color
Once the seal layer (if used) is dry, or immediately if you skipped the seal, apply your bold accent paint within the taped area. Use an angled brush for the edges and a small roller for the main area. Apply two coats for deep, rich color saturation, allowing the first coat to dry before applying the second.
Step 4: Remove the Tape While Wet
This step is key for achieving the sharpest line. Immediately after applying the final coat of accent paint, while it is still wet, carefully and slowly peel away the painter’s tape.
Step 5: Final Inspection
Allow the color block to dry completely. If there are any slight bleeds, touch them up carefully using a small brush and the border color (white). The finished color block provides an inexpensive, modern update that looks like it was designed by a professional.
12. Patterned Tile Splashback and Brass Accents

Small bathrooms gain tremendous character when you introduce an element of strong pattern. This design uses white subway tile on the walls and bathtub area to keep the space feeling clean and open. The luxury is established by a dramatic patterned tile splashback located just behind the vanity. The intricate green and white design creates an immediate focal point that looks custom and thoughtfully placed.
Further elevating the space are the uniform brass fixtures. Notice how the finish is consistent across the faucet, the mirror frame brackets, the towel hooks, and the shower head. This consistency in warm metallic hardware unifies the room and contrasts beautifully with the cool white and green palette. Finally, using towels with a thin accent stripe of blue pulls the whole look together, making the small space feel cheerful and expensive.
Material Required for DIY Accent (Stenciled Tile Look)
- Paint in your chosen accent color (e.g., deep green, suitable for tile or floor painting).
- Small tile stencil with a Moroccan or patterned design.
- Stencil brush or small foam roller.
- Painter’s tape.
- Clear polyurethane topcoat or sealant (required for moisture resistance).
Equipment Required for DIY Accent
- Mild cleaner and scrubbing brush.
- Level.
- Ruler or straight edge.
- Gloves.
DIY Instruction Steps (How to Create a Patterned Tile Look with Stencils)
Step 1: Clean and Prepare the Surface
The surface must be spotless for the paint to adhere. Thoroughly clean the tile area behind the vanity using a mild degreaser, ensuring all soap residue and grime are gone. Let the tile dry completely.
Step 2: Mask the Edges
Use painter’s tape to carefully mask off the edges of the area you intend to stencil, such as the surrounding white tile or the vanity countertop. Ensure the tape creates a crisp border.
Step 3: Begin Stenciling
Secure your stencil onto the first tile using a small piece of tape or temporary adhesive spray. Use a stencil brush or a foam roller to apply the accent color in light, vertical motions. Do not overload the brush or roller; excess paint will bleed under the stencil. Apply two thin coats if needed.
Step 4: Repeat the Pattern
Once the first tile is complete, carefully peel off the stencil and align it perfectly over the next tile, using your ruler or the existing pattern lines as guides. Repeat the painting process until the entire splashback area is covered. Let the paint dry completely.
Step 5: Seal the Design
Once the paint is fully cured (check the manufacturer’s directions, this may take 24 to 48 hours), apply a clear polyurethane topcoat or sealant over the entire stenciled area. This is essential for protecting the painted design from water and cleaning products, giving it a durable, luxurious finish.
13. River Rock Tile and Floating Shelves

Bringing natural stone into the bathroom is a classic way to achieve a high-end spa aesthetic. This design uses smooth river rock tile for both the shower wall accent and the entire floor, which provides fantastic texture and a lovely tactile element. The neutral gray tones of the stone are complemented by a soft gray paint on the remaining walls, creating a calming, cohesive palette.
A simple white vanity keeps the look clean and contemporary. The crucial affordable accent here is the pair of floating wood shelves placed in the corner. Made from light, natural wood, they break up the coldness of the stone and metal, offering open storage for plants and toiletries. The slatted wood mat on the shower floor continues the natural theme, reinforcing the tranquil, organic mood of the room.
Material Required for DIY Accent (Floating Corner Shelves)
- Two pre-cut solid wood boards (look for light maple or bamboo).
- Two floating shelf brackets (ensure they are rated for the wood depth).
- Heavy duty wall anchors and screws.
- Wood sealer or light polyurethane (required for moisture protection).
Equipment Required for DIY Accent
- Level and tape measure.
- Drill with appropriate bits.
- Stud finder.
- Pencil.
DIY Instruction Steps (How to Install Simple Floating Corner Shelves)
Step 1: Mark and Plan Placement
Decide on the corner and the desired height and spacing for your two shelves. Use a tape measure to ensure the shelves are spaced equally. Using a level and pencil, mark the precise location on the wall where the mounting brackets for the first shelf will be installed.
Step 2: Install the Brackets
Use a stud finder to locate any studs. If you hit studs, use long screws. If not, use heavy duty wall anchors specifically designed for the weight of the shelf plus its intended contents. Drill the pilot holes, then screw the floating shelf brackets securely into the wall at your marked points. Ensure the brackets are perfectly level.
Step 3: Prepare the Wood
If your wood is not already sealed, apply a coat of wood sealer or light polyurethane to all sides. This step is critical in the humid bathroom environment to prevent warping and water damage.
Step 4: Attach the First Shelf
Slide the prepared wood board onto the installed brackets. Depending on the bracket design, you may need to use small screws (often provided with the hardware) to secure the shelf from the bottom onto the bracket rods.
Step 5: Repeat and Finish
Repeat Steps 2 through 4 for the second shelf, ensuring it is level both horizontally and in alignment with the first shelf. Once both shelves are mounted, decorate them simply with small plants and neatly stacked towels to complete the airy, modern look.
14. Concealed Lighting and Monochrome Tones

This design exemplifies sophisticated, minimalist luxury achievable through lighting and texture. The overall palette is a muted monochrome—various shades of warm gray and black. This uniform color scheme creates a calming and spacious feel. The floating white vanity with its clean vessel sink maintains the uncluttered aesthetic.
The key element that provides the luxurious ambiance is the lighting. Hidden LED strip lighting is strategically placed: running beneath the mirror and recessed into the shower niche. This concealed lighting washes the walls with a soft glow, highlighting the texture of the large format tiles and eliminating harsh shadows. Using only matte black fixtures and a dark accent wall behind the vanity adds strong, subtle contrast, perfecting this contemporary sanctuary.
Material Required for DIY Accent (Undermount LED Lighting)
- LED strip lighting kit (rated for damp environments).
- Aluminum channel with a diffuser cover (optional, but gives a cleaner look).
- Waterproof connectors and low-voltage wire.
- Power supply/driver (needed to plug into an outlet or hardwire).
- Double-sided adhesive tape (if not included with the strip).
Equipment Required for DIY Accent
- Tape measure and scissors (to cut the LED strip).
- Wire strippers (if hardwiring).
- Pencil.
DIY Instruction Steps (How to Install Undermount LED Lighting)
Step 1: Plan and Measure
Measure the exact length beneath your mirror or along the edge of your vanity where you want the light. Cut the LED strip light to the required length at the designated cutting marks. If using an aluminum channel, cut the channel to match.
Step 2: Install the Channel (Optional)
If you are using the aluminum channel, secure it beneath the mirror or along the vanity edge using small screws or strong double-sided tape. The channel ensures a straight line and helps diffuse the light evenly.
Step 3: Mount the LED Strip
Peel the backing off the LED strip and press it firmly into the aluminum channel or directly onto the desired surface. Ensure the strip is mounted so the light shines down (for mirror light) or forward (for vanity light).
Step 4: Connect the Power
Connect the LED strip to the power supply/driver unit using the connectors. You will need to plug the driver into a nearby outlet, or have an electrician hardwire it for a concealed setup. Hide the power cord and driver neatly behind the mirror or under the vanity cabinet.
Step 5: Test and Diffuse
Plug in the light to test the connection. If using the aluminum channel, snap the diffuser cover onto the channel. This hidden, ambient lighting instantly elevates the style, giving the bathroom a high-end, gallery feel.
15. Farmhouse Vanity and Shiplap Wall

Embracing the rustic charm of modern farmhouse style is an excellent way to introduce warmth and character. The focal point here is the sturdy wood vanity, featuring open side shelving for easy towel storage in wire baskets. Its rich brown stain contrasts beautifully with the clean white surfaces.
The walls are elevated using a mix of horizontal shiplap and white subway tile. A subtle black divider line separates the two textures, grounding the space and adding a custom touch. A simple, round wood-framed mirror complements the vanity, while industrial sconces with exposed bulbs flank the mirror, enhancing the rustic feel. The final touches of natural texture—like the cotton stems and the woven rug—make the room feel welcoming and effortlessly stylish.
Material Required for DIY Accent (Shiplap-Style Wall)
- Thin MDF or plywood strips (pre-cut or cut yourself to a uniform width, e.g., 6 inches).
- White satin or semi-gloss paint.
- Finishing nails or nail gun.
- Small spacers (pennies or nickels work well).
- Caulk and wood filler.
Equipment Required for DIY Accent
- Level and tape measure.
- Saw (if cutting strips).
- Stud finder.
- Hammer or nail gun.
DIY Instruction Steps (How to Install Affordable Shiplap-Style Paneling)
Step 1: Find Studs and Mark the Wall
Use a stud finder to locate the wall studs and draw a light, vertical line down the wall at each stud location. This is where you will nail your shiplap. Mark the starting point near the floor or the top of any existing tile border.
Step 2: Install the First Plank
Apply a small bead of construction adhesive to the back of the first plank (optional, but adds stability). Line the first plank up with your starting point and ensure it is perfectly level. Nail the plank into the wall studs using finishing nails.
Step 3: Space and Install Subsequent Planks
Place two pennies or nickels at the top edge of the first installed plank; these will act as your uniform spacers. Place the next plank directly on top of the spacers, pushing it firmly against the wall, and nail it into the studs. The coins create the characteristic shadow gap that defines shiplap style. Continue this process until the wall is covered.
Step 4: Fill and Caulk
Use a small amount of wood filler to cover any visible nail holes. Let the filler dry, then sand lightly. Use caulk to fill any gaps where the shiplap meets the ceiling, existing trim, or the vanity.
Step 5: Paint the Planks
Apply a coat of white paint to the newly installed shiplap. Ensure the paint flows slightly into the gaps to enhance the shadow effect. This affordable treatment adds instant architectural texture and farmhouse charm.
16. Bold Coral and Teal Color Block

This bathroom uses high-energy color accents to create a playful, stylish statement that feels young and fresh. The base is kept simple with white tiles and a white vanity. The key to the elevated style is the consistent use of a bright coral red and deep teal throughout the space.
The color play is dramatic: the ceiling is painted a solid coral, acting as a visually stunning fifth wall. A two-toned shower curtain and matching round rug in the teal block immediately draws the eye. These colors are strategically repeated in small accents—the round teal rug, the coral soap dispensers, and the vibrant rolled towels. This calculated use of bold, coordinated color proves you do not need expensive fixtures to achieve a distinctive, luxurious look.
Material Required for DIY Accent (Painted Ceiling Accent)
- Paint in your chosen bold ceiling color (e.g., coral, use a satin or semi-gloss finish for moisture).
- High-quality painter’s tape.
- Primer (recommended if painting over a dark color).
Equipment Required for DIY Accent
- Step ladder.
- Roller with an extension pole.
- Angled paintbrush (for cutting in edges).
- Drop cloths.
DIY Instruction Steps (How to Paint a Ceiling Accent Color)
Step 1: Prepare the Room
Clear all furniture and fixtures that can be moved. Lay drop cloths over the vanity, floor, and any remaining fixtures. The ceiling must be clean and free of dust.
Step 2: Mask the Walls
Using high-quality painter’s tape, carefully mask off the perimeter of the ceiling where it meets the walls. Press the tape down firmly to create a tight seal. Take your time with this step, as a clean edge is crucial for a professional look.
Step 3: Prime the Ceiling (If Needed)
If the existing ceiling color is much darker than your coral accent color, apply a coat of ceiling primer and let it dry completely.
Step 4: Apply the Accent Paint
Using the angled paintbrush, “cut in” along the taped edges of the ceiling. Follow immediately with the roller to cover the rest of the ceiling area. Use a long extension pole for easier reach. Apply the paint in long, smooth, overlapping strokes.
Step 5: Apply Second Coat and Remove Tape
Allow the first coat to dry according to the paint can directions. Apply a second coat of paint to ensure rich, consistent color. While the final coat is still wet, carefully and slowly peel away the painter’s tape.
Step 6: Finish and Accessorize
Allow the ceiling paint to dry completely. The bold color overhead instantly changes the scale and mood of the room. Purchase towels and small accessories that match the ceiling color to complete the coordinated, custom design.
17. Minimalist Black and White Contrast

A monochromatic palette delivers immediate high impact and sophistication, making any bathroom look dramatically upscale. This design uses matte black paint on the walls and black subway tile on the floor and shower to create a moody, enclosed aesthetic. The intense dark background allows the white elements to truly pop.
The focal point is the sleek white floating vanity countertop, which appears substantial and clean against the darkness. A simple circular mirror and striking vertical tube sconces with metallic gold accents prevent the black from feeling flat. The gold provides a touch of warmth and glamour. This clean, high-contrast style is both accessible and a bold statement of modern luxury.
Material Required for DIY Accent (Paint Walls Black)
- Matte black paint (use a paint specifically rated for bathrooms or high-moisture areas).
- Primer (recommended if painting over a light color).
- High-quality painter’s tape.
Equipment Required for DIY Accent
- Roller with a long handle.
- Angled paintbrush (for cutting in edges).
- Drop cloths.
- Safety glasses and ventilator mask (due to ventilation needs).
DIY Instruction Steps (How to Achieve a Black-Painted Wall Aesthetic)
Step 1: Prep and Protect the Room
Lay drop cloths carefully across the floor, vanity, and toilet. Ensure the walls are clean and dry. Use painter’s tape to meticulously mask off all trim, the ceiling line, and around any fixtures.
Step 2: Apply Primer
If your existing wall color is light, apply a coat of gray or black-tinted primer. This is crucial when painting black, as it prevents the original color from showing through and ensures the final coat is deeply saturated. Allow the primer to dry completely.
Step 3: Paint the First Coat
Use the angled brush to carefully “cut in” along the edges and corners. Follow immediately with the roller to cover the main wall area. Apply the paint evenly, avoiding drips.
Step 4: Apply Second Coat and Remove Tape
Allow the first coat to dry according to the paint instructions. Apply a second, uniform coat to achieve a deep, flawless finish. While the final coat is still wet, carefully remove the painter’s tape to ensure clean, crisp lines.
Step 5: Cure and Accessorize
Let the paint cure fully. The newly black walls provide a gallery-like backdrop for metallic hardware, white accents, and greenery, instantly giving the room a chic, dramatic, and expensive feel.
18. Spa Serenity with Marble and Floating Shelving

This bathroom achieves five-star hotel luxury through seamless materials and sophisticated lighting. The entire space uses bright white marble-look tiles, creating a continuous, airy, and expensive atmosphere. The simplicity is key; the floating white vanity keeps the floor clear, enhancing the sense of space.
Smart storage solutions elevate the functionality without clutter. Instead of bulky cabinets, minimalist floating glass shelves are recessed into the shower wall, providing near-invisible storage for bath products. The lighting is again critical: an illuminated mirror casts a soft glow, complemented by cylindrical wall sconces. Using brushed nickel fixtures throughout offers a subtle, contemporary metallic accent that whispers luxury.
Material Required for DIY Accent (Floating Glass Shelves)
- Tempered glass shelves (ensure the thickness is appropriate for mounting).
- Glass shelf mounting hardware (brackets or clips, look for brushed nickel or chrome finish).
- Silicone sealant (optional, but good for moisture).
- Wall anchors and screws.
Equipment Required for DIY Accent
- Level and tape measure.
- Drill with a masonry bit (if drilling into tile/stone).
- Pencil or marker.
DIY Instruction Steps (How to Install Floating Glass Shower Shelves)
Step 1: Plan and Mark Placement
Decide on the height and spacing for your glass shelves, ensuring they are positioned at a comfortable reach inside the shower niche or on a flat wall. Use a marker and level to precisely mark the points where the mounting brackets will be secured to the wall.
Step 2: Drill the Mounting Holes
If you are drilling into tile, it is essential to use a masonry bit and drill slowly to prevent cracking. Drill the pilot holes at the marked locations. Insert the wall anchors, ensuring they are flush with the wall surface.
Step 3: Install the Brackets
Screw the mounting brackets or clips securely into the wall anchors. Check them with the level one last time. Ensure the brackets are strong enough to support the glass and the items you plan to place on the shelves.
Step 4: Place the Glass
Carefully slide the tempered glass shelves into the brackets or clips. Some clips may have a tightening screw to secure the glass in place; secure these gently. For added protection against moisture and movement, apply a small amount of silicone sealant where the glass meets the wall (let it dry completely before use).
Step 5: Finished Look
The transparency of the glass shelves keeps them from visually interrupting the wall material, achieving a sleek, minimalist storage solution that looks customized and refined.
19. Dark Blue Walls and Copper Accents

Rich wall color combined with unexpected metallic hardware creates a dramatic and sophisticated look. Here, deep slate blue walls provide an enveloping, luxurious feel. The bottom half of the wall remains bright white subway tile, ensuring the room does not feel too cave-like.
Instead of common silver or gold, this design uses copper-toned hardware—seen in the sconces, the faucet, and the vanity handles. The warmth of the copper beautifully offsets the cool intensity of the blue paint, adding an antique, bespoke touch. A simple, rectangular wood-framed mirror complements the traditional wood vanity, completing this timeless, layered look that feels deeply personalized and high-end.
Material Required for DIY Accent (Copper Accent Baskets)
- Simple wire storage baskets (in a size that fits your open shelving).
- Copper metallic spray paint (suitable for metal).
- Drop cloth or old newspaper.
- Gloves and safety mask.
Equipment Required for DIY Accent
- Soap and water (for cleaning baskets).
DIY Instruction Steps (How to Create Copper Wire Storage Baskets)
Step 1: Clean the Baskets
Acquire inexpensive metal wire baskets. Thoroughly wash the baskets with soapy water to remove any dust, oil, or residue. Any dirt will prevent the copper paint from adhering correctly. Dry the baskets completely.
Step 2: Prepare the Spray Area
Set up your spray painting area outdoors or in a well-ventilated garage. Lay down a drop cloth or old newspapers to protect the surface below.
Step 3: Spray Paint the Copper Finish
Wearing your safety mask and gloves, shake the copper spray paint can well. Hold the can approximately 8 to 12 inches away from the basket. Apply the paint in light, smooth, sweeping motions. Rotate the basket frequently to ensure the paint reaches all the wire intersections and angles. It is essential to use light coats to avoid drips.
Step 4: Apply Second Coat and Cure
Allow the first coat to dry completely. Apply a second, light coat if needed to ensure full, even copper coverage. Let the baskets cure for the time specified on the paint can before handling them (often 24 hours).
Step 5: Organize and Display
Once dry, place the new copper-finished baskets into your open shelving. These functional pieces now act as sophisticated, warm metallic accents, instantly elevating the organization and overall color scheme of the room.
20. Rose Gold Walls and Vertical Tile

This soft, feminine design proves that warm colors can feel sophisticated, not childish. The walls are painted a beautiful muted rose or dusty pink, creating a calming, enveloping atmosphere. This unusual paint choice is anchored by a vertical-set, pinkish terracotta subway tile acting as the splashback. The vertical orientation of the tile is a modern twist that adds height and visual interest.
The streamlined white floating vanity and basin are kept simple to let the wall color take center stage. An illuminated mirror provides excellent, flattering light. The sleek design is completed with minimal chrome fixtures and an open wood shelf beneath the sink for accessible towel storage. This unexpected, warm color palette feels contemporary and incredibly welcoming.
Material Required for DIY Accent (Vertical Striped Splashback Effect)
- Paint in a complimentary color to your walls (e.g., dusty rose).
- High-quality painter’s tape.
- Narrow foam roller or vertical sponge for texture.
Equipment Required for DIY Accent
- Level and ruler.
- Pencil.
DIY Instruction Steps (How to Create a Vertical Striped Splashback Effect)
Step 1: Prep and Mark the Area
This technique mimics the look of vertical tile or grasscloth without the cost. Clean and dry the wall area behind the sink. Use your level and pencil to draw a series of light, vertical lines approximately 1.5 to 2 inches apart across the entire splashback zone.
Step 2: Apply the Painter’s Tape
Apply painter’s tape along the outside of every other pencil line. You should have alternating stripes of exposed wall and tape. Press the tape down firmly.
Step 3: Apply Texture Paint
Using a narrow foam roller or a vertical-patterned sponge, apply your slightly darker contrasting paint (the dusty rose or terracotta shade) to the exposed vertical stripes. The key is to avoid getting paint onto the wall areas covered by tape. The lines you are painting should be straight and clean.
Step 4: Remove Tape and Finish
Allow the paint to dry partially (about 15-20 minutes). Carefully peel away the painter’s tape to reveal the original wall color in clean, vertical columns, creating the illusion of grout lines between the painted “tiles.”
Step 5: Seal (Optional)
Once the paint is fully cured, you can apply a clear, satin sealant over the entire painted area for added moisture protection. This quick paint trick creates stunning, upscale texture that dramatically elevates the wall.
21. Herringbone Tile Pattern and Wood Countertop

Texture is paramount in creating a customized, luxurious space. This design uses a sophisticated herringbone tile pattern, applied vertically on the shower wall and horizontally on the floor. The warm gray tone of the tiles is modern and neutral, allowing for easy accessorizing.
A classic white vanity is topped with a rich, dark wood countertop, which provides a welcome, warm contrast to the cool gray tile. Paired with a simple black-framed mirror and matching matte black hardware—faucet, towel ring, shower head—the room achieves a balanced, modern farmhouse feel. The overall look is tied together by a soothing neutral paint color on the main walls, making the shower tile the undisputed textural centerpiece.
Material Required for DIY Accent (Wood Countertop Sealing)
- Wood countertop (existing or new, should be a durable hardwood).
- Marine-grade sealant or water-resistant oil (e.g., Tung oil or Osmo oil).
- Fine-grit sandpaper (220 grit).
- Clean, lint-free rags or foam brush.
Equipment Required for DIY Accent
- Safety glasses.
- Ventilated area (or fan).
DIY Instruction Steps (How to Waterproof a Wood Countertop)
Step 1: Clean and Sand the Surface
If you have an existing wood countertop, clean it thoroughly. If the wood is bare, sand the entire surface smooth with fine-grit sandpaper. Wipe away all dust with a tack cloth or slightly damp rag.
Step 2: Apply the First Coat of Sealant
Working in a well-ventilated area, apply the first coat of your marine-grade sealant or waterproof oil using a clean rag or foam brush. Apply a liberal amount, moving in the direction of the wood grain. The wood should absorb the product. Allow the first coat to soak in for the time specified on the can (usually 20 to 30 minutes).
Step 3: Wipe and Lightly Sand
Wipe away any excess sealant that has not fully absorbed. Allow the countertop to dry completely, which may take several hours or overnight. Once dry, lightly sand the entire surface again with the fine-grit sandpaper to knock down any raised grain. Wipe away dust.
Step 4: Apply Additional Coats
Apply a second coat of sealant following the same steps, and repeat for a third coat if desired. The goal is to build up a thick, protective layer that repels water.
Step 5: Cure and Maintain
Allow the final coat to cure fully for the recommended time (this can be several days for oil-based products). This deep sealing process ensures your wood countertop will resist water damage and staining, providing a durable, rich, and high-quality centerpiece for your vanity.
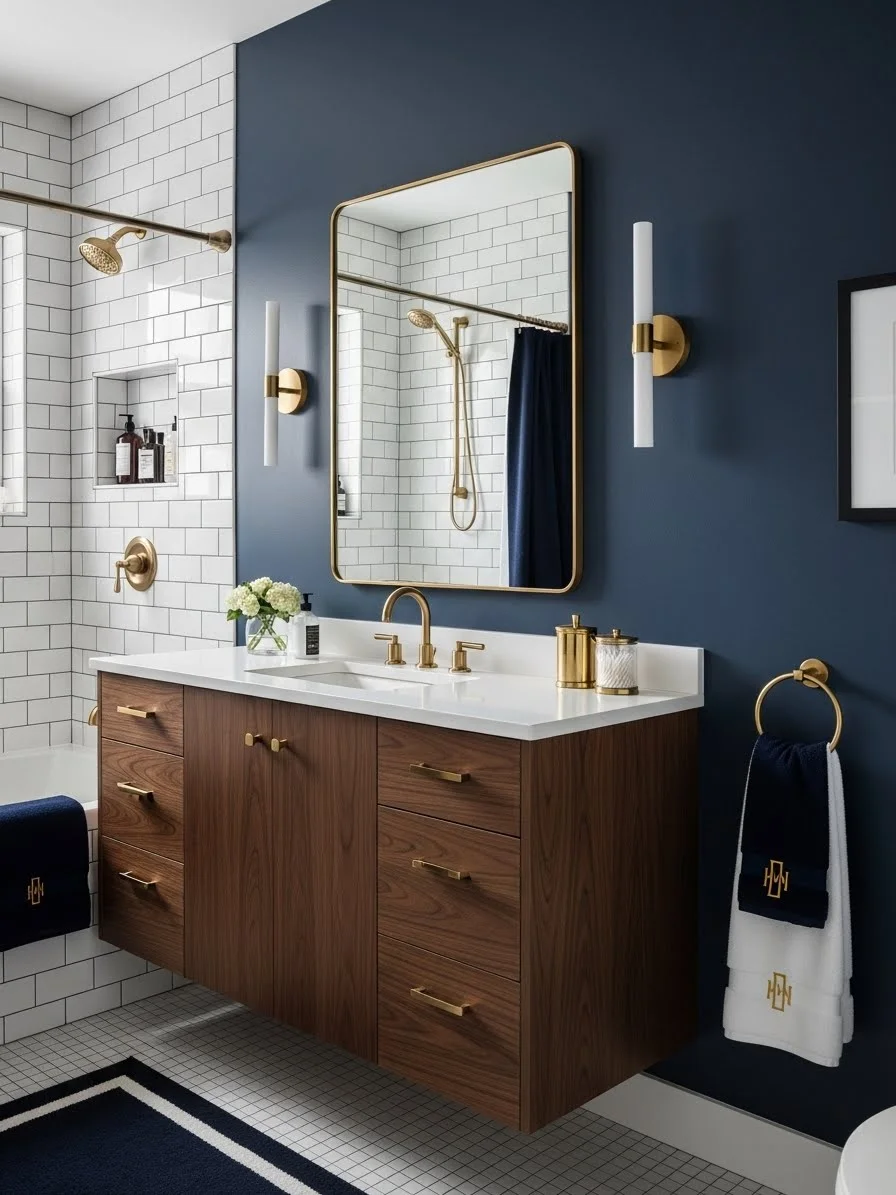
22. Navy Walls and Gold Hardware

This is a quintessential example of how two bold, classic elements combine to create ultimate luxury. A deep navy blue accent wall serves as a stunning backdrop, creating incredible visual depth. This is contrasted with bright white subway tile in the shower area, maintaining a fresh, clean feel.
The accent that truly elevates the space is the extensive use of warm, bright gold or brass hardware. The metallic finish is featured consistently on the mirror frame, sconces, faucet, towel ring, and shower hardware. The dark wood floating vanity, featuring subtle gold drawer pulls, perfectly bridges the gap between the dark wall and the warm metal. This pairing of navy blue and gold is a failsafe way to create a classic, tailored, and extremely upscale bathroom.
Material Required for DIY Accent (Towel/Hardware Upgrade)
- Gold or brass spray paint (suitable for metal).
- Clear sealant (for metal).
- Simple towel hooks or rings.
- New bath towels (navy and white, or navy with a gold embroidered monogram).
Equipment Required for DIY Accent
- Screwdriver.
- Drop cloth.
- Painter’s tape.
DIY Instruction Steps (How to Coordinate Towels and Hardware)
Step 1: Paint or Procure Gold Hardware
If you are painting existing hardware, follow the gold spray paint instructions provided earlier (in step 2). If you are buying new hardware, select a gold or brass finish for your towel rings, hooks, or bars. Install the chosen hardware near the vanity or shower.
Step 2: Choose Coordinated Towels
Purchase towels that complement the navy wall and gold hardware. Deep navy blue is a sophisticated choice. For an extra touch of luxury, select white towels featuring a navy border or, if your budget allows, have them monogrammed in gold thread.
Step 3: Accessorize the Vanity
Ensure your soap dispenser and toothbrush holder are also in a coordinating metallic gold or white/navy tone. This small detail prevents the vanity from looking cluttered and keeps the sophisticated color scheme dominant.
Step 4: Display with Care
Display the towels neatly. Fold the large towels and stack them on open shelves, or hang the hand towels centered on the new gold rings. Using a decorative technique like the ‘hotel fold’ immediately elevates the presentation.
Step 5: Achieve High-End Cohesion
By ensuring every metal finish and textile color complements the bold navy and gold palette, you achieve a designer-level cohesion. The deep, rich color and glittering accents make the space feel intentionally custom and expensive.
23. Light Wood Vanity and Calming Greenery

This bathroom radiates tranquil, Scandinavian-inspired simplicity. The walls are painted a soft, neutral gray, which acts as a gentle backdrop. The floating light wood vanity introduces an element of natural warmth while keeping the floor area open and uncluttered.
The luxury element here is the consistent use of calming color accents. All textiles, from the bath mats to the stacked towels, are in a soft, minty green. This color is echoed in the artwork and the striking botanical-print shower curtain. Simple chrome hardware and mirror fixtures provide a bright, clean sparkle. Fresh eucalyptus branches and potted greenery are used as effortless styling elements, reinforcing the spa-like, nature-infused retreat aesthetic.
Material Required for DIY Accent (Eucalyptus Decor)
- Fresh or high-quality faux eucalyptus branches (silver dollar or spiral).
- Glass vase or clear jar (in a simple, elegant shape).
- Water (if using fresh stems).
Equipment Required for DIY Accent
- Pruning shears or sharp scissors.
DIY Instruction Steps (How to Use Eucalyptus for Instant Spa Style)
Step 1: Procure the Branches
Obtain either fresh-cut eucalyptus (available at florists or large retailers) or select realistic-looking faux branches. Fresh eucalyptus offers a wonderful, natural aroma that enhances the spa experience.
Step 2: Prepare the Stems
Using shears, cut the branches down to varying sizes. You want some taller pieces for the main vase and some smaller pieces to lay on the shelves or on the edge of the tub. If using fresh branches, strip any leaves that would fall below the water line in the vase.
Step 3: Arrange the Main Display
Fill your glass vase about halfway with water (for fresh stems) or leave it empty (for faux stems). Place the tallest, most dramatic branches in the center of the vase. Arrange the remaining pieces around them, ensuring the arrangement looks natural and slightly asymmetrical.
Step 4: Style the Surfaces
Place the main vase on the vanity or counter, ensuring it is a focal point. Use the shorter cut stems to accessorize the floating shelves, or drape a small sprig near the soap dispenser.
Step 5: Maintain the Freshness
If using fresh eucalyptus, change the water every few days to keep it looking crisp. Even as the branches dry, they will continue to release a calming scent. This simple organic element provides incredible visual texture and sensory luxury for a minimal cost.
24. High-Contrast Monochromatic with Red Accents

This bathroom masters high drama through its contrasting palette and choice of bold textiles. The walls are painted a deep charcoal gray, providing a sophisticated backdrop. The black vanity and classic black-and-white patterned floor tile anchor the entire room in sharp contrast.
To inject warmth and character, deep crimson or burgundy accents are introduced. This color is seen in the towels, the bath mats, and the striking patterned tapestry hanging on the wall. The addition of a small, antique-style framed picture and a vintage rug on the wall enhances the old-world charm. Finally, the lighting fixture, with its copper-toned base and exposed bulbs, adds a touch of rustic metallic warmth, preventing the gray and black from feeling too sterile.
Material Required for DIY Accent (Wall Hanging Tapestry)
- Small, patterned rug or tapestry (e.g., Persian, Kilim, or highly patterned fabric).
- Dowel rod or thin piece of wood trim (slightly wider than the rug).
- Small hooks or metal eyelets.
- Wall anchors and screws.
Equipment Required for DIY Accent
- Needle and strong thread (to attach rug to rod).
- Drill.
- Level.
DIY Instruction Steps (How to Hang a Decorative Rug or Tapestry)
Step 1: Prepare the Rug for Hanging
Choose a small, lightweight rug or tapestry. Lay it flat. Sew the dowel rod or trim piece securely along the top back edge of the rug using strong thread. This spreads the weight evenly and keeps the rug flat against the wall.
Step 2: Attach the Hanging Hardware
Screw small metal eyelets into the back of the rod at both ends. Alternatively, if using a simple trim, you can attach two small sawtooth picture hangers near the top corners.
Step 3: Mark and Install Wall Anchors
Decide on the perfect wall space—a large, empty vertical area works best. Hold the rug up and use a level to mark the precise spot for the mounting hardware on the wall. Install appropriate wall anchors and screws.
Step 4: Hang the Tapestry
Carefully hang the dowel rod onto the wall screws or hooks. Ensure the rug is straight and centered.
Step 5: Finish the Look
The wall tapestry provides tremendous visual warmth, texture, and a rich pop of color, making it a dramatic, custom centerpiece that looks like a curated piece of art.
25. Mint Green Walls and Matte Black Fixtures

This bathroom proves that fun, playful colors can look sophisticated when grounded by high contrast. A cheerful mint green paint covers the main wall, instantly brightening the space. This light, airy color is juxtaposed with sharp, matte black hardware.
Matte black is used everywhere: the round mirror frame, the vanity light bar, the faucet, the shower head, and the towel ring. This strong, consistent contrast elevates the simple fixtures and makes the hardware feel modern and substantial. The white subway tile in the shower area, combined with a playful black and white patterned floor tile, adds texture without distracting from the color theme. The result is a vibrant, graphic, and highly coordinated look.
Material Required for DIY Accent (Matte Black Faucet)
- Matte black faucet assembly (ensure it fits your sink configuration).
- Plumber’s putty.
- Silicone sealant.
Equipment Required for DIY Accent
- Adjustable wrench or basin wrench.
- Screwdriver.
- Bucket and towels.
DIY Instruction Steps (How to Install a Matte Black Faucet)
Step 1: Turn Off Water and Drain Lines
Locate the hot and cold water supply valves under the sink and turn them off completely. Turn on the existing faucet briefly to drain any residual water from the lines. Place a bucket under the pipes.
Step 2: Remove the Old Faucet
Disconnect the hot and cold water supply lines from the old faucet using the wrench. Unscrew the mounting nuts securing the old faucet to the sink or countertop. Carefully lift and remove the old unit.
Step 3: Prepare the New Faucet
Apply a small bead of plumber’s putty around the base of the new matte black faucet if necessary (check the manufacturer’s instructions). Gently lower the new faucet into the sink holes.
Step 4: Secure and Connect
From underneath the sink, hand-tighten the mounting nuts onto the new faucet, then tighten them securely with the wrench. Connect the new faucet’s supply lines to the hot and cold water shut-off valves.
Step 5: Seal and Test
Once all connections are tight, apply a thin bead of clear silicone sealant around the base of the faucet where it meets the sink (if not sealed by putty). Wait for the sealant to dry, then slowly turn the water supply back on and check for leaks. The strong lines of the matte black faucet instantly upgrade the vanity with an expensive, contemporary touch.
26. Floating Wood Vanity and Stone Walls

This design emphasizes rich texture and materials for a feeling of grounded luxury. Large format, dark gray stone-look tiles cover the walls and floor, creating an immersive, cave-like serenity. To prevent the space from feeling cold, a vibrant, warm floating wood vanity is introduced. The wood grain contrasts dramatically with the cool stone, immediately becoming the room’s warm focal point.
The minimalist design uses simple black fixtures, including the wall-mounted faucet and the towel ring, which are subtle against the dark tile. A simple slatted wood bath mat and a plush gray towel add tactile softness. The use of a simple illuminated mirror and a recessed niche for storage provides clean lines and functional light, completing this high-end, contemporary aesthetic.
Material Required for DIY Accent (Slatted Wood Bath Mat)
- Wood planks (cedar or bamboo are excellent choices).
- Waterproof sealant (marine varnish or oil).
- Thin, flexible rubber strips (for the bottom supports).
- Waterproof adhesive.
Equipment Required for DIY Accent
- Saw (if not pre-cut).
- Sandpaper.
- Clamps.
DIY Instruction Steps (How to Construct a Slatted Wood Bath Mat)
Step 1: Cut and Seal the Planks
Cut your chosen wood planks to the desired length of your mat. Sand all edges smooth to prevent splinters. Apply at least two coats of marine-grade sealant or waterproof oil to all sides of the wood pieces. This is crucial for bathroom use.
Step 2: Measure the Support Strips
Cut three or four long, thin rubber strips to the width of the finished mat. These will run perpendicular to the planks on the bottom side and act as non-slip feet and drain supports.
Step 3: Arrange and Adhere
Lay the finished planks side by side, leaving a small, equal gap (about $1/4$ inch) between them for water drainage. Apply a strong waterproof adhesive to the rubber strips. Carefully press the rubber strips onto the underside of the planks, ensuring they are straight and equally spaced along the length of the mat.
Step 4: Cure and Finish
Use clamps or heavy objects to hold the strips firmly against the planks while the adhesive cures completely (check the product’s recommended time).
Step 5: Place the Mat
The finished mat will naturally repel water and keep your feet off the cool tile, adding a touch of custom, spa-quality luxury to your shower or tub exit area.
27. Crisp White and Light Wood Accents

This design is a masterclass in coastal farmhouse elegance, relying on bright white and light natural textures. The walls feature crisp white subway tile on the lower half, contrasted with a soothing blue-gray paint above. This combination is fresh and inviting.
The vanity is traditional, painted white, and features classic beadboard paneling on the cabinet fronts. To introduce warmth, a natural butcher-block style wood countertop is used. Small black knobs provide a subtle, grounding contrast to the light surfaces. The inclusion of a light wood towel rack, featuring exposed pegs, reinforces the relaxed, functional farmhouse aesthetic, turning simple storage into a decorative feature.
Material Required for DIY Accent (Peg Towel Rack)
- One piece of solid wood (e.g., oak or maple, cut to length).
- Wooden dowels or decorative pegs (at least 3-4, sized for hanging).
- Wood glue.
- Wood stain or clear sealant (matching the vanity top, if possible).
- Wall mounting hardware (keyhole hangers or screws).
Equipment Required for DIY Accent
- Drill and drill bits (matching the dowel size).
- Pencil and ruler.
- Clamps.
DIY Instruction Steps (How to Build a Decorative Wood Peg Towel Rack)
Step 1: Prepare the Wood Backing
Cut the wood back piece to the desired length. Sand the entire surface smooth. Apply your chosen wood stain or clear sealant and let it dry completely.
Step 2: Mark and Drill Peg Holes
Use a ruler and pencil to mark the precise locations for the wooden pegs. Ensure the spacing is even. Using a drill bit that matches the diameter of your wooden dowels, drill holes about $1/2$ inch deep into the wood back piece.
Step 3: Glue in the Pegs
Apply a generous amount of strong wood glue into each drilled hole. Insert the wooden dowels or decorative pegs into the holes, twisting slightly to ensure the glue spreads evenly. Wipe away any excess glue. Clamp the pegs in place and let the glue cure completely.
Step 4: Install Hanging Hardware
Once the glue is dry, attach keyhole hangers or metal brackets to the back of the finished peg rack.
Step 5: Mount and Use
Use a level to mark the mounting points on the wall. Install the appropriate wall anchors and screws, then mount the peg rack securely. This simple, custom rack adds functional, natural texture and a warm farmhouse touch.
28. Spa White and Acrylic Storage

Sometimes, the most luxurious look is achieved by embracing simplicity and texture. This design uses floor-to-ceiling white rectangular tiles for a clean, seamless look that is visually expanded by a massive, custom-sized mirror. The focus remains strictly on cleanliness and reflective surfaces.
The extremely long, simple white vanity counter provides ample space. The clutter is managed beautifully with clear acrylic storage drawers placed beneath the sink. This nearly invisible storage solution organizes towels and toiletries without breaking up the visual space, which is an element of high-end, minimal design. Simple chrome fixtures and a pop of turquoise accessories add just enough color to make the serene white feel intentional and fresh.
Material Required for DIY Accent (Acrylic Stacking Drawers)
- Set of clear acrylic stacking drawers (various sizes if preferred).
- Silicone cabinet or furniture protectors (small, clear dots).
Equipment Required for DIY Accent
- Soap and water (for cleaning the drawers).
DIY Instruction Steps (How to Install and Style Acrylic Storage)
Step 1: Clean and Prepare the Unit
Thoroughly clean the new acrylic drawers to ensure they sparkle, as clear storage relies on flawlessness. Dry them completely.
Step 2: Apply Non-Slip Pads
Apply small silicone or clear rubber cabinet protectors to the four bottom corners of the lowest stacking drawer unit. This prevents the acrylic from scratching the floor tile and stops the unit from sliding around.
Step 3: Stack and Organize
Stack the drawer units neatly in the open area beneath your vanity. Organize the contents before placing them in the drawers. Acrylic storage is highly effective when items are neatly folded (e.g., white or blue towels) or organized into matching containers.
Step 4: Style for Transparency
Since the storage is clear, think of the contents as part of the decor. Use the drawers to organize necessities but make sure the top shelf features visually appealing items, like neatly folded, colorful towels or bath bombs.
Step 5: Maintain the Clean Look
The key to this accent is organization. Regularly clean the acrylic to maintain its transparency. This simple, transparent storage solution introduces high-end functionality without compromising the sleek, minimalist aesthetic of the open vanity.
29. Earthy Olive Green and Terracotta Tones

This design relies on a rich, earthy color combination to evoke a cozy, rustic luxury. The walls are painted a deep olive green, providing a calming, nature-inspired envelope for the room. This warm green is expertly paired with terracotta tones, featured in the square floor tiles, the rounded mirror frame, and the small pottery accents.
The large vanity, also painted in a coordinating olive green, grounds the space. Simple floating shelves above the toilet provide storage for curated accessories, such as terracotta pots. Woven baskets and a round jute rug enhance the natural, textural theme. The consistent use of organic colors and materials achieves a layered, bespoke look that is both inviting and incredibly chic.
Material Required for DIY Accent (Terracotta Pottery Accents)
- Inexpensive terracotta pots or simple ceramic vases.
- Matte sealant spray (optional).
- Small plants, branches, or reed diffusers.
Equipment Required for DIY Accent
- Clean cloth.
DIY Instruction Steps (How to Introduce Terracotta Accents)
Step 1: Source Simple Pottery
Purchase a few inexpensive terracotta pots or simple ceramic pieces. Look for varying heights and shapes to add visual interest.
Step 2: Clean and Seal (Optional)
Wipe down the pottery. Since the bathroom is moist, you can optionally spray the exterior with a matte sealant to protect the unglazed surface from water spots and condensation.
Step 3: Coordinate Accessories
Use the terracotta pieces to hold functional items that match the color scheme. For example, fill one with a reed diffuser with dark sticks, use another to hold your toothbrush and toothpaste, or use a small one to hold bar soap.
Step 4: Style the Shelves
Place the pots strategically on the vanity counter and the floating shelves. Pair the pots with greenery or a small picture frame.
Step 5: Achieve Organic Cohesion
The warm, matte texture of the terracotta immediately introduces an artisan, rustic feel that softens the hard lines of the vanity and tile. This inexpensive, consistent use of an organic material is crucial for a high-end, curated look.
30. Classic Green and Brass Contrast

This small bathroom shows how strong color choices create instant architectural interest. The walls are painted a deep, moody forest green, a stunning backdrop for the crisp white subway tile wainscoting. This contrast highlights the period charm of the small space.
The vanity is painted a dark charcoal, which complements the black countertop. Gold or brass hardware is used consistently across the mirror frame, the globe sconces, the faucet, and the door knobs. This warm metallic element provides a rich sparkle against the deep green. Using lush emerald green hand towels ties the entire sophisticated, jewel-toned palette together, creating a luxurious and cohesive atmosphere.
Material Required for DIY Accent (Vanity Paint Job)
- Cabinet paint (high-quality, semi-gloss or satin finish) in a deep charcoal or forest green.
- Primer (bonding primer is best for cabinets).
- Painter’s tape.
- Fine-grit sandpaper (220 grit).
Equipment Required for DIY Accent
- Screwdriver (to remove hardware).
- Foam roller and brush.
- Drop cloths.
DIY Instruction Steps (How to Paint a Vanity for a Custom Look)
Step 1: Prepare and Dismantle
Remove all knobs, pulls, and hinges from the vanity doors and drawers. Use the screwdriver to carefully remove the doors and drawer fronts. Label everything to ensure correct reassembly. Place drop cloths down.
Step 2: Clean and Sand
Thoroughly clean all cabinet surfaces with a degreaser to remove dirt and oils. Lightly sand all surfaces to create a smooth base for the paint. Wipe away all sanding dust.
Step 3: Prime the Surfaces
Apply a coat of bonding primer to all surfaces (doors, drawers, and cabinet frame). This step is essential for durability. Allow the primer to dry completely.
Step 4: Apply the Topcoat
Apply the dark accent paint using a high-quality foam roller for the large, flat areas and a brush for any inset areas or trim. Apply thin, even coats to prevent dripping.
Step 5: Layer and Reassemble
Apply a second coat once the first is dry. Once the final coat has cured completely (this may take several days), reattach the doors and drawers and reinstall the original or new gold/brass hardware. This custom color upgrade gives the existing vanity a high-end, designer feel.
31. Geometric Wall Paint and Modern Lines

This bathroom showcases a fun, energetic use of negative space and line work. The base is clean white subway tile and a simple white vanity. The luxury is injected via an abstract, hand-painted geometric pattern on the wall above the toilet. Using a bold navy blue color against the white creates a dynamic, graphic effect.
To ground the playful wall, the bathroom uses black fixtures consistently: the mirror frame, the lighting, the faucet, and the shower hardware. Simple striped towels echo the lines in the wall pattern, creating a cohesive, artful feel. This affordable DIY wall treatment elevates the entire space, turning a standard layout into a vibrant, modern statement.
Material Required for DIY Accent (Geometric Wall Pattern)
- Paint in your chosen bold color (e.g., navy blue).
- Fine-line painter’s tape (the narrower the better).
- Pencil and ruler.
Equipment Required for DIY Accent
- Small paintbrush (or foam brush).
- Level.
DIY Instruction Steps (How to Create a Geometric Wall Pattern)
Step 1: Plan and Pencil the Lines
Decide on the scale of your pattern. Use a long ruler, level, and pencil to lightly draw a series of intersecting diagonal and vertical lines onto the wall surface. Do not worry about perfection; abstract lines are meant to be imperfect.
Step 2: Apply Fine-Line Tape
Carefully apply the fine-line painter’s tape over all the pencil lines you just drew. This tape will act as the “grout line,” exposing the white wall underneath. Press the tape down firmly.
Step 3: Fill in the Geometric Shapes
Using your bold navy blue paint, carefully paint over all the open white spaces created by the tape. Do not worry about painting over the tape; just ensure you get complete coverage on the exposed white wall. Apply two coats if necessary.
Step 4: Remove Tape to Reveal Lines
Before the paint is completely dry (while it is still slightly wet), carefully peel away all the painter’s tape. This reveals the precise, negative space lines of the original white wall color, creating a sharp, modern geometric pattern.
Step 5: Final Touches
If needed, use a small angled brush to touch up any small areas where the paint bled. The finished result is a visually stunning, graphic wall treatment that feels like custom artwork.
32. Rope-Wrapped Mirror and Natural Fiber Rug

This design achieves a natural, bohemian luxury through layered textures and warm, monochromatic colors. The walls are painted a soft, neutral beige, complemented by light, glossy tiled surfaces. The entire mood is warm and incredibly inviting.
The essential accent is the round mirror framed in thick rope. This simple touch adds an organic, nautical texture that immediately catches the eye. The natural fiber theme is continued with the beautiful round jute rug, woven baskets for storage, and exposed wood shelves. The continuous use of natural textures—rope, wicker, and wood—creates a cohesive, layered look that feels exotic yet cozy and custom-made.
Material Required for DIY Accent (Rope Mirror Frame)
- Round mirror (existing or new, preferably frameless or thin-framed).
- Thick natural fiber rope (jute or manila).
- Strong, clear drying construction adhesive or hot glue gun with high-strength sticks.
Equipment Required for DIY Accent
- Scissors or sharp knife.
- Ruler.
- Gloves (for working with adhesive).
DIY Instruction Steps (How to Create a Rope-Wrapped Mirror Frame)
Step 1: Prep the Mirror Edge
Ensure the edge of your mirror or mirror frame is clean and dry. You will be gluing the rope directly to the frame or the edge of the glass.
Step 2: Start the Gluing Process
Apply a small, manageable section of adhesive to the mirror frame near the bottom edge. Take the end of the rope and press it firmly into the adhesive. Hold it in place for a moment until it sets.
Step 3: Wrap and Glue
Continue applying adhesive in small sections around the mirror’s perimeter, wrapping the rope tightly and evenly next to the previous coil. Use consistent pressure to ensure the rope stays flush and adheres securely. Take your time to keep the coils tight and uniform.
Step 4: Finish the End
When you reach the starting point, cut the rope at an angle so the end blends seamlessly into the beginning coil. Glue the end down firmly. You can wrap a small section of thinner twine around the joint for extra security, or cover it with a piece of decorative leather.
Step 5: Cure and Hang
Allow the adhesive to cure fully before hanging the mirror (this is crucial for durability). The rope frame adds a rich, organic, custom texture that is the definition of casual luxury.
33. Geometric Mirror and Glass Shelving

This bright, airy bathroom uses light and geometric shapes to create a luxurious, contemporary feel. The base is clean white subway tile and white walls. The style is immediately elevated by the unique, multi-sided gold-framed mirror, which acts as a powerful art piece.
The gold frame is perfectly matched by brass hardware on the plumbing and the custom floating glass shelves. These shelves feature a subtle green-blue tint, introducing a splash of gentle color to the all-white background. The transparent glass keeps the small space feeling completely open, while the metallic supports provide necessary glamour. This strategy of using unique shapes and reflective materials makes the space feel expensive and customized.
Material Required for DIY Accent (Tinted Glass Shelves)
- Tempered glass shelves (clear, or lightly tinted blue/green).
- Gold or brass shelf support clips/brackets.
- Wall anchors and screws.
- Level.
Equipment Required for DIY Accent
- Drill and appropriate bits.
- Pencil.
DIY Instruction Steps (How to Install Decorative Glass Shelving)
Step 1: Mark and Plan Placement
Choose the wall area and mark the desired height for your shelves. Use a level and pencil to mark the exact locations for the gold/brass shelf support brackets. If installing near a mirror, ensure the placement is balanced.
Step 2: Install the Brackets
Install the necessary wall anchors into the wall at the marked points. Screw the metallic shelf brackets securely into the anchors. Double check that the brackets are perfectly level.
Step 3: Place the Glass
Carefully place the glass shelves into the clips or brackets. If the shelves are custom-tinted, ensure the desired side is facing up. Many glass clips have small screws that tighten to hold the glass in place; secure these gently.
Step 4: Curate the Display
Style the shelves with light-reflecting items: clear apothecary jars filled with salts or bath bombs, small metallic objects, or a single piece of bright pottery.
Step 5: Finish with Reflection
The combination of the geometric gold mirror and the reflective glass shelving adds depth, light, and a bespoke level of glamour that makes the space feel highly tailored and custom.
34. Mid-Century Walnut and Ladder Storage

This stylish bathroom achieves a rich, mid-century modern look through strong lines and warm wood tones. The focal point is the large floating walnut vanity, featuring clean lines and a simple, dark stain. The neutral, cool gray walls and light floor tile prevent the rich wood from feeling too heavy.
The crucial design element is the wood ladder rack placed next to the shower. This simple, angled piece serves as decorative towel storage, eliminating the need for bulky wall racks. A subtle mint green bath mat and coordinated towels introduce a fresh, calming accent color. The large, rectangular wood-framed mirror ties the vanity color up to the eye level, completing this intentional, cohesive design.
Material Required for DIY Accent (Ladder Towel Rack)
- Simple wood ladder (often sold as decorative blanket ladders).
- Wood stain or sealant (matching the vanity, if possible).
- Furniture pads (for the bottom feet).
Equipment Required for DIY Accent
- Sandpaper.
- Clean cloth or brush (for staining).
DIY Instruction Steps (How to Use a Ladder as a Towel Rack)
Step 1: Prepare and Match the Wood
If your decorative ladder does not match the vanity, lightly sand the wood. Apply a wood stain that closely mimics the color of your main vanity or mirror frame. Apply a layer of sealant to protect the wood from moisture. Allow it to dry completely.
Step 2: Secure the Ladder Base
Apply small felt or rubber furniture pads to the bottom of the ladder’s feet. This prevents the wood from scratching the floor and keeps the ladder from slipping.
Step 3: Position the Ladder
Place the ladder rack in an open area next to the shower or bathtub. Lean it gently against the wall at a comfortable angle.
Step 4: Style the Towels
Fold towels neatly in different colors—a mix of white and your accent color (like mint green)—and drape them over the rungs. Varying the color and size of the towels adds visual interest.
Step 5: Functional Decoration
The ladder provides stylish, mobile, and non-permanent storage. This simple piece functions as both furniture and art, significantly boosting the room’s sophistication level.
35. Vintage Floral Wallpaper and Pedestal Vanity

This design embraces classic, feminine charm with a luxurious, cottage-style appeal. The use of traditional elements immediately gives the small space character. The tiny vanity, converted from an antique dresser, adds vintage elegance and warmth.
The most important accent is the floral wallpaper border, paired with an oval antique-style mirror and classic brass fixtures. The pattern is echoed in the full-length floral shower curtain, creating a cohesive, immersive look. Simple white subway tiles on the lower walls keep the backdrop clean, while lace-trimmed towels and simple lavender sprigs complete the soft, romantic atmosphere that is deeply inviting and timelessly luxurious.
Material Required for DIY Accent (Wallpaper Border)
- Roll of floral wallpaper border (self-adhesive is easiest).
- Paste (if not self-adhesive).
- Sponge and bucket of water.
- Seam roller.
Equipment Required for DIY Accent
- Ruler and pencil.
- Level.
- Utility knife.
DIY Instruction Steps (How to Install a Wallpaper Border)
Step 1: Prep and Mark the Border Height
Clean the wall where the border will be installed. Use a ruler and level to measure and lightly pencil a straight line around the room at the desired height (usually just above the tile line).
Step 2: Measure and Cut the Strip
Measure the first wall section and cut the wallpaper border strip to length, adding a couple of inches for trimming. If using traditional paste, apply the paste evenly to the back of the strip.
Step 3: Apply the Border
Starting in an inconspicuous corner, align the top edge of the border strip with your penciled line. Slowly press the paper onto the wall, working out any bubbles or wrinkles with a damp sponge or a plastic smoother.
Step 4: Trim and Roll
Use the utility knife to trim the excess paper neatly at the corners and ends. Use a seam roller to gently press down on all the seams and edges, ensuring a tight bond. Wipe off any excess paste with a clean sponge.
Step 5: Accessorize with Texture
The floral border adds instant vintage charm and color. Complete the theme by hanging a floral shower curtain and using embroidered or lace-trimmed towels. The soft patterns and feminine details create a warm, luxurious, cottage-style escape.
36. Dramatic Matte Black Walls and Chalkboard Accent

Achieving maximum contrast with matte black and bright white creates a dramatic and ultra-modern look. Here, the large white vanity and crisp white subway tile in the shower are powerfully framed by the rich black walls. This sharp contrast immediately looks custom and expensive.
A fun, functional accent is the chalkboard wall area. This inexpensive DIY feature allows for creative freedom, personalized messages, or simply a place to jot down notes. Using consistent matte black fixtures and hardware—faucet, handles, and linear light—grounds the bright white elements. The final touch of a simple, framed piece of art softens the intensity, making the space feel both sleek and liveable.
Material Required for DIY Accent (Chalkboard Wall)
- Chalkboard paint (matte black works best).
- Painter’s tape.
- Primer (optional, but recommended).
Equipment Required for DIY Accent
- Small roller and paint tray.
- Angled paintbrush.
- Level and pencil.
DIY Instruction Steps (How to Create a Chalkboard Accent Wall)
Step 1: Mark and Mask the Area
Choose a vertical section of the wall to dedicate to the chalkboard accent. Use a level and pencil to lightly mark the outline of the rectangular area. Carefully apply painter’s tape along the outside edge of the marked area, ensuring a sharp line.
Step 2: Prime the Area
Apply a single coat of primer within the taped area, especially if the wall color underneath is light. Allow the primer to dry completely.
Step 3: Apply Chalkboard Paint
Stir the chalkboard paint thoroughly. Use the angled brush to cut in along the edges of the taped line. Use the small roller to fill in the rest of the area. Apply the paint in thin, even coats.
Step 4: Layer and Cure
Allow the first coat to dry, then apply a second coat for full, opaque coverage. Once the final coat is dry to the touch, carefully remove the painter’s tape. Let the painted surface cure completely for at least three days before using it—this is crucial for the chalkboard paint’s durability.
Step 5: Season the Surface
Before writing, gently rub the entire surface with the side of a piece of white chalk, then wipe it clean with a dry cloth. This “seasons” the surface. The custom chalkboard provides a modern, interactive, and visually striking feature.
Creating a beautiful, luxurious bathroom is ultimately about consistency and attention to detail. Every element, from the finish on your faucet to the fold of your towels, contributes to the overall ambiance.
Whether you choose the moody drama of black walls, the organic serenity of slatted wood, or the playful punch of coordinated color accents, uniformity is key. Do not underestimate the impact of upgrading simple fixtures like faucets or towel bars; these small metallic elements truly sparkle when chosen carefully.
By focusing your budget on high-impact areas—such as painting, installing simple paneling, or adding a stunning statement mirror—you can achieve a style that looks far more expensive than it costs. We hope these 36 ideas inspire you to mix textures, embrace bold color, and begin crafting the personalized, upscale bathroom you deserve.
Key Takeaways for High-End Style
Focus on Cohesion
Luxury is found in consistency. Ensure all metallic elements (faucets, mirrors, towel racks) match, whether you choose brass, chrome, or matte black. This simple step instantly ties the design together.
Master the Contrast
Use high-contrast elements, like painting walls a deep navy or black and pairing them with crisp white tile. This dynamic contrast is affordable and provides maximum visual impact and depth.
Embrace Texture
Introduce natural, organic textures to soften hard surfaces. Look for slatted wood mats, woven baskets, thick jute rugs, or rope-framed mirrors. These items add warmth and bespoke character.
Let Lighting Define Luxury
Hidden or customized lighting is a hallmark of expensive design. Consider installing LED strips under cabinets or around mirrors for a soft, ambient glow that elevates the whole room.
DIY for Custom Details
Many of the most impactful changes, like stenciling tiles, painting geometric walls, or sealing a wood countertop, are achievable as weekend DIY projects. These custom touches make your space unique and high-end.